Drain for a shower stall: types of structures and rules for their arrangement
Are you renovating your bathroom and want to connect the shower stall yourself? Agree, the comfort of taking water procedures and protection from accidental flooding of the bathroom largely depend on the quality of the installation and the serviceability of the drainage equipment.
Let's figure out how to choose the right drain for a shower stall, what parameters to focus on when purchasing a device. We will also provide a step-by-step technology for arranging a shower drain system.
The instructions for assembling and installing the equipment are accompanied by visual photographs for a better understanding of the process. The article is supplemented with videos about the nuances of installing shower drains.
The content of the article:
Drainage devices for trayless showers
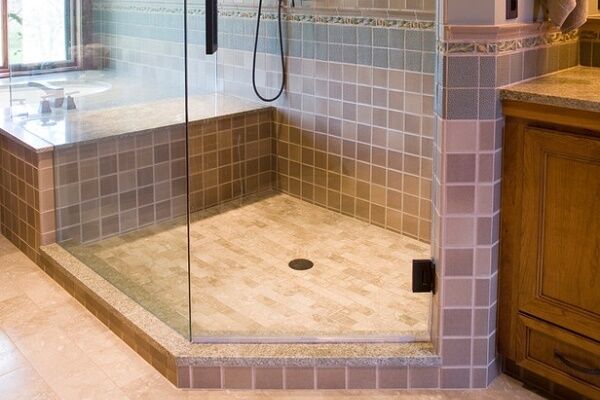
Plumbing stores mainly stock shower cabins with a classic drainage scheme through a hole in the pan. This drainage device is easy to install, reliable and does not require preliminary floor preparation.
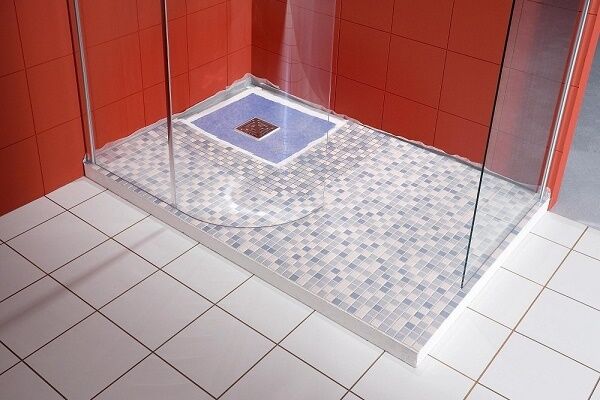
In shower rooms of saunas and public baths, more convenient drainage options are used without pallet. The water there goes into special holes (ladders) or channels, recessed into the floor at the stage of laying the tiles.
Common drain options and conditions for their installation will be discussed below.
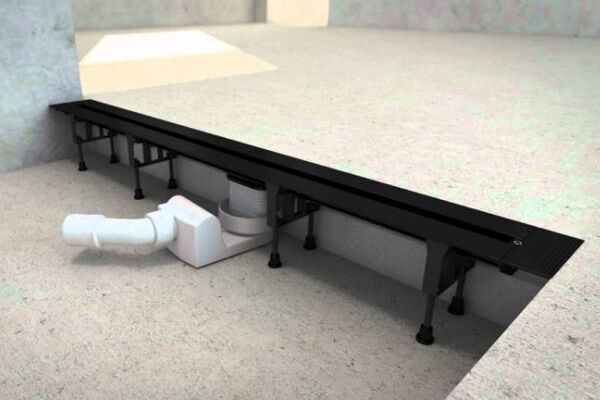
Channel water collection system
Installation channel drain requires appropriate preparation of the floor or pedestal for the shower stall. When installing a channel against a wall, the slope is only in one direction, so planning the installation location of the booth and the structure of placement of sewerage elements in the bathroom must be done in advance.

The channel system consists of a drainage tray, a drain system and a grate.
Components can be made from:
- ceramics;
- durable plastic;
- metal
Channels are usually sold ready for installation.A siphon system is also included in the design. After purchasing, all that remains is to connect them with a corrugated pipe to the sewer drain and cover the top with tiles.
The sizes of standard channels range from 50 cm to 118.5 cm. The elements of the system are replaceable, so it is possible to select each part separately according to your taste.
Shower drain with point water collection
The design of the shower drain is a device for receiving waste water, mounted in the floor. Sometimes a channel drain is considered a type of drain, because the mass of engineered drainage systems really blurs the line between these two devices.

The ladder consists of:
- front grille;
- garbage catcher;
- clamping gaskets and seals for sealing;
- ladder bodies;
- water seal (drain cup).
Drains can be cast iron, plastic or stainless steel. Based on the type of structure, they are divided into vertical and horizontal.
Vertical ladders can pass large volumes of water, therefore they are installed mainly in swimming pools, where free access to the drainage system from below is provided.
Horizontal ladders They have a side drain pipe and are used in most apartments as compact and easy-to-install devices.

Drain hole grids can be made square, round, or rectangular. The height of the ladder bodies varies from 7.5 to 19 cm.
There are a number of nuances in choosing such a drainage device.
- External plastic grates must be thick and durable, taking into account the weight of people who will regularly wash in the shower stall.
- Preference when purchasing is given to ladders with adjustable body height.
- The drainage capacity must be greater than the incoming water flow.
- The recommended size of the outlet pipe is 50 mm.
- A siphon and a foreign particle trap are required.
It is better not to skimp on the quality of the drain molded into the floor, because the seals on cheap models wear out quickly, and the roughness of the internal plastic parts leads to rapid clogging of the siphon.
Standard shower construction process pallet with ladder and draining consists of several stages:
Siphons for shower stalls with tray
Cabin manufacturers often use exclusive engineering solutions on pallets that are difficult to classify into any common siphon categories.
Most models can be divided according to two principles:
- by mechanism of action;
- by type of construction.
The features of their device should be understood in more detail.
Classification of siphons by mechanism of action
Differences in the principles of the operating mechanism separate existing siphons into 3 main groups.
First group - simple siphons. They are included in most cheap shower cabins on the domestic market. The operating principle of these siphons is simple: the drain hole is plugged from above with a plug, after which water begins to collect in the pan. When the plug is removed, the water goes down the drain.

The elementary design ensures the low cost of these devices. Their operation is dangerous, because when opening/closing the hole you can slip and injure yourself.
Second group - siphons with manual control.In this design, a control knob is mounted on the wall, and when turned, the drain hole is adjusted.
This mechanism of action is especially convenient for people with disabilities who find it difficult to bend down to manually close the hole with a plug.

Third group — click-clack system. In such siphons, the plug is permanently located above the drain hole and at the same time acts as a switch for the “open”/“closed” positions.

When you press the plug with your foot for the first time, it rises slightly and the drain hole opens, and when you press it again, the plug is fixed in the closed position and does not allow water to drain.
Structural classification of siphons
Depending on the engineering features of the water seal mechanism, siphons are divided into 3 types.
First view - bottle siphons. In apartments they are installed everywhere on kitchen sinks. This type of siphon received its name because of its oblong appearance. Debris is deposited at the “bottom” of the bottle, which is easy to unscrew and clean from dirt.
The water seal is provided by the internal arrangement of the siphon, which also prevents large objects from entering the side corrugated drainage system.

The disadvantage of such a siphon is its bulkiness and length, so installing it on a shower stall requires a large gap between the floor and the tray.
Second type - classic pipe siphons. Among systems for draining water from shower stalls, the most common are siphons in the form of the letters U and S. The formation of a hydraulic seal occurs directly in the pipe bend.
Such siphons are characterized by reliability and durability, and their compact modifications are used in most budget shower stalls.

The disadvantage of this type of siphon is the inconvenience of dismantling and cleaning, especially in conditions of limited space under the shower tray.
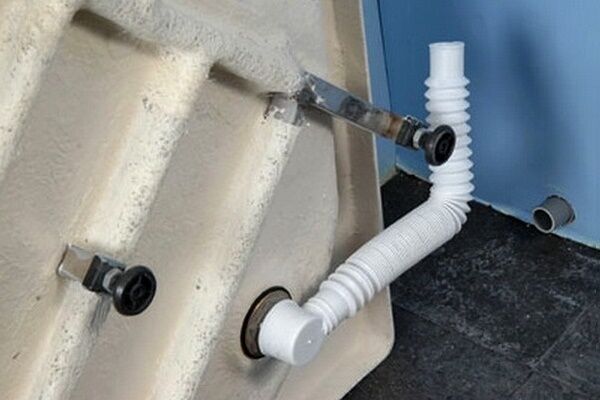
Third type - corrugated siphons. This type of siphon drains is an empty tube in the form of an angle, one end of which is attached to the hole in the pan, and the other goes into a corrugated hose.
The siphon can be installed at any angle to the horizontal plane, which makes it convenient for non-standard drain placement options. This model is often used in shower cabins with low tray.

The water seal in corrugated siphons is formed manually in a place remote from the drain. To do this, the hose is bent in the shape of a U and fixed in this position below the level of the pan opening.
There are also exclusive versions of siphons that combine the features of several design options.
Arranging a drain for a shower stall
When installing a shower stall, special attention should be paid to the construction of the drain. After all, the service life of the cabin and its comfortable operation depend on how correctly it is done. Thus, an incorrectly connected drain can quickly leak or cause unpleasant odors in the bathroom.
Let's take a closer look at the stages of arranging a bathroom drain.
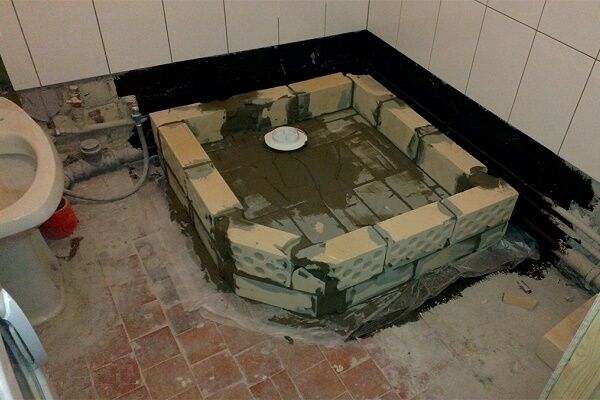
Stage #1. Installation of a shower channel
Installation of channel drainage in the bathroom takes place directly into the floor, fixed on all sides with cement mortar. Before installing the channel, it is necessary to cover the grille with adhesive tape to protect the polished surface from damage.

If the outer surface of the channel is polished, then it is necessary to roughen it with sandpaper so that the cement mortar adheres better. After treatment, it is necessary to treat the surface with a degreasing solution.
Next, you need to secure the channel with brackets to the floor and ground the body of the drainage tray if it is made of metal.

Align the tray strictly horizontally using the side adjusters.

Attach one end of the connecting hose to the channel pipe, and the other to the sewer pipe. Make sure that the hose is inserted all the way and is tightly fixed.
If you suspect the possibility of a water leak, you must first treat the pipe with a thin layer of silicone.

The next step is to fill the space on the sides of the channel with cement, taking into account the thickness of the tiles that will lie on top.
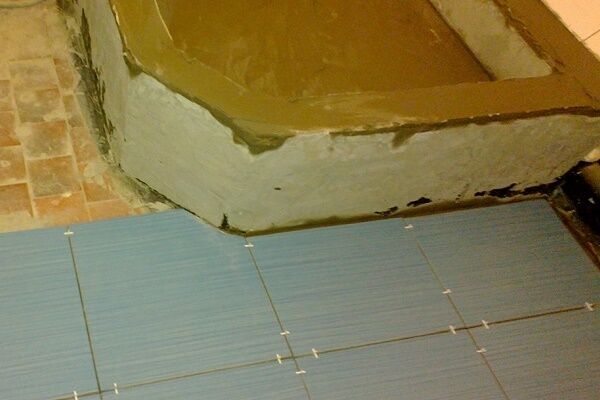
Then place a tile on the cement, the top of which should be 1 mm above the level of the channel so that water does not accumulate near the grate. Bathroom tiles must be laid from the drain tray to ensure smooth joints on all sides and no sharp edges.
To allow water to drain, the tiles must be inclined from the sides of the shower area to the drain at the rate of 1-1.5 cm in height per 1 m of floor length.
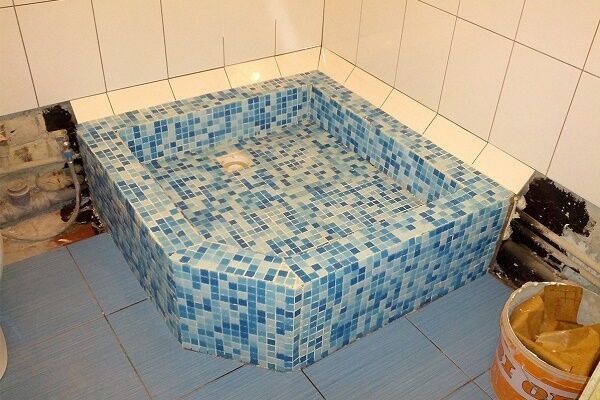
After laying the tiles, it is necessary to clean the area where they meet the edge of the channel grate and fill them with tile adhesive or sealant. After it has dried, it is necessary to finally clean the space around the edges of the channel drain and remove the protective film from the grate. The drain is ready!
When installing a channel drain, the following nuances must be taken into account:
- The channel capacity should not be less than the water flow in the shower. The classic hydromassage cabin uses 10 liters per minute.
- The distance from the outlet of the drainage tray to the vertical sewer pipe should be minimal.
- If you have doubts about the throughput of the drain system, you can check it. To do this, you need to secure the tray to the floor, connect it to the sewer pipe and apply water pressure to the tray.
- The diameter of the hose coming from the nozzle should not be less than 40 mm, and its slope should be less than 30 mm per 1 m.
- When installing a channel drain in a bathroom door, it is recommended to choose a sectional grille to facilitate access to the siphon.
Following the instructions will allow you to install a channel drain in a shower stall quickly and efficiently. There is no need to be afraid of blockages in the drainage tray built into the floor, because its design allows for cleaning the system from the outside without the need to dismantle the tiles.
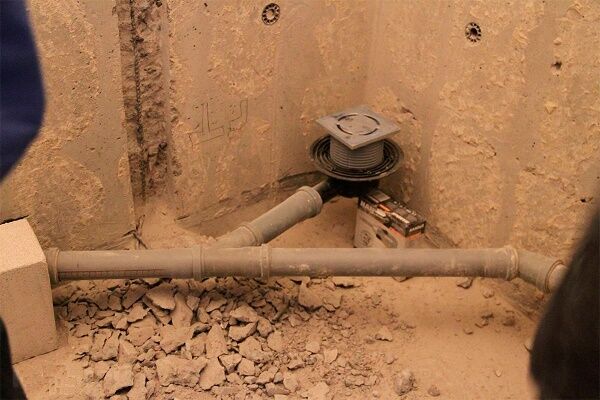
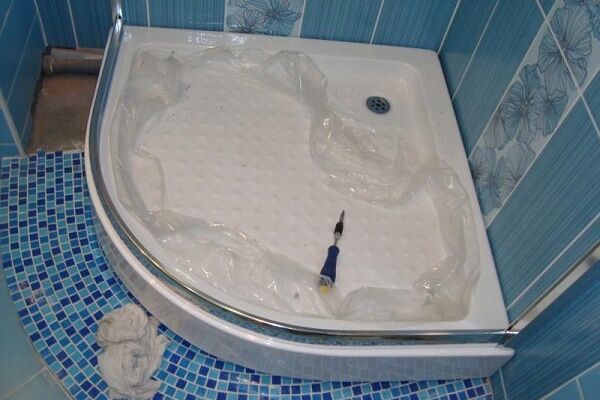
Stage #2. Installation of drainage drain
Installation of the shower drain is carried out similarly to the installation diagram for a channel drain described above. Cheap drainage drains are sold without fixing devices, so you should be aware of one nuance when installing them.
If the external drainage device looks like a simple housing with an internal mechanism and a discharge hose, then you must first firmly fix it in the desired position.
To fix the height, you can place a brick, several tiles or other available material under the body.

With the regulation of horizontal stability the situation is more complicated. If there are no fastening elements, it will be necessary to control the correct location of the drain body after laying the cement screed during the drying process.
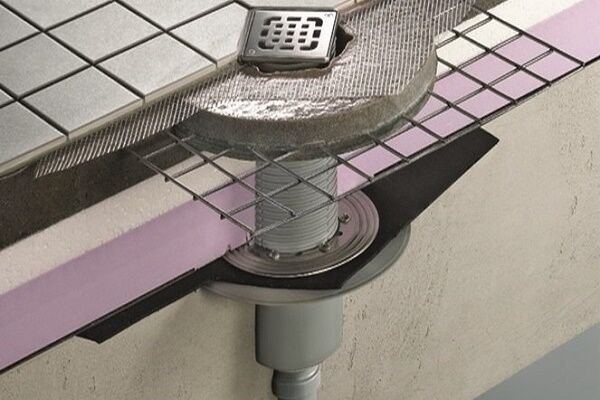
General diagram of shower floor layers when installing a ladder as follows.

The diagram shows a square drainage ladder with fixing elements. Clearing blockages in the drain is done after removing the grate and removing the internal elements.
The drain body is actually a hollow flask with a pipe, so after disassembling it, you can even clean the drain hose using a cable.
Stage #3. Installing a shower cabin siphon on a pallet
The process of installing a siphon is so varied that step-by-step instructions for installing a specific shower drain device can only be found in its installation instructions.
Below we will consider the installation of one of the simple types of siphon to understand the fundamental stages of this process. The general diagram of the device is shown in the figure.

The first thing you need to do is attach the neck of the drain pipe to the water seal. You need to take the drain pipe and put a conical rubber band on it.

Turn the pipe over, insert it into the water seal from above and secure it with a nut.

Place a rubber gasket in the plug and screw it to the side outlet of the water seal. Not all siphons are equipped with such a plug, but this design is a priority when choosing a drain mechanism.

Place a rubber gasket on the second outlet of the water seal, attach the neck to it and tighten the fixing nut.

The result is a ready-made siphon, which must be attached on one side to the pan, and on the other to the corrugated drain hose.

Next, you should prepare the neck for mounting on the pallet. To seal the connection, it is necessary to place a special wide rubber gasket on the upper part of the neck. There is also an elastic band on the inside of the pallet.

Then the neck is attached to the pan from below, and the upper part of the siphon with a drain hole and a fixing bolt is placed on top. The bolt is tightened with a screwdriver, and this completes the attachment of the siphon to the shower stall.

The next step is to attach a corrugated hose to the outlet pipe of the siphon and the overflow hole (if any). The result is a siphon ready for use.

It is advisable to carry out all the above procedures on an inverted pallet before installing the shower stall on the floor. And then the attached siphon will only need to be connected to the sewer pipe.
Secrets of choosing and installing siphons
Before purchasing and installing a new shower, it is advisable to read the advice of experts so that you do not have to exchange the product, change the design yourself, or purchase additional suitable parts.
A few important recommendations:
- Before purchasing a siphon, you need to measure the distance between the outlet of the tray and the floor so that the siphon body fits under the shower. The most common drainage mechanisms are 80-200 mm in size.
- The size of the drain hole in the pan must correspond to the width of the siphon neck. Their standard sizes are 52, 62 and 90 mm.
- The lower level of the outgoing pipe of the siphon must be higher than the level of the sewer opening.
- To maintain water flow in low-level pans with compact drains, priority should be given to filtering debris at the inlet of the drain.
It is also necessary to take into account the advice of sellers who understand the nuances of installing specific cabin models and siphons presented in their plumbing store.
Conclusions and useful video on the topic
The videos will introduce you to the nuances of installing plumbing fixtures, which will help you complete the installation and cabin connection without the help of specialists.
Design, operation scheme and installation of the drain ladder:
Installation and repair of a siphon for a shower tray:
Having considered the nuances of choosing siphons and their installation, you can safely go to the store to buy a shower stall. Now it’s clear what equipment is suitable for your bathroom and how to operate it for a long time and without breakdowns.
Do you have practical skills in installing shower cabins and connecting drains? Share your accumulated knowledge or ask questions about arranging a shower drain system in the comments below.


We have a good shower cabin, it was installed just recently. But my daughter put some of her toys in there while she was swimming. It turned out that the water was difficult to pass through, and it was impossible to get it out.
It was not possible to clean it with a metal cable, as I was afraid of breaking the drain; the drain hose was corrugated. I had to unscrew everything and look at every knot. The work dragged on for the whole day. Now I have installed a special plug to prevent this from happening again.