DIY waterproofing in the bathroom: comparative review of materials + installation instructions
In the bathroom, the level of humidity is constantly increased.We have to accept this as a given and abandon useless attempts to fight “the elements.” The only thing that can and should be done is to neutralize as much as possible the negative effects of moisture on building structures and materials.
To achieve this, the bathroom is waterproofed, the use of which is mandatory for all bathrooms. We will tell you how water protection is performed and list what materials are used to form a reliable barrier against water. To help independent home craftsmen, the article provides detailed instructions.
The content of the article:
Is it possible to do without waterproofing?
It may seem that installing insulation in the bathroom is a waste of effort and money. Proponents of this point of view motivate their position by the fact that ceramic tiles, which are most often used to decorate bathrooms, are completely waterproof.
This is true, but the seams between the tiles allow moisture to pass through perfectly, as do cracks and chips on the tile itself. Even if these cracks are microscopic.
You should not be confident in the quality of plumbing fixtures. Sooner or later, they may develop faults, and water will rush onto the floor in a stream or, even worse, will accumulate under the equipment little by little, gradually destroying the floor covering or wall.
That is why plumbers and builders persistently recommend installing high-quality waterproofing for the bathroom. What does this mean?
First of all, you need to insulate the floor. This is done so that water cannot penetrate the floor slab and seep into the apartment or basement located below. And also so that moisture does not accumulate in the base, does not destroy it and does not provoke the growth of mold and mildew.
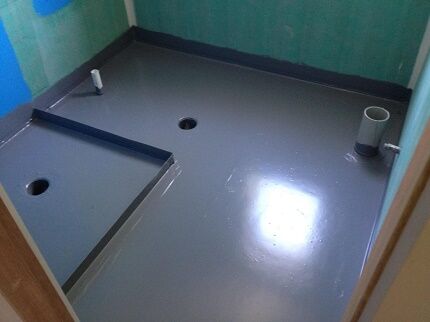
Ideal floor waterproofing looks like a kind of “trough” made of a special material. It is applied to the bathroom floor with partial coverage of the walls. The height of such an approach is about 20-25 cm. The insulating “trough” must be completely waterproof. But that's not all.
Bathroom walls also need insulation, even if they are tiled. As already mentioned, tile seams and cracks perfectly allow moisture to pass through, which will flow down the surface of the wall and accumulate in the most inappropriate places.

To prevent this unpleasant phenomenon, it is worth arranging waterproofing protection in the most “dangerous” areas. They are located in close proximity to shells, baths, shower boxes and other plumbing equipment.
In some cases, experts recommend waterproofing the bathroom ceiling. This is necessary if the bathroom is in a multi-story building and there are other apartments above it.
Brief overview of the main types of materials
In construction stores, the range of insulating materials is very, very wide.They can all be divided into several main types, and let’s take a closer look at each of them.
Roll type insulation
This is a large group of rolled insulation, which includes materials with a wide variety of properties. Initially, the basis for them was cardboard, onto which several layers of bitumen-containing compounds were applied.
They ensured the waterproofness of the material. Such coatings include roofing felt, glassine and the like. Their main disadvantage is their relatively short service life.
Later, fiberglass or fiberglass was chosen as the basis for insulation. This significantly increased the service life, but slightly complicated the installation of materials. Because such coatings may crack during installation.
Roll insulation can be installed in different ways:
- Fastening. This option is used less frequently than others. Its essence lies in the fact that the panel is fixed on an insulated base with self-tapping screws with plastic telescopic devices in the form of mushrooms with wide caps. To install, the base is first drilled, which is very labor-intensive and not reliable enough.
- By fusing. In this case, special equipment is used: construction hair dryers or gas burners. With their help, workers melt the bottom layer of coating, and then lay it in the right place. A labor-intensive and rather dangerous method that is not recommended for use indoors.
- By gluing. The material is glued to a pre-prepared base. The glue can be applied to the base or, which is much more convenient, already on the insulating coating.Most manufacturers produce so-called self-adhesive insulation, for installation it is enough to remove the protective film from the back adhesive side.
Of all the methods described, gluing is considered the simplest. It is possible that fusing provides the highest quality laid insulation, but only specialists can perform such installation correctly.
When heated, the panel becomes very elastic and breaks easily. It is also important to prevent the coating from overheating, otherwise it will melt and become unsuitable for use. In addition, volatile compounds released by bitumen are very toxic. Working with it indoors is dangerous.

There are quite a few advantages of adhesive insulation. After installation, it forms a plastic sheet that allows the base to “breathe.”
For this reason, such materials are widely used for insulation of wooden floors and protection devices. bathrooms in a wooden house. The elastic material calmly tolerates all movements of natural wood and at the same time maintains its integrity. In addition, the insulating layer of rolled materials is held very well on the base.
Another significant plus is quick readiness for subsequent work. The adhesive insulation does not need time to dry; almost immediately after its installation, you can begin the following technological operations. The cost of such materials, which is also important, is very low.
The main disadvantage is the difficulty of installation. Even self-adhesive material is quite difficult to install correctly, given that the base will need to be carefully prepared before installation.
Coating insulating materials
Coating compositions can be considered the very first means used as protection against water. Initially, these were vegetable and animal oils and fats, which were used to coat the surfaces to be protected.
Over time, their composition has changed radically, but the principle of application has remained the same. Modern coating materials come in a variety of forms. These are mastics, various pastes or dry mixtures.

Before application, the latter must be diluted in a polymer emulsion compatible with it or in clean water. The manufacturer will definitely attach to its products instructions for preparing the working mixture, from which it is not recommended to deviate.
The composition of dry mixtures is varied, and accordingly, the properties of the insulating material also vary. For pastes and mastics, no preparation for application is required. The compositions are sold in hermetically sealed containers. However, unlike dry mixtures, their shelf life is quite limited.
You should know this and not purchase material for future use. The main characteristic of coating waterproofing is its consistency. The hiding power of the material depends on this, which affects the number of layers applied, the properties and scope of application of the coating.
Liquid solutions are applied in a layer about a millimeter thick. It is clear that at least three or four such layers will be required to obtain high-quality insulation. Important note.
When applying liquid, each subsequent layer is applied in a direction perpendicular to the previous one.This is the only way to ensure that there are no possible gaps on the surface. To apply the liquid solution, take a brush, preferably a wide one, or a brush.
Pastes or mastics are denser. It is impossible to lay them with a brush; for such coatings a notched trowel is used. The height of the insulating layer applied in this way is usually about 3 mm.
This makes it possible to reduce the number of layers; two, maximum three, will be enough. When laying mastic or paste, it is quite acceptable and even desirable to reinforce the surface with a special mesh.

The panel is laid between two layers of coating. A significant disadvantage of coating pastes and mastics is the rather long hardening time of the coating.
Considering that each subsequent layer of material can be laid only after the previous one has hardened, the process of applying waterproofing is significantly delayed. In rare cases, the manufacturer allows the third insulating layer to be applied to the wet second one. This point needs to be clarified in the instructions.
Protective impregnating compounds
Impregnations are one of the latest achievements in the field of insulating materials. The compositions have a completely different principle of action from others. They do not cover the base with a protective layer, but react with it. The compositions penetrate into the porous base to a depth of 120 mm, after which they harden, forming needle-shaped crystals.
The base of each such crystal is turned in the direction of the expected water flow. Thus, each of the surface pores is, as it were, sealed with a solution.In this case, the base acquires a new monolithic structure that does not peel off, crumble or crack.
Impregnations are very easy to apply. They are applied to the base with a regular brush. The composition has a liquid consistency and is applied in a thin layer, so it does not affect the height of the room at all.

The manufacturer produces impregnations, which may contain not only active substances, but also cement mixtures or sand. In any case, they should be applied exclusively to a damp base. This is the main condition for the impregnation to penetrate deep into the coating.
The main disadvantage of impregnating materials is their limited scope of application. They “work” perfectly on concrete bases, gypsum and lime plaster, FSB with low water resistance. However, they are completely powerless on brick and cement plasters.
An absolute contraindication for the use of impregnating mixtures is base crack resistance group 3 and above. Before purchasing, it is important to clarify the possibility of using the composition you like on the existing foundation. Another disadvantage is the high cost of such insulating materials.
Questions about choosing waterproofing for your bathroom
This is a rather complex question that cannot be answered unambiguously. The choice of insulation type depends on many factors. First of all, this is the floor material. If it is wood, it is advisable to use adhesive insulation. Any type will work for concrete.
It is also important to understand how serious the repair work is planned to be carried out.If you have the opportunity and desire to perform the highest quality waterproofing, it is better to choose adhesive, laid under the screed, followed by treatment with coating compounds.

Such a tandem will provide guaranteed protection against any leaks for decades. However, this is the most time-consuming option. If relatively minor repairs are planned, only coating waterproofing can be laid.
It is worth considering the number of floors of the building. If the bathroom is located on the ground floor of a private house, insulating the floor and walls will be sufficient. For a high-rise building, you will also need work on the ceiling.
When choosing a material, it is also important to take into account the possibility of changing the height of the room. If this is extremely undesirable or impossible, it is worth using impregnated or liquid coating insulation. Any of the existing types of materials can be selected to work with the floor.
It is worth considering the configuration of the room. It will be extremely difficult to install a rolled panel in a bathroom of complex shape. For walls and ceilings, only impregnating and coating compounds are used.
Methodology for carrying out insulation work
There are many options for how to properly waterproof a bathroom with your own hands. We will consider the main points without which it is impossible to obtain high-quality coverage.
We carry out preparatory work
Once the insulation material has been selected, you can begin preparing the base. The most difficult work lies on the floor. Especially if you plan to lay adhesive insulation under the screed.
We start by cleaning the base.If renovations are being carried out in a bathroom that is already in use, you will have to completely dismantle and remove all the equipment, remove the floor covering and remove the old screed.

The latter is the most labor-intensive, but necessary. As a rule, the old screed is not in the best condition. It is most likely dirty, cracked and crumbling.
You can, of course, use it as a base for adhesive insulation, but then you will have to lay a new screed directly on the old one. This will be an extra significant load on the floors, in addition, the floor will rise, which is extremely undesirable for the bathroom.
According to the rules, the floor in the bathroom should be lower than in any other rooms, which is additional protection in the event of a possible “flood”. The old screed is disassembled using special tools: a hammer drill, an angle grinder or a concrete hammer. After removing all the debris, an inspection of the exposed base is carried out.
All irregularities, chips and cracks are repaired and rubbed. Dust is removed and then treated with a special fungicidal composition. This is necessary to prevent the appearance of fungus. Next is priming. It is best to apply two or three layers of a suitable primer.
The work is carried out with the obligatory capture of the lower part of the walls. It is primed about 30 cm up from the base level. It is advisable to slightly smooth out the corners between the floor and the wall, this will make it easier to lay the insulating sheet.
Features of laying roll insulation
For work inside the building, it is optimal to choose self-adhesive insulation. The one that is laid on glue will be more difficult to work with. First, the material is cut. It is cut into panels, the length of which includes overlaps on the walls.
In addition, you need to remember about overlaps, which must be present when laying roll coverings. Their average size is 10 cm. If this is not the case, the manufacturer indicates this in the instructions.

We roll out the panels on the bathroom floor and leave them until the next day so that the material is leveled. Now you can start installation. From the upper edge of the panel we retreat a distance corresponding to the amount of approach to the wall and place the covering on the base.
Carefully pry off the edge of the sheet and remove the protective film, while simultaneously pressing the insulation into the floor with force. We do everything slowly, carefully. To better press the panel, use a roller. After the first panel has been laid, you can lay the second one, not forgetting about the necessary overlap.
Important note. When cutting and subsequent installation, it must be taken into account that the junction of the two canvases should not be in the area where the wall and floor meet. Otherwise, a leak will inevitably appear over time, and the tightness of the insulation will be broken.
Particular attention is paid to engineering communications. To remove pipes, holes are cut in the insulating sheet. In order for the insulation to fit tightly, their diameter must be smaller than that of the pipes.
We thoroughly coat all the joints of the plates and the edges of the resulting waterproof “trough” with bitumen mastic and once again forcefully roll the entire coating with a roller. If the canvas does not stretch well, you can slightly warm it up with a hair dryer.
Method of applying coating insulation
Coating type insulation is very easy to apply. If the work will be carried out using a dry mixture, first you need to prepare the working solution exactly according to the instructions.
It must be remembered that after a relatively short time it will harden and become unusable. Therefore, the material is diluted in small portions. If you plan to use an already prepared coating, you only need to open the jar.

Prepared base, which can be the floor and side wall bath screen, lightly moisten to improve the adhesion of the materials, and then begin applying the solution. It is advisable to move strictly in one direction; when applying the second layer, the composition is laid perpendicular to the first direction.
Do not forget that the first layer must dry completely before laying the second. All corners and joints are additionally covered with a special waterproofing tape.
It is placed in damp mastic and pressed forcefully into the material. Before applying the last layer, a reinforcing mesh can be laid on the base, which is then covered with a continuous layer of mastic.
The composition is allowed to dry completely and harden. At this time, you need to protect it from possible dust and debris.Even small particles of dirt will spoil the quality of the finished coating.
Conclusions and useful video on the topic
Video #1. How to waterproof a bathroom using coating materials:
Video #2. What is penetrating waterproofing:
Video #3. How to work correctly with adhesive insulating materials:
A bathroom, like no other, needs competent waterproofing. High humidity and water leaks are extremely dangerous for building materials and finishing coatings. In addition, there is always a risk of an emergency, which could result in flooding of someone else’s apartment or your own basement.
Only the correct choice of material and its high-quality installation will permanently eliminate all problems associated with excess moisture.
Would you like to talk about how you did waterproofing in a bathroom or a separate bathroom with your own hands? Do you know methods and techniques that allow you to quickly apply a protective layer to building structures? Please write comments in the block below, ask questions, post photos on the topic of the article.


When doing renovations, before laying tiles in the bathroom, I applied an emulsion called Flechendicht to the screed. Previously, the emulsion included bitumen, but now it does not. The emulsion was applied three times. Each layer took more than three hours to dry. But before the emulsion I also primed the screed. The primer was applied once, less than 1 ml thick. The primer took 2 days to dry.
Usually, after waterproofing a bathroom, the junction of the walls and the floor becomes semicircular, which makes it impossible to lay the tiles normally, which requires a right angle between the wall and the floor.