How to make a shower drain in a floor under tiles: construction and installation guide
When independently arranging hygienic premises in a country house, in a house, in an apartment, we most often strive not to save money, but to remodel the space to suit personal requirements. That’s why we often choose not ready-made proposals, but install a shower drain in the floor under the tiles and build a unique shower stall. With all the desire to achieve an ideal result, not all of us know how this work is done. Do you agree?
We will share with you all the subtleties and nuances of installing a shower without the usual tray and standard designs. We will tell you about the types of plumbing drains, guidelines for their selection and materials required to implement the idea.
The article we presented contains all the answers to the questions of independent craftsmen and customers of construction team services. The process of building a shower with your own hands is described in detail. Diagrams, photos and video selections will greatly facilitate familiarization with the information.
The content of the article:
Types of ladders, their features and differences
Drain devices of this type differ in appearance, internal structure and height. Decorative grilles are the only visible part, and, of course, first of all we evaluate their shape, and it can be round and oval, square and rectangular, in the form of a triangle or a long tray.
Gratings for drains are made of different materials.The most durable, high-quality and affordable - made of matte or polished stainless steel. Tempered glass, chrome, and brass are also used. Less durable, but cheaper - plastic. Plastic will serve its intended purpose well, but compared to stainless steel it will look too poor.
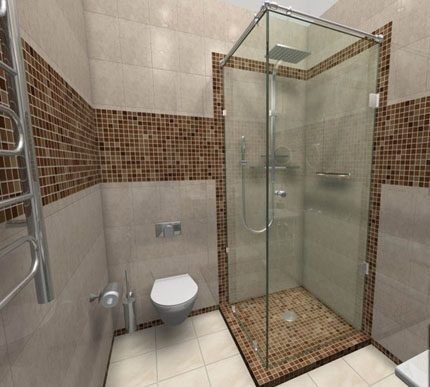
As a rule, a grate is chosen based on one’s own taste... But you should take a more thorough and objective look at the variety of drains depending on the type of water intake device. The classification here is:
- Spot. They are a small-area water intake funnel covered with a grate. They can be installed anywhere: in the center, any corner, directly under the shower head, etc.;
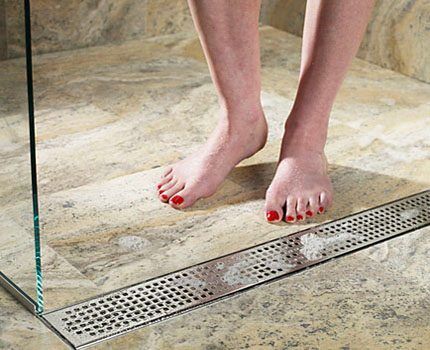
- Linear. The water intake part is made in the form of a tray, similarly covered with a grating. They are mounted both along the walls of the stall and in the center of the shower.
The most powerful in terms of the volume of wastewater received are linear drains. They are adjustable in length, their capacity can be easily calculated in accordance with water flow. Indispensable in showers where several people wash at the same time, and when using modern “tropical shower” style shower heads.
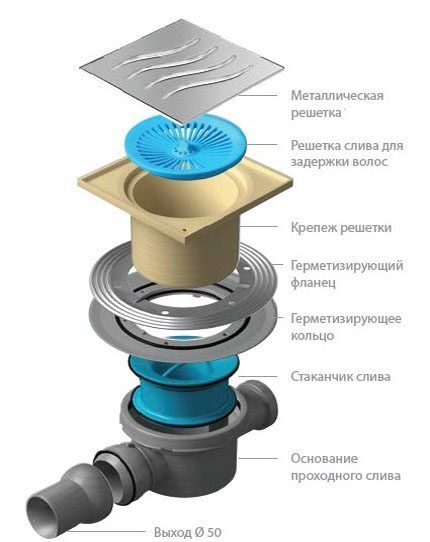
The shower drain kit includes the following main elements:
- frame (plastic, steel, cast iron);
- removable decorative grille (front panel) and a sieve for catching hair and other debris underneath - both parts stand on top of the ladder body, resting on it;
- water inlet with sealing elements (waterproofing membrane and steel pressure flange for fastening);
- siphon;
- outlet pipe in the lower part, through which water goes into the sewer.
Now about the material from which the ladder itself is made. Cast iron installed exclusively at industrial facilities, public swimming pools, baths. Cons: difficult to install due to heavy weight. Pros: durability, increased throughput.
Stainless steel - a material that meets the requirements for premises with strict sanitary and hygienic standards (hospitals, kindergartens, canteens). Steel products are easy to clean and maintain.
Can be used at home plastic, the choice of material is not so important, although stainless steel is, of course, preferable. It is anti-corrosion, durable, reliable.
And finally, when choosing a ladder, we take into account its height, which varies between 55-180 mm. This determines how much the floor level needs to be raised. You should not try to minimize this characteristic, since high ladders have better throughput.
The industry produces models with adjustable neck heights; they can be easily adjusted to the existing thickness of the screed. Modern shower drain models designed for water temperatures up to +80-85 °C, the grates can withstand weights of up to 300 kilograms or more.
Siphon and outlet pipe design
The purpose of the siphon is to prevent the penetration of unpleasant odors from sewer pipes into the bathroom. This function is performed by a water seal located inside the siphon. But if you don't use the shower regularly, the drain gradually dries out and odors begin to seep through.
In this case, the drain system must be equipped not only with a hydraulic valve, but also with a “dry” valve. Its reliability will increase many times over, since in the drain with a “dry” shutter there are several dampers that block the drain under their own weight. The dampers are opened by a flow of drain water and then closed again.
In non-residential cold rooms, drains must also be equipped with a mechanical shutter that does not freeze in the cold and has a special drainage ring. If the waterproofing breaks, water returns to the drain through the holes in this ring.
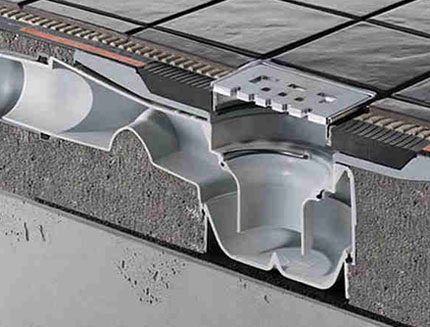
Shower drains also differ in the cross-section of the sewer pipe to which they are connected. It has a vertical or horizontal outlet. The diameters of the pipe and the sewer pipe must match one another.
If the drain is vertical, then the cross-section will be 110 mm. This option is suitable for country houses and cottages; in this case, the sewerage system is connected from below.
The second option, where the connection to the sewer pipe is lateral (horizontal), is considered more universal, and for apartments in multi-storey buildings - the only possible one.For domestic purposes, in this case, a diameter of 40-50 mm is sufficient.
Basic criteria for choosing a ladder
Since drains come in a wide range of products, it makes sense to list which parameters and in what sequence you should focus on.
First step — we determine whether the exit to the sewer will be directed horizontally or vertically. A drain with a horizontal outlet pipe has a smaller height and is used if there is a limitation on the thickness of the screed.
A device with a vertical outlet can only be connected to a sewer pipe located low enough.
Second step — choice of gangway capacity. According to this characteristic, the “fork” is 0.4-2.0 l/per second. The larger the diameter of the outlet pipe, the higher the throughput of the ladder.
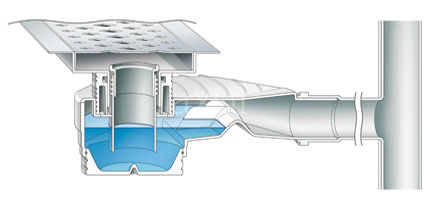
Third step — choose between a water seal and a “dry” seal. The decision depends on how often the shower stall will be used.
A water seal implies the presence of a certain amount of water in the drain at all times, and a “dry” seal will protect against unpleasant odors and when the drainage channel dries out. It is useful not only in cases where the shower is rarely turned on, but also when integrating a drain into a “warm floor”.
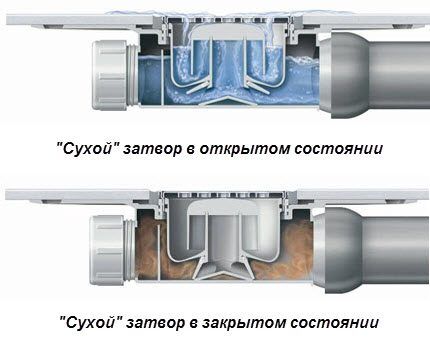
And only on fourth step the turn comes to the appearance of the drain - or rather, its outer part (drain grate).It is important that it harmoniously combines with the overall design of the room, the size and color of the tiles.
Fifth step — finally, we’re thinking about whether it’s worth purchasing a cheaper non-height-adjustable ladder or whether it’s better to pay extra for an adjustable model. Accuracy of installation, separation of installation operations into dirty and clean, high accuracy of joining with the level of floor tiles - these are the advantages of height-adjustable drains.
Installation instructions step by step
If the house is just being built, there are no complications regarding how to drain the shower. The concrete floor monolith allows for the installation of a vertical sewer drain. And in a high-rise apartment, the thickness of the screed is not enough even for a horizontal outlet, so the floor level will need to be raised by 10-15 cm.
And in houses that are in use, you first have to completely remove the old covering and remove the debris. Only the sewer pipe should remain on the exposed base. Most likely, it is cast iron, and its service life has long expired. It is best to replace such a pipe with a new plastic one, into which the pipe from the drain will be routed.
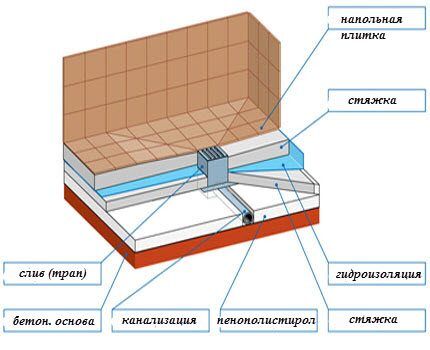
#1. Selection of tools and materials for work
The installation of the drain is carried out simultaneously with the construction of the moisture-proof floor covering. Based on this, you need to prepare tools.
To lay the screed, for example, you will need buckets, a spatula (or mixer) for mixing the solution, trowels, spatulas and graters for applying it to the base and leveling it.To dismantle the existing floor - a hammer drill (impact drill), chisel, hammer.
You will also need the following tool:
- tape measure, laser level, knife, ruler, square;
- tile cutters;
- a set of keys and screwdrivers;
- wire cutters;
- jigsaw, etc.
List of necessary materials (its quantity depends on the floor area):
- dry DSP for screed (at the rate of 5 kg per 1 sq. meter);
- expanded clay concrete, foam concrete to “lighten” the bottom layer of the screed (in order to reduce the load on the floors);
- expanded polystyrene in sheets for thermal insulation (50 mm thick);
- waterproofing membrane (damper tape);
- sealing mastic (with a distribution calculation of 3 kg per 1 m3);
- isoplast;
- tile adhesive (consumed up to 5 kg per 1 square meter);
- grout for joints, silicone paste-sealant.
And most importantly: the drain is complete (with fasteners, etc.), plastic pipes, ceramic floor tiles.
#2. Preparing the base for installing a ladder
Stage 1 — laying a drain pipe into the sewer. Drain pipe crash into the sewer with the required level of slope (2 cm should be per linear meter) and fill the connection contour with sealant paste. If necessary, we combine the drain from the shower with other drains - from the kitchen, washing machine.
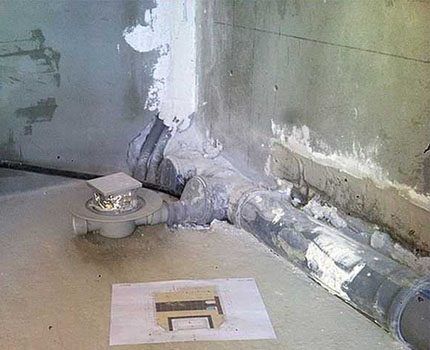
Stage 2 — calculation of screed height (preliminary marking). We perform the following actions:
- install the level so that it shows the axis of the drain pipe into the sewer;
- set the drain 1.5 cm above the outlet pipe (focus on the axis);
- move the beam to the height of the ladder grating;
- add the thickness of the grate and another 1-1.5 cm to the height of the slope for normal water flow (at the rate of 1 cm per linear meter);
- From the line indicating the installation height of the grille, we set aside the additional height upward and move the leveling beam to a new mark.
All that remains is to mark the projection of the beam on the wall with a pencil or marker - this is the height to which the floor in the shower stall must be raised.
Stage 3 - preparation of the base. At this stage we make a rough screed:
- we clean the floor, seal cracks, eliminate damage and unevenness;
- Based on the fact that the main screed will contain polystyrene foam 5 cm thick, and the screed itself cannot be less than 3 cm, we put 8 cm down on the wall from the mark (see previous paragraph) and get a new mark - this is the upper edge of the rough screed ;
- fill the screed - to reduce the weight and load on the floors, light concrete (foam concrete, expanded clay concrete) or foam blocks are used, fastened with a reinforcing mesh and cement-sand poured with a layer of 3 cm.
We place damper tape along the walls to create a “floating” effect and protect the screed from possible cracking. We dry the screed as required by building codes for at least 14 days, if the temperature in the room being equipped is not lower than a stable +20º.
Stage 4 - waterproofing treatment. We use coating waterproofing - bitumen or other sealing mastic. We apply it with a brush in several layers over the entire surface, overlapping the walls. We carefully coat the corners and joints of the walls with the floor - the most likely places for mold and mildew to spread.
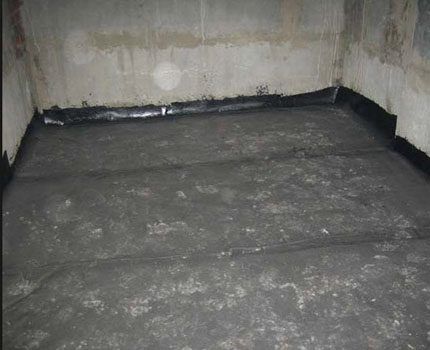
The mastic forms an elastic waterproof film. To increase reliability, you can seal all joints with rolled waterproofing material, covering up to 25-30 cm in height, and coat the top with another layer of mastic. Waterproofing treatment should be repeated several times in the future as the layers of the floor are built up. Read FurtherHow to properly waterproof under tiles in a bathroom.
Stage 5 — choosing a place to place the ladder. We experiment with the layout of the tiles and choose a place to place the ladder so that the overall appearance of the floor looks aesthetically pleasing. The decorative drain grate should be positioned symmetrically with respect to the tiles and the joints between the tiles.
It would be nice to remove one tile and install a point drain in its place. If the tiles are large, then the ladder is placed at the junction of two/three/four elements. It is also recommended to combine corner and linear drains with solid tiles, avoiding unnecessary cutting whenever possible.
#3. Installation and construction of thermal insulation
Stage 6 — installation of a ladder. We assemble the drain body, secure it, insert the outlet pipe located at the bottom into the sewer outlet pipe.
Stage 7 — creation of a thermal insulation layer. We cut the sheets of polystyrene foam into pieces. We strictly adjust the cutting lines to the contours of the existing sewer components, and lay polystyrene foam on the floor. Due to its thermal insulating properties, polystyrene foam will prevent heat from escaping into the walls.
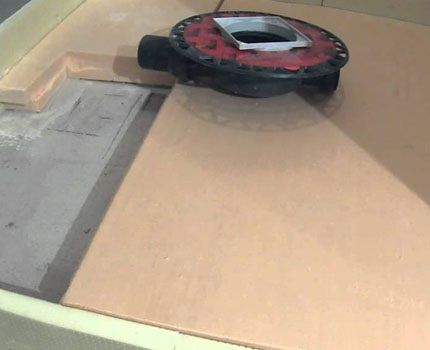
A damper tape is also needed around the perimeter, but it is better to cut it manually from the same material, only with a smaller thickness (3 cm). The joints between pieces of polystyrene foam are sealed with tape to prevent cold penetration from the concrete below.
#4. Floor screed device
Stage 8 - pouring the second layer of screed and forming a floor slope. We cover the insulation with a reinforcing mesh. We install “beacon” strips to indicate the slope towards the drain. Special standard planks can be bought in a store or made from wood yourself.
If you are lucky with the choice of model, then complete with the ladder you may find a set of guide rails with thickness varying along the length (the same “beacons”). When assembled together, they form a frame that facilitates pouring the screed with a slope towards the drain hole.
Having set up the “beacons” and checked all the measurements, we fill the floor with a regular solution of cement and sand in a ratio of 3-4 parts sand to 1 part cement. The screed should completely hide the drainage device. Only the flange remains open. We strive to get the surface as even as possible; we make a slope at the rate of 1 cm per linear meter.
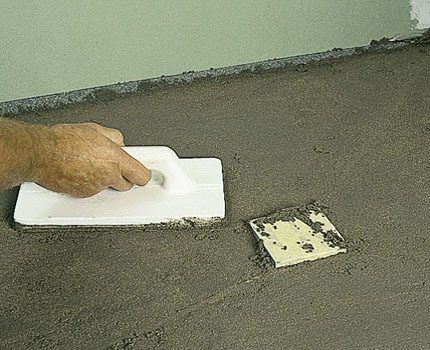
The easiest way is to make a slope towards the tray-tray located along the wall, since it is directed in one direction.For a point ladder located in the center, the floor slope must be done on four sides, which is technically much more difficult. After completing the work, dry the screed for 3-4 days.
Stage 9 - waterproofing treatment. Place a waterproofing substrate (isoplast sheet) on top of the dried screed. We cut a hole, bring the flange out through it, and secure it with screws along the edges. We fuse the isoplast onto the surface, heating its back side with a blowtorch. Once again we rub the corners and joints of the floor with the walls with sealing mastic.
#5. Carrying out finishing work
Stage 10 - assembly of the ladder. We place a siphon in the drain body, try on a decorative grille, placing a rubber O-ring under it.
Stage 11 - pouring the third layer of screed. We temporarily remove the grate from the ladder and cover the hole with a piece of waterproofing material so as not to contaminate the inside of the ladder. We make the last screed similarly to the previous one. At the same time, we leave a small margin of height to which the floor level can be raised at the final step when laying the tiles. This margin is equal to the thickness of the tile plus 1-2 mm (allowance for the adhesive layer).
The last drying is the longest. The screed must mature, which takes an average of 25-28 days, but it is better to withstand the full cycle of 43 days. In this case, it is necessary to maintain moderate humidity (regularly wet the surface in the first days), a temperature of +20-22 °C, and also protect the room from drafts and direct sunlight.
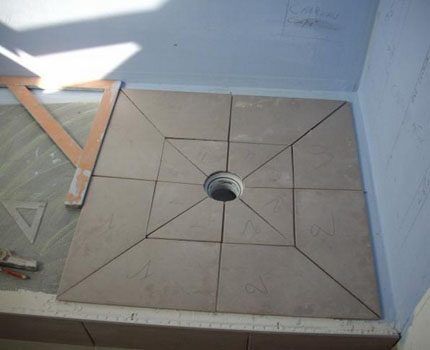
Stage 12 - laying tiles.We lay the tiles in the direction from the ladder to the walls, using tile adhesive and cutting carefully in the right places. Dry for 1-2 days.
On this shower drain installationfinally ends. All that remains is to grout the tile joints with waterproof grout materials.
Conclusions and useful video on the topic
The internal structure of a shower drain (using the example of a drain tray):
Installation of a shower drain:
Laying tiles in a shower tray with a slope:
In conclusion, a bathroom floor drain is a practical and original idea. The popularity of open showers is explained not only by their modern design, but also by their convenience. The only thing that scares many is the risk of flooding neighboring rooms and lower floors with water. But if the installation is done professionally, there is no reason to worry and there cannot be!
If, after studying the material, you have questions or have ever installed a shower drain yourself, please share your experience with our readers. It would not be bad if you supplement the comment with a photo of your homemade product.


Once I was admitted to a perinatal center for safekeeping; I was assigned a ward with a separate toilet room, in which the drain strangely worked. When I took a shower, the water did not completely go down the drain and accumulated on the floor; I stood in a puddle. Moreover, the water did not go away on its own; it had to be collected with a rag. Apparently, at some stage the technology for installing the shower drain was broken.
Hmm, good food for thought. I was just planning to recycle the old bathtub and make a normal shower stall.There are already options for the colors of the tiles, it looks very cool, I might even buy the same one, if possible, I’ll have to google it) There don’t seem to be any super technical difficulties, I should be able to manage it myself.