How to install a toilet on tiles: a review of the best methods and technical nuances
The variety of finishing building materials on the market opens up wide horizons for homeowners.This factor has long been the reason for the growing popularity of ceramic tiles. Wall and floor ceramics are used for finishing toilets and bathrooms.
The result of such finishing is impressive, but in this case, each owner inevitably has to decide the question of how to install the toilet on the tile and secure the device without damaging the created interior.
The content of the article:
What is special about installing a toilet on tiles?
The plumbing installation procedure itself is no different from standard options. The only difficulty is that installing any toilet on a tile automatically creates a fastening problem.
A natural point is that it is not at all easy to “tightly” secure a household appliance weighing more than ten kilograms on a smooth, slippery surface.

But along with the technologies for producing ceramic tiles, the technologies for manufacturing fasteners are also improving.Therefore, the seemingly difficult task of installing a toilet on tiles can be solved in any case. The main thing is to familiarize yourself with the installation technique and correctly apply it in practice.
There are several methods for installing plumbing fixtures on a tiled floor with subsequent reliable fastening:
- by means of a tie with mounting screws;
- using specialized adhesive pastes;
- by traditional cementation of the base.
Regardless of the method of installing the toilet on a tiled floor, the main rule always remains relevant - caution and accuracy in work. Ceramic tiles do not tolerate roughness. Any careless movement threatens to result in trouble.
Method #1: screw fastening
Design all types of toilets (except for exclusive models) provides for the production of holes for fasteners. These holes are located at the bottom of the device, just above the plane of the sole.

But there is also a considerable share of toilets, the design of which is designed for fastening with four screws (2 on each side). Typically these are large-sized models with significant weight.
In order to secure the toilet to the tiled floor with mounting screws, follow these steps:
Marking and centering on tiles
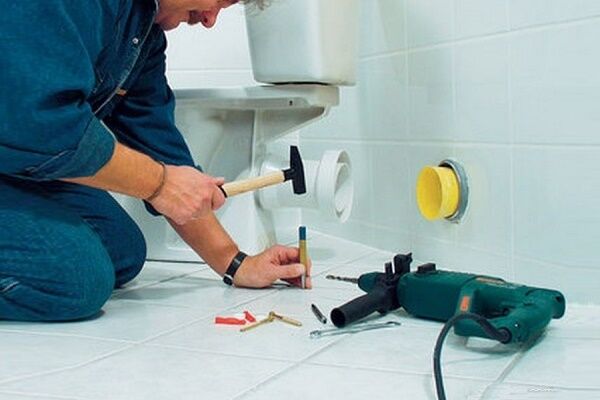
If the task is how to install a toilet of any of the marked configurations on a tile, the main part of the solution is preparing holes for dowels (plugs). But how to make holes in ceramic tiles without damaging this fragile material?
A special drill for ceramics and a little experience with a drill will help here. But first, the master needs to mark the installation location and mark the fastening points.

Then, directly on the tile, draw the border of the sole with a marker along its contour. Next, mark the points of the centers of the mounting holes. Having completed the marking, the toilet is removed.
Core and drilling tiles
The next step is a small core at points indicating the centers of future holes. The core is performed with a well-sharpened center punch. The point of the punch is directed to the point and several very weak blows are applied to the butt plate of the tool with a light hammer.
The goal is to chip off the polishing layer of the tile and get small holes with a radius of no more than 2 mm. This work must be done extremely carefully.

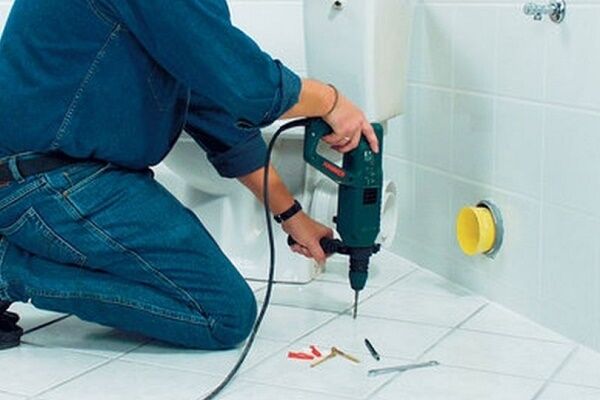
Having obtained small holes on the ceramic, take a drill and insert a special tile drill into the chuck. It is necessary to use a drill with a motor speed control function.
Drilling tiles should only be done at low speeds. During the process, it is recommended to periodically water the drilling area with a small amount of water. At the same time, we must not forget about electrical safety rules.
Drilling holes in the tiles is carried out to the boundary of the cement screed. Then the tile drill is replaced with a concrete drill, and the electric drill with a hammer drill.
The diameter of the drill should not exceed the diameter of the tile drill.Using this tool, holes are drilled in concrete to the depth of insertion of the fastening screws and thrust plugs (dowels) are pressed inside.
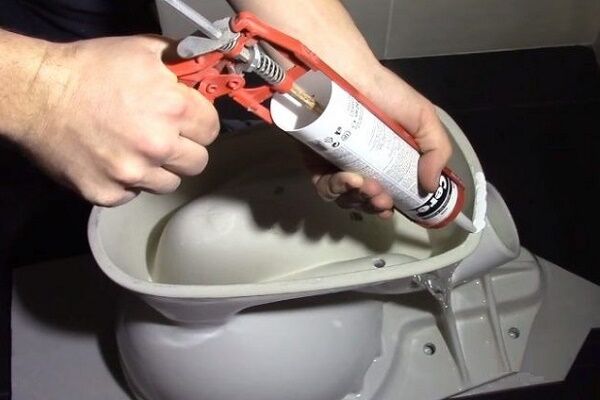
Sealing and screwing
At the final stage of installation, perform the following actions:
- The toilet base is treated with a thin layer of sealant.
- Place the toilet bowl exactly on the previously marked mark.
- The mounting screws are equipped with gaskets.
- Insert screws into mounting holes.
- Screw in until it stops, tightening it 1-2 turns.
Do not over-tighten the screws. This can damage the plumbing faience.
Method #2: glue installation
The method of gluing toilets is usually used when it is not possible to use screw fasteners. For example, the plumbing configuration does not allow it, or the homeowner simply does not want to violate the integrity of the floor ceramics.
There are different technical brands of glue and paste that can provide quite reliable fastening:
- silicone sealant;
- liquid Nails;
- “Fix All” series pastes;
- epoxy resin.
How to perform the procedure? The adhesive installation method is much simpler in terms of complexity than the screw mounting method. However, the sequence of the procedure actually repeats the technique with screws.
The main factor here is the preparation of the mounting base directly on the tiles and on the toilet base.

Surface preparation and treatment
Marking the installation boundaries is carried out in the same way as in the previous installation diagram. Plumbing fixtures are installed in the place where it is intended fix the toilet to the floor, and outline the mating area.
It is advisable to make the surface of the tile area where the toilet base will lie rough. To do this, you can use coarse sandpaper. Be sure to degrease surfaces with white alcohol or similar substances.

Along the outside of the marked border, glue the tiles with masking tape (protecting the tiles from getting glue).
Bonding a plumbing fixture
After the working surfaces of the tiles and toilet are ready, you must perform the following steps:
- Apply glue in a uniform, even layer on the base of the device.
- Carefully place the toilet in its “native” place.
- Using a small periodic force (10-15 seconds), press the plumbing fixtures to the floor.
- Remove residual adhesive material along the edges of the sole.
The installed plumbing must be allowed to stand for at least a day without any action being applied to it. This time is enough for the adhesive to become a solid, reliable attachment.
Then all that remains is to remove the protective masking tape and after 3-5 days you can begin to fully operate the plumbing fixture.

The use of technology with adhesives is not recommended if it is possible to use the standard option fixing the toilet to the floor – bolted installation. With all the advantages of adhesives, it is extremely difficult to choose the ideal composition for glossy surfaces.
But if this method has already been chosen, it is worth paying special attention to the preparation of the surfaces to be bonded. In addition, it is recommended to select the optimal adhesive by trial gluing test materials.
Method #3: cement clip
You can also install a plumbing fixture in a toilet on tiled floor tiles using cement mortar.This technique is practiced in some cases, and it has shown quite acceptable results.
The technology of “planting” on cement, however, requires careful preparation of the working surface of the tile. In particular, it is necessary to make notches, notches, and burrs (to create a corrugated surface) on the working area (the area where the toilet sole sits).
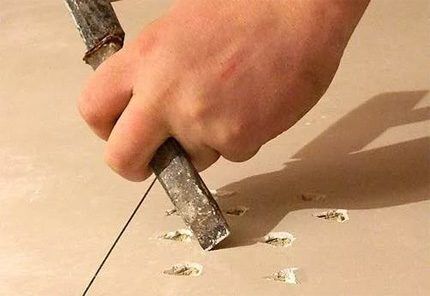
This work is performed using hand tools (chisel, punch) or power tools (grinder, grinder). The option of drilling shallow holes on the tiles throughout the entire working area cannot be ruled out.
Creating a grooved surface where the toilet is attached to the tiled floor will ensure better contact of the cement mortar with the tile. Sustainability tile-mounted sanitary ware, thus, is achieved to the level of fastening with special adhesives.
Preparation of a regular solution
Cement mortar is usually prepared based on a mixture of cement and quarry sand in a ratio of 1:2. Initially, being in dry form, both components are thoroughly mixed.
Then water is added to the container with the resulting mixture in small portions with constant stirring. In total, the volume of water poured should not exceed one third of the mass of cement in the solution.
This is how a cement mortar is obtained for attaching the toilet to the tiled floor tiles.

Final installation steps:
- Moisten working surfaces (floors and toilet soles) with water.
- Cover the working area of the floor within the sole of the device with cement mortar (layer thickness 7-10 mm).
- Place the toilet at its location and briefly press it against the floor with a little force.
- Use a spatula to remove excess mortar along the planting boundaries.
- Keep the installed device in a calm state for at least 24 hours.
Full use of the toilet should begin no earlier than after 3-5 days.
Cement mortar with liquid glass
The practice of cementing toilets on tiled floors does not exclude the use of modernized cement mortars.
So, during a plumbing installation, a solution containing liquid glass along with cement and sand was tested and showed good results. But various options for obtaining such solutions have shown that only with a ratio of cement and liquid glass of 1:10 is it permissible to use the solution for installing toilets on tiles.

Meanwhile, the technology for preparing cement mortar containing liquid glass has its own characteristics. For example, you cannot mix liquid glass with already prepared cement-sand mortar.
The admixture is pre-diluted with water and the dry cement-sand component is diluted with the already obtained liquid. When working with liquid glass, precautions must be taken.
Instructions for installing and connecting a toilet with an oblique outlet are given in next article, the contents of which we recommend that you familiarize yourself with.
Conclusions and useful video on the topic
Here you will find everything about installing toilets, including on tiled floors:
Installation of plumbing fixtures in the toilet on a tiled floor is possible. This fact is confirmed by several installation methods, each of which has been tested in practice and successfully applied.
Another question is that the choice of one or another installation technology on tiles must be compared with the load parameters that are presumably possible during the operation of plumbing fixtures.
Would you like to share your own experience in installing and connecting a toilet? Do you have useful information on plumbing installation technology that is available to site visitors? Please write comments in the block below, ask questions, publish thematic photographs.

Had experience installing a toilet on tiles. Of course, fastening with screws is the most reliable method. Judge for yourself: the weight of the toilet + the weight of the water tank + the weight of a person. The load is severe and unevenly distributed. It is doubtful that the adhesive joint will hold up. And certainly, planting on cement mortar will not help. It does not tolerate vibration and humidity at all. And in the bathroom, both will be required.
The most reliable method can be screwed, but modern adhesives should not be underestimated either. My toilet is secured with silicone sealant and there are no problems with it.
I try to do all the plumbing work around the house myself, at least as far as I have the tools and skills. I installed the toilet myself, we have a tiled floor, I decided to mount it with liquid nails, and for strength I secured it with 2 screws and sealed it around the perimeter for additional insulation and strength. The toilet is standing tight. So, anything is possible.