DIY generator: step-by-step instructions for making it at home
Electricity is not always supplied uninterruptedly, for example, due to the remote location of power lines from residential buildings.And when the power goes out every now and then, have you probably thought about buying a generator? Of course, a purchased device is not a cheap solution, and the costs are not always justified. A more affordable option is to make a generator yourself. This solution does not require large investments in assembly; it can convert energy not only using expensive gasoline or a diesel engine, but also more affordable ones - gas, steam, etc.
Therefore, it solves the problem of power outages and saves a certain amount in the budget. But how to make a really high-quality generator, what other advantages do homemade products have over purchased devices? We will help you understand all the nuances - in this article we will provide diagrams for assembling an electric generator, the principle of its operation, and the advantages of using a homemade one. We will also consider step-by-step instructions for making a generator at home.
The content of the article:
Advantages of a homemade generator
A homemade generator outperforms a purchased one due to its more affordable price. Of course, the financial side is important, but a do-it-yourself device is a device that only meets the necessary and stated requirements.
It is worth considering that the chosen design directly affects the efficiency.Thus, in asynchronous generators, efficiency losses do not exceed 5%. The laconic design of its housing, which protects the motor from moisture and dirt, reduces the need for frequent maintenance. An asynchronous generator is more resistant to voltage surges due to the rectifier at the output, which prevents damage to the connected equipment.

Such a device effectively powers welding machines, incandescent lamps, computer and mobile equipment that are sensitive to voltage changes. Has good performance and service life.
The device is a good alternative to conventional power sources, helps out in case of a power outage, and saves money. Mobile, small-sized, with a simple design, easy to repair - you can replace failed parts and components on your own.
Among other things, the homemade product is small in size, so it can be easily installed even in small spaces.

Depending on the type of fuel used, the generator only requires compliance with precautions during use.

Types of electricity generators
Typically, a homemade generator at home is made on the basis of an asynchronous motor, magnetic, steam, or wood.
Option #1 - asynchronous generator
The device will be able to generate a voltage of 220-380 V, based on the performance of the selected motor.
To assemble such a generator, you only need to start an asynchronous motor by connecting capacitors to the windings.
A generator based on an asynchronous motor self-synchronizes and starts rotor windings with a constant magnetic field.
If the rotor is of a squirrel-cage type, then the windings are excited using the residual magnetization force.
Option #2 - magnetic device
A commutator, stepper (synchronous brushless) motor and others are suitable for a magnetic generator.

During the assembly process, magnets are attached to a rotating axis and installed in a rectangular coil. The latter generates an electrostatic field when the magnets rotate.
Option #3 - steam generator
For a steam generator, a furnace with a water circuit is used. The device operates using the thermal energy of steam and turbine blades.

This is a closed system with a massive, non-mobile plant that requires control and a cooling circuit to convert steam into water.
Option #4 - wood-burning device
For wood-burning generators, stoves, including camp stoves, are used. Peltier elements are attached to the walls of the furnaces and the structure is placed in the radiator housing.
The principle of operation of the generator is as follows: when the surface of the conductor plates is heated on one side, the other is cooled.

An electric current appears at the poles of the plates. The greatest difference between plate temperatures is provided by the generator with maximum power.
The unit is more efficient at sub-zero temperatures.
Operating principle of an electric generator
The generators operate on the principle of electromagnetic induction, when current is induced in a closed loop due to its intersection with a rotating magnetic field. The magnetic field is created by windings or permanent magnets.
When the electromotive force from the commutator reaches the closed circuit and the brush nodes, the rotor begins to rotate together with the magnetic flux. This creates tension in the spring-loaded brushes pressed against the plate-type commutators.
Next, the electric current is transmitted to the output terminals, passes into the network, and spreads through the generator.
They use alternating and direct current generators. The alternating current electric generator is small in size, does not generate eddy currents, and at the same time has the ability to operate in extreme temperatures. A device with direct current does not require careful monitoring and has a significant number of resources.

The alternating current generator can be either synchronous or asynchronous.The first is with a permanent electric magnet and the number of stator rotations is equal to the rotor, forming a magnetic field. The advantages of such a generator are a consistently high voltage; the disadvantages include current overload due to an excessive load on the regulator, which increases the rotor winding current.
Design of an asynchronous generator: squirrel-cage rotor, stator. When the rotor rotates, the generator induces a current, and the magnetic field produces a sinusoidal voltage.
Step-by-step assembly instructions
It is necessary to assemble a generator at home after a set of necessary radio components, power tools and materials has been prepared.
Stage 1 - preparation of radio components
To assemble a mechanical generator module with electromagnets, you will need a motor. To make a low-power generator, you can use an electric motor from an Oka, Volga washing machine, an Agidel pump, and others.
The current generated by the motor determines the choice of parts and components. To convert current from AC to DC, rectifier diodes are needed, for example, a high-power diode bridge of tens of amperes with a voltage of no more than 50 V. For DC polar capacitors, smoothing filters with the ability to equalize DC voltage ripple are important.
As an additional board with a USB port for connecting gadgets, a device is selected to convert the voltage to 1.5-20 V.Such a list of radio components is sufficient for a low-power generator with a voltage of up to two tens of volts. In the case of an asynchronous motor, you can connect mobile devices directly.
Stage 2 - preparation of tools and materials
As for power tools, you will need a grinder, the set of which includes cutting discs for metal, wood and a grinding disc (hard or sandpaper).
We recommend that you read rules for working with an angle grinder.
You also need an electric drill with metal drill bits. You may need a hammer drill with impact drills and concrete drill bits. Sometimes the hammer drill is equipped with an adapter with simple, conical drills and wood bits. A screwdriver with heads for an adapter-wrench and a head for nuts will also be useful.
Materials will be required to assemble the generator frame. They are chosen at their own discretion. This can be rolled pipes of different diameters, metal fittings, profiles, etc.

For connections, they stock up on fasteners - nuts, washers, screws, bolts. This is a universal set of equipment, after collecting which you can start making a generator set with your own hands.
Stage 3 - preparatory work
After preparing the tools and materials, preparatory work begins. They are necessary before assembling the generator because they include an initial calculation of the device’s power.
Power is calculated by connecting the motor to the network. The number of rotations issued will determine the power of the motor.Sometimes a tachometer is used for measurements, and 10% is added to the data obtained to compensate for the load (preventing the motor from overheating during use).
After the power is accurately calculated, the capacitor is selected according to the previously obtained engine power data.

At the end of the preparatory work, they consider grounding the future generator. This process helps to avoid traumatic situations and extend the operating life of the generator.
Stage 4 - study the star and triangle diagram
To assemble a 220 generator, you need analogue circuits of the production model - star or triangle.

According to the star circuit, the electrical connection is made for each of the ends of the windings of one point, for a triangle - a series connection.
Stage 5 - assembly itself
Let's consider several options for assembling an electric generator.
Asynchronous generator assembly
The manufacture of an asynchronous generator does not require regrinding the rotor for neodymium magnets, therefore the device circuit is called reworking a finished asynchronous motor. In this option, there is no need to power the rotor winding; it is removed from the engine, and the rotor axis is machined for flat magnets.
According to the assembly diagram of an asynchronous generator, the power of the device reaches from 2 to 5 kilowatts with capacitor capacities from 28 to 138 microfarads. In order for the voltage to be static, a capacitance is required, depending on the planned load on the generator.
Assembly of the unit occurs in three stages. The first involves assembling one supporting structure, installing an engine with a gear-type drive in it.

At the second stage, variable and non-polar capacitors are connected to the windings. The latter are connected according to a star circuit, when some of the ends are connected to the center of the body, and the rest are brought out separately.
Finally, the free winding ends are connected to the tops of the capacitor according to the triangle diagram.

Before the first launch, a new device is tested, for example, with an ordinary incandescent light bulb of two to three dozen watts. This is necessary to check the generator’s ability to provide uninterrupted voltage output of 3000 rpm.
Assembling a wood-burning generator
Let's look at the assembly of a wood-burning generator using a potbelly stove as an example. The assembly procedure is as follows: first, the radiator is placed on the walls of the potbelly stove so that the spikes point inward. Next, depending on the size of the radiator, Peltier elements are installed, to one of which another radiator is subsequently attached.
It is better to place such an installation in the shade, near an uninsulated wall of small thickness, which will ensure maximum cooling.
To start the generator, logs are set on fire using wood. When they flare up, they heat the walls of the stove, which force the Peltier element to produce maximum power. The generator is cooled by cold street air.
We have detailed instructions on our website production of wood gas generator with your own hands.
Nuances of assembling a collector generator
A commutator generator is assembled according to the following scheme: first, a commutator-type motor is placed on a supporting frame or other structure.
Then a smoothing capacitor and a DC-inverter converter board are connected to the motor terminals. The capacitor must be DC current.

The next step, if there is no USB port, is to connect it to the output from the DC board. You can connect mobile devices to such a generator.
The generator design is located on a bicycle frame or windmill.

Instead of a commutator motor, you can install a stepper motor with higher efficiency and a service life of 10 years. It is preferable to choose models with a voltage of 12 V and a current of 1.8 to 4.2 amperes. In such motors there are from 2 to 4 windings, they are connected in series for voltages of 24, 36, 48 V.If the motor is connected in parallel, then the output amperage is large. In this regard, it will be more difficult for the generator to accelerate to the required voltage.
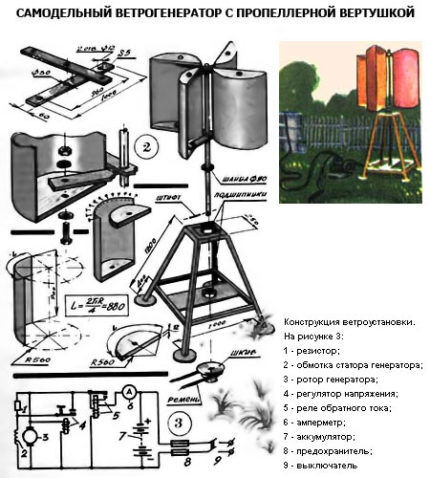
In addition to these options, we have detailed assembly instructions on our website wind generator And hydrogen generator
Recommendations for safe use
For generators that will be used in an outdoor environment, for example, a wind power plant, a bicycle generator, protection should be provided from precipitation, dust, and dirt. The device is placed in a special separate housing.
If the generator will operate outdoors for many hours, experiencing daily loads, it needs regular lubrication of the bearings. Manipulations are carried out once or twice every six months.
Short circuits are not permissible: engine wires, auxiliary radio electronics, semiconductors. This can cause the shorted windings to burn out.

Engine repair can be complicated by difficulty in accessing internal components due to the force of the rotor, which slows down rotation in proportion to the load. To prevent such situations, you should constantly monitor the engine temperature to prevent it from overheating.
You should also try not to use the device for a long time: the longer the generator is in operation, the less power it has. The optimal engine temperature is from 40 to 45 degrees.
A homemade generator without automatic control devices requires constant user control, including for data collection.
If assembling and using a homemade electric generator seems difficult to you, we recommend taking a closer look at purchased analogues - the following article shows rating gas power generators.
Conclusions and useful video on the topic
However, a homemade generator is a backup power source with good performance, service life and economic benefits. Even low-power generators ensure that devices and equipment are operational and maintain comfort at the proper level in a private home, apartment within the city or beyond. In order to make a homemade generator, you just need to decide on its design, type of device and select the necessary parts.
Or maybe you have your own ways of making a generator with your own hands or even tricks? Please share your secrets. This can be done in the comments to this article, in the block below.
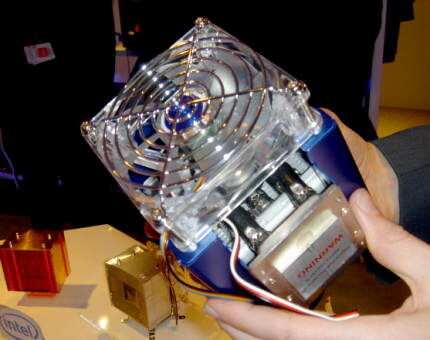
Video about making a hand-held electric generator:
We assemble a wind generator with our own hands:
A generator made at home is a backup power source with good performance and service life. Even low-power generators ensure that devices and equipment are operational and maintain comfort at the proper level in a private home, apartment within the city or beyond. In order to assemble a homemade generator, you will need to decide on its design, type and select the necessary parts.
Do you have experience making a generator yourself? Share your recommendations with other visitors to our site. This can be done in the comments to this article - the block is located below. Also here you can add unique photos of a homemade electric generator.


