Socket with a switch in one housing: how to connect a socket with a switch
Combining a power point and a device that controls lighting devices allows you to rationally organize the power supply of a residential or office space. Agree, it is much more convenient if the electrical fittings are grouped and not randomly “scattered” around the room.
In addition to significant ergonomic advantages, such a technical solution has a lot of design advantages. However, it also makes you think about how a socket with a switch in one housing is connected to the electrical network. In our article you will find answers to all complex and simple questions that arise during the installation of such a block.
We provide comprehensive information on installation methods and methods of connecting block electrical devices. Subtleties and nuances are highlighted in photo collections and videos that clearly demonstrate the specifics of the work. Such powerful information support will help you cope with the task “perfectly”.
The content of the article:
Connecting sockets with a 1-3 key switch
Since then, when the wires from the switch were connected to the electrical circuit, it was not clear how, and in some cases even at random, very little time had passed. It was noticed that in ancient houses and buildings a sufficient number of devices were connected in violation of many safety requirements.
Yes, this approach did not in any way affect the performance of the components. Everything functions normally, but the safety of operation of such devices remains in question.

Every year, saving money and space remain priority factors. That is why, in order to reduce the number of wires and the used space on the wall, manufacturers of electrical appliances have combined several devices in a single design.
Combining a one- or two-gang switch with a socket increases the maximum efficiency and comfortable use of such electrical equipment.

It should be remembered that to connect a block electrical installation device choose cable necessary taking into account the maximum load.
#1: Methods for connecting a switch-socket unit
There are several ways to attach a merged block. This feature became available relatively recently. Previously, it was impossible to find electrical equipment with different optional features in a single housing in a house.

The method of connecting the switch and socket was carried out by connecting the wiring in the box, but without mixing the devices themselves.This method is still used today if, for certain reasons, it is impossible to install consumers near each other.
At the same time, the option of unpaired connection of the structure also has its advantages. Let's look at them below:
- Such devices are publicly available. Buying even a cheap switch with a socket will make it possible to connect them in one circuit.
- Work on connecting these electrical devices can be done easily even with your own hands.
- An increased level of safety when using separately connected mechanisms, since the wiring to them is laid separately, which reduces the likelihood of a short circuit.
So why in recent years have homes given preference to special units, where the combination of socket and switch is laid down by the supplier. And all because such a device connection plan is more lightweight.
Firstly, there is no need to run two separate cables to the devices. Secondly, the advantages of such a block are much greater than those of divided ones.
Let's list some of them:
- Simplified transfer of such a block to another location. Now there is no need to lay two separate wiring.
- It is no longer necessary to measure the height twice during the installation of the above-described device, since it is one block.
- High-quality devices can be used outdoors and indoors.
- The combined block is easier to install on surfaces made of concrete, stone, wood and plasterboard.
The main disadvantage of a connected block is that one part cannot be replaced if it breaks. It doesn’t matter whether it’s a power socket or a switch itself. It will almost always require a complete replacement.
New units are manufactured with a one-, two-, or three-button switch, which is combined with a socket in a single product.
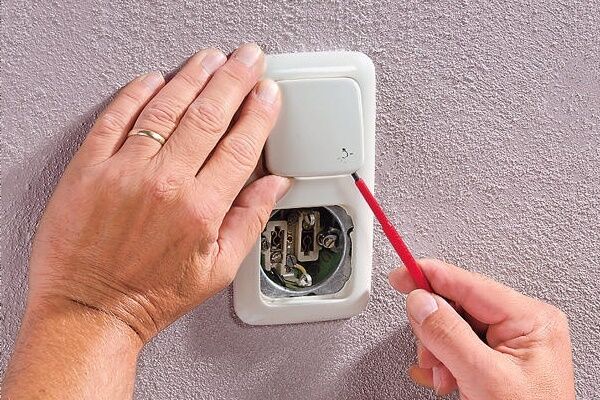
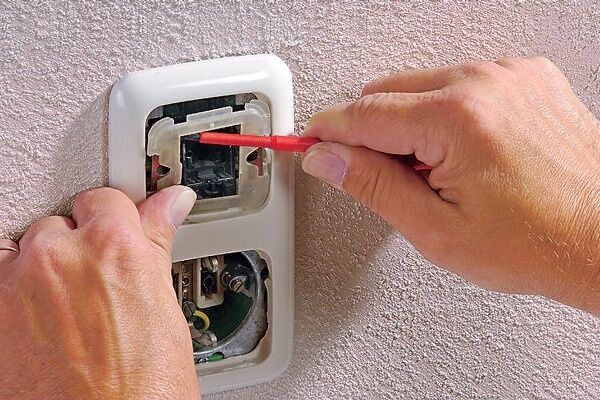
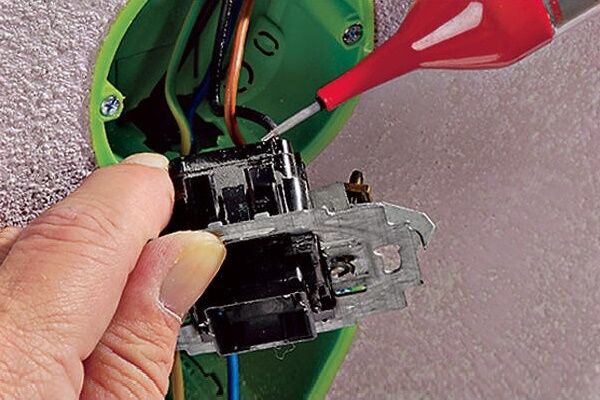
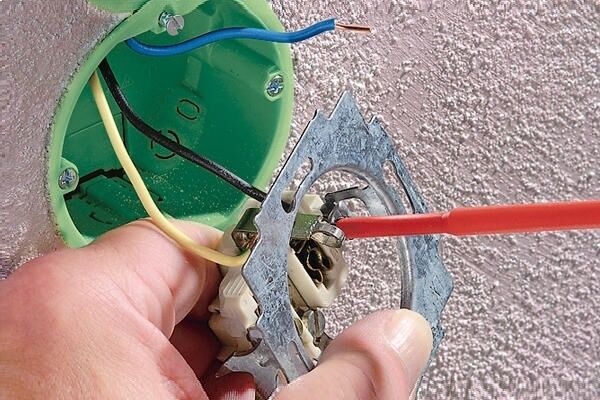
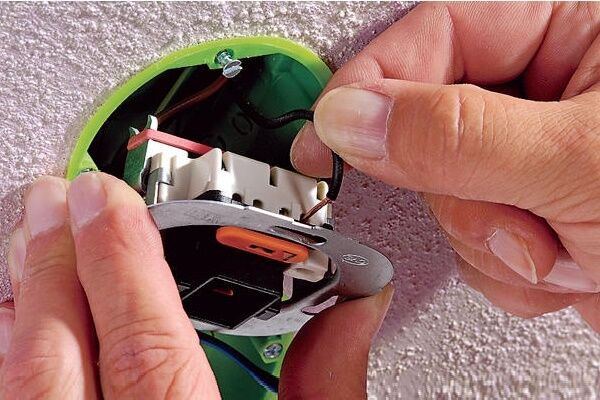
Let's look at the step-by-step process of replacing a block switch-socket system:
Having completed the dismantling of the old device and prepared the wiring, we proceed to install and connect the new unit from a socket with a switch.
#2: Connecting and switching the socket through a switch
There is a specific sequence that determines how to connect an outlet with a switch in a one-piece structure. It should be remembered that it is based on standard wiring diagrams for electrical installation devices and mandatory compliance with the PES.
An elementary way to connect wires from the network is to connect them to devices according to a clear plan in the distribution box.
The work algorithm below will tell you how to correctly connect a combined socket with a switch:
- A special hole in the wall is prepared for the indoor unit, and a suitable space for installation is selected for the external unit. For premises in wooden buildings, overhead paired mechanisms with combined electrical units are most often used. This method is used, for example, with open wiring.
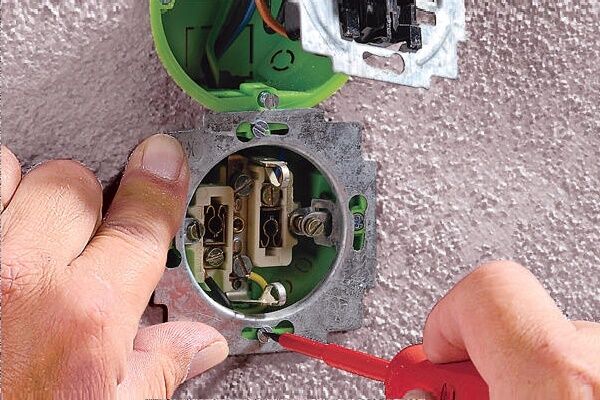
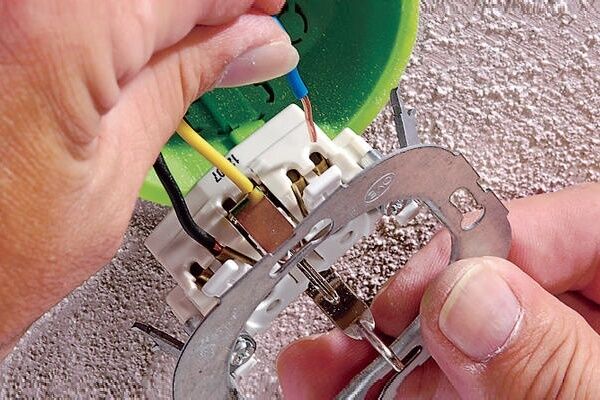
- The distribution box has six (6) strands of incoming electrical cables.One pair is for the socket, the second is for the switch, and the third is for the distribution panel. Each pair is a phase and neutral conductor. Most often in houses you can see an additional ground wire.
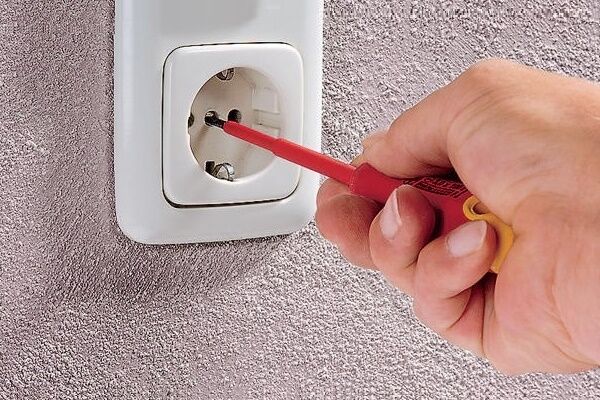
- First of all, we determine the phase that comes from the distribution panel and de-energize the room.
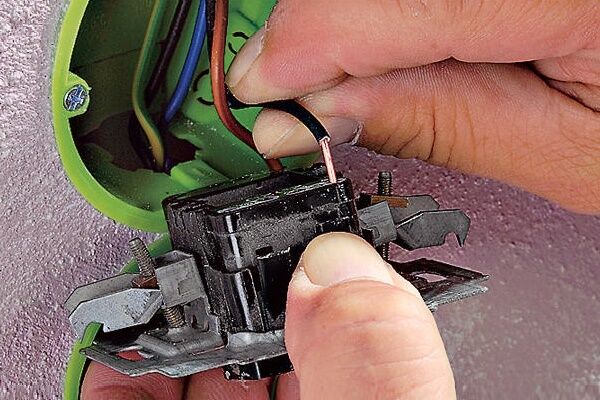
- The next step is to connect the phase cable from the mains to the wire going to the switch. It is necessary to strip the ends of the phase conductors, then twist them together and insulate them. Insulating tape is used for this.
- Next, the neutral wire of the network must be connected to the wire from the outlet. We also wrap them with insulating material.
- The unused edges of the wires from the combined unit are also twisted together and must be rewound with electrical tape.
- This connection diagram will ensure that the phase cable of the socket is connected through a switch. The effectiveness of this method is noticed when the network socket is very rarely used, and the connected devices need to be constantly turned on/off.
The mechanism combined in a single body operates relatively simply. The socket is supplied with phase through the switch if the switch is activated. This scheme is popular, for example, if you need to heat water in a heater that does not have its own off/on button, and you don’t want to constantly pull the plug.

Another way is to connect lighting in the utility room through an extension cord. Then you can turn it off using a single-key switch.
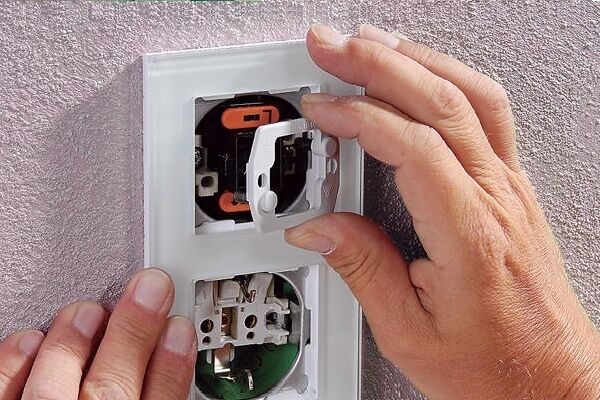
#3: Installation of connected sockets with a switch
Blocks of electrical installation devices combined in a single housing are in great demand. The main factor remains that both devices will be used separately.
To install such a socket and lamp switch, a number of simple steps are carried out:
- Cables with neutral and phase are laid from the main panel to the distribution box.
- The box should contain five (5) wires - two (2) from the lamp and three (3) from the unit connecting the individual devices.
- The phase conductor from the shield must be connected to the wire from the outlet. Using a jumper, connect the socket to the terminal on the switch.
- The neutral wire from the electrical network must be connected to the neutral wire from the lamp and socket.
- The phase cables running from the socket to the switch must be twisted and insulated.
- Grounding is also connected using a suitable cable.
A similar circuit with a socket and switch combined in a single housing will work separately from the switch. And the main functions of a single-key switch (on/off the electric lamp) will also be performed independently.

Those who want to know how to connect a double switch that controls two light bulbs should pay attention to andinformation about the next article, which we recommend that you familiarize yourself with.
#4: Connecting a socket with a two-gang switch
Most often, a block connecting a socket and a two-key switch is installed between the entrance to the restroom and the bathroom. Alternatively, it can be installed in a large room to supply voltage to one to three light sources.
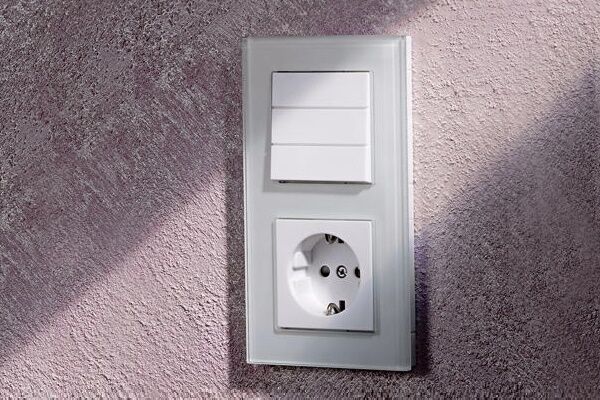
Conclusion: thanks to a single unit, the user can control the light in several rooms at once, as well as connect any device that consumes electricity to an outlet.
Let's consider the connection diagram of the combined device, consisting of 7 steps:
- The first stage is the installation of five (5) conductors from the distribution box to the dual electrical system.
- From the distribution panel, the conductors with neutral and grounding are connected only to the outlet.
- Thanks to a special jumper in the connecting block, the phase is supplied to the dual trip device.
- Both free conductors are connected to two connecting nodes of the switch, through which the phase is supplied to the lighting fixtures in the bathroom and restroom.
- It is necessary to twist the cables with a phase (from the switch) with free conductors (from lamp sockets) in the restroom and bathroom.
- In the sorting box, the cable with “0”, as well as the grounding wire from the socket, must be twisted with the exposed ends of the twists from the lighting.
- There are times when the order of the keys on a switch needs to be changed. To do this, the wires on the switching contacts that supply voltage to the lamps in the bathroom and restroom are simply swapped.
It turns out that the connection diagram for a one- and two-key switch combined with a socket differs only in the amount of time spent and the number of wires. For a one-button device, four (4) cables are used, and for two-gang switch – five (5) conductors. Both options include grounding.

#5: Installation of a block with a socket and a three-key switch
A three-button switch with a socket is used for greater energy savings. In recent years, it has been in increasing demand among electricians, specialists and ordinary people.
Previously, three-key switches with a socket were installed only in panel houses. Their main purpose was to control light in the kitchen, bathroom and restroom. But the network socket was provided for household purposes - connecting a hair dryer, electric razor, vacuum cleaner and other devices. Much time has passed since then, most of them need to be replaced.
Modern layouts and design capabilities make it possible to use a three-key switch-off device as the main control link of several light sources for one room. Among them:
- basic;
- additional light sources;
- decorative.
This method saves a person from the need to connect lamps when there is a lack of lighting. On the other hand, it protects a person from excessive amounts of light in the room and allows them to dim it. Light control remains under your complete control thanks to one single switch.
In addition to convenience, such three-key block decorates the room. Agree that a solid block with a socket looks more aesthetically pleasing than three separate ones. In addition, the amount of time and effort spent on installing it is much less.
A three-key device is usually installed in rooms of the following type:
- in a place where multi-tiered lighting is planned;
- in rooms with a large area and complex shape;
- in narrow and long transitional rooms;
Such a switch is also mounted to control lighting in several rooms at once, such as a toilet, bathroom and hallway, from a single place.It can also be used in work areas to illuminate a specific desktop.

The configuration of the device with a socket is not much different from a conventional three-button switch. The neutral wire going directly into the outlet is the main difference.
Previously, such a design could cause inconvenience. The passage of time has changed this rule. Since the fashion for the location of switches has changed significantly, installing the socket above the baseboard, and the switch at a distance of 800–900 mm from the floor, is becoming an almost unclaimed option.

There are several rules when choosing a switch. Then it will last longer and not cause discomfort. Here are the main ones:
- the keys don't stick;
- do not make any extraneous sounds when pressed;
- the inside of the switch contains its connection diagram;
- smooth and even surface.
You should also pay attention to the level of security of the device - this is the IP code on the packaging. The first number reflects the level of protection from dust, the second – from moisture. The value and effectiveness are indicated from zero (0 – no protection) to six (6 – the highest level of protection).
For example, when installing a switch in a bathroom or shower room, you need to purchase a device with IP 44. If it is a street, the protection level is 65. When installing a switch in a recreation room, an IP value of 20 will be sufficient.
When commissioning a switch with a socket, it is difficult to do without certain tools, such as:
- pliers for clamping and gripping parts;
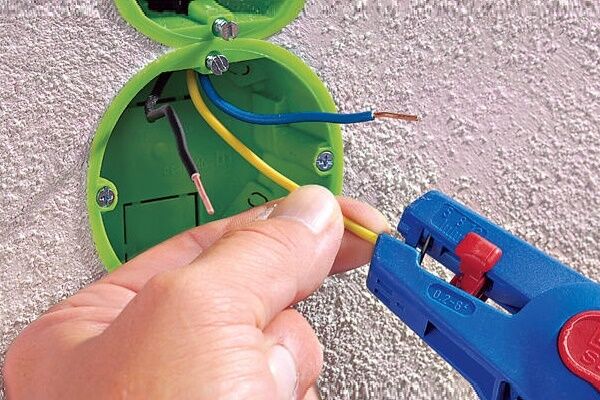
- stripper for removing insulation from the edge of the wire;
- flat and Phillips screwdrivers.
The installation diagram of a three-button switch is also not much different from connecting a two- or one-button device.

Let's look at them again:
- Before starting work, you must make sure that the network is completely de-energized.
- Neutral and phase cables must be distributed.
- Check the phase with a special screwdriver with an indicator.
- Connect the cable to the distribution box.
- Test the connection.
An important skill during installation is the skill of finding wires with neutral and phase. Usually, certain the wire has its own color. The zero core is blue, and the phase is black or red.

There are several ways to determine the phase. Its presence will be indicated by an indicator on a screwdriver or a simple incandescent light bulb. The first option is preferable because it is simpler. For the second method, you need to screw the lamp into the socket and alternately short the lead wires. When the cable is at zero phase, the light bulb shines brighter.

Purchasing one-, two-, three-button switches with a socket is not a complicated process. But, as practice shows, not everyone can figure out the connection plan. That's why this article appeared. Now it has become much easier to independently install, and even more so, replace a switch with a socket.
Finally, a few recommendations. When dismantling the old unit, it is better to label each disconnected wire. This will significantly save time on connection and immediately figure out where to connect which wire.
Conclusions and useful video on the topic
You can also watch these manipulations in video format. In them, experienced specialists will explain and show the correct connection of all the above-described blocks.
Video #1. How to connect a socket and switch:
Video #2. Reliable electrics in a house or apartment: connect correctly:
Video #3. Repair of a unit with a two-key switch and socket:
Remember, if this article and video did not give you a clear idea of connecting switches, or you have never encountered electrical equipment at all, especially if you have to carry out electrical work in the bathroom, please contact professional electricians to avoid the occurrence of electric shock or short circuit.
Do you want to share your own experience as an electrician, have you found any shortcomings in the article, or have any questions? Please write a comment in the block below the text.


My wife and I inherited a dacha from my great aunt. The house is small and looks quite cheerful, but in reality it turned out to have a lot of problems. The main problem is with the wiring. That is, there is electricity in the sockets, but there is no electricity.They were afraid that the dacha would burn down, and that the neighboring houses would also be damaged. We decided to change the wiring completely. I really liked the idea with the socket-switch and it will be very useful. I will definitely do this!
I recently bought a house and did the renovations myself. When replacing electrical wiring, I was faced with the question of how to combine sockets with switches in one housing. I thought that this particular method would save space and eliminate unnecessary wires. I realized that I couldn’t do it without outside help. I read an article about this and did everything according to the suggested schemes. Everything is working.
When we were doing renovations in our own house, we decided to completely replace the wiring, since it was already old. Of course, I wanted to save money. We decided to install sockets and switches in one housing. This is very convenient; you don’t need to install a splitter box and save on cables. And all this using modern European technologies, again. In addition, it greatly improves the appearance and saves space.
I can't understand anything. I decided to connect the socket from the chandelier switch. I plug it in and the chandelier stops turning on. Only one thing works - either a switch or a socket. What am I doing wrong? I don’t want to call an electrician over something like this.
Dmitry, combining an outlet and a switch is a rather strange idea that does not give any benefit in anything, and creates only inconvenience. Don't worry, it's better to do everything separately.
Good afternoon, Dmitry. The paradox is explained simply - a phase wire goes to one terminal of the switch, and from the other it goes to the chandelier.After all, the main function of the switch is phase interruption. The neutral wire is routed to the chandelier from the junction box.
By powering the socket from the switch, you supply the same phase to its contacts - without the “zero” the socket does not work. Describing electrical circuits in words is a thankless task. Therefore, I have attached a screenshot of the diagram of your amazingly working electrical network.
The diagram shows that when the switch is open, zero reaches the socket through the chandelier - it can supply voltage, for example, to an iron. When the switch is closed, only the phase gets to the socket - it is useless to turn on the iron, but the chandelier is on.