How to make a potbelly stove using waste oil with your own hands: a review of the best homemade products
When operating any mechanisms, technical oils are used.When used for their intended purpose, they do not burn and remain flammable. Instead of recycling, an alternative option for reusing them is a potbelly stove using waste oil, which you can make yourself.
Let's try to figure out how a potbelly stove works and what materials are needed to make it. We will also talk about popular models of homemade stoves and share the secrets of their successful operation.
The content of the article:
- Operating principle of a potbelly stove
- Making a simple potbelly stove with your own hands
- Making a potbelly stove from a gas cylinder
- Potbelly stove plus water circuit
- Drip potbelly stove under development
- Conversion of a solid fuel stove for testing
- Secrets of successful operation of a potbelly stove
- Conclusions and useful video on the topic
Operating principle of a potbelly stove
The operation of a potbelly stove is based on the phenomenon of pyrolysis. Such a furnace, where the fuel is waste oil, has 2 main compartments: a tank and a combustion chamber, located at different levels. The first is intended for pouring waste and burning it.
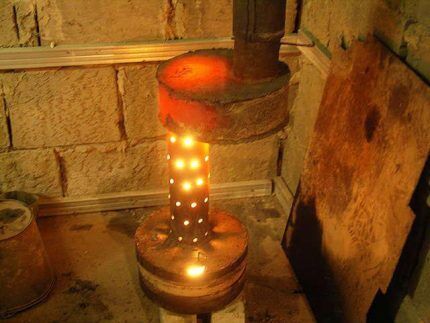
In another compartment, located above, combustion products of waste mixed with air are burned. At the first stage, the temperature is relatively moderate, and at the second stage it is much higher - up to 800⁰.
When making such a stove, the main task is to ensure that air flows into both compartments. It enters the first chamber through an opening designed for loading liquid fuel. The hole is equipped with a special damper, through which the volume of air supply is regulated.
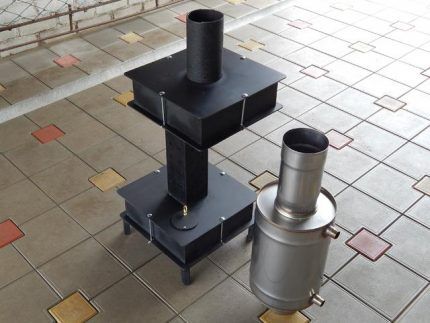
Air access to the second tank is provided by holes with a diameter of about 9 mm. The efficiency of a properly assembled potbelly stove reaches 90%. Visually, different potbelly stoves may differ from each other in both shape and size, but the principle of operation is the same.
The power of a potbelly stove is proportional to the volume of the lower tank. The larger it is, the less often you will have to add mining. Sometimes this container is made very massive, holding about 30 liters of used oil.
Improving the simple design of the stove during development made it possible to invent a unit for arranging a garage, in which it would be pleasant to wash your hands with hot water, or a small private bathhouse:
Making a simple potbelly stove with your own hands
The basic design of a homemade potbelly stove consists of 4 parts:
- Fuel tank of arbitrary shape with a hole in the center, the diameter of which is equal to the corresponding size of the attached pipe. This is where the combustion of the waste begins. The metal for the manufacture of this structural element must have a thickness of at least 3 mm.
- Combustion chambers or an injector, which is a vertical cylindrical container with a number of holes, connected through an opening to the tank. As a result of air feeding through the perforated walls of the injector, the fuel entering the chamber burns completely.
- Heat exchanger in the form of a tank located above the combustion chamber. A heated gas mixture enters it. The design can have any size and shape. Ideally, this is a tank with a hollow platform on which food can be heated.
- Smoke exhaust pipesproviding effective traction.
To make a potbelly stove yourself you need to have good welding skills. Welded seams must ensure tightness.
Making a waste tank
An alternative to a welded tank can be an unusable gas cylinder or a canister with thick walls, but in any case, 3 basic requirements are mandatory:
- The design must be at least partially collapsible to allow for periodic cleaning.
- The hole for connecting the injector must be located in the center.
- The hatch for pouring waste should be equipped with an adjusting valve on a bolted connection. With its help, the intensity of combustion is controlled.
The easiest way to make a tank is from large diameter pipes.The bottom and legs are welded to one piece of pipe with a diameter of about 35 cm. In order to close the tank, take a small piece of pipe with a slightly larger diameter, weld a lid to it, then make 2 holes in it - one control hole with a diameter of approximately 60 mm, and the other for the injector.
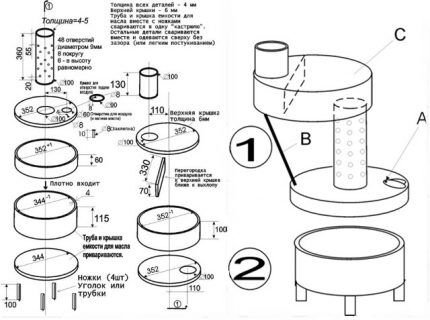
The height of the side of the 2nd part should be 1/3 of the height of the lower container. The total height of the tank, measured from its bottom to the central hole on the lid, is 10 - 15 cm.
Light the fuel in the tank using paper or cloth soaked in kerosene. They are set on fire and lowered into the container through the control hole. The waste will have to be constantly added to maintain the level of 2/3 of the tank height.
How to make an injector?
The optimal pipe diameter for making an injector is 10 cm, the minimum wall thickness is 0.8 cm. To calculate its height, take the length of the chimney pipe, divide it by 10. Subtract five percent from the result and get the required value. It should be between 36 and 38 cm. This is a condition for normal traction.
The holes made in the walls of the pipe in a checkerboard pattern or simply evenly distributed over the surface have a diameter of 0.9 - 0.95 cm. Indentations of 2 - 2.5 cm and 5.5 - 6 cm are made at the bottom and top of the pipe, respectively.
Basic heat exchanger option
The minimum thickness of the walls of the heat exchange tank is 0.3 cm. It is manufactured using the same technology as the fuel tank. It is better to make the top flat, and the hole for the chimney needs to be moved, then it will be possible, if necessary, to place a frying pan or kettle on the stove.
A partition is made inside the hollow vessel, creating a labyrinth for better heat transfer. Moreover, the thicker this part is, the hotter the surface of the potbelly stove will be. In order to clean the heat exchanger from carbon deposits, a special hatch is made on the side and closed with a lid.
A channel is welded onto the hole intended for the chimney - a pipe with a height of 5 to 10 cm and a diameter of 10 cm.
What is a chimney made of?
In order for the combustion products exiting through the pipe to have the lowest possible temperature, the part of the pipe that is located in the room must be made of steel. Due to this, the smoke transfers its temperature to the walls of the chimney and cools, increasing the residual heat transfer.
An ordinary tin pipe can serve as a continuation of the chimney from the outside, but it will have to be insulated to prevent the accumulation of soot during the cold period. Thermally insulated pipe is the best option, but more expensive. It is not necessary to seal the joints of pipe sections.
Photo instructions for do-it-yourselfers
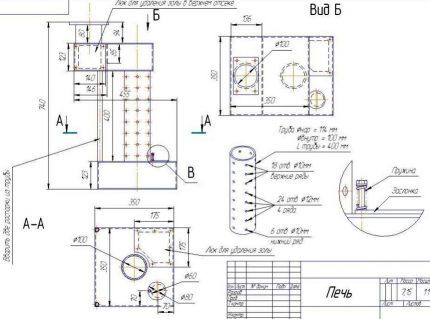
The production of the stove for mining, which we will consider in the example, was carried out in accordance with the drawing attached below. The cutting of sheet steel was carried out in advance on a machine with a guillotine. The turner drilled 54 holes in the pipe.
The stove manufacturing process itself consists of joining the blanks by welding and assembling the unit; it includes a number of standard steps:
All of the above actions were aimed at manufacturing the structural parts of the potbelly stove, which now just need to be assembled:
The pipes themselves can be of different diameters, but the one with the smaller diameter is connected directly to the furnace. Read about how to make a chimney for a potbelly stove yourself Further.
Making a potbelly stove from a gas cylinder
Another design option for a waste furnace is a self-made potbelly stove based on a 50-liter gas cylinder. In addition to this main element, you need to prepare 2 steel pipes with a wall of about 4 mm and a diameter of 10 cm. One of them will remove burning gases, and the second will act as a heat exchanger.
To this should be added a 4 mm steel sheet for the hood above the heat exchanger and the partition separating the evaporator and the combustion chamber. For the evaporation chamber itself, you will need a brake disc from a car with such a diameter that it fits into the cylinder without effort. A piece of 0.5-inch pipe is needed to transport oil to the combustion chamber.
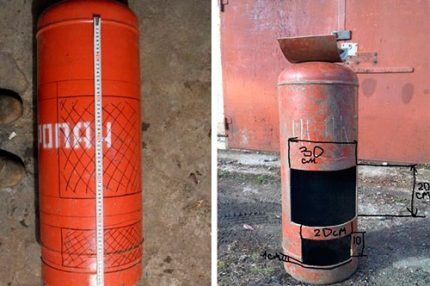
In addition, you should have in stock an equilateral steel angle with a shelf of 50 mm and a length of more than 1 m, a 0.5-inch valve, clamps for sealing - 2 pcs., a hose, any cylinder equipped with a needle valve.
The work of creating a potbelly stove is carried out in a certain order. First, the container is turned upside down and a small hole is drilled in it.A measure such as wetting the drill and the drilling site with oil will prevent sparking.
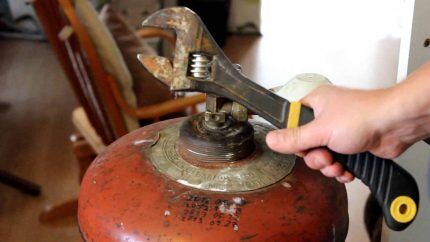
Empty the container from gas condensate. Drain it carefully away from your home, because... its unpleasant odor lingers for a long time. Then the workpiece is filled with water, after which it is drained again, thus removing any remaining gas. Since the mixture is explosive, there should be no open flame nearby.
Cut out 2 rectangles of the same width in the cylinder body, equal to 1/3 of the diameter of the workpiece. The height of the lower rectangle is 20 cm, the second, located 5 cm above the first, is 40 cm. To separate the chambers, a circle with a diameter equal to the internal diameter of the vessel is cut out of a sheet.
In its middle, a hole is made for a pipe with a diameter of 10 cm. This part will separate the combustion chamber from the heat exchanger.
A burner is made from a pipe 20 cm long and 10 cm in diameter. Its lower part is perforated by making holes with a diameter of about 2 cm. The inside is cleaned of burrs, otherwise they will collect soot on themselves, which will significantly narrow the hole later.
Place the previously cut circle on the burner, placing it exactly in the middle, and weld it. The structure is placed inside the stove and a weld is made around the circumference of the cylinder.
Weld the bottom and cover onto the brake disc. This will be the evaporator pan or bowl. To supply fuel, an opening is left in the lid through which air will flow into the stove. The opening is made quite wide, otherwise the draft will decrease and the oil will not get into the bowl.
Weld the pipe onto the top of the lid.A coupling is made from a pipe with a diameter of 10 cm that will connect the bowl to the burner.
Assemble the fuel supply system, for which:
- make a receiving hole in the pan;
- insert a 0.5-inch piece of water pipe into it at an angle of about 40⁰;
- weld the pipe to the furnace body;
- screw an emergency backup valve to the pipe, the role of which is played by an ordinary water tap.
A heat exchanger is made from a pipe with a cross-section of 10 cm. It is cut horizontally into the body of the potbelly stove, and a reflector is mounted at the end. Inflating is achieved by installing a duct fan at the end of the heat exchanger. The air driven through the heat exchanger with its help has a high speed.
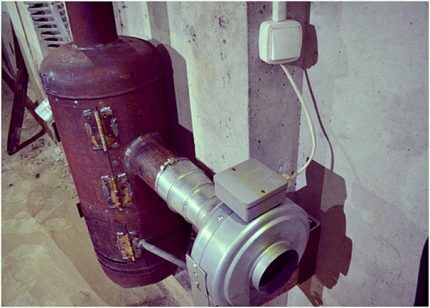
An air swirler consisting of triangular teeth connected by welding is placed inside the heat exchanger. A chimney is made from a pipe with a cross-section of 10 cm.
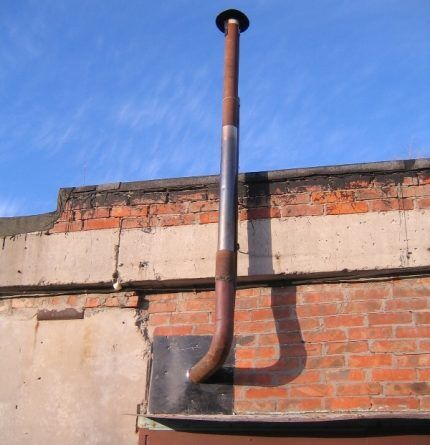
It is welded into a hole located in the upper part of the furnace body and brought out through the wall to the roof of the building.
Next they are making the oil tank. If you have a freon-free cylinder with a working needle valve, then it is quite suitable for this purpose. The vessel and the potbelly stove are connected with a hose connected to the valve. To fill the used oil, a hole is made in the tank body.
To ensure air access to the burner and the evaporator bowl, a groove is selected in the door of the lower compartment.Thrust plates are attached to the door opening of the upper chamber, which ensures reliable sealing of the combustion chamber. For the same purpose, the door is additionally equipped with a lock.
Now, even if the potbelly stove body is deformed as a result of strong heating, the tightness of the combustion chamber will not be compromised.
All that remains is to weld the legs from the angle pieces to the body and place the stove vertically. In addition to vertical potbelly stoves, they are also made from cylinders. horizontal stoves. Their structure is similar.
Potbelly stove plus water circuit
Any home could benefit from having an emergency heat source. Its role can be played by an ordinary, but slightly modernized, potbelly stove. There are two ways to improve the stove - put a water jacket on the burner pipe or wrap its body with a coil of copper tubes.
The coil turns are placed at a distance of about 5 cm from the perforated body of the potbelly stove and connected to the general heating system. A reflective screen is installed around the coil. For its manufacture, sheet aluminum, galvanized steel, and tin are used.
The water jacket is a tank on the upper chamber of the potbelly stove. There should be 2 fittings in its body - one for water supply and the other for drainage. In general, the design resembles a samovar. The volume of the water jacket depends on the length of the heating system and the method of circulation of the coolant.
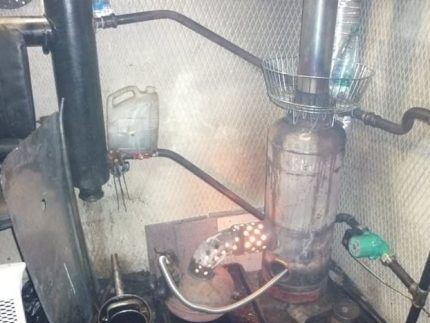
If a pump is built into the system, the volume of the tank is small, but with natural circulation it has impressive dimensions. To control water parameters, a pressure gauge and thermometer are installed on the tank.
Drip potbelly stove under development
You can also make an economical model of a drip stove yourself. For the body, a small metal barrel or another container available on the farm is suitable. A hole is made in the housing through which oil will flow.
Next, take a burner with a capacity of about 2 liters, connect a 1 m long copper tube to its hose, and then fold it in half.
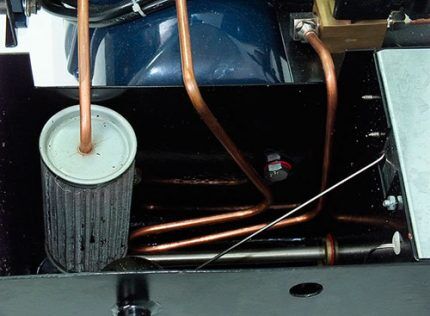
A hole is made in the container along the diameter of the tube. The tube itself is shaped like the letter “L”, and the burner is suspended.
Conversion of a solid fuel stove for testing
When the household already has a potbelly stove, but is not happy with the fact that it runs on solid fuel, you can modernize it and it will become universal. For this purpose, an attachment is made that resembles in its design a stove with processing in its lower part.
There is also a perforated pipe here, but not straight, but bent at a right angle. It is connected to the side wall of the furnace, which serves as the final combustion chamber. If you weld the potbelly stove door and make a hole in it for the pipe to enter, then the stove will only work during exhaust.
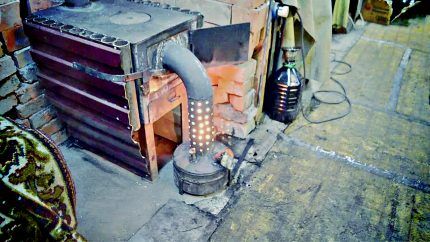
To make it possible to use not only industrial oil for heating, but also firewood, two replaceable doors are made. The standard one is hung when it is planned to lay firewood, and the modernized one with the appropriate hole - when the stove will operate on waste oil.
We also suggest reading an article on how to assemble a potbelly stove using waste oil from a pipe - to familiarize yourself with the material, go to link.
Secrets of successful operation of a potbelly stove
In order for a potbelly stove running on waste oil to be effective and safe, you need to follow a few tips. The oil must settle before use. You need to fill it into the oil tank to 2/3 of its volume.
For safety reasons, all elements of the stove should be cleaned regularly. To simplify this task, its top module should be removable. This will provide access to the chamber where the combustion of the mixture occurs. To remove soot from the walls of the chimney, it should be tapped.
To extend the service life of the combustion chamber and the furnace as a whole, it must be painted using paints that are resistant to high temperatures. The potbelly stove should be installed on a non-combustible base. Do not place it in a draft, under the influence of which a flame could escape.
Conclusions and useful video on the topic
The author of this material talks about his experience in making potbelly stoves that work in mining. Perhaps some of his statements are controversial, but in general there is a lot of useful information:
Improved design of the potbelly stove. The author of this video shares the details of its creation:
This video author shares his invention:
The potbelly stove has a simple design, but to make it yourself, you need drawings with exact dimensions. A design made by eye will not only not provide heat, but will also become a source of various troubles in the form of soot, splashed oil and numerous alterations.
It makes sense to start manufacturing such a unit only when it is possible to provide it with fuel. Otherwise, its operation will be economically unprofitable.
Perhaps you already have experience in making a potbelly stove yourself? Please share valuable tips with our readers. Leave comments in the block below. Here you can ask a question about the topic of the article, and we will try to answer it promptly.


I advise you to think twice before making a stove using waste oil. Saving such risks is not worth it. A very fire-hazardous stove. As soon as there is an admixture of water or antifreeze in the oil, it begins to boil and splash outside the stove in a burning state. If you really have the urge, then at least make it a closed type. Well, if you don’t pay attention to the danger and environmental friendliness, then it heats well, you can’t take that away from it.
Don't write nonsense. A potbelly stove using waste oil is not much more dangerous than a regular one. You just need to take basic precautions - do not fill more than 2/3 of the volume so that the oil does not splash out and clean it regularly.
In my opinion, the best option for making this type of stove is an empty gas cylinder. I have one like this in my dacha.The gas cylinder is ideally suited for these purposes with its shape, and its walls, which are capable of withstanding high gas pressure, will reliably serve as a heating element. They are not at all afraid, it seems to me, of high-temperature thermal effects. As for the fact that a potbelly stove using waste oil is a fire hazard, I completely disagree. Especially if you use oil from a certified manufacturer. Moreover, products from responsible companies are now inexpensive.