How to make water supply at your dacha from a well with your own hands: we bring water into the house
Is the source of water supply for your home a well located right on your garden plot? Agree, it would be great to have an autonomous water supply so you don’t have to carry a bucket several times a day. Or have you already thought about installing a water supply system in your dacha from a well on your own, but you don’t have the proper experience and don’t know where to start?
We will tell you how to bring water into the house and what you will need for this. Our article presents the basic schemes for organizing the automatic supply of water from a well, and describes the process of implementing such schemes step by step.
With the help of a pumping station and modern building materials, you can try to build a plumbing system yourself. To help with the description, we have provided step-by-step photos that describe in detail each of the stages, recommendations for maintaining the water supply system, and useful videos about the rules for doing the work yourself.
The content of the article:
Advantages of autonomous water supply
Residents of megacities who are not puzzled by the problem of private water supply may be surprised to learn that the well water supply system has many advantages.
The largest is contained as a liquid.It has almost spring purity - its composition is completely free of harmful impurities such as chlorine or rust.
The second advantage concerns saving the family budget - you freely use natural resources without paying monthly bills.
And another nice bonus is control over the operation of the system. For example, you can independently regulate the pressure or lay pipelines to a garden plot or flower bed.
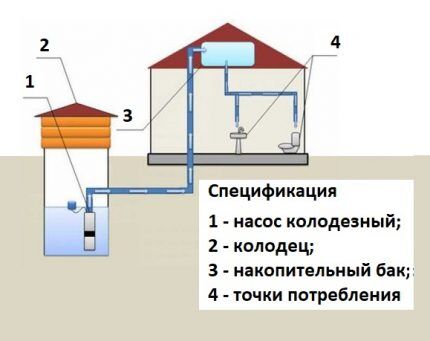
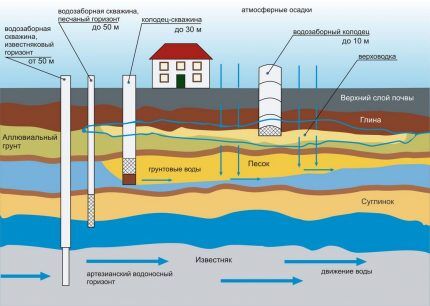
Many doubt the feasibility of installing a water supply system from a well to a house, citing the fact that water supply system with well would be much more effective.
Perhaps, but having a strong, deep well with sufficient water level, there is no need to drill a well for the following reasons:
- registration of permits for an artesian well, drawing up a project and drilling work take a lot of time;
- the cost is high and not everyone is happy with it (about 130 thousand rubles for a well up to 30 m);
- setting up a well system is a little easier (especially the summer version);
- the presence of a well does not require permission from government agencies.
If minor repairs or cleaning of silting are required, it will take much less effort and money than cleaning a well.
In case of temporary power outages, there is always a backup option - a bucket on a rope or a special lifting mechanism (the narrow borehole does not allow the use of improvised devices).
There are a number of difficulties, but they can be solved. For example, an old wooden structure becomes unusable over time - it is better to replace it with concrete rings.
If the structure has lost its tightness and allows water and domestic waste to pass inside, it is necessary to thoroughly seal the seams on both sides, internal and external.
Country well water supply diagram
To present the scope of work, we will analyze the scheme of autonomous water supply along the entire length - from the source to the points of water use.
The main mechanism for pumping out water is submersible or surface pump. The submersible option is located at a sufficient depth, but not at the very bottom (no closer than 50 cm).
It is suspended on a strong cable, to which an electrical cable is also attached. In addition to the electrical wire, a pipe is connected to the pump through which water enters the house.
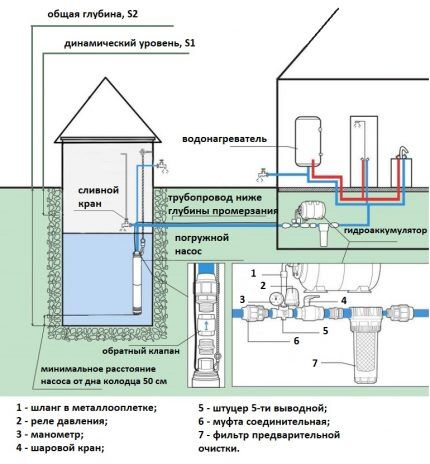
Wiring is installed inside a residential building so that water flows to various points. The “heart” of the system is the boiler room, where it is usually install a hydraulic accumulator and a heating boiler.
The hydraulic accumulator controls the water pressure, uses a relay to balance the pressure and protects the structure from water hammer. You can monitor the indicators using a pressure gauge. For preservation, a drain valve is provided, mounted at the lowest point.
Communications go from the broiler room to water intake points - to the kitchen, shower room, etc.In buildings with permanent residence, a heating boiler is installed that heats water for use and the heating system.
There are many options for constructing circuits, their assembly depends on the needs of homeowners. Having drawn up a diagram, it is easy to calculate the cost of technical equipment and building materials.
Choosing a method of supplying water to the house
The choice of equipment for delivering water from the source to the consumer depends on many factors, for example, the number of residents, water collection points or the needs of the owners.
Let's say a permanently living family with a small child uses much more water than a retired couple. After analyzing the situation, they choose either a conventional pump or a pumping station.
Which pump do you prefer?
There are two types of pumps: submersible And superficial. The factor that plays a major role in the choice is the depth of the water in the well. For a shallow reservoir, a surface mechanism is appropriate.
Its coverage area is up to 6-8 m (less often – up to 10 m). The equipment is placed on the surface. Sometimes, in order to increase the suction depth, they are equipped with an ejector.
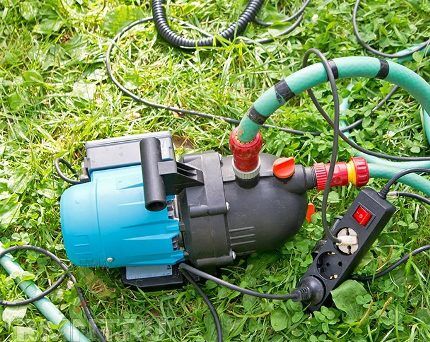
An example of a surface centrifugal pump is a budget domestic model of the brand "Vortex". It is not suitable for servicing a residential building, but it is quite suitable for supplying water to summer residents who come on weekends or on vacation.
Models of this type are most often used for watering a vegetable garden or garden. This pump is ideal for shallow wells with slow recovery. More powerful units are capable of delivering 3 thousand l/h.
If you are planning to equip a more serious system, pay attention to submersible pumps. They have high performance, produce less noise and save energy.
The power of a submersible device directly depends on the depth of immersion. Well models have a low cost, on average 2-3 thousand.rub., but you can find it even cheaper - for 1500 rubles, for example, Olsa Brook.
Affordable brands that are quite powerful and easy to repair and replace are popular, for example:
- Bison;
- QUATTRO ELEMENTI;
- Olsa Brook;
- Stavr.
Inexpensive submersible models have an average capacity of up to 1500 l/h. A pump is suitable for a small country house BISON NPV-240 or any analogue.
Maximum productivity is 24 l/min, which is enough to uninterruptedly provide several water points.
The maximum height is 60 m, that is, the pressure will be enough to deliver liquid from great depths to the second floor or attic. The BISON is equipped with an upper fitting, which means it is protected from accidental intake of bottom sediment.
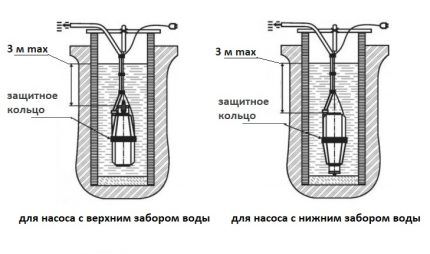
Submersible models easily “digest” mechanical particles up to 2 mm in diameter and, if necessary, can serve as drainage equipment.
To protect the water supply system, control devices - pressure gauges and pressure switches - are installed along with the pumps.
Another device - a dry running sensor - protects the mechanism by stopping its operation when the water level drops or the pipes are not sealed.
When choosing a pump, do not forget to read the characteristics and installation instructions - technical information will help you decide whether the model meets your requirements.
Advantages of pumping stations
If you do not want to constantly turn the equipment on and off and depend on power surges, instead of a pump, purchase pumping station – a unit for those who love comfort and stability.
Hydraulic accumulator (also a damper or water tank) ensures the constant availability of water in the network, and additional devices control the pressure and perform standby or emergency shutdown.
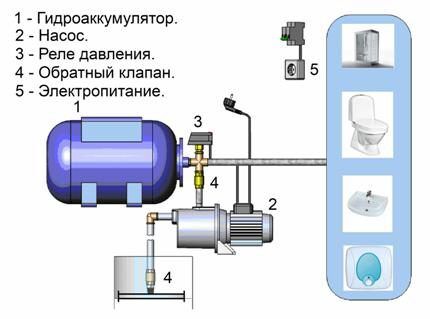
It is better to install the pumping station in the basement, basement, or utility room - this makes it easier to connect to a source of electricity and frees you from laying an electric main.
If it is necessary to stretch cables over a long distance, three-core copper wires with a cross-section of one and a half millimeters are used.
Cables enclosed in polymer corrugation are buried at a depth below the seasonal freezing level. To protect them from accidental damage, they are covered with sand and gravel.
If there are residential premises in the immediate vicinity, when purchasing, choose a model with minimal noise levels. The supply of water through the pipes to the tank is controlled by a pressure switch.
The device works in such a way that even in the event of an unexpected power outage, a reserve of about 1/3 of the tank is created.
When choosing a particular brand, pay attention to the following characteristics:
- power – 250-1400 W;
- performance – 1500-4000 l/h;
- depth – from 8 m to 50 m;
- volume damper tank (60-80 l).
Economical options include the brands Whirlwind, Belamos, Aquarobot, mid-level household stations - Gardena, Jumbo, the most expensive and high-quality are Wilo, Karcher, Grundfos.
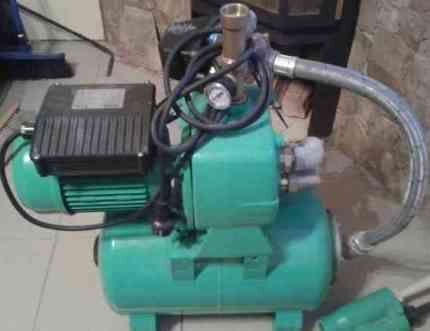
Before installing a water supply from a well, try to purchase as many protective mechanisms and devices as possible.
For example, filters protect against clogging, and protection relays protect against overload. The automation unit regulates the operation of the station as a whole, and check valve allows water to move in only one direction,
To prevent the unit from being disconnected from the power supply intermittently, do not forget about the voltage stabilizer.
Water supply for seasonal use
In a house for permanent residence, installing a water supply system from a well to a house with your own hands must be done taking into account many technical requirements. For example, pipes must be buried in the ground to a depth exceeding the freezing depth.
If this requirement is not met, the water supply system to the house will fail with the first frost. For thermal insulation, multilayer pipes and traditional insulation materials are used, for example, mineral wool + geotextile set.
Everything changes dramatically if the system is mothballed for most of the year. When you come for a few weeks, you install a pump with a flexible hose and connect it to the internal wiring.
Thermal insulation is not needed, since even in the northern regions the summer temperature does not fall below 0 °C.
It is important to provide a device responsible for draining water during departure. Most often, this is a simple drain valve, which is mounted near the check valve, at the bottom of the horizontal pipe. If the water is not drained, it will freeze and destroy communications.
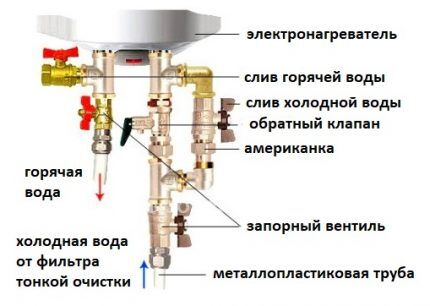
For those who need water for watering the garden and summer shower, it’s even easier: just connect a prefabricated structure made of pipes and a hose to the pump. Disassembly points can be installed in any place convenient for use: in the garden, vegetable garden, on the lawn near the house.
Before leaving, the structure is disassembled, dried and, together with the pump, put away in the utility room - until the onset of the next warm season.
Instructions for water supply installation
In order for the system to work productively, uninterruptedly and not require frequent replacement of elements, during installation it is necessary to think through each stage. Let's try to figure out what needs to be given special attention.
Stage #1 - determine the requirements for the condition of the well
Water supply in its simplest form, using a pump and a hose, can be organized from any well - concrete, wooden, assembled from rubber tires. To set up a stable system that will work for years, serious preparation will be required.
Let's assume that at the dacha concrete ring well - the most popular option, which many choose due to its affordable cost and convenient installation method.
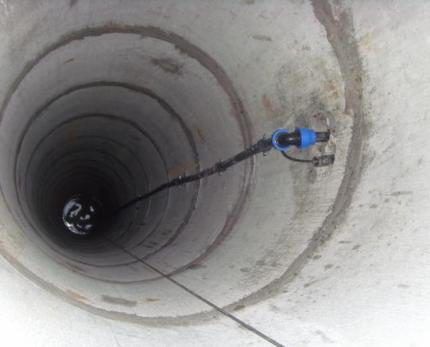
To begin, you need to carry out the following activities:
- seal seams;
- provide external protection - drainage and thermal insulation;
- install a bottom filter.
For external sealing, roll materials, deep impregnations and concrete mixture are used, for internal sealing - liquid glass. To seal the connecting part of the rings, ropes made of natural materials or self-adhesive tape are used Rubber Elast.
To prevent the rings from moving under the influence of frozen soil, which increases in volume in winter, the upper part (at least 2 m) is dug in and wrapped in a thick waterproof film or geotextile.
Then the outside of the shaft is lined thermal insulation material, after which the trench around the well is covered with a thick layer of sand (40-50 cm) and a clay castle is built.
To protect against silting, install a bottom filter, which should stabilize the base but allow water to pass through.
We recommend using Dornit - durable geosynthetic material, which for reliability is covered with a layer of crushed stone (10-15 cm). The edges of the material are fixed around the circumference with galvanized steel tape on dowels.
Stage #2 - finding out the nuances of pipe laying
Cast iron and ceramic products are a thing of the past; plumbing is easiest to build from lightweight and wear-resistant polypropylene (PP) And polyethylene (HDPE) pipes for outdoor use.
Both varieties tolerate temperature changes well and are elastic enough to withstand mechanical loads. They can be connected to each other using a welding machine or fittings.
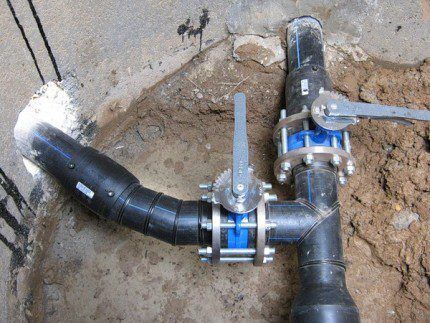
Recommendations for choosing diameter:
- a cross section of 25 mm is used exclusively on short pipeline branches, maximum 10 m;
- for 30-meter communications, products with a diameter of 32 mm are suitable;
- if the line exceeds 30 m in length, a 38 mm section must be used.
Given the additional pressure produced by the pump, pipes with a diameter of less than 32 mm are not used at all.
The order of pipe laying is as follows:
- we dig trenches (the depth depends on the level of seasonal soil freezing characteristic of the region plus 30 cm);
- at the bottom we arrange a dense sand cushion thickness of at least 20-30 cm;
- laying pipes, connect to the source and pump;
- carry out testing – supply for 1-2 hours under pressure and without it;
- we produce sand backfill – 15-20 cm;
- filling the trenches with soil, leveling.
When laying a pipeline above the seasonal freezing level, a heating cable is used. Automation for adjusting and turning off the power supply must be separate (4-5 A).
At the same time, we monitor the slope of the main line - it should be the opposite, that is, directed towards the well. Thanks to it, in case of conservation, the water is drained.
Stage #3 - carry out internal wiring
Installation of internal pipes can be done in two ways: sequential and manifold. The first is suitable for houses with insignificant simultaneous use of disassembly points.
Branches go from the main pipe to the taps, and if you use 2-3 points at once, the pressure will weaken. With the collector method, each point of use is equipped with a separate supply line, so the pressure level remains the same.
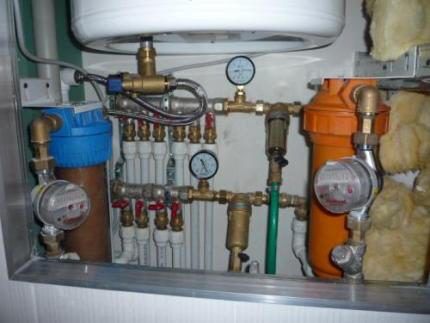
The beginning of the wiring is in the sleeve laid in the foundation of the house, where the external main is introduced, and a shut-off valve is installed here. Next, the pipe leads to the hydraulic accumulator.
The pressure gauge is connected with a brass fitting, which is also used to install the pressure switch. The filters must be secured together with the fitting. If a pump supplies water instead of a pumping station, you need to install a storage tank.
Water supply maintenance rules
A correctly installed system rarely fails, but preventive maintenance and inspections can prevent some breakdowns.
To do this, we recommend paying attention to the following system elements:
- pump — monitor the operation of the pump, clean it on time and replace consumables, for example, rubber gaskets;
- sealing — if the composition of the water changes, check the sealing of the well (surface water may enter);
- pressure — monitor the pressure in the system (the norm is from 2.5 to 4 atmospheres);
- filters — use filters that purify water from large particles and impurities, thereby preventing mechanical breakdowns of equipment.
Automating the process will allow you to control the system even in your absence. In the event of a sudden change in pressure or emergency drying out of the source, the triggered relay will stop the operation of the station.
Conclusions and useful video on the topic
The videos will help you decide on the choice of technical equipment and the method of installing the water supply system.
Water supply systems from a well and heating based on a condensing boiler:
How to select and assemble a pumping station with your own hands:
How to make water supply in a country house with your own hands (equipment inside the house):
Recommendations are provided for information purposes; the process of installing a water supply system is described in general terms. To draw up an individual project, it is necessary to rely on specific data, and the choice of equipment should be made only after studying the instructions.
After reading the material, questions arose about how to install water supply from a well? Please ask them in the comments to this article. You can also share with our readers your own experience of arranging a water supply system in your country house or using it.


Not long ago I set up such a system with my own hands.A very interesting solution that is not so difficult to implement. But there are still some nuances associated with the pump and some types of pipes. I had to replace two pumps before the system worked. I don’t know what this is connected with, but they couldn’t stand it and broke. So be very careful when choosing a pump.
I agree, an interesting solution that allows you to lay a water supply from the well. I have not yet installed such a system in my house. But I'm going to do it soon. Some stages of system installation were not clear. Now I understand everything. I consider the recommendations useful regarding the fact that you need to carefully approach the choice of pump. Now I will take into account the different characteristics of the pumps and compare them with each other, and then I will purchase the most suitable one.
Tell me what to do if the soil is floating. Freezing depth (1.8) below groundwater (1-1.3). What is the best way to lay a water pipe from a well then?