Roof ridge ventilation: types + installation instructions for ridge strips and aerators
When planning the installation of a pitched roof, you most likely wondered why roof ridge ventilation is needed. They were probably deciding how best to make it.We found out whether the arrangement technology depends on the type of roofing.
Only properly arranged ventilation in the ridge ridge area will ensure complete drying of the roofing pie. The air flows formed by it will remove vapors from the insulation, maintaining the height of its insulating qualities. Airflow will prevent condensation on wooden elements and their destruction.
In this article we will talk about what options for ridge ventilation exist. We will introduce you to the solutions offered by manufacturers and give examples of self-manufactured structures.
The content of the article:
What functions does ridge ventilation perform?
A ridge is a horizontal element that connects two roof slopes at their top. Despite its apparent simplicity, in order to ensure a long service life of the roof, this element must perform two functions at once:
- Prevent precipitation, insects and birds from entering the roof structure;
- Allow steam and moist air to freely escape from under the roof to the street.
While the task of protecting the roof from precipitation and foreign objects is obvious, and most developers do it, many manage to forget about ridge ventilation.
Ignoring the requirement to provide ridge ventilation can lead to the most severe consequences, including the need for a complete reconstruction of the roof.
The fact is that even with a well-performed vapor barrier of insulated slopes or attic floors, warm air and steam gradually but continuously enter from the house into the under-roof space. Next, warm air and steam rise upward to the roof arch, which is covered by the ridge.
If, having reached the ridge, this air encounters an obstacle and cannot escape into the street, then it will cool down and begin to collect into large drops. Water in thermal insulation halves its ability to block heat waves. Puddles on the ceiling will at least turn into a favorable environment for mold and other putrefactive microorganisms.

This process will be repeated endlessly, and will lead to excessive moisture in the roofing system and, in the space limited by the roof, wetness of its wooden structures and insulation.
The inevitable consequences of working in this mode are damage to wooden structures by blue rot and black mold, and metal fasteners by rust. The result will be loss of bearing capacity and subsequent destruction.

To prevent such a scenario, the ridge must provide free ventilation. To do this, it must have holes through which air from the under-roof space will be removed to the street.
If the roof has good ridge ventilation, then the situation is completely different.
Streams of warm air, which have entered the under-roof space in various ways, rise to the very top to the ridge and, without encountering resistance along the way, freely go outside, taking with them excess moisture. This ensures a comfortable environment for the roof, and the risk of the insulation getting wet and the wood becoming infected with fungus is minimized.
Preparing to install a ventilated ridge
There are several options for constructing a ventilated ridge, which will be discussed below. But in order for any of these methods to work, two important conditions must be met even at the stage of installation of roof slopes.
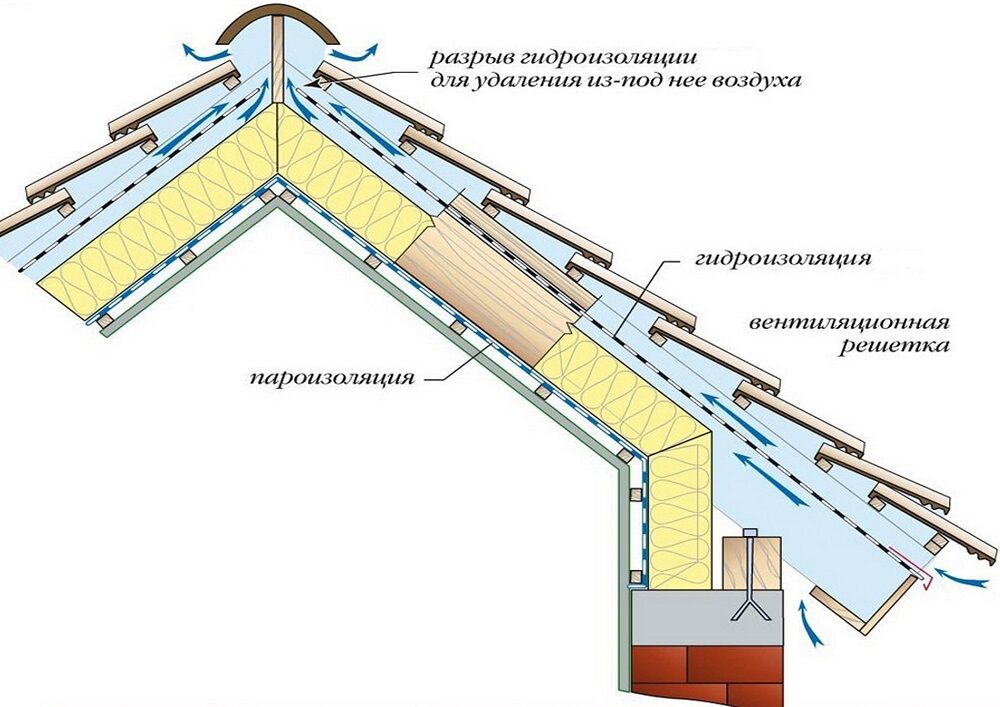
Firstly, regardless of what material the roof is made of, to ensure ridge ventilation it is necessary to leave a gap between the slopes 5-10 cm wide. This space is necessary for free flow of air from the under-roof space to the ridge and ventilation holes.

Secondly, if you used a waterproofing film when installing the roof, then in the area of the ridge this membrane should also have a longitudinal gap 5-10 cm wide.When using a waterproofing membrane, it is not necessary to leave this gap, because This material is capable of allowing moisture to pass out through the pores.

Compliance with these two rules is a prerequisite for the operation of ridge ventilation.
Options for making ridge ventilation
Roofing materials are abundant in variety. Each of them, be it metal, ceramic or soft tiles, corrugated sheets, slate or ondulin, has its own characteristics. Roof structures assembled for different materials differ from each other. Therefore, the designs of skates and methods of organizing their ventilation also vary.
Depending on the roofing material and the personal preferences of the developer, three types of ridge ventilation are usually used:
- Ventilated ridge on roofs made of corrugated materials;
- Ventilated ridge on a roof made of soft tiles;
- Ridge ventilation with universal aerators with conventional or pipe deflectors.
All of these ventilation methods work effectively. And even amateurs can perform any type of ridge ventilation.
Installing a ridge on wavy roofs
This method of ridge ventilation is the simplest and cheapest.
The fact is that roofs made of metal profiles, metal and ceramic tiles, slate and ondulin have a wave-like shape. Due to this, gaps are formed between the roofing material and the ridge strip, through which air can freely escape from under the roof.

Therefore, for a roof made of such materials, installation of a ventilation ridge can be performed in just two stages:
- install a seal or a special ridge tape;
- Secure the ridge strip over the seal.
The seal and tape prevent snow, dry leaves, insects or birds from getting under the roof. This is especially true if the roof is flat, that is, it has a small angle of inclination or is located in an area with frequent winds.

Structurally, the tape and seal are strips of porous materials that allow air to pass through well, but trap small objects. For strong fastening and elimination of cracks, the seal and tape have an adhesive layer.

It should be noted that sealing roofing tapes began to be used in domestic individual construction relatively recently. However, their installation is not a prerequisite. However, they perfectly protect the under-roof space from dust, and do not in any way affect the speed and volume of flows exiting through them.
In the case where a wide ridge strip covers the gap between the slopes with a large margin, there is practically no chance of rain or snow getting under the ridge without seals.
He will familiarize you with all the intricacies of the roof ventilation system with a metal-tiled roof. next article, which we recommend reading to owners of dachas and country estates.
Installation of a ridge on flexible tiles
A roof made of flexible tiles is absolutely flat, therefore, if you simply attach ridge elements to it, there will be no ventilation gaps, as on wavy roofs.

If the ridge tiles of flexible tiles hermetically close the gap that is left between the slopes for ventilation, ventilation outlets are selected at the top of the gable. Most often these are small openings above the purlins of a pitched roof or gable windows located below.
To make a ventilated ridge on a roof made of flexible tiles, it is necessary to install an aeration structure that forms a longitudinal gap between the plane of the slope and the ridge.

There are two options for constructing a ventilated ridge structure:
- Installation of a factory aerator on the ridge;
- Making a ventilated ridge with your own hands.
Both methods are simple and guarantee an excellent appearance of the roof with a well-equipped and beautifully designed roof.Installing a ridge aerator is an excellent way to save time on installation work and, by default, provide protection against foreign objects getting under the roof.
The construction market offers many options for ridge aerators from various manufacturers. However, the principle of their design is similar: the aerator is a plastic structure that creates a gap for air to escape. On the street side, the aerator is equipped with a mesh that prevents insects and birds from entering.

Depending on the needs of the developer, ridge aerators provide varying levels of protection against the penetration of foreign objects and precipitation under the roof. The smaller the cells in the mesh or grate of the aerator, the smaller the particles they allow through.
In addition to large-mesh mesh, some aerators are also equipped with sealing tapes, which completely eliminate the possibility of anything getting under the roof.

Installing such a ridge aerator is not difficult and occurs in three stages:
- Before laying flexible tiles along the ridge line, the sheathing is reinforced. Usually a board is used here if all the slopes are equipped with OSB boards. If the sheathing was made with a board, then it is placed along the ridge ridge without gaps. A waterproofing carpet is laid on top.
- The ridge is secured with nails or screws to a board laid along the slopes;
- The tiles are attached to the top of the ridge in the usual way.
The factory-made ridge has a long service life and guarantees good ventilation.
You can make a ventilated ridge with your own hands if for some reason you do not want to use a factory-made ridge aerator.

To independently manufacture a ventilated ridge, you will need the same materials that were used in the construction of the roof itself:
- Lattices made of bars 50×50 mm;
- OSB or plywood;
- Flexible tiles designed for ridge installation. You can buy it ready for installation or cut it yourself from ordinary shingles;
- Galvanized roofing nails.
If desired, to protect against snow, insects and birds, you need to purchase a cornice or some other mesh.

First of all, we fix the laths in the upper part of the slopes above the rafters. The length of the beam depends on the angle of the roof: the smaller the angle, the longer the sheathing elements should be made to prevent rain from getting in during bad weather. In normal cases, a length of 50 cm will be sufficient. Excessively increasing the length of the sheathing and ridge elements will impede air circulation.
We attach a cornice mesh of appropriate height to the ends of the block.
Next, we install a base on the block for flexible tiles made of OSB or plywood, on top of which we fasten the flexible tiles in the usual way.

Ridge ventilation made in this way will harmoniously match the appearance of the roof and will not require serious skills or financial costs.
Installation of ridge aerators
There are situations when a ventilated ridge cannot be installed. For example, on roofs with a small angle of inclination, the snow cap does not go away and can block the ridge, completely stopping ventilation. In areas with snow and strong winds, snow may blow under the ventilated ridge.
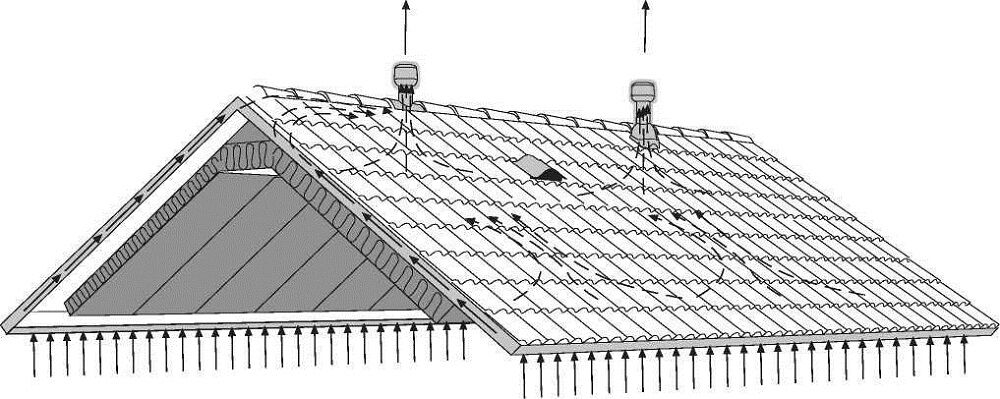
Also, during operation, it may become clear that the ventilated ridge is not effective enough. In these cases, the best option is to install universal deflector aerators on the ridge.
The roof aerator can be installed in any type of ridge element. It can be used as the main element of ridge ventilation (with a blind ridge), or in addition to the existing ridge ventilation.
The advantages of this solution are:
- Prevents precipitation and other foreign objects from getting under the roof;
- Can be used on roofs with a slight slope on which snow accumulates;
- Providing additional traction.
Unlike a ridge aerator, which releases air evenly along the entire length of the ridge, a slope aerator provides targeted ventilation. Therefore, when using it, it is necessary to ensure that there are no obstacles to the movement of air towards it along the ridge. This can be done by cutting off the upper parts of the rafters 5-7 cm parallel to the ground.
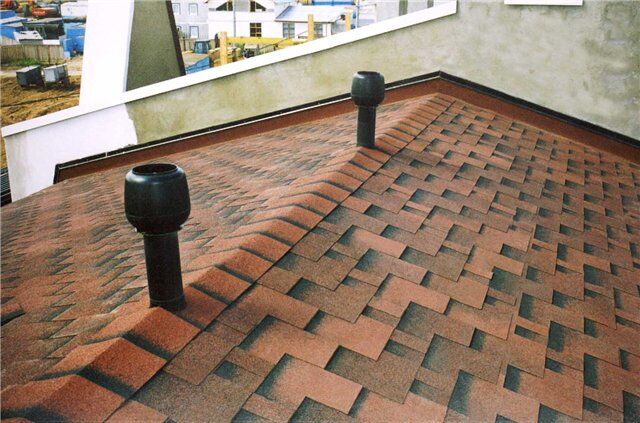
Manufacturers offer an excellent selection of ridge aerators, as well as ventilation pipes with turbine or conventional ventilation deflectors. They are suitable for all types of roofing, so choosing the right device for you will not be difficult.
Consequences of poor or no ventilation
Concluding the topic, we cannot help but touch on the troubles that can result from the absence or ineffective operation of ridge ventilation. At the beginning of this article it was already mentioned that the consequences of improperly organized ventilation can be quite serious, up to a complete replacement of the roof.
Of course, in order to bring the situation to such a state, it is necessary to seriously violate the rules for constructing floors and roofs or to ignore ventilation problems for a long time. However, the likelihood of encountering trouble is still high.
First of all, problems with roof ventilation lead to increased humidity and moisture condensation on roof elements. In winter, moisture condenses on roof structures and turns into frost, which melts during the thaw and turns into water.

The consequences of this phenomenon are the most unpleasant and destructive:
- Wet wooden structures are affected by fungus and gradually collapse;
- Metal fasteners begin to rust and lose strength;
- Condensation dripping from roof structures onto the insulation of the floor or attic penetrates it, negating the thermal insulation properties.
The second common type of negative consequences from improper installation of a ridge strip or ridge aerator, or the lack of a seal in them, is the entry of foreign objects into the roof structure.
In windy weather, rain or snow can penetrate into the under-roof space, leading to wet roofing elements or insulation.

Without ridge seal or tape, birds can enter the attic. They can build nests there and annoy you with constant noise, or they can pick and pull out insulation to build their nests.

Another dangerous consequence of the lack of ridge ventilation can be the formation of an ice dam (jam) on the roof. This phenomenon is inherent in poorly insulated roofs with a slight slope that retains snow, or in the presence of snow retainers installed on the eaves.

This phenomenon is especially dangerous if people are walking under the eaves, because falling icicles and ice can cause irreparable harm.
It should also be noted that ridge ventilation is only a component element in roof and attic ventilation and is essentially an exhaust hood. Based on this, for its normal operation it is necessary to ensure air flow under the roof, for example, through eaves vents.
If this is neglected, then in the absence of the necessary air flow, even ideally designed ridge ventilation will simply have nothing to draw outside, and water vapor will continue to accumulate in the roof structure and destroy it.
In addition, when arranging ridge ventilation, we must not forget about installing a vapor barrier for the ceiling and insulated attic slopes, they will protect insulated structures from household fumes. Vapor barriers are not used on cold roofs. To protect both insulated and cold roofs from atmospheric water, waterproofing is necessary.
Also an obligatory component of roof ventilation are dormer and gable windows. The first ones are built on hip and hip roof types, the second ones - on single-pitch, gable and broken roofs. In addition to them, as an addition they mount ventilation valves with and without fans, vents and other devices.
Conclusions and useful video on the topic
The video shows how to independently make a ventilated ridge on a roof made of flexible tiles:
Video of installing a ridge with a seal on a metal tile:
Installation of a ridge aerator with a deflector:
Installation of a blind ridge and a ridge aerator on a roof made of flexible tiles:
Video about the causes of condensation in the attic and the need for ventilation:
Ridge ventilation is an important element that allows you to extend the life of roof structures.At the same time, thanks to various design options and a wide selection of finished products, you can make or install ventilation yourself.
The main thing is to choose the appropriate type of ridge ventilation specifically for your roof.
Please write comments in the form below. Tell us about how your roof is ventilated through the ridge. It is possible that your recommendations and the information you provide will be very useful to site visitors.


But what about the corrugated sheet roof??? They talked about everything and forgot about this one