How to make ventilation in a country house: subtleties and rules for installing ventilation for a country house
One of the main conditions for a comfortable stay indoors is the quality of the air we breathe.Therefore, it is very important to take care of how to make ventilation in the country house so that the air circulation meets generally accepted requirements. It is obvious that a microclimate that is too wet or dry can cause illness and cause exacerbation of chronic diseases.
We are not at the dacha all the time, but seasonally: pensioners can spend six months there, and working dacha residents visit the country house only on weekends, and sometimes during vacation. But this does not mean that living conditions should be worse than in a city apartment or cottage.
In the article, we talked about the rules for arranging ventilation in a country house and provided brief installation instructions that will be useful to those who want to improve the microclimate of a country house with their own hands.
The content of the article:
Is ventilation needed at the dacha?
Skeptics will say: why waste time installing additional devices if the dacha is a house for temporary, short-term residence.
You can spend several nights, especially in summer, with the window open, and that’s ventilation.

In fact, comfort is not only about fresh air.This includes normal humidity, favorable conditions for storing fresh vegetables and preparations, quick drying of wet clothes, and the absence of mold, along with which a musty smell settles in the house.

How can you tell if the air is stagnant and not circulating? Here are some obvious signs:
- condensation on the window glass, flowing in streams onto the windowsill;
- spots of mold on the walls, in corners or on the ceiling;
- wallpaper coming off the walls, dry furniture;
- persistent “aroma” of mold and mustiness;
- a cool, unpleasant atmosphere caused by high humidity even in a warm room.
Things in such a house practically never dry out; bugs and wood lice are constantly crawling along the walls.
There are many ways to quickly correct the current unsightly situation. Often you just need to install a device or device that helps air enter/exit the room.
Here are some of these devices:
Even after installing one of the listed devices, you will immediately notice the difference: dampness will disappear from the house, and you will not have to create drafts for ventilation.
Natural or forced – which is better?
According to the method of stimulating air, ventilation is divided into natural, occurring without the intervention of the owners of the house, and artificial or forced, organized with the help of fans and air ducts.
The simplest example of natural ventilation is an apartment in a house with wooden windows. Although the hood is organized during construction, it obeys the laws of physics, and air enters through cracks in window and door openings, open windows and vents.

But sometimes natural air exchange is not enough to create a healthy, comfortable living environment. And then you have to use the devices listed above and install new ones ventilation ducts.
Used as air ducts or plastic pipes or galvanized elements. They are located above suspended structures and in walls with access to the outside above the roof or in the wall.

The best way to establish proper ventilation is a combination of natural and mechanical methods to improve air circulation. From this side, a country house is no different from an ordinary city apartment: in addition to the half-open window, you can add the installation of a fan in the toilet and the installation of an inexpensive hoods in the kitchen.
Simple DIY solutions
Of course, to improve the microclimate in a country house, it is unlikely that anyone will demolish walls in order to equip full-fledged ventilation shafts. However, some useful changes can be made, and all the work can be easily done on your own, and instruments and devices can be purchased at a reasonable price.
We offer several popular options that, having tried to arrange at the dacha, you can implement in a more serious home. Let's look at how to make supply and exhaust ventilation in a country house without radically altering the layout.
Option #1 - improve natural circulation
Knowing that for a healthy microclimate a certain volume must enter the room and the same volume must leave it, you can simply create more favorable conditions for natural circulation.
As an example, let's take a small wooden country house of traditional construction, with a gable roof, a stove and wooden windows.

What can be done to activate the flow of air in/out or at least not impede it? It is necessary to ensure that the stove dampers open in time and that the pipe is protected by a cap. It is also recommended to keep the chimney clean.
If you plan to install plastic windows instead of wooden ones, keep in mind that you will have to organize supply ventilation in some other way. Perhaps the old sashes just need to be sanded and painted, and then replacement will not be required.
If there are interior doors, air moves freely under them. Do not rush to install thresholds - they interfere not only with the movement of residents, but also with air circulation.

Do not think that good ventilation conflicts with the thermal insulation of the house: properly adjusted air circulation does not disturb the thermal regime.
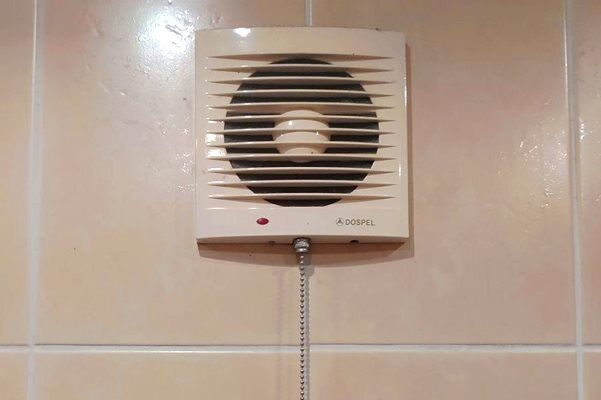
Option #2 - installation of an axial fan
One of the best ways to reduce indoor humidity and remove unpleasant odors is to install a fan. If the house has a ventilation shaft or at least a pipe walled into the wall, the fan is mounted in the finished hole. If not, purchase a special window model and insert it into the window.

It should be remembered that fans are connected to the electrical network, so its presence at the dacha is mandatory.
To connect you will need the fan itself, VVG 3*1.5 wires, and a switch.
Let's consider how and in what sequence to make a hood in the country:
- Preparing the seat. The minimum hole diameter is 10 cm.
- Choice of connection diagram - for a 1- and 2-key switch, as well as for a device with a timer, they will be different.
- Checking the draft in the channel - if there is none, you need to clean it.
Next, you need to remove the cover from the device, and secure the remaining “working” part to the wall using self-tapping screws or sealant.

Let's proceed further:
- we bring the wires from the switch and the junction box, expose the ends, insert them into the appropriate terminals and tighten them;
- we install the switch in a previously prepared socket box, having previously connected the wires to it;
- testing the fan operation;
- We put on and fasten the decorative panel.
We select the scheme depending on the conditions of use.

The fan can be installed in the kitchen, in the toilet, and in any room of the dacha where conditions permit and there is a ventilation duct or hole leading to the street.
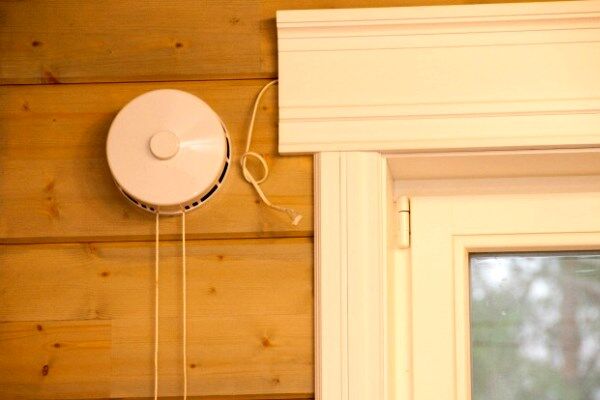
Option #3 - installing a supply valve
If you don’t want to spoil the structure of the window, but there is no special ventilation shaft in the house, then instead of a fan you can install wall inlet valve.
Installation location: to the right/left of the window, at a height of 2-2.2 m.There is another option - under the window, but this requires a heating radiator.

The valve does not take up much space; inside the room it can be covered with a curtain. The outer grille protects the unit from debris and dust and reduces noise caused by rain, strong winds or passing traffic.
Installation instructions:
- Check the functionality of the exhaust ducts that provide the functionality of the supply ventilation.
- Determine a place near the window to make a hole, make sure that there is no fittings or electrical wiring in the wall.
- Install a bit of the required diameter on the drill - slightly larger than the diameter of the valve.
- Drill a hole. Use a construction vacuum cleaner to collect dust.
- Wet the hole in the wall with cold water to cool the crown.
- Clean the hole, insert the insulating tube.
- Insert the air duct inside the tube.
- Outside, at the outlet of the air duct, attach a decorative grille with an acoustic canopy.
- Install the valve on the mountings from the inside.
- Check the operation of the damper and the presence of traction.
The simplest device for supply ventilation only works in conjunction with a well-established exhaust hood.
Option #4 - arranging ventilation in the basement
Country cellars are often used for their intended purpose - for storing fresh and canned crops. Vegetables and fruits require a cool but dry microclimate, and excess moisture is destructive, so ventilation is essential.

If the air ducts are not installed during the construction of the house, they can be installed later, but you will have to work hard to make holes in the ceilings.
Device Features:
- pipes must have the same diameter;
- the channels need to be located in opposite corners;
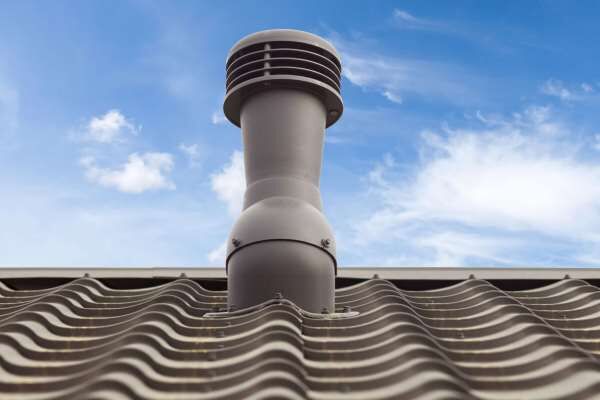
- the exhaust vent of the air duct should be placed close to the ceiling to eliminate stagnant air;
- the height of the pipe above the roof ridge is at least 1.5 m;
- plastic sewer pipes are suitable for a small basement;
- you need to try to ensure that the pipes are positioned strictly vertically, without turning.
The upper part of the pipe must be protected from precipitation and debris.

If natural ventilation cannot cope, a fan is installed in the basement, as in the kitchen or bathroom. To thoroughly dry the room, use an electric radiator or other heating device.
In the summer, in dry weather, you can create a draft, and in the winter, install a box with sea salt, which absorbs excess moisture.
You can read more about organizing cellar ventilation in this material.
Conclusions and useful video on the topic
Installing a fan in the wall of a frame house:
Ventilation elements in a house under construction - personal experience:
Video instructions for installing the supply valve:
Insufficient air circulation causes many problems: colds, rapid spoilage of food, unpleasant stagnant odors. You can improve air exchange using the simple solutions presented above. A few hours of work, and the atmosphere in the house will become much warmer and more comfortable!
If you are interested in construction requirements, take a look at SNiP 41-01-2003, and more information about fans can be found in GOST 11442-90.
Do you have any questions, have you found any shortcomings, or can you supplement our material with valuable information on arranging ventilation in a country house? Write your comments - the contact form is located under the article.


