How to install a faucet on the side of a bathtub: step-by-step installation instructions
Despite the successes of modern housing construction, a small bathroom and a combined toilet remain a sad reality for many apartment owners. Where almost every square centimeter counts, some problems can be solved by installing a faucet on the side of the bathtub.
This fashionable novelty has many advantages. However, it also has a number of disadvantages. Let's try to understand them and the intricacies of installing faucets on the side of the bathroom.
The content of the article:
What's good about this mixer?
The ability to save space is not the only advantage of devices of this type. The mixer, installed directly above the bathtub bowl, fills it with virtually no splashes, which can stain walls and other interior elements. As a result, cleaning will require less effort.
Faucet models that are mounted directly on the side usually have increased performance. Therefore, the bathtub fills faster and the level of comfort is noticeably increased. Indirectly, this solution allows you to save a little: if the bathtub fills quickly, the water in it does not have time to cool down, i.e. the cost of heating hot water will be slightly reduced.
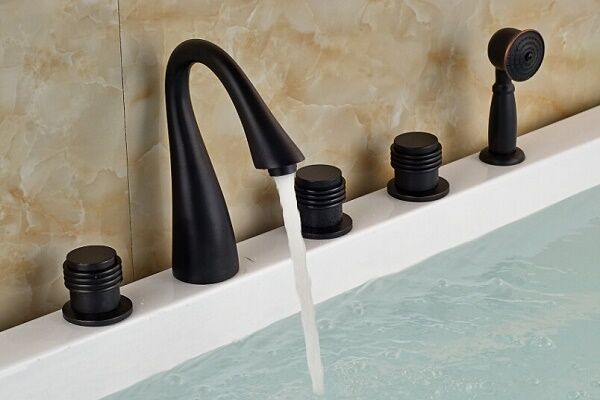
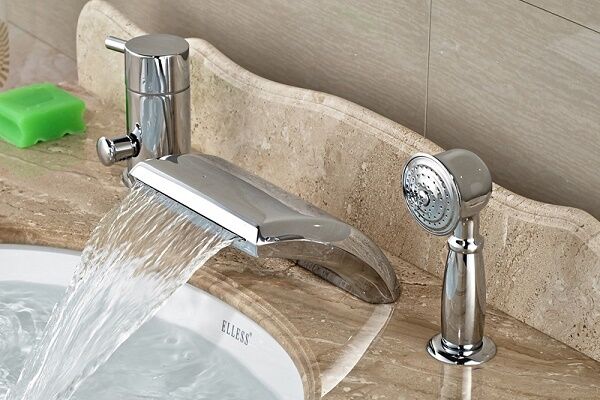
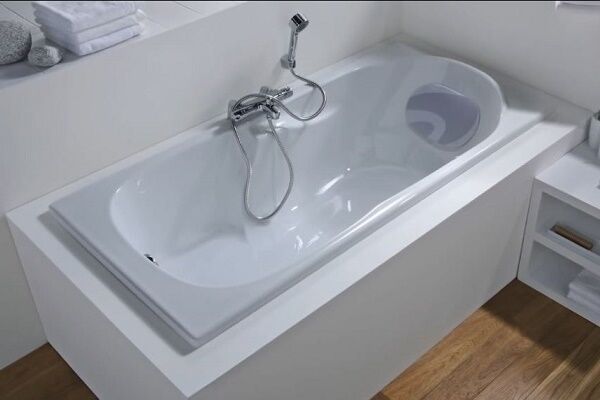
These faucets are distinguished by their stylish design and a wide variety of designs. For example, you can choose cascade model, the elements of which are mounted separately. The control panel is placed at the head so that it is at hand, the spout is in the center of the long side, the shower head is in the corner, etc.

Finally, faucets of this type usually look very stylish, they leave many possibilities for decorating the interior. The shower head stands directly on the side, and its hose is usually hidden between the wall and the side of the bath or behind the false panel.
Bathroom interior design only benefits from such a solution. Another advantage is the low noise level when the mixer operates.

Disadvantages to be aware of
Despite all the advantages that are described in detail in advertising brochures, before purchasing a faucet for a rim, you should think about a number of problems, especially if the owner of the house plans to install it himself.
First of all, you should not buy an inexpensive model, since due to the nature of their operation, these plumbing products are subject to high loads. A low-quality faucet will have to be replaced very soon.
The most vulnerable element of such a mixer is the shower hose. Most of the time it is in a curled state, so it gradually becomes deformed. Soon cracks appear on the hose, it begins to leak and requires replacement. Unfortunately, even expensive and high-quality faucets are not immune to problems with the hose.

You will have to come to terms with the fact that the hose needs to be changed periodically. Prudent buyers immediately take a spare hose to perform this simple repair as soon as the need arises.Particularly vulnerable in this regard are faucets whose spout also serves as a shower head.
Amateur craftsmen who do not have much experience in plumbing work should remember that at home the easiest way is to install an on-board faucet on acrylic bath. When working with a product made of cast iron or steel, the enamel will almost certainly be damaged, which can cause corrosion. As a result, the bathtub will have to be repaired or completely replaced.
It is better for an inexperienced master to entrust this work to a reliable specialist. Another way to solve the problem is to purchase a bathtub with a ready-made hole for installing a mixer. True, acrylic bathtubs are usually supplied with this option. Of course, when choosing a mixer, you will have to take into account the size of such a hole.
Features of the design of a mortise mixer
For installation on the side of the bathtub, manufacturers most often offer so-called modular models, although there is also an option in the form of a monoblock. Before starting installation, you should carefully study the design of your mixer, as well as the manufacturer’s recommendations for its installation and further operation.

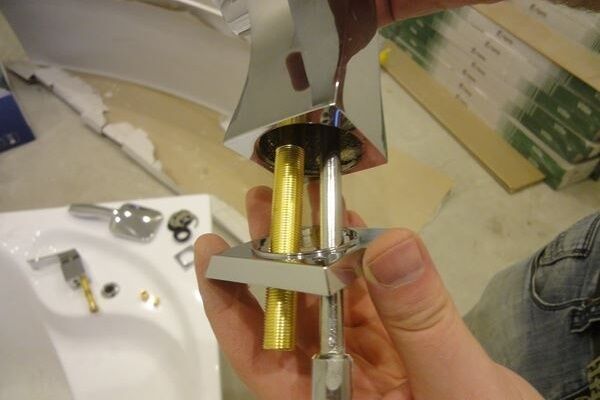
Monoblock models are usually supplied assembled, but modular devices consist of several elements.
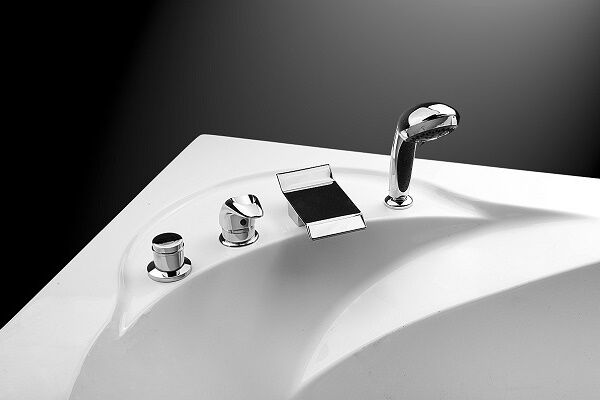
First of all, this is the tap - the central part of the mixer, on the body of which there are three outlets:
- for hot water;
- for cold water;
- for spout.
There is a separate space for connecting a shower head.These entrances have standard sizes, so the buyer can decide for himself exactly where the spout and shower head will be located. The connection to hot and cold water pipes is made using special half-inch eccentrics.

High-quality mortise mixers from well-known brands have the ability to withstand quite serious water hammer. In many models, the separately located shower head is controlled by a lever mounted on the spout body. This design automatically switches the water supply from the shower back to the spout when the watering can is returned to its place.
Installation procedure for a mortise mixer
To install a mortise mixer, you need to perform a number of operations.
Here is their order:
- Mark the installation location of the mixer.
- Drill a hole of the appropriate size.
- Install the mixer.
- Secure its position using fasteners.
- If necessary, install other elements of the modular system.
- Connect the hot and cold water supply hoses.
In words, the information on how to install a faucet on the side of an acrylic bathtub looks very simple, but in practice everything may turn out to be completely different. There are a number of nuances and important points that you should pay attention to even before installation, and maybe even before purchasing a mixer.

First you need to prepare
There are three steps to follow when preparing to install an inline faucet:
- purchase a suitable mixer;
- prepare the necessary tools and materials;
- select a suitable installation location.
Of course, the models of mixers of this type are very diverse. Still, there are a number of general requirements that should be taken into account. You should not buy a suspiciously cheap faucet.
A low-quality model will have to be replaced very soon. It’s better to pay a little more, so as not to remember later the saying about the miser who had to pay twice. Preference should be given to a mixer manufactured by a well-known manufacturer.

It will not be superfluous to have a product passport, manufacturer’s recommendations for installation and, of course, warranty statements certified by a signature and seal. If there is a need or desire to save money, it is better to choose a faucet with a simple design and high-quality performance.
We also recommend that you read the information on how to choose bathroom faucet.
The same principle should be followed when choosing consumables: even more expensive, but more reliable.

You will need the following materials and tools:
- electric drill, professional or household;
- a special attachment for a drill, it is called a core cutter;
- screwdriver;
- fasteners;
- flexible hoses for supplying cold and hot water;
- adjustable wrench.
The hardware is usually sold with the faucet, but this is not always the case. The diameter of the hole cutter must match the dimensions of the device. You can do without a drill or a cutter if you buy a bathtub in which the hole for the mixer has already been made at the factory.
Instead of flexible hoses, you can use PVC water pipes. They are more difficult to install, but such structures last longer than flexible liner.
Usually the mixer is installed in the middle of the side, at the end or at the corner. When choosing a location, you should remember that some of the communications, including the shower hose, must be hidden. A special space should be provided for this. Sometimes you have to install a special false panel to hide these communications behind it. It all depends on the specific situation.
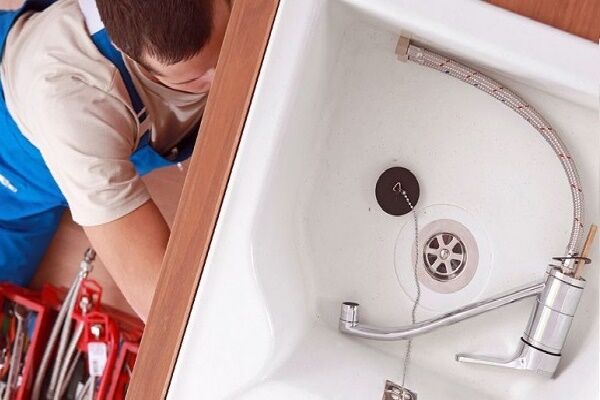
Another important point is ensuring access to communications. Periodically, hidden communications of a mortise mixer must be maintained, repaired, and replaced.Therefore, it is important not only to find a sufficiently spacious place, but also to make sure that communications can be reached without much difficulty.
For example, if a false panel is used, it should be made removable. Access can also be provided using inspection hatches or removable decorative bath screen, which covers the entire bowl.
Mixer installation procedure
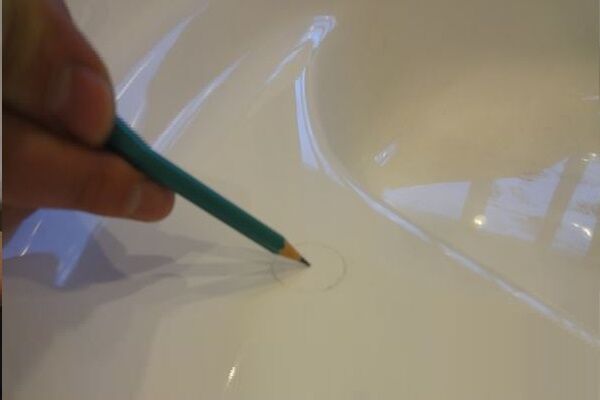
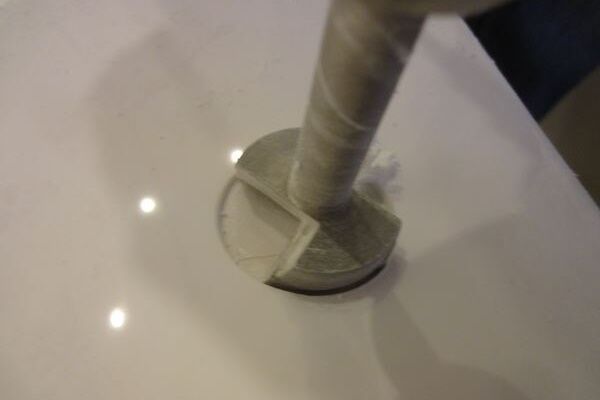
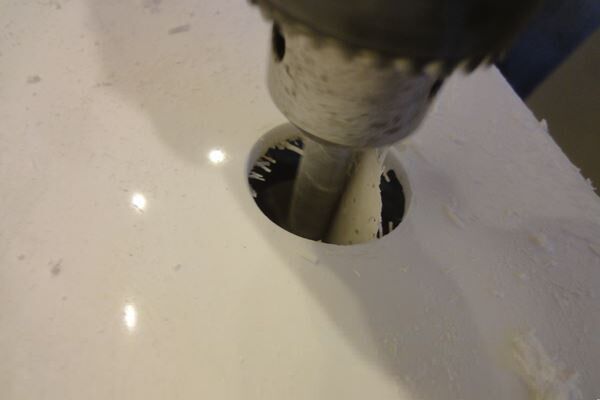
First, markings should be made on the side of the bathtub. To do this, you can use a special marker or any writing medium that will leave a fairly noticeable mark and which is then easy to erase. After this you can start drilling. The core cutter is put on an electric drill and drilling is performed according to the markings.

When the hole is ready, its edge needs to be processed by cleaning it with sandpaper, a file or other similar device. This will not only make the edge of the hole smooth, but also allow you to adjust its diameter.
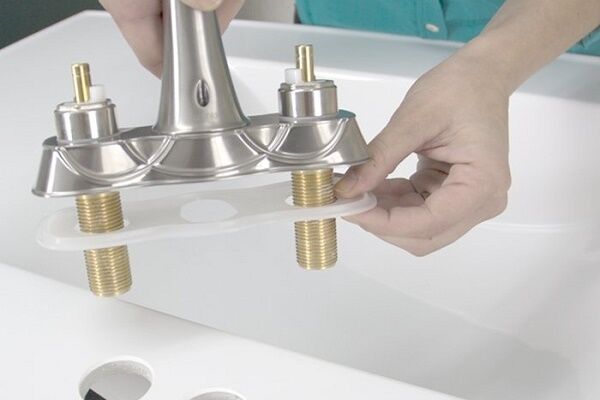
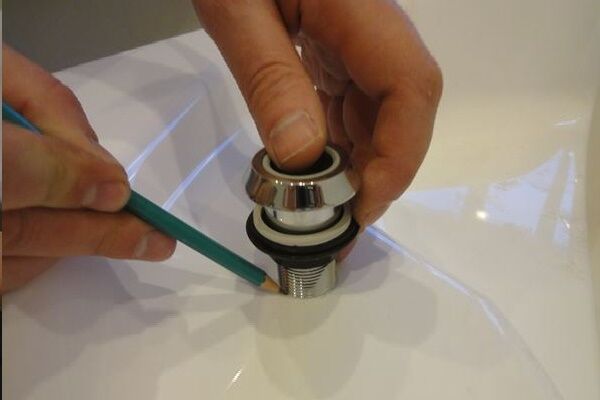
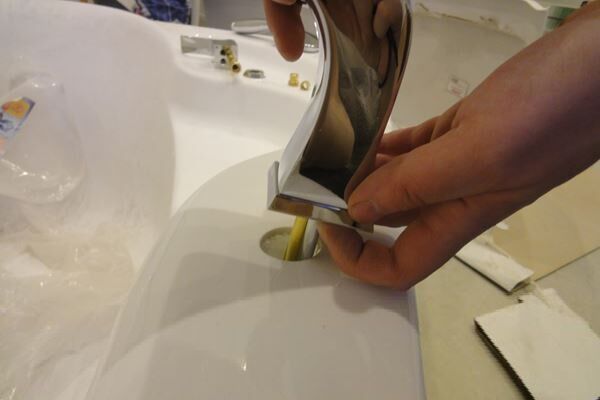
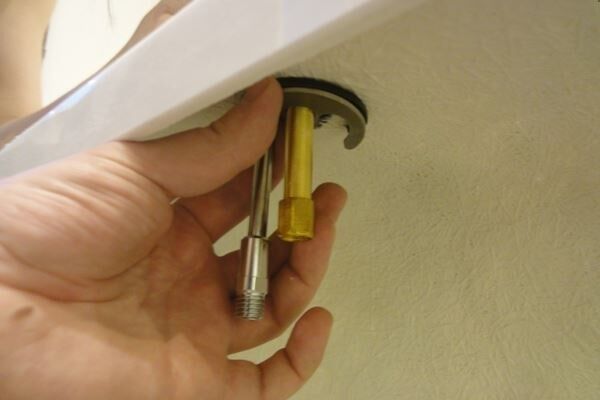
The mixer is placed in the hole using a special gasket, which is placed between the side of the bathtub and the device. The gasket acts as a shock absorber and seal. If this item is not supplied with the faucet, it must be purchased separately.
After this, the mixer is secured using special fasteners. These can be clamping nuts or a special pin in combination with a pressure washer and a nut. It all depends on the device of a particular model.
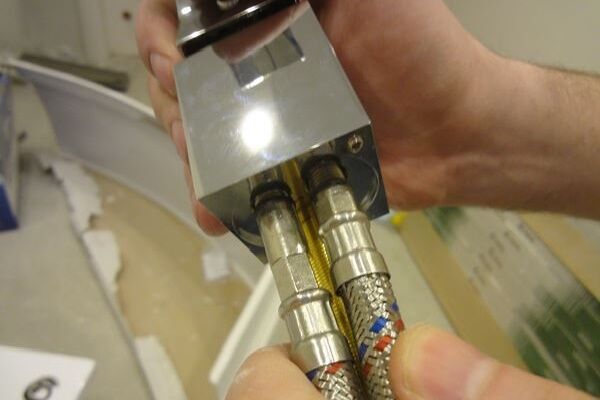
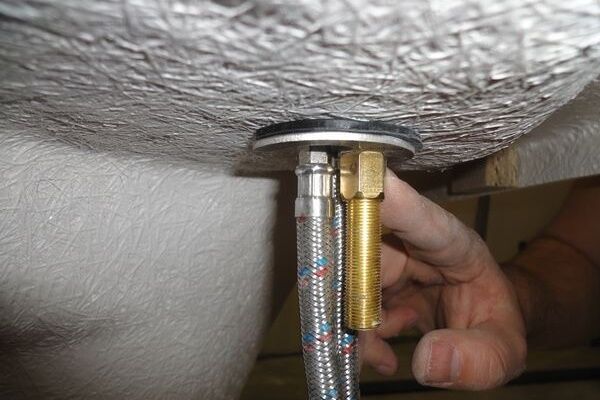
Then the individual elements of the mixer are installed: spout, shower head, controls, etc.Please refer to the manufacturer's manual for specific model details. Now the mixer is installed, all that remains is to supply hot and cold water to it.
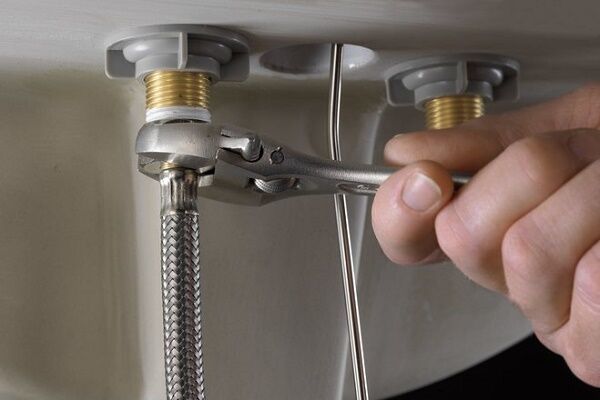
Most often, special flexible hoses with a threaded connection are used for this. When installing on the thread, you should wrap a special sealant, for example, flax thread or FUM tape. Do not use too much sealant as this may damage the threads.
But too little sealant will not provide sufficient sealing of the connection. The optimal sealant layer is determined as follows: if the thread relief can barely be felt through the sealant layer, winding should be stopped.

It is normal for the seal to protrude slightly from under the nut after screwing. To ensure that the seal fits correctly and does not unwind during installation, it must be wound onto the thread counterclockwise. Sometimes, instead of FUM tape, special gaskets are used. These elements will have to be replaced periodically to ensure the connection does not leak.
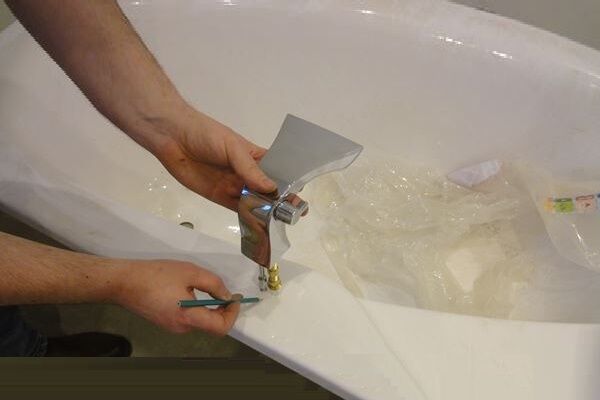
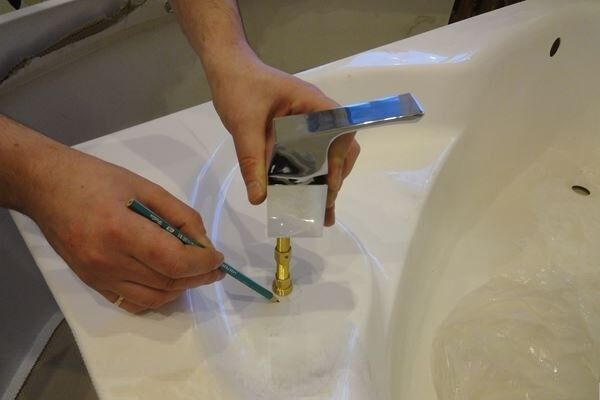
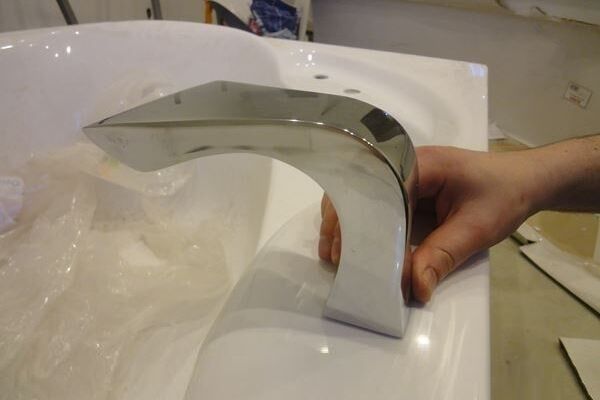
Example of installation of a mortise mixer
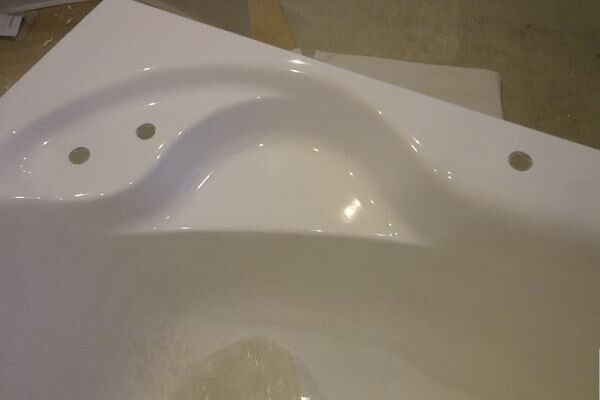
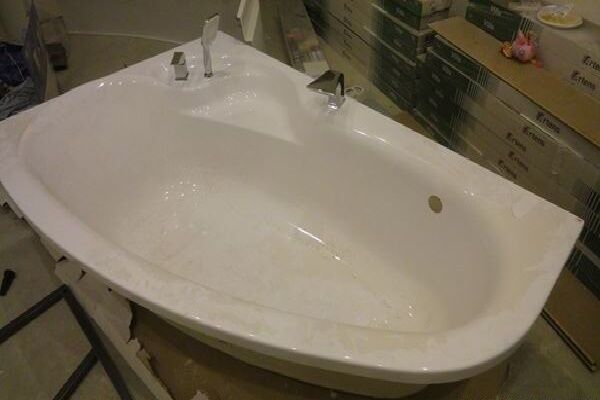
Let's look at the process of installing a mortise mixer step by step. the insert will be made into the side of the acrylic bowl. The gander and shower head of the mixer are located separately from the shut-off valves.
Below is the diagram:

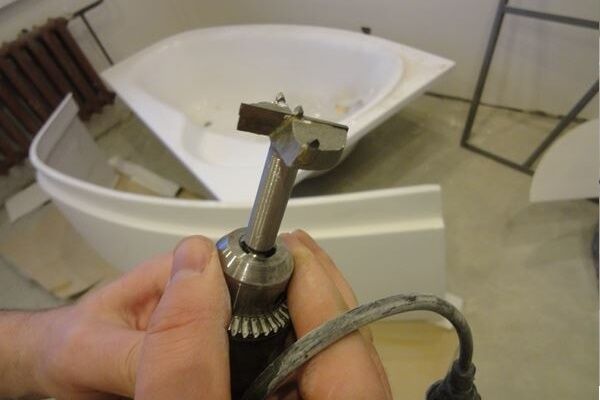
To drill holes for installing elements of a mortise mixer, we will stock up on a marker, tape measure, drill and a set of cutters, in particular, a Forstner drill.
Further steps for installing the mortise mixing device on the side of the acrylic bowl are carried out in accordance with the manufacturer’s recommendations:
Finally, we connect to the hot and cold water supply systems. From the back of the bath it should look like this:

Some useful tips
The best time to install a faucet on an acrylic bathtub is during the period of renovation and installation of a new bathtub.Installation of the device is carried out before connecting the bath to the sewer and installing a decorative screen.
If you decide to replace a conventional wall-mounted faucet with a mortise model, you will have to carry out some finishing work after installing and dismantling the old faucet.

It is possible that the entire bathtub will have to be dismantled and installed again. These costs of time, effort and money must be taken into account. If it is necessary to install a non-removable version of the decorative bath screen, you can make an inspection hatch in it to provide access to communications.
When installing a mortise mixer on the side of an acrylic bathtub, manufacturers recommend using a special strip. Indeed, acrylic is not as durable a material as cast iron or steel. According to manufacturers, the presence of a hole in the side weakens the structure. Planks and panels serve to strengthen the side and prevent its possible deformation.
In practice, masters do not attach importance to this point and do without any planks. This element often has to be trimmed and adjusted to the size and configuration of the side. The side usually has a rounded shape, which significantly complicates such an adjustment.
In order not to tinker with this problem and waste time, home craftsmen simply ignore the manufacturer’s recommendations.
Fortunately, there have been no reports of a collapsed faucet installed without a bracket yet. Nevertheless, one should remember this danger and wisely assess the balance of risks and costs for installing a reinforcing strip.If its shape matches the configuration of the side, it makes sense to strengthen the structure.
Features of drilling through enamel
In addition to the usual tools, such as a marker, tape measure, screwdriver and drill, you will need a special feather drill designed for drilling glass and ceramics, as well as transparent tape and a piece of plasticine. After marking, the drilling site should be carefully sealed with tape.
Then you need to make a round side from a piece of plasticine and stick it around the circumference so that the place for drilling is in the center. The area limited by the plasticine side should be three times the size of the hole for the mixer. It turns out to be a flat round platform with a side. You need to pour water into it.
After this, you can start drilling in the center of the marking. It is recommended to use a drill with a diameter of 6mm at a speed of about 500-600 revolutions. The pressure should be moderate. During such careful drilling, a narrow through hole will appear in the side of the bathtub, through which the water present at the drilling site will flow out.
Now you should make a small cap from plasticine and stick it to the bottom of the side so that the resulting hole is in the center. You need to pour water again and re-drill using a 12 mm drill. The pressure should be light. When the drill goes right through the side, you can remove all the plasticine and evaluate the quality of the work; chips on the enamel should be minimal.
After this, you need to widen the hole to the required size to install the mixer. To do this, new markings are made, indicating the boundaries of the hole. The surface must be sealed again with transparent tape.
The hole should be widened using a grinder using a rubber attachment with sandpaper. The speed should be set to maximum, but the applied force should remain minimal.

When the hole is wide enough, you can use a nozzle with a diameter of 20 mm. It should be understood that with minimal effort, which will protect the enamel from damage, the work will not progress too quickly. You will have to work with the grinder for more than an hour. When the hole is ready, insert the o-ring into it and install the mixer in the usual manner.
There are other ways to accurately drill into enamel surfaces. Some craftsmen simply glue a metal plate to the enamel and drill through such a “sandwich”. The metal will protect the enamel from damage. Others carefully remove some of the enamel with a grinder before drilling, and then drill with a hole saw.
Finally, there is a way to drill into cast iron with a diamond core cutter using a wood jig. But in this case, the cutter must be cooled quite often by pouring water on it.
Conclusions and useful video on the topic
The procedure for installing a faucet on the side of an acrylic bathtub is shown in detail here:
The process of drilling the side of an enamel bathtub is clearly presented in the following video:
In general, installation of a mortise mixer is relatively simple.When performing work, it is important to act carefully and accurately. Even a novice master can handle installing such plumbing fixtures on the side of an acrylic bathtub.
Do you have any questions about installing a faucet on the side of a bathtub? Or maybe you have the necessary experience or knowledge that you can share with our readers? Leave your comments, share your experiences and tips in the block below.


Installing a faucet on the side of a bathtub is a very interesting solution in terms of design and ease of use. The rest only brings disadvantages if the bathtub is not acrylic.
I will share information from my own experience. You can make holes yourself in a cast iron or thick steel bathtub, if you are not pressed for time, tinker for at least a week. But if your plans are to bring and install a bathtub and immediately connect the water, this is not your thing. Then all that remains is to negotiate with the seller for this work using his own resources before the bath is delivered.
But! Immediately and definitively approve with him how it will be done and what the final result will be. If they promise you possible outcome options (not specific ones), look for another performer.
I decided to install the faucet myself on the side of my acrylic bathtub, because, firstly, it is convenient, and secondly, it looks interesting. When I started doing this, I regretted it a hundred times, it’s a lot of hassle) You definitely won’t be able to do it quickly, there are so many subtleties and nuances. Now, if I had read this information before installing the mixer, maybe everything would have turned out much faster and easier. I plan to put the same one in the bathroom at the dacha, maybe this time it will work out better.
There was a problem with replacing the hose in the built-in faucet, because... The nut from the new hose does not fit into the hole, I can’t imagine how the manufacturer put it there. In the hole there is a so-called stainless steel tube and it is 3-4 mm narrower than the nut on the mixer hose. Is it really necessary to grind and expand this tube? I hope you understand that the hose for the watering can is attached under the bathtub and led out through a hole on the side of the bathtub.