Do-it-yourself shower stall: procedure for construction and connection to communications
A shower stall built with your own hands will not only make your stay more comfortable, but will also save you money.A homemade box will save you from the costs of hiring third-party and not always conscientious workers. The moral satisfaction received from the results of one’s work is also important. Isn't it true?
We will tell you how to build a shower cabin in a private house with your own hands, and we will help you choose the optimal plumbing fixture. We’ll show you how to develop a project and bring the idea of building a hygienic homemade product to life.
The article we presented describes the process of constructing and arranging a shower step by step. The technology for installing the cabin and connecting it to the sewer largely depends on the selected modification of the pallet.
The content of the article:
Design features of shower stalls
Before proceeding directly to the description of the assembly process, we will briefly consider the main types of shower stalls available for sale and the criteria for their selection.
Variety of models: which is better to choose
A shower corner is a simple design made from a tray and curtains.Instead of walls, which are typical for a full-fledged shower stall, the walls of the room are used. The shower corner has no ceiling. Its main advantages are low cost and compactness.

More sophisticated models have a roof and walls. Expensive multifunctional units have rich technical equipment: Turkish bath or Charcot shower, flavored steam mode, different types of hydromassage, additional functions, various lights.

Such booths are controlled by a complex electronic system. Before purchasing an expensive cabin equipped with a hydromassage function, you must first find out the level of water pressure in the pipes.
Combined shower cabins are a kind of compromise for those who like to take a bath with hydromassage and have a full-fledged shower cabin at home. Combined models are distinguished by an original and stylish design - on the market they are often positioned as home SPA centers.
Can select a cabin model any shape that best suits the dimensions and layout of your bathroom: round, square, oval, polygonal, etc.
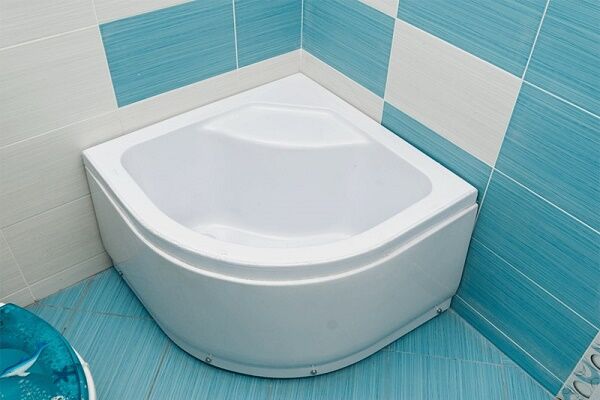
For a small bathroom, the best option is a corner stall that doesn't take up much space.Corner booths are very popular among owners of apartments with standard layouts, which is why manufacturers produce a large number of models in a variety of price categories.
Particular attention should be paid shower cubicle size, especially if you have to arrange a combined or compact bathroom.
A tray as a necessary element of a shower cabin
One of the main parts of any shower stall is the tray. Its main purpose is to collect and remove dirty water through the drainage system. The installation features of the pallet directly depend on its shape - corner, rectangular, round, oval.
Depending on the height of the sides, there are two types of pallets:
- flat;
- deep, reminiscent of a bath.
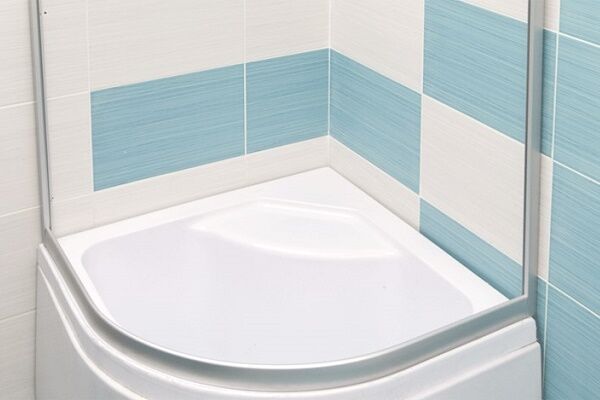
Flat models. Thanks to the low side height of such products, comfort when using the cabin is significantly increased, since there is no need to step over a high obstacle. However, such pallets require efficient drainage system water, as they cannot hold a large amount of liquid.
Tray-bath. Unlike the previous model, this pan is deep enough, which allows you not to worry about the speed of water drainage. Some models provide for their use as a small bathtub.

When buying a shower stall, the first thing you need to pay attention to is not the number of functions and appearance. Interesting solution - shower cabin with sauna.
It is the pallet of the product that places increased demands on.A high-quality pallet must withstand heavy loads, and at the maximum permissible weight of the user, it must not crack, bend or deform.
Shower trays are made from different materials.
The most popular models:
- earthenware;
- from artificial stone;
- enameled;
- acrylic.
Faience. Everyone knows the material used in the manufacture of toilets. The earthenware tray is completely hygienic, easy to clean and can withstand a lot of weight.

Fake diamond - reliable and durable material, beautiful and hygienic, but expensive.
Enameled pallets for shower stalls are cheap and durable. The only drawback that should be noted is the fragility of the enamel. However, the enamel coating can be easily restored or replaced with acrylic. An additional disadvantage is the roar of falling water on the metal surface of the pan.
Acrylic pallets are the most popular. The acrylic surface does not absorb dirt at all, warms up instantly, and does not darken over time.

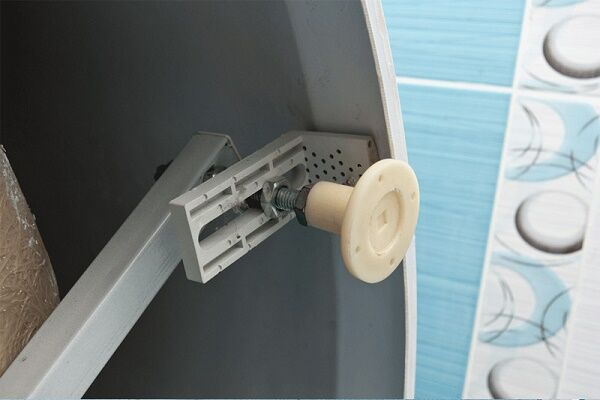
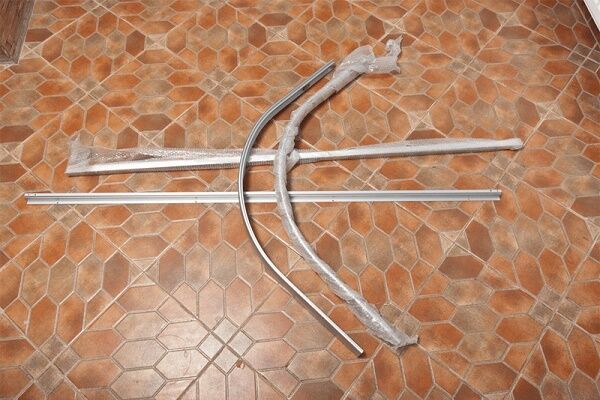
The disadvantage of acrylic pallets is the inconvenience of installation, since the installation of a special frame is required. As such, an aluminum structure with adjusting screws is used, with which you can select the desired height of the tray.
A comparative overview of different types of shower trays is presented in this article.
What types of curtains are there?
The second most important element is the cabin curtains, which can be hinged or sliding. Hinged doors require more space. They are single-leaf and double-leaf.
As for sliding curtains, they have from two to six flaps, which are held in place by a rubber magnetic tape. The curtains move on rollers hidden inside the shower frame. High-quality curtains should open and close almost silently.

Shower curtains are made of polystyrene or high-quality tempered glass. Products made from polystyrene are quite cheap and light in weight, but they quickly lose their transparency and stains remain on them.
Glass curtains are expensive, high-quality products.

Water and dirt are very easily washed off from the surface of the glass - the material does not absorb anything and does not fade over the years. You can also buy a booth with curtains made of classic transparent, tinted, colored and rough glass.
Shower project development
Despite the apparent technical complexity, independent construction of a shower stall is, in fact, a completely feasible procedure for the average person, especially for a hard-working owner.
Just as the construction of any capital structure begins with the development of a project, so before starting work on equipping a shower in a private house with your own hands, you need to think about it.
It is advisable to outline on paper the main plans and diagrams, for example:
- plan for placing a shower stall in a designated room;
- connection diagrams to power supply, water supply and sewerage networks;
- procedure for equipping a shower room with a ventilation system.
The preparation of the room for the shower and the installation of the cabin itself is carried out in several stages.

It is necessary to calculate and plot on the plan not only the dimensions of the cabin itself, but also all the distances to the connection points to utility networks, which will avoid miscalculations and save materials
Installation and connection of a finished acrylic booth
How to correctly assemble a shower stall according to all the rules without critical errors that will affect the functionality of the structure? This is quite possible and not even very difficult if you strictly follow the instructions and follow the rules for installing this plumbing product.
It is difficult to assemble a shower stall from scratch if you have to work in a limited space, so all manipulations must be carried out slowly, in several stages, with additional assembly and adjustment of the finished structure.
This approach allows you to get by with only one pair of working hands, while professionals almost always work together to save time.
A home craftsman who decides to independently assemble and connect a shower tray will have to perform a number of standard actions:
Preparing for quality assembly
A complete set of components is required. Before purchasing, you should carefully check the availability of all parts and their quality.If defects, damage or size discrepancies are detected, you must request a replacement part or refuse to purchase the selected model.
Also, to assemble and install the shower cabin with your own hands, you will need a prepared place.
Set of tools:
- a drill, or better yet a battery-powered screwdriver;
- metal drills (6 and 3 mm), bits for self-tapping screws;
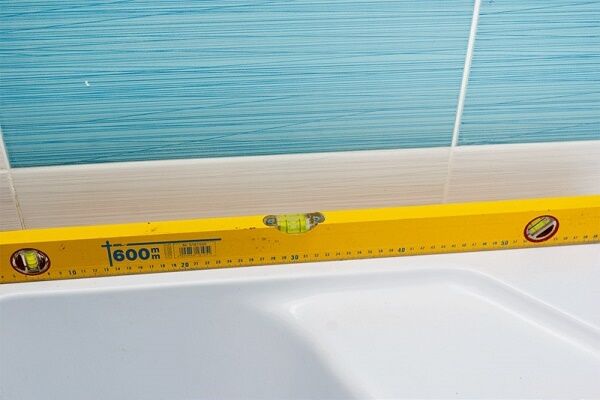
- building level (for adjusting the pallet relative to the floor);
- figured and flat screwdrivers;
- an adjustable wrench or a set of wrenches of the required size;
- fum tape or tow;
- sealant for sealing joints.
If the kit does not include hoses for connecting hot and cold water, you should also worry about them in advance.
Installation of the booth: work order
At the preparatory stage of work, a work site is selected where, in fact, the cabin will be assembled. It should be noted that many models are large, so it is recommended to assemble individual units in another room adjacent to the bathroom.

All tools must be located so that they can be easily reached during work. You can assemble the booth yourself, but it is still strongly recommended that you do it together, since at certain stages of assembly the precise alignment of some parts is required.
The walls and floor adjacent to the booth must be smooth, without differences. You should start with drain installations. For pallets made of acrylic, the joint is treated with a transparent sealant.

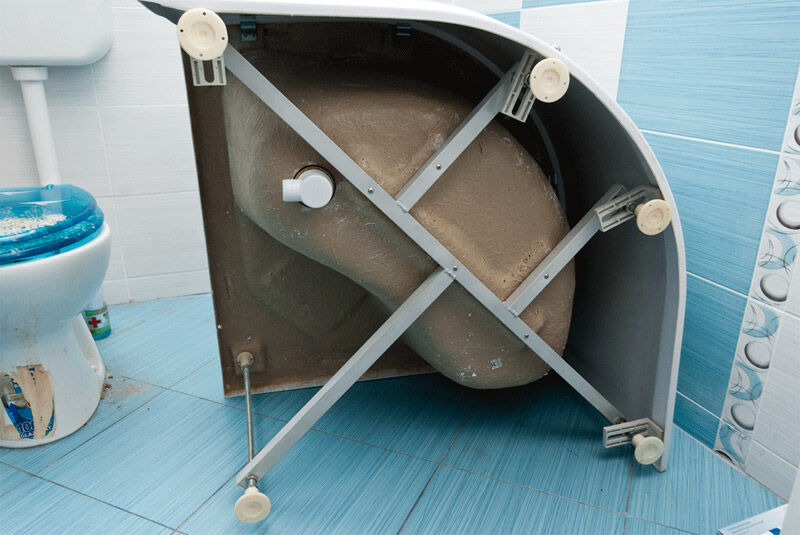
The next stage is the installation of a steel profile structure on the bottom. The studs for the legs will be installed on this frame a little later.

Next is the installation of studs. We pass them through the holes in the frame intended for this purpose, and screw them into the grooves of the pallet as tightly as possible.

The short part of the frame has a special rigidly welded nut, which is needed for mounting the central leg. After the leg is screwed in, a nut is installed, followed by a lock washer, then another nut.
We install all the other legs on studs, after which the pallet can be moved to the installation site and leveled using a level. For deep bathtub trays, a more or less flat horizontal line will be sufficient, but small trays must be positioned strictly according to the instructions, adhering to the specified tilt angles.

When connecting a finished shower tray to the sewer system, you must:
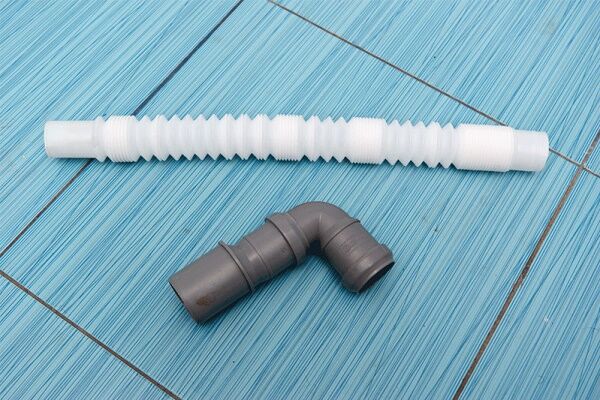
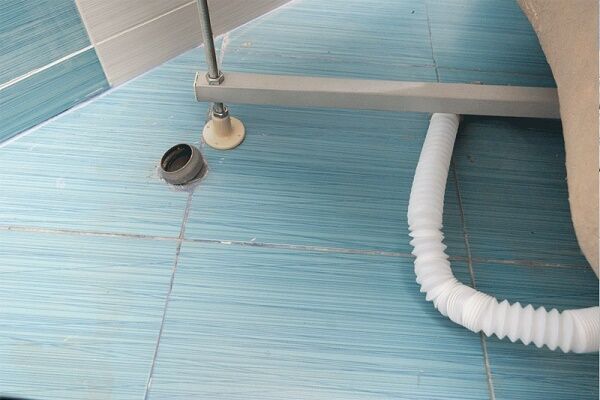
- connect a shower siphon to the drain hole;
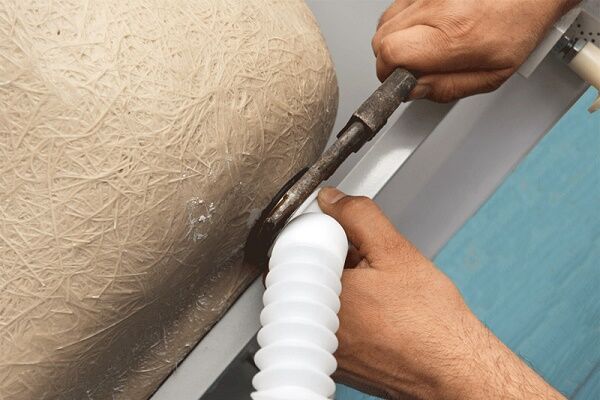
- connect a corrugated pipe to the siphon;
- connect the second end of the corrugation to the sewer drain hole and fix it;
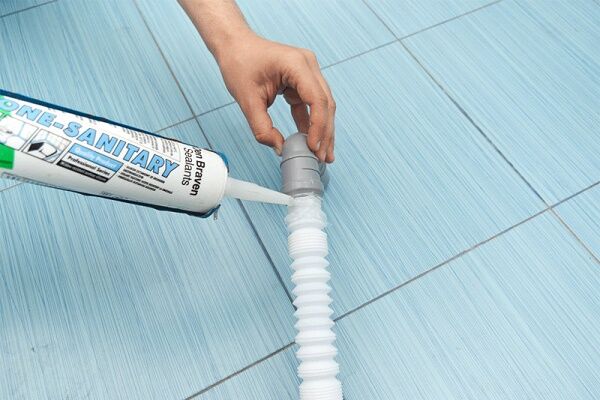
- Treat all connections with waterproof sealant.
All connections are made using the threaded or soldered method. A siphon must be used to drain sewage, as it creates a water lock that prevents odors from the sewer from entering the shower room.

Pay attention to the gap between the bottom of the product and the floor - it should be sufficient for laying and possible repair of communications.
Now you can begin assembling the walls, curtains and installing all other equipment, in particular, assembling the frame. To prevent corrosion, frames are most often made of aluminum. Each side of the frame, depending on the type of cabin, is assembled separately.
It is recommended to treat all joints on the outside with acrylic-based sealant. For internal joints it is better to use colorless sanitary sealant. Almost all fastenings in inexpensive models are made using metal screws.
For greater strength and durability of connections, it is recommended to replace self-tapping screws with M5 bolts, nuts and washers. All fasteners do not need to be immediately clamped all the way - this is done only after installation.
The fasteners are finally fixed after all elements of the shower cabin have been checked for functionality. After this, you can seal all seams and joints and begin assembling the frame profiles.
Features of installation of different purchased models
Each type of structure has its own characteristics that should be taken into account during the installation process.
The nuances of installing open booths
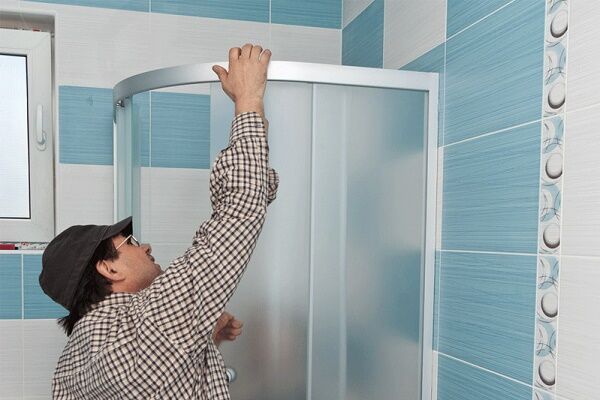
Since the design of open-type booths is quite simple and consists of a single aluminum frame, assembly usually does not pose any particular difficulties. Having assembled the aluminum frame, they immediately begin installing it on the pallet.

The end of the aluminum frame is attached to the wing of the transition profile with fasteners or special latches. All seams at the joints are treated with sealant. Once the frame is securely attached to the wall, blind transparent elements are mounted.
The kit must include special fastening clips, which are needed to fix the fixed glass in the frame of the shower stall.
The glass is secured by pressing it tightly to the frame and fixing it with clips, but not too tight so that it does not crack. Open cabin models most often have sliding doors. There are special rollers on the door frame. They are installed in the lower and upper guide grooves.
Installation specifics glass for the cabin depends on the type of door design. To ensure that the sashes are tightly adjacent to each other, a magnetic plastic cover is installed on their outer ends.
Assembly of closed structures
This option is almost identical to the technique described above, but with some minor differences.
The walls of the shower stall are assembled separately and attached to the tray in a ready-made, assembled form.First of all, the rear walls of the cabin, in which the jets for hydromassage are located, are attached, and only after that the front part is installed.

During the installation process, safety regulations are followed and the flexible hoses of the cabin are connected to the hot and cold water supply system as efficiently as possible.
In closed models, the blind parts of the front panel are installed differently. Most often, additional parts made of aluminum profiles are used for this.
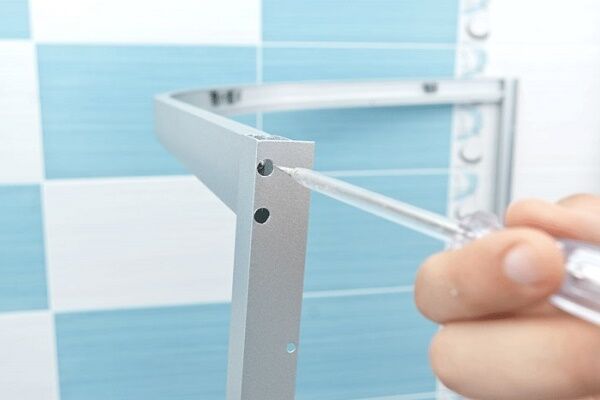
To install, the sheet is applied to the edge of the frame, the location of the fastening of the reinforcing profile is marked, which at the same time plays the role of a stiffener for the entire structure.
Then, using a drill or screwdriver, make holes for bolts or screws, press the profile tightly against the glass and attach it to the frame. All seams and joints are sealed, the shower stall elements are checked for functionality, and then the decorative panel (apron) is installed on the pallet.
Remember that you need to rely on the instructions and diagram for assembling the shower cabin.
Specifics of installing a corner booth
Corner showers are the most common options for shower stalls, as they take up little space and are inexpensive.

Before starting installation, be sure to make sure that the distance between walls at different heights is the same.The frame of the corner booth is very rigid, and after installation all the unevenness of the wall will be visible under the frame, in addition, water will enter the room through the cracks.
If you try to pull the frame more tightly to the wall, it may become deformed, after which it will be impossible to install the doors and blind parts of the booth.
Technology installation of reinforced models made of metal requires a special approach and the creation of a reliable foundation.
Arrangement of a cabin with a homemade pallet
If we do not take into account all the nuances of constructing home-made pallets, depending on the chosen cabin design option, then using the example of a pallet made of concrete or brick, as the most popular materials, we will consider step-by-step instructions.
Stage #1 - performing preparatory work
The very first step is preparation. It will look like this:
- Thoroughly clean the shower floor and adjacent wall areas.
- Waterproof the base of the pallet.
- Install a primary cement screed if there is none.
- Prime and process the base of the future cabin highly adhesive waterproofing composition, for example, bitumen mastic.
- Install the shower drain in the chosen location, strictly according to the level, and, in accordance with the instructions, connect it to the sewer.
- Install the formwork.
- Fill the inside of the shower tray and the sides with concrete or brick.
After all the preparatory work has been completed, calculations have been made, all the necessary components have been selected and purchased, you can begin the main work on its construction.

Stage #2 - water supply
With the correct selection of all materials and the availability of the necessary tools, connecting the shower stall to the water supply and sewerage networks will not be difficult. As a rule, in a private house, hot water is supplied to the shower from a gas or electric boiler. For this, tees or fittings with a threaded connection are used.
Main nuances of water supply:
- The distance between hot and cold water pipes, to eliminate their temperature influence on each other, should be at least 10-15 cm.
- The diameter of the pipes is selected depending on the water pressure, the optimal is 27-30 mm.
Flexible hoses are used to supply water directly to the shower panel or faucet. All connections must be made using gaskets and FUM-tape.

Step-by-step instructions for connecting to water supply:
- shut off the water supply to the main pipelines;
- insert the sealing gaskets into the nuts of the flexible connection on the side connecting to the hot and cold water pipes;
- Connect the hoses to the pipelines without much effort.
Shut-off valves must be installed on all connections to plumbing fixtures.
Stage #3 - ensuring waterproofing
A very important point in the construction of a pallet is primary waterproofing. It is carried out before installing the screed, by covering with a special film or roofing felt the joints between the floor and the walls, and placing waterproofing material on them.

To plan further work, it is necessary to take into account that the complete drying of the concrete layer from which the base of the pallet is constructed, especially if this layer is thick enough, takes at least a week.
After the cement has dried, final waterproofing is carried out before starting facing work. The surfaces and joints of the pallet are coated with water-repellent mastic, and a special waterproofing tape is laid around the entire perimeter.

Stage #4 - construction of the pallet
As an alternative to the classic version of a stall with a ready-made tray, you can build a shower entirely with your own hands, starting with the construction of its base.
For this purpose, you can use brickwork, concrete blocks or cement screed. Water drainage in such trays is carried out using shower drains, the installation features of which will be discussed below.
Cement-lime compositions are not suitable for use. Concrete is prepared from a mixture of cement and pure sand, or ready-made mixtures are used, but always marked as waterproof.

When installing a pallet, a drain is constructed entirely from concrete, and then, with the help of formwork, the self-leveling floor is raised to the level of the ladder.
Not only must the slope be maintained to the ladder, but also a margin must be provided for the thickness of the facing tiles. The ladder grate should be a few millimeters below the floor.

Stage #5 - frame construction and finishing
The most common and optimal choice of location for constructing a shower stall is in the corner of the room. With this placement, not only space is saved, but there is also no need to install two walls that replace the walls of the room itself.

The structure of the pallet and the walls are lined.The choice of finishing method for a shower stall should be approached with special responsibility, since this is a room with a high degree of humidity and is subject to constant exposure to water and steam.
Features of tile finishing
As a rule, ceramic tiles are used for cladding walls and other elements of the shower enclosure, which harmoniously fit into the overall design of the shower stall and the room itself.
Choosing an option shower tile finishing, it is necessary to take into account the fragility of this material under strong mechanical stress. If it is necessary to fasten shelves and other objects to the walls of the bathroom using dowels, holes in the tiles or at their joints should be drilled very carefully.

At the same time, tiles have many undeniable advantages over other materials and are the leader in use in rooms of this type.
The advantages of tiles include:
- tightness;
- significant service life, which with the correct installation technology is 20 - 25 years;
- ease of care;
- relatively affordable price;
- temperature resistance;
- the possibility of covering not only the walls, but also the tray, sides and floor in the shower room.
We should not forget that wet tiles are quite slippery, therefore, in order to avoid injury, it is advisable to use a rubber mat on the floor in the shower stall, which can be easily selected both in size and color.
A comb spatula is used to apply tile adhesive. It is recommended to start laying tiles from the floor.Depending on the pattern of the tiles laid on the floor, the walls are covered. It is necessary to start laying tiles on the walls from the central corner, towards the edges.
Since the size of the shower stall is not too large, you can pre-plan the option of laying tiles on the surface of the floor or wall and make markings. The purpose of marking is to ensure that at the corners you do not have to cut tiles, part of which will be less than half of the whole plate.

Panel cladding rules
Use of plastic or siding — a more budget-friendly option for finishing the cabin walls. If you have the necessary skills in installing panels from these materials, high-quality tightness in the room will be achieved and the attractive appearance of the shower will be preserved for a long time.

To install the panels, a vertical or horizontal lathing is attached to the surface to be finished in increments of 50-60 cm. Plastic panels and siding you can also close the ceiling. The material does not require much effort to maintain.
Applying latex paint
The presence of modern finishing materials does not push into the background the old proven method - painting the walls. This is the simplest and least expensive, both time- and financially, option for finishing showers.
The use of latex paint does not at all imply that the waterproofing qualities and aesthetics of the room will be sacrificed to the detriment of the price advantage.

The main guarantee that there is no need for a quick re-repair of the shower room after painting it is thorough preparation of the surface.

In addition to the above materials used for finishing showers, there are a number of others that are relatively expensive and technically difficult to work with. For example, marble, granite or decorative stone. The choice remains with the owner of the house.
Stage #6 - installation of cabin fencing
The cabin enclosure is usually installed after connecting the pan to the sewer.
The design of a homemade shower cabin can have several options:
- corner square or rectangular;
- in the form of edges;
- with a semicircular connection of 2 walls.
The methods that are used when installing cabin walls with a ready-made pallet and a pallet built with your own hands are almost the same.

Regardless of the chosen type of cabin, the doors are installed on it as hinged or sliding type.
The front part of the cabin can be equipped with additional side walls, usually made of the same material as the doors. These walls are mounted using a vertical profile. Special seals are attached to the sashes, which are recommended to be treated with silicone.
Installation of swing doors
The process of hanging swing doors in a DIY shower stall is not very difficult. For this purpose, commercially available furniture hinges are used. Sealing elements are installed at the joints.

Installation of sliding sashes
For sliding sliding doors, frames or niches are mounted at the base and top of the cabin, along which they will move on rollers. Such a door is hung on the profile and mounted on casters.

Stage #7 - connecting a homemade pallet
At the first stage of constructing a homemade pallet, a drain system is installed, which uses unusual hydroboxes, A shower drains. There are two types of drains: slotted and square grating.

When selecting a drain, in order to eliminate the effect of a “pool of dirty water” in the pan, it is necessary to compare its throughput with the performance of shower heads. The throughput of the ladder is considered good within the range of 30 - 48 l/min.
The location for installing the slotted ladder is chosen near the cabin wall. The throughput of such a design will be higher. To a ladder of any type it is necessary to create a slope according to the norm, at least 3 mm/m.p. All pipes draining water are installed in the floor.

Another method of drainage for a homemade tray is through a drainage channel, which can be placed across the entire width of the shower stall, which will ensure uniform discharge of water into the sewer. Installation and connection of drains and drainage systems to the sewerage system is carried out using the equipment included in their kit.
He will introduce you to the technology of constructing a shower stall without a tray. next article, which provides step-by-step installation instructions.
Conclusions and useful video on the topic
You can learn more about assembling shower stalls by watching the following videos.
Video #1. How to build a concrete shower tray with your own hands will be discussed in the following video:
Video #2. Another option for making your own shower tray:
Video #3. Accessible and quick information about all stages of assembling an acrylic shower tray:
If all the recommendations and instructions are followed, then a self-made shower cabin will not bring you the slightest bit of disappointment.It will not only improve your everyday life and create additional comfort, but will also harmoniously fit into the interior of any home and give a modern and aesthetic appearance to your home.
Would you like to tell us about how you built a shower stall with your own hands? Do you have any technological subtleties in your arsenal that are worth sharing with site visitors? Please write comments in the block below, post photographs of the device process, and ask questions.


I almost completely made the shower cabin in the house with my own hands. The only thing is that I am not a plumber, and the water supply and sewer lines were designed and installed by a specialist. I purchased the materials myself after drawing up the project. I made tiles on the floor, but I don’t recommend it to others. It is slippery, so I had to buy a special mat, which needs to be washed and dried from time to time.
I won't undertake to lay the pipes myself. He hired people for this, and did the rest himself. I didn’t bother with tiles; it’s complicated, expensive and not very convenient. I made do with panels; they are easier to install yourself and are more cost-effective.
I installed the plumbing myself and decorated everything with my own hands. It turned out much cheaper than if I hired him, because now the work costs the same as the materials.
A few additions, based on experience: 1) If you want, you can find an expensive European booth with metal parts, but then you won’t run around the shops and look for rollers or something else? 2) Do not trust silicone, even the most expensive one, check the condition of lubricated joints more often.3) Even taking into account point No. 2, when installing in an apartment, it is advisable to make multi-layer waterproofing of the floor; you will have a chance of not getting to know your neighbors below.
Yes, Dmitry, we had such a situation; our neighbors below were flooded several times. Very unpleasant memories, our neighbors are scandalous. There was no good waterproofing, and the pan was shallow and leaking. I had to tear out the entire shower and install a new, deep tray. Now everything is in order. And now it’s even better, my wife uses this tray as a small bathtub, she likes it.
They installed a European shower stall. The kit included all the necessary parts for installation of fairly good quality. Sealant was purchased additionally
German manufacturer, I don’t remember the name now. My godfather and I installed it ourselves, and did everything in one day. In principle, this article contains all the necessary tips for installing a shower stall. But it’s better to call a plumber, just a normal one.