How to fix a toilet installation: popular breakdowns and ways to fix them
A wall-hung toilet, like its compact brother, can also break or start leaking.This situation is not at all a sign of impending expensive repair work with the collapse of the walls in the bathroom - repairing the installation for the toilet can cost a little money. Moreover, you can always try to eliminate the problem yourself.
We suggest that you familiarize yourself with the methods available to independent craftsmen for troubleshooting a wall-hung toilet. We list the main causes of breakdowns and the “symptoms” indicating their occurrence. Attention was paid to both the plumbing fixtures themselves, installed on the support frame, and the fittings of the flush cistern.
We supplemented the detailed diagnostics and scrupulously outlined methods for restoring the functionality of plumbing fixtures with visual illustrations and video tutorials.
The content of the article:
List of traditional breakdowns
A broken toilet can throw even the most calm and good-natured person out of balance. This is not a faucet, which you can do without for a couple of days using a shower head. It will not be possible to live comfortably without a toilet, so the issue of repairs must be resolved promptly.
Think about what's expensive wall-hung toilet with installation It can last forever without problems, it's not worth it. Each toilet, like any other product, has its own service life. For some systems it can reach 10-12 years or more.
The service life of your plumbing fixtures can be found in the manufacturer's instructions in the warranty section.If you carefully study this document, you will see that some components have a shorter service life.
Thus, the filter and gaskets must be replaced much earlier.

Built-in plumbing with an installation system consists of the following parts:
- frame or frame;
- cistern;
- units for inlet and outlet of working fluid;
- toilet/bidet/urinal.
Breakdown is possible in every part of the installation. To eliminate the cause of the malfunction, you must first find it. This task seems impossible without major renovations. But it seems so only at first glance.

Frame or support frame It is made of durable metals and is coated with an anti-corrosion layer on top. This part is durable - all other elements of the system will be attached to it. It can withstand up to 600-800 kg of load.
This characteristic will differ for each manufacturer.It is important to pay attention to the maximum permissible load before purchasing. your favorite model. Sometimes, wanting to save money, they buy a cheap fake, where this figure is only 100 kg.

Such a frame can easily bend or crack from overload - about 70-80 kg the weight of an adult + a water tank + the weight of the toilet itself. And if a large relative weighing more than 100 kg visits the bathroom, it’s scary to imagine what will happen. Therefore, you should not buy fakes - this is an unaffordable luxury.

All manufacturers make the installation cistern from plastic. It is flat or triangular, and inside it stands plumbing fittings to ensure automatic filling and flushing.
What can happen to the tank:
- The plastic container may break if installation errors occur. If this was a DIY installation and the installer made mistakes due to inexperience, the tank may become warped and crack over time.
- If the installation was carried out by a crooked craftsman and he was accidentally hit during installation, then after a short time a leak may occur at the place of the chip and will need to be replaced with a new container.
- The fittings installed inside the tank consist of plastic parts, rubber and silicone sealing gaskets. Often problems arise due to wear of one of the components.
The inlet and outlet units may leak.The coarse filter, installed before water enters the drain tank, becomes clogged over time. And at the junctions of all pipes, the tightness may be compromised - elastic rubber gaskets fail over time, turning into hard plastic parts.

Problems can also arise with the toilet - from a simple chip to a violation of the system for draining the working fluid into the sewer riser.
Fixing the problem yourself
To find the source of the problem, due to which the toilet is out of working order, you can resort to calling a plumber, calling a neighbor who helps everyone and charges inexpensively, or try to do everything yourself.
The first option is safe, but requires agreeing on the time of the work and will cost a decent amount of money. Of course, this is the most convenient and simple option - you don’t need to do anything, twist, change - you gave the money and accepted the job.
The option with a neighbor/acquaintance of friends is like a pig in a poke. Questionable quality of work can lead to even bigger problems and more serious breakdowns.

The third option involves self-study installation systemsinstalled in your bathroom and its repair. This is a simple activity that does not need to be rushed. It is important to take the manufacturer's instructions and read the relevant section carefully.If the instructions are lost, you can find them on online store websites or ask a plumbing store consultant.
All controversial issues that arise during the installation repair process can be viewed in thematic video clips. Models of fittings for built-in tanks from different manufacturers may differ from each other.

Sometimes it is enough to disassemble the fittings of the drain tank, wash the components, replace worn parts, reassemble everything again, and the system works like a well-oiled mechanism - without failures.
Installation repair methods
Along with the purchase of a toilet installation, it is advisable to immediately buy a spare repair kit. It may be needed after 10-12 years or already after 3-4 years from the start of using the system. In order not to run around and look for spare parts, you should always have them in the pantry/on the tool shelf.
Finding the problem inside the cistern
The scope of repair work will depend on what exactly is broken. The most common problems encountered due to the fault of fittings:
- The water continues to flow after the flush is completed. The reason may be the accidental entry of foreign objects into the drain tank - hair, cardboard, pieces of construction waste and other inclusions. The solution to the problem is to get the filling and draining mechanisms and fix the problem;
- Water comes out of the tank slowly after pressing the flush button. The accordion for lifting the drain mechanism may break. The solution is to replace the drain mechanism;
- Water does not fill into the tank - there may be problems with the float. It may come off the mount. The solution is to disassemble the system and replace the float;
- The valve does not completely shut off the water - change the membrane or replace the gasket.
It turns out that in most cases you need to look inside the cistern without removing it from the wall. A home craftsman can do this with instructions for dismantling the fittings.

Restoring the flush button
The flush button is mounted on a special frame and connected to the system using levers and cables. They are pneumatic and mechanical. It is important that the devices are reliable and of high quality for long service.
On sale you can see different models of buttons - backlit, with two and with one key. They differ in size, color, shape and material from which they are made. But some options may be universal - suitable for installations from various manufacturers.

If the flush button does not work well, you need to remove it and look in the inspection window of the installation. It is possible that the air hose supplied to the installation through the pneumatic button does not fit tightly. Or the button itself is broken.
The solution to the issue depends on the situation - adjusting the hose or buying a new button. Often in instructions for a specific model the manufacturer not only describes the installation process, but also indicates which buttons are suitable.

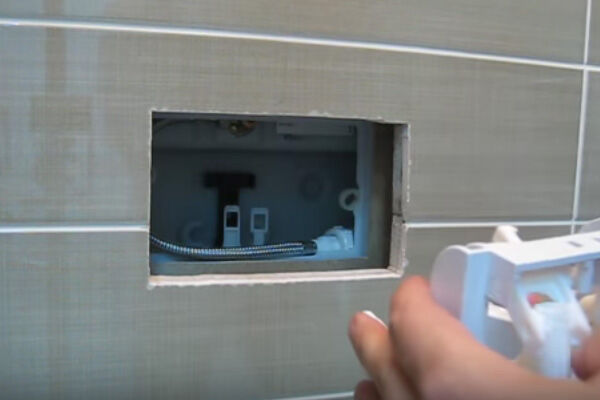
Failure detection methods
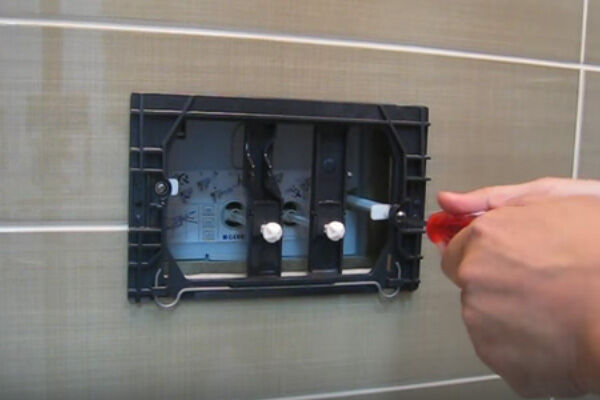
When you need to find a breakdown inside an installation, it is not at all necessary to break the wall. You can reach the flush tank mechanism through the inspection window. Let's take a closer look at how to do this using the Geberit installation as an example.
First you need to remove the decorative cover with the flush button by pressing down and pulling it towards you. Then you have to remove the frame on which the key is attached.
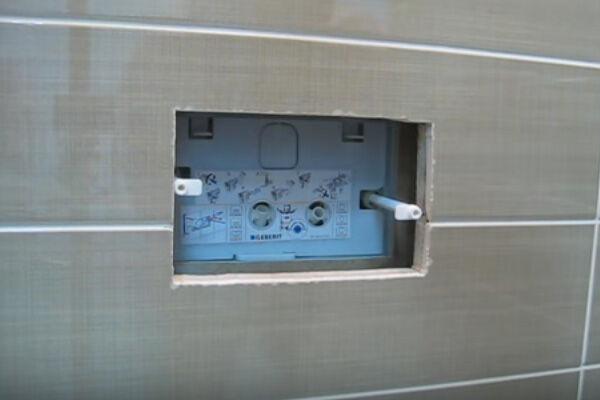
To do this, you need to unscrew the screws and pull out the plastic pusher clamps. Then, in a way that depends on the model and manufacturer of the plumbing fixtures, you will have to remove the partition by pressing its latches. This partition can be marked with a diagram for dismantling the drain tank fittings, which is used to clean the valves and check the gaskets.
An important step is to turn off the water supply to the cistern. Otherwise, your actions could cause a real catastrophe on a local scale - flooding not only your bathroom, but also your neighbors below.
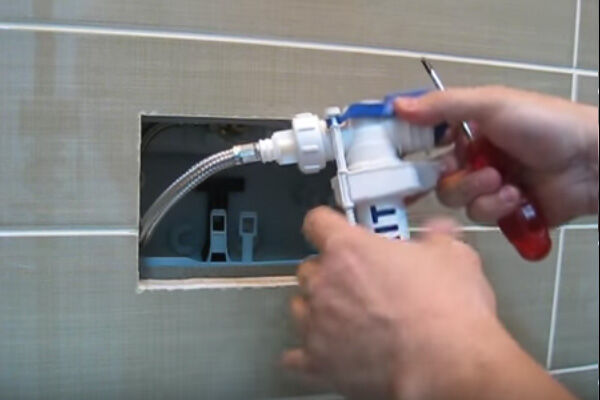
Next, you need to dismantle the filling valve - you must first remove the rocker arm block, and during reassembly you will have to use two rocker arms to engage the flush valve and 2 fixation points.
Then it was the turn of the filling valve itself, to which a flexible water supply pipe is connected. They carefully take him out. This valve regulates the level of water filling in the tank - if you twist the plastic pin, you can raise the float higher or lower it, which ensures that the tank is filled to the specified volume.

Now the next step is to remove the drain valve lock - to do this, move the wings in opposite directions, which removes the part from the cordon.
It is necessary to dismantle a rather long flush valve - this cannot be done without partial dismantling inside the tank. To do this, holding the inner part, you need to turn out the top part and lower the second rod to the side.
That's it - the valve is easily removed from the internal space of the flush tank built into the wall. It consists of two blocks - the upper one for the small drain, and the lower one for the large drain. There is a basket on the bottom of the valve, which can be easily removed if it is necessary to replace the sealing gasket.

Now all the parts need to be carefully inspected, washed under running water, and their condition assessed for wear. Replace broken parts and gaskets. After eliminating the breakdowns or routinely cleaning all the fittings, you will have to reassemble all the components in exactly the reverse order.
If the condition of the mechanism is extremely poor, then you need to replace the entire mechanism with a new one, using new fittings for the drain tank.
The bathroom smells bad
You can often encounter a situation where everything is fine with the bathroom ventilation system, but there is a leak under the wall-hung toilet and there is a disgusting sewer smell in the room, and water may be leaking behind the tiles inside the structure.
Here the problem may be related to rule violations installation of a wall-hung toilet and with nodes for connecting the tank to the toilet and the toilet to the sewer.

The fact is that the basis of these troubles may be in mistakes made during installation. It is important that the pipe routing is done correctly before installing the installation. What matters here is the length of the supply pipe and the remaining sewer inlet.
In some installation models, the pipes are short. This must be taken into account so that later you do not have to invent dubious sealing schemes. The installation pipes are most often 90 mm in diameter. They are placed through an adapter into the sewer, which is usually 110 mm.

When the toilet adapter or installation pipe connecting the system to the sewer is short, it would be correct to buy a longer pipe from another manufacturer. It will work great and everything will be sealed.
There is no need to skimp on the adapter - everything here must be sealed and leak free. For some, this length is sufficient, while for others, for example, the latest models from Grohe, the pipes are a bit short.
Conclusions and useful video on the topic
Video #1. It is possible to disassemble the installation without destroying the wall of the bathroom. How to do it yourself:
Video #2. The appearance of an unpleasant odor may be the result of an error when connecting the toilet through the installation pipe to the sewer. You can fix this problem:
Video #3. When water begins to appear under the wall-hung toilet, you need to find a breakdown of the installation:
Any breakdowns in the toilet installation can be repaired with your own hands. This is more effective than inviting a handyman, and cheaper than the services of a professional plumber. And familiarity with the installation system may be useful in the future, when the need for prompt repairs arises.
You can tell us about how you yourself repaired the support frame of a wall-hung toilet and share useful information in the block below. Please comment and ask questions.


The installation has been in place for five years now. It must have been a lucky purchase of the kit, since no repairs were required after so many years. When purchasing, pay attention to the permitted weight. A good filter was installed on the water pipe, since the water in our house comes with a high content of rust. By the way, the filter has to be changed very often, which may be why the plumbing works for a long time without repair.
I encountered the following problem: the water did not stop after the flush was completed. I fiddled with this tank all evening and the second day, I spent a lot of time and effort.Maybe, of course, my hands are in the wrong place, but for the future I decided for myself that everyone should mind their own business. Next time it’s better to call a specialist right away. Although everything is described here easily, it is actually a lot of time for a person who has never encountered this.
The toilet in the installation below is leaking, knee-deep onto the floor. It's dry at the back. There were already 5 plumbers who reinstalled the toilet with a new set of pipes. We curse the day we decided to install it
Thank you very much! Thanks to you, everything worked out for me.
Help with advice. I want to do it on my own. After drawing water, the water flows into the toilet through the flush valve. What and how to do? Tank "Groh" with one button. Thank you.
Hello. Most likely there is a problem with the seal. Detailed information on this topic is available in this and in this articles.
Toilet with bidet included, the bidet button is leaking, how to unscrew this button
Installation "Visa" in a new building. After installation, we used it only occasionally for a year, because... We're not living yet. Water stopped flowing into the tank after draining. As soon as you turn off the water supply valve to the apartment and open it again, it fills up. Then everything repeats itself. What is the reason - are there knowledgeable people?
The same nonsense with the installation “Visa”. Only used it for a couple of days, and then stopped filling after flushing))
Alexander, you need to slightly bore (make it oval) 2 holes in which the lever that is connected to the float is held. So it is necessary that the lever presses the gasket a little less.Then, at the moment of opening after draining the water, the pressure is released and the same thing happens as after closing/opening the water supply valve.
We installed the installation, and when flushing, water flows as long as you hold the button. When you let go, it stops flowing. How can I set it so that when pressed, the entire barrel is drained? Thank you
Hello. You will find this information in this article on our website. Please read.
Everything worked out! Thank you!..
There is also a problem with water leaking into the toilet when it is at rest. A small amount, but still, it’s money being flushed down the toilet...
Good afternoon. I have a Geberit system. When flushing, there is a weak water pressure that does not completely wash the entire toilet. Although there is enough water flowing. In other bathrooms of the house there is a strong pressure (that is, it is not related to the general water pressure). Is something broken in the Geberit drainage system?
I have the same problem. Two identical toilets and Geberit installations. One doesn't wash off well. I haven't found a solution yet (
When I wash off, rusty water flows, what can I do? The water running from the tap is normal. Since the barrel is hidden behind the wall, it cannot be removed and cleaned, is there any way to remove rust?
Hello. For ceramic tanks - acid-based products, for metal and plastic - something alkaline. There are plenty of products in any household department of stores - Sanita, Silit, various gels, capsules, etc. You can, by analogy with a washing machine, use folk remedies - lemon juice, soda, vinegar, Coca-Cola.
Good afternoon Thank you for the complete and useful information for everyone. I just have a problem with a violation of the system for draining working fluid into the sewer riser. Background: we installed a ceresit wall-hung toilet, everything works well, sometimes after draining the water does not fill into the tank, but when you press it again 3 times, water does fill. Sometimes I heard water dripping into the tank; when you open the hatch, you can see that water is dripping from the internal parts when filling (I don’t know for sure). And recently a KSK plumber came, saying that we were drowning the neighbors below.
They opened up part of the bricked-up riser (the problem was with the riser) and along the way he saw that the water supply from the common pipe of the house to the toilet goes through a flexible hose, but according to the rules, he said it must be a plastic pipe. Because this hose can burst at any moment due to pressure or wear, metal corrosion, etc. - offered to replace it.
Question:
1. What is the probability of a break in the flexible hose (water is drawn through it into the tank and that’s it).
2. After this, we partially turned off the tap from this hose (to reduce the water pressure) - will this help?
3. But another problem arose (whether this is due to a partial shutdown of the water supply or not - I don’t know), but the water in the toilet began to drain for a long time and slowly, visually there was enough water volume, but it seemed as if there was not enough strength (it’s not clear how to write correctly) and even It’s just that when I poured out half a bucket of water, the dirty water stayed above the normal level for longer than usual and took a long time to drain away. The “mole” fell asleep at night - the situation did not change.
The main question for all experts is: what to do? Change the hose to a plastic pipe? Open the water supply? Or something different?
Hello!
I have two German wall-hung toilets with Geberit installation. They have been working for 20 years.One toilet stopped draining low water. When pressed, nothing merges. What could it be? How to fix the problem?
Same problem. Geberit installation. Suddenly, for no apparent reason, the small button began to be pressed freely and did not drain anything, the large one worked fine. I watched the videos and removed the release valve. I calmly lift the ear of the small drain, but I don’t understand how and what it should cling to in order for the valve to rise, there is a small plastic hook down there, it goes into the slot, but it also calmly comes out of it and doesn’t cling to anything, it goes in and comes out. I don’t understand how it should work, and I don’t understand where to read how a small drain should work. While I am using the large drain, the small one is resting and looking for materials.
Michael, did you find a solution? same problem.
Good afternoon Same problem, did you solve it?
Hello, something happened to the flush button, it’s a wall-mounted one with two keys, so where the keys meet in the middle of the button, they both jumped out and it turns out that they protruded forward (they folded over the roof of the house) they protrude now, how can I fix it?
I see water in my button, what could it be?
Hello. Somewhere there was a seal failure. Most likely in the flush mechanism.
Hello! Maybe someone can tell me. Why can a toilet water seal fail (installation)? We made repairs, replaced part of the drain pipe and, accordingly, the horizontal pipe to the toilet. The drainage system in the bathroom was also replaced. The bathtub and sink drain work without problems, but there is a problem with the toilet flush. Moreover, not always.It’s as if something is preventing the waste from passing through the toilet. The problem initially appeared after using the toilet for three days. Then they thought that the paper did not dissolve enough in water and a blockage occurred. But the blockage is somehow strange, the water slowly drains out of the toilet with air leaking. They cleaned it up and stopped throwing paper down the toilet. Everything has been working fine for three days. No air leak. Then the “gurgling” in the toilet began again and the masses did not go down the drain. We asked the neighbors, maybe they had the same problem, perhaps due to a clogged drain pipe. But no, no one has anything like that. Now we are racking our brains, why does the toilet water seal fail?! Due to improper installation or is it the design of the toilet (as my repairmen told me) or something else? Has anyone encountered this problem, please help me solve it. I will be very grateful
Most likely there is a clog in the sewer vent pipe in the roof or attic. In winter usually ice, in summer foreign objects or the body of a bird. Treated by cleansing
Hello, it takes a long and noisy time for us to fill the tank with water. Can I somehow fix it myself? Installation Am Pm.
Hello. Please tell me how to get out of this situation. Installation of Roca, unclear draining process. When you press the button, it flushes; when the flush is complete, the water stops flowing into the toilet, and you can hear the tank filling up. After some time, water begins to flow into the toilet and this continues for about 30 seconds, after which the water supply to the system stops and, as a result, it stops flowing into the toilet. What could be wrong and what to do about it? Thanks in advance for the hint.
same problem with Roca.
Good afternoon. We have been using Geberit installations for over 20 years. After a break in use of about 9 months, a problem appeared. After flushing, after approximately 1-2 minutes, a small amount of water flows out from the seam between the wall in which the installation is located and the floor. If you remove it and do not use the flush, then water no longer flows. If you flush several times in a row, the volume of leakage increases and can involve the seam between the floor and the adjacent wall (the installation is installed near the corner). Thanks in advance for the advice.
Same problem. Were you able to fix the leak?
Good afternoon. The apartment has a new Grohe installation. We rarely use it, we don’t live there all the time. After flushing and filling the tank, water begins to flow. Lightly tap the tank and everything will return to normal. What is the reason?
Hello. I fight the smell from the drain barrel with the Roca Gap system. Maybe because the water was bad and dirty for several days in the summer, I opened it and saw that the tank was covered with a gray-green coating. I washed everything with bleach and mole and antibacterial soap and throw in dissolvable tablets, but it’s true that I can’t wash everything with a brush, there’s a residue here and there. For some time the smell disappeared on its own. Yesterday again I don’t understand how I showed up. I apologize for being rude, but the smell of “dead meat” is disgusting. At first it seemed like the smell of a swamp or stagnant water. But now it is no longer possible to hear him. Maybe the problem is not the plaque on the walls and parts of the drain?
Good afternoon A GROE system with a pneumatic button is installed. After flushing, a sound similar to a passing truck appears. Especially the hour
It appears when flushed with a small amount of water, and is eliminated by repeated flushing, but not always. What to do?
Good afternoon A GROE system with a pneumatic button is installed. After flushing, a sound similar to a passing truck appears. It appears especially often when flushing with a small amount of water; it is eliminated by repeated flushing, but not always. What to do?
Good afternoon. For an accurate answer as to what exactly the malfunction is, you need to contact a specialist.
Hello. The new cersanit installation drains water very noisily. It seems that air is mixed with the water: the water is seething and “snorting.” Could this be the case?
Good day. Vitra installation. Served for 10 years. There was a leak from under the toilet. I thought that the gasket on the water supply pipe from the tank to the toilet had deteriorated. There was a problem that was not written about anywhere. The tank itself burst at the bottom. Two small cracks. Water flows from them. Tell. What repair options are there? Blowing up the entire wall and changing the tank is very painful.