How to repair a water heater with your own hands: methods available to the home handyman
An electric boiler is an effective solution to the problem of hot water supply for a private home.Such equipment, however, like any other, periodically breaks down.
If you wish, you can repair the water heater yourself, provided that the breakdown is simple. But serious damage will have to be repaired at a service center.
In this article, we will analyze common types of breakdowns and provide recommendations for eliminating them, which will allow any more or less experienced technician to cope with the repair.
The content of the article:
Operating principle of a water heater
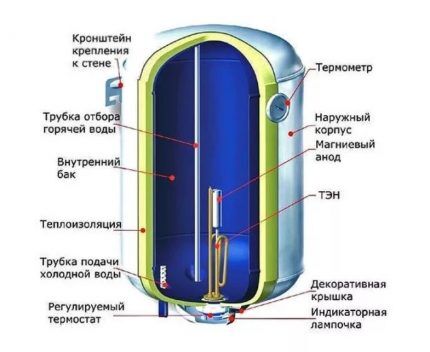
To minimize problems with the device, you should study its structure and operating principles. Typically, private households use not flow-through, but cumulative models, which allow you to use electricity more efficiently. Such a device consists of a heat exchanger tank, inside of which a heating element is installed - a heating element, connected to the power supply.
An important part of the device is the thermostat. This element allows you to maintain a constant temperature of the water inside the storage tank. Water flows through pipes into the heat exchanger. If its temperature is too low (and this is usually the case), then the thermostat sends a signal and turns on the heating element.
The water is heated until it reaches the required temperature. After this, the thermostat operates again and turns off the heating element. Hot water is taken from the tank and replaced with cold water, the heating process is repeated again and again.This is a general diagram of the design and operation of a conventional storage water heater.
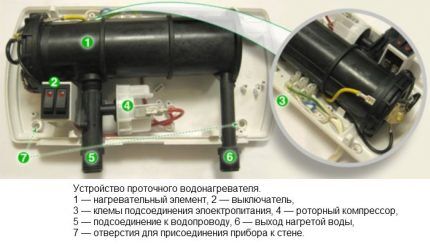
Also popular among consumers instantaneous water heaters, which are presented on the market in a wide range. Such models are arranged somewhat differently. They heat not a static volume of water, but a flow. They use more powerful heating elements that start when the water is turned on and stop when it is turned off.
To study the operation and design of a particular model in more detail, you need to carefully read the technical documentation accompanying it.
The heater tank is a durable stainless steel container, one or two millimeters thick. No matter how resistant this material is to corrosion, these processes still periodically arise and develop, which leads to water leaking from the device. One of the common causes of such breakdowns is electrocorrosion.
To prevent it, you need to regularly, i.e. annually replace the magnesium anode installed inside. This element is designed specifically to prevent electrocorrosion. Over time, it wears out, and storage tank owners neglect to replace this important part.
As a result, the tank, which has been serving well for some time, suddenly begins to leak. The incorrect condition of the magnesium anode can also affect the condition of the heating element.On the outside, the storage tank is usually enclosed in a metal or plastic housing, and it also has an insulating shell that prevents heat loss.
Damage to the outer shell and insulation occurs rarely, usually due to careless handling of the device. Cracks and chips on the body of the water heater may not disrupt its operation, but this will lead to a deterioration in the properties of the heat insulator and will negatively affect the functioning of the device as a whole.
Inlet pipes for cold water and outlet pipes for hot water usually do not cause any problems if installation of storage or flow-through heater is installed correctly.
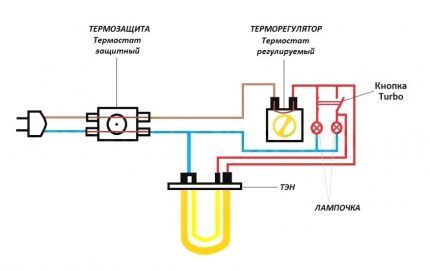
Typically, a water heater is equipped with two thermostats, one of which is designed to control the water temperature, and the second monitors the condition of the first device.
Sometimes a third thermostat is used, which determines the working condition of the heating element. In any case, a broken thermostat will have to be completely replaced. There are capillary, rod and electronic types of thermostats. Their design is different, but the principle of their operation is similar.
The insulating gasket not only serves to seal the connection between the elements of the water heater, it is also necessary as an electrical insulator. It is recommended to replace this element regularly during each maintenance of the water heater.
The thermostat shows to what temperature the water inside the device is heated. If this element breaks, the water heater will still perform its functions, although data on the degree of heating will not be received.
Common breakdowns and repair methods
Next, we will consider the most common problems with a water heater and provide repair methods for each of the breakdowns.
Problem #1 - heating element malfunction
Failure of the heating element is a typical problem for both instantaneous and storage water heaters. This element works under high load and therefore wears out quickly. If the power supply is connected, but the water in the tank does not heat up, most likely the problem has arisen with the heating element.
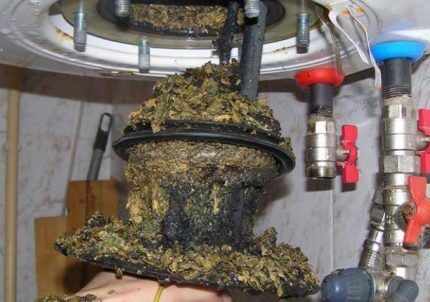
First, you should check whether electricity is flowing to the heating element and thermostat. At the cable connection points, check the presence of voltage with a tester.
If there is no power, you may need to replace the cable itself or check to see if there is a power outage throughout the house.
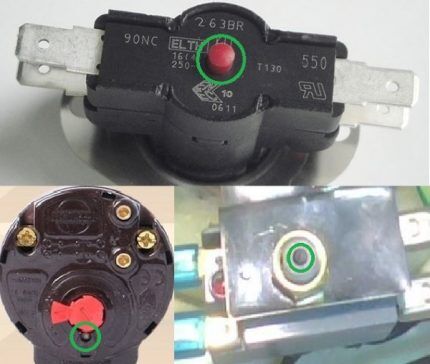
If there is electricity and the cable is working properly, then problems have arisen with the heating element, which will have to be replaced, or with the thermostat. To figure out what exactly is broken, you need to remove the thermostat and check it with a tester.
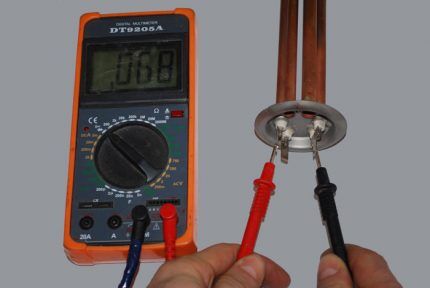
Testing the serviceability of the heating element is carried out as follows. First, the measurement scale of the device is set to the range 220-250 V.Then measure the resistance at the terminals connecting the heating element to the electrical network.
If there is voltage, you should disconnect the heating element from the network and check the potential at the terminals of the heating element. The lack of response from the tester will indicate that the device is faulty. If there is a reaction, you need to continue the diagnosis.
First, disconnect the water heater from the power supply. Then the heating element is disconnected from the thermostat so that the contacts of the heating element remain uninsulated.
The contacts of the tester are applied to them and the reaction is observed. If it is there, the heating element is working; if not, it is necessary replace the heating element. In this case, it does not matter what numbers the tester produces, only the presence or absence of a reaction is important.
These fault detection methods are suitable for both storage electric water heaters and instantaneous models.
Problem #2 - thermostat failure
To check the serviceability of the thermostat removed from the water heater, you need to set the adjustment knob to maximum and take measurements at the inlet and outlet of the device. If the tester's needle remains calm, i.e. its position does not change, which means the thermostat is faulty and needs to be replaced.
If the arrow deviates, then you need to continue testing. Now you should set the thermostat to the minimum position and apply the tester's measuring probes to the contacts.It will not be easy to continue the diagnosis alone; you will have to fix the probes or ask someone to hold them for some time in the correct position.
After this, you need to take a lighter and heat the tip of the temperature sensor. If the thermal relay works, the circuit opens, and the resistance on the tester scale goes down sharply, then the thermal relay can also be considered working. If the system does not respond to heating, then this element is damaged and needs to be completely replaced.
Sometimes the water heater may stop working due to tripping safety valve as a result of dangerous overheating of the device. It is enough to correctly adjust the operation of the device so that it starts working as usual.
Problem #3 - control board malfunction
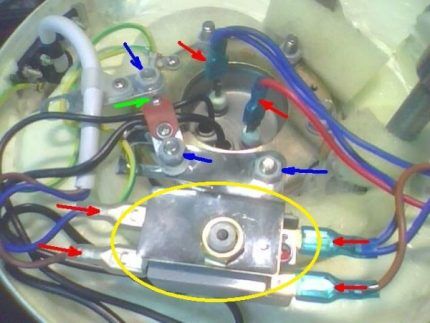
If the check shows that both the heating element and the thermostat are working, most likely the problem has arisen with the control board. It is almost impossible to repair such an element at home.
You will have to replace it with a new one, and you will have to use the help of a specialist who will help you set up the electronic equipment. Most often, you just need to contact a service center, where the required element will be selected and installed correctly.
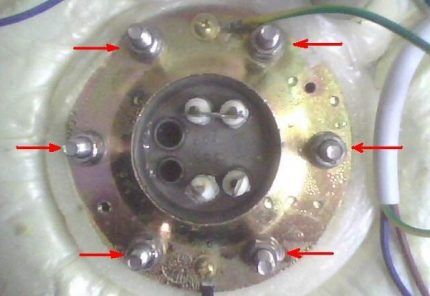
Problem #4 - tank leaking
A tank leak is a serious problem that you can’t always fix on your own. In some models, either the tank or the entire heater will have to be replaced.
Sometimes the leak can be sealed, but care must be taken to restore the integrity of the outer casing and the thermal insulation layer. Usually such measures are insufficient and short-lived, and soon the leak will occur again.
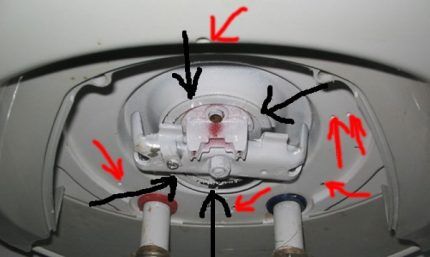
A water heater tank is most likely to leak if:
- damage to the internal tank has occurred;
- the heating element has deteriorated;
- the gasket has leaked.
If water flows at the place where the heating element is attached, it may not be necessary to repair the tank itself. A special gasket is installed in this place; a leak may be caused by its damage. The gasket is replaced and this solves the problem.
A leaking water heater tank is usually caused by neglect or late maintenance, which also includes replacing the magnesium anode. Another common problem is lack of grounding. This can also lead to the development of corrosion processes and leakage.
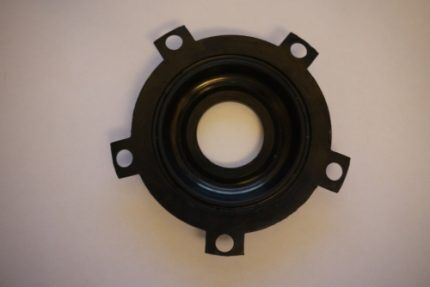
If you need to replace a gasket or heating element, it is best to first dismantle the faulty element in order to take it with you and select an exact analogue. Purchasing parts by eye can lead to unnecessary expenses. Making such a replacement is relatively easy.
But if problems arise with the tank, you will have to at least contact a service center.You must immediately find documents for the water heater and clarify the warranty periods and service conditions.
We bring to your attention the article - How to repair a blender.
Recommendations for home repairs
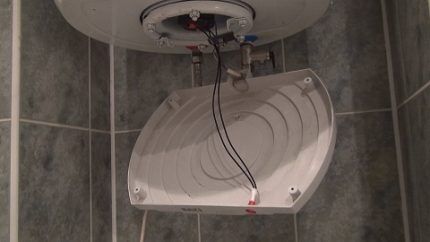
Regardless of the nature of the breakdown, before starting repair work, you first need to turn off the power supply, remove the protective cover, disconnect the wires, pipes and drain the water.
Wall-mounted models are usually removed from their brackets. The protective cover, which hides the connection point for electrical wires and the mounting of heating elements, may have a different position depending on the model.
On horizontal devices, this element is usually located on the left, on vertical heaters - at the bottom, and on small models - in front. In some devices, you first need to unscrew the main mounting bolt located in the center. Sometimes this element is hidden under a decorative sticker.
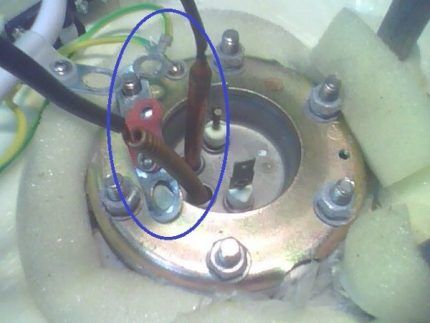
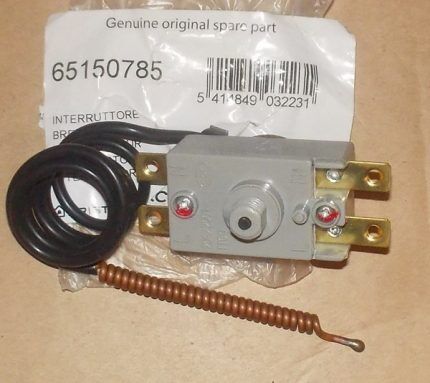
After this, you need to carefully remove the thermostat, and then remove the temperature sensor tubes. They must be handled very carefully. If the integrity of the temperature sensor tube is damaged, liquid filler will leak out of them. As a result, you will simply have to throw away the water heater and buy a new device.
If there are stickers on the case that indicate the serial number, they must be preserved, even if they interfere with the maintenance and repair of the product. This may affect the manufacturer's fulfillment of warranty obligations, as well as make the work of service center employees easier.
Basic rules for servicing the device
For long-term and trouble-free operation of the water heater, it is important to follow rules of its operation and service. Otherwise, breakdowns are inevitable.
The fact that problems have arisen in the operation of the device may be indicated by some changes in its operating mode:
- increasing the time for heating water to a given temperature;
- the appearance of unusual sounds accompanying the operation of the device;
- the appearance of foreign impurities in tap water, changes in its color, smell or taste.
If at least one of these signs is observed, you should immediately clean the water heater.
To do this you will have to perform the following operations:
- Disconnect the device from the power supply.
- Remove the protective cover.
- Disconnect the contacts of the electrical wires.
- Shut off the cold water supply.
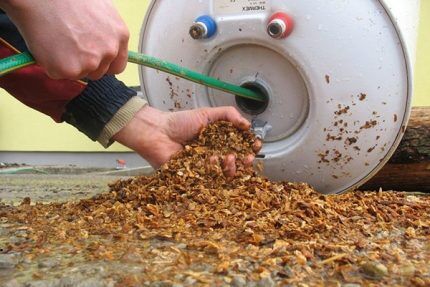
- Use a hose to remove any remaining water from the tank.
- Unscrew the bolts that hold the heating element.
- Remove the heating element and descale it.
- Clean the inside of the drive from dirt and scale particles.
- Rinse the device thoroughly.
- Check the serviceability of the magnesium anode.
- If necessary, replace this element immediately.
- Wait for the cleaned tank to dry completely.
- Reinstall the heating element.
- Reassemble the device.
- Check the reliability of all fastenings.
- Connect the water heater to the power supply.
- Check for grounding.
The heating element should be removed from the tank carefully; the bolts may be too stubborn; sometimes the heating element is difficult to remove due to too much scale.
The heating element is cleaned by mechanical or chemical means, as is the removal of contaminants from the tank. If a large amount of scale is found inside the device, you should consider reviewing the operating mode of the water heater.
This phenomenon is often observed when the device operates at maximum power for a long time. It is recommended to set the maximum heating temperature no higher than 60 degrees to increase the life of the device and reduce the number of breakdowns.
If the body of the heating device receives an electric current, the heating element may be deformed and ruptured, or there may be a breakdown in the control system.
Conclusions and useful video on the topic
A detailed video on diagnosing the condition, maintenance and self-repair of household water heaters can be viewed here:
Repairing a water heater is not so difficult if we are talking about replacing some of its elements. In the event of a serious breakdown, it would be wiser to contact a specialized service center. Proper operation of the device and its timely maintenance will save you from many problems and expenses.
Have you been repairing water heaters for a long time and want to supplement our material with useful tips and professional secrets for eliminating various types of breakdowns? Or is this the first time you’ve encountered a malfunction and can’t find its cause? Write your comments, ask questions, share your opinion below the article.


The only problem is that all manufacturers have recently developed completely different water heater designs. Recently I actually saw one such Chinese one, cheap, as it turned out, “disposable”, i.e. you start to climb in there, and once you unfasten the lid, you can’t put it back. This, apparently, is the know-how to make people shell out money for new water heaters more often.
Nikolay, even one manufacturer has different boiler designs, so why be surprised?
I like it when the flange is unscrewed from below, then there is normal access to the anode and heating element. There are boilers where you have to completely dismantle it just to clean it, they attach a lid to the top, and hang the boiler from the ceiling. That's another problem. Consider doing the installation all over again. Drain, remove, repair, and hang up this bandura.
I have never met such boilers in which the lower part could not be returned to its place. Apparently quite China. Although China is different from China. The same Termex, as far as I know, is Chinese, but everything is done according to Feng Shui - the bolts are unscrewed, the bottom is removed and both the heating element and the anode are changed. So at this point you can try to clarify it when purchasing, or google it at worst.
Tell me, if the tank leaks in one place, is there another way to fix it? Solder it there or do something else. Or is the boiler going to waste? I'm just thinking about the money for such a repair. Many people say that it is cheaper to buy a new one and that any soldering will not be reliable and airtight. By the way, including masters of the same opinion. But maybe it makes sense to give the tank to some welder?
Hello.If you could tell me what model you have and where the leak is, it would be easier to answer your question. But in general, the masters you consulted with are absolutely right. Apparently they diagnosed a leak. Most tanks are coated on the inside with glass enamel, stainless steel or plastic. Welding work with such a coating is contraindicated. And in any case, soldering will not be a reliable and durable method of solving the problem, especially since there is a “wound” from inside the tank.
The other day I encountered this problem. The tank began to leak where the flange was attached. I disassembled it, dried it and found a crack on the flange, above the rubber gasket. I cleaned the crack using an engraver and filled it with epoxy. So far everything is working fine, no leaks. But I have already ordered a new boiler. When filling with epoxy, it is necessary to take into account the fact that the longer the life of the glue, the more difficult the repair. Glue that hardens for a long time constantly leaks out of the crack. I used epoxy with a hardening time of 20 minutes and a joint density of 100 kg per m2.
I have a question. Installed a new STIBEL ELTRON. When the pressure in the city water supply network, the pressure does not rise above 3 atm, but the valve constantly releases water when heated (although it should be somewhere around 6 atm). The installers say that this is how it should be. It seems to me that it is set to a different pressure... and you have to pay for water.
The Monlan boiler began to display the temperature incorrectly, it shows 25-29 and that’s it, everything works, heats up, turns off, is the control unit broken?
Water heater Redber. When no one is home, we turn off the water heater.When it cooled down it stopped turning on normally. If you press it a few dozen times, it will turn on, but recently, even when heated to the maximum temperature, it will turn itself off. Tell me what the reason is.
Hello, I have a lot of voltage or I don’t know, the wires are heating up from the water heater, they’re smoking, what should I fix?
maybe it will be useful for someone... if the heater is normal and you have a cheap one without a display and only 2 light bulbs - heating and waiting and the boiler does not work, test the moment...... on the tank there is a tablet with 4 pins.. and there is a pin in the center………. == this is a machine gun platoon... as in email. vending machines in the apartment - only visually changed. click and you will be HAPPY…….