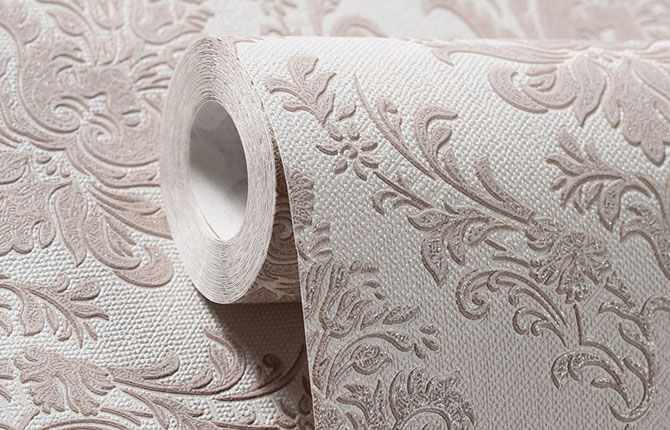
How to hang vinyl wallpaper quickly and easily - step by step guide
The main thing before gluing vinyl wallpaper is to carry out preparatory procedures.It is important to choose the right glue and then strictly follow the instructions on how to glue vinyl wallpaper. In this case, the coating will lie flat, without stains, smudges or air bubbles.
The content of the article:
Basic Rules
To ensure that the walls in the room are beautiful and smooth, and the coating is held firmly, the following rules must be observed:
- Vinyl-based wallpaper with ornaments is glued strictly joint to joint, making sure that the pattern is drawn up. Direct gluing is carried out if the pack has an icon with arrows running opposite each other. In other cases, it is necessary to glue the sheets with an offset. This indentation in centimeters is indicated on the packaged roll.
- Before gluing, select an adhesive that matches the structure of the coating. If the base is denser - non-woven, purchase an adhesive composition intended directly for vinyl wallpaper. If the coating is paper, standard glue will do.
- The canvases are glued strictly in the direction from the ceiling to the floor. Initially, the part that goes in the center is pressed tightly. After this, excess glue and air are expelled to the sides. This is done with a dry rag or a thick rubber spatula.
- For an even coating, the edges must be leveled especially carefully. Each individual counter joint must be worked with a narrow roller made of dense rubber.
- After gluing each strip, it is necessary to remove excess adhesive mass. This way you can prevent stains from forming on the walls.
In addition to the general rules listed, it is important to consider the basis of the finish. Paper webs are relatively light in weight. Non-woven wallpaper have a relief coating, which significantly makes the canvas heavier. When gluing this factor must be taken into account.
Depending on the category of wall covering purchased, there are several additional rules:
- if you have vinyl wallpaper made on standard paper, glue should be applied both to the cleaned wall and to the paper sheets;
- If the purchased coating is non-woven, only the walls are covered with glue, the finishing material itself remains dry.
Rules for choosing glue
Choose an adhesive that matches the base material. In any case, do not use the usual PVA glue and self-mixed paste. PVA will not provide high quality gluing. The canvases will slide under their own weight.
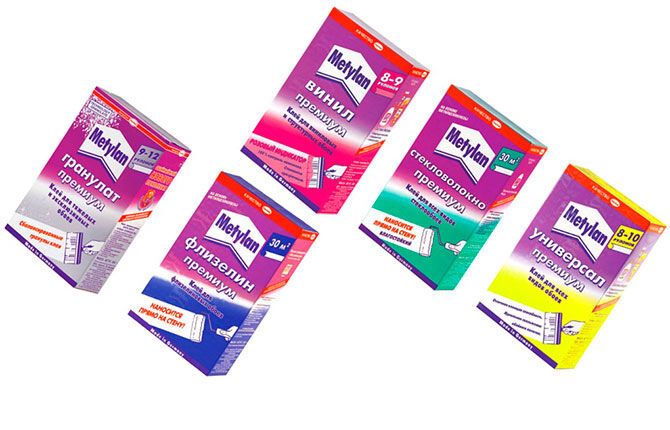
It is not recommended to glue with paste. A substance made of starch and flour is considered an ideal basis for the appearance of various microorganisms. For gluing you need to purchase a special composition, sold in construction and repair stores. Here you can follow 2 rules:
- For non-woven wallpaper, you need to buy a special adhesive that has the purpose for vinyl written on it. It contains chemically modified starch. To protect against mold, antiseptic components are used, which simultaneously increase viscosity and adhesiveness.
- For paper wallpaper, standard wallpaper glue is suitable. But provided that the surface of the canvas does not have three-dimensional patterns, which significantly make the wallpaper heavier.
The amount of glue purchased depends on the consumption indicated on the package.On average, to stick four stripes, you need 180 g of dry powder.
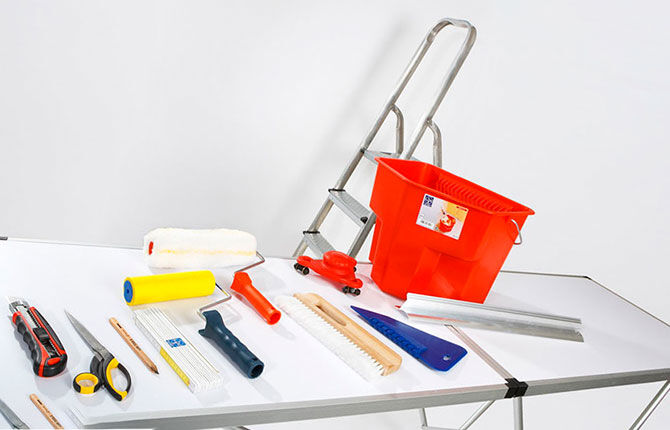
Tools and accessories
In order for vinyl wallpaper to be hung efficiently, it is important to carefully prepare and buy the following:
- a bucket or basin for mixing glue;
- construction roller to remove excess glue and air;
- floor protection film;
- clean rags for various small jobs;
- narrow rollers for rolling opposing joints;
- wallpaper knife, spatula for cutting cloth and pencil;
- rubber spatula for adjusting strips;
- special corner roller for leveling corners.
Preparatory work
Before carrying out interior finishing, the following preparatory measures must be carried out:
- Choose wallpaper and suitable glue.
- Prepare the wall surface.
- Remove traces of previously carried out repair work.
- Cover the floor with film.
- Turn off the electricity supply.
- Take off switches and sockets.
Next you can mix the glue. The procedure is carried out in accordance with the instructions. In most cases, you need to do the following:
- Dry adhesive granules are poured into warm water.
- The solution is mixed during the filling process using a screwdriver or manually.
- Having prepared the adhesive mixture, they begin to glue. You must first make sure that the wall surface is level and clean.
Vinyl wallpaper should not be glued to old paper coverings, paint, or polystyrene foam. The coating will not adhere to tiles or laminated plastic panels.
Concrete walls are ideal, but they often have defects. They are removed using putty. Only then can you glue the canvases. Plasterboard walls require minimal preparation.The only thing that needs to be done is to remove the remains of the old coating, lime, whitewash or paint, as well as other contaminants.
Regardless of what material the walls are made of, after cleaning and necessary leveling, a primer is applied. It enhances the adhesion between the wall and the decorative material, making it stronger and more durable.
Gluing procedure
Before gluing, cut individual strips. This is done taking into account the drawing. If a shift is necessary, a small margin is taken into account. The distance should be enough to select an ornament. The strips should be glued end to end; overlapping is not allowed. If the purchased vinyl wallpaper is made on non-woven material, there is no need to lubricate it. In such a situation, gluing comes down to simple 4 steps.
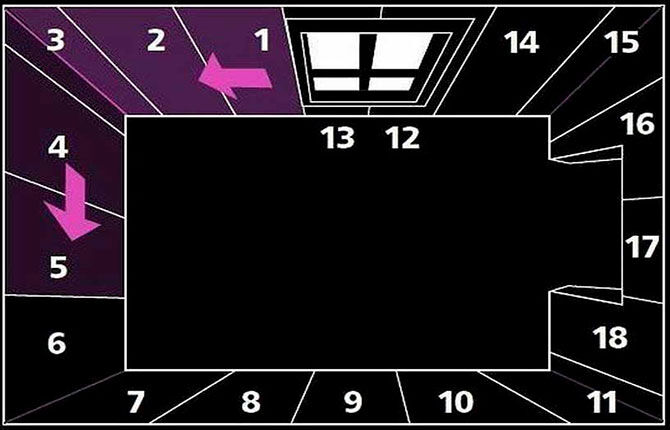
Surface marking
They start gluing strictly from the window. For this purpose, the width of the strip of vinyl covering is measured, and then a line is drawn using a building level. The entire area is marked in a similar way. This allows you to calculate how many stripes will be needed to decorate the entire room.
Preparation of strips
Correctly cut strips are spread out. The pattern is adjusted and only then can they be glued in a predetermined order.
Wallpapering
The upper part of the first strip is applied to the wall previously coated with glue. Using a dry roller, press the center of the strip along the longitudinal axis. This is done from the ceiling to the floor. In a similar way, carry out from the center in both directions, simultaneously removing glue and air.
The ends of the vinyl strips at the top and bottom, as well as the joints, are rolled with a prepared narrow roller. Excess glue is removed with a roller or rag.
The final stage
The excess is cut off with a wallpaper knife.For an even cut you need to use a spatula.
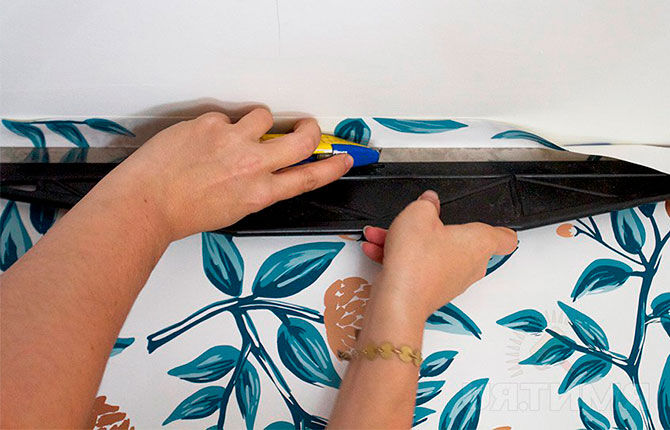
Pasting on difficult areas
It’s easy and simple to apply vinyl decorative covering to straight and previously thoroughly cleaned walls. Difficulties arise when finishing corners, in areas where switches are located. In such a situation, use special tools and follow these rules:
- when gluing areas around doors and windows, you need to make pieces of a suitable size in advance;
- when finishing the wall behind the battery, you also need to prepare carefully calibrated elements in advance;
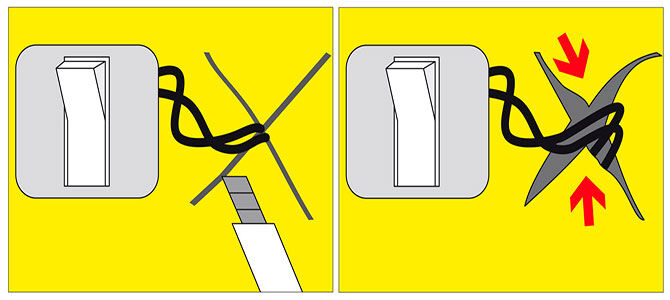
- When gluing areas with switches located, it is necessary to make a cross-shaped cut in the vinyl sheet.
Which is better, non-woven or vinyl wallpaper: advantages and disadvantages + subtleties of choosing wallpaper. You can read about this in our article link.
Drying period
To make vinyl wallpaper dry faster, the room should not be ventilated throughout the day. The presence of a draft will lead to overdrying of the coating, it will lose its shape and appearance. Forced heating of the room is undesirable. Windows can be opened after 24 hours. If it is frosty outside and the apartment is cool, you will need to wait 2-3 days for the vinyl coating to dry.
If you follow the instructions presented above, you can stick vinyl wallpaper without problems and quite quickly. This is a great opportunity to save money without having to turn to professionals.
How did you do the renovations, how did you hang beautiful vinyl wallpaper? What secrets do you know? What problems did you encounter during the renovation? Tell us about it in the comments. Share the article on social networks and save it to bookmarks so that you have information at hand during repairs.
The author of the video will tell you how to properly glue vinyl wallpaper: