Installation of a chandelier on a suspended ceiling: the main stages of self-installation
Stretch ceilings attract with their unusual texture and perfectly flat surface. Now they are installed everywhere - in offices, trading floors, apartments and houses.The range of canvases is varied: you can choose simple options or complex designs with three-dimensional effects and original designs.
But, before installing such beauty at home, you should think about lighting. After all, installing a chandelier on a suspended ceiling involves many nuances. If you do not take them into account, you can easily damage the surface, hopelessly ruining its aesthetic appearance.
In our material we will tell you how to choose the right lighting fixture, analyze possible methods of attaching lamps to tension structures and give detailed recommendations for do-it-yourself installation. In addition, we will explain what to do in the case when the canvas is already stretched, and the installation of the chandelier was not thought out in advance.
The content of the article:
Requirements for chandeliers for suspended ceilings
Not every chandelier is suitable for installation on a suspended ceiling. The main catch is that PVC fabric and textile materials can darken and deform due to bright directional light from lamps and exposure to high temperatures.
The power of the incandescent light bulb in the device should not exceed 60 W for textile coating and 40 W for PVC fabric. This lamp produces little light, so you should opt for multi-track models or mount several devices.

Lamps with lower wattage (less than 40 W) do not create dangerous heat, which significantly extends the life of the tension fabric. As an alternative better choice of light bulbs with sockets for LED and energy-saving light sources, which can be used without restrictions.
The distance from the device to the stretched covering also matters. It is desirable that the design allows the lamp to be hung at a distance of at least 25 cm from the ceiling. You should be especially careful with “dish” type shapes: they must have a special diffuser above the lamps and a non-metallic base.

In addition, when choosing a product, you need to take into account the type, shade and texture of the stretch fabric, and focus on the interior design of the room. Classic horn models and devices with a wide horizontal surface are not entirely suitable for glossy coatings. Overly complex and heavy structures should also be avoided.
In addition to the chandelier, are you also planning to buy lamps for installation in a suspended ceiling? We recommend that you familiarize yourself with their main types and nuances of choice the best option.
Methods for attaching ceiling chandeliers
There are two ways to attach chandeliers to the ceiling. The first of them involves fixing on the hook, the second - on a straight line or cross-shaped mounting plateu.The nature of the preparatory work before installation depends on how exactly the device will be mounted.
Hanging hooks
The hanging hook is one of the most common mounting units in lighting configurations. This item is usually included in the basic kit, but can be purchased separately. Chandeliers suspended on a hook are equipped with a special ring, bracket or carabiner on the body.

Main types of fasteners:
- anchor – fixed by surprise in a pre-drilled hole of the required diameter and depth;
- through type – fixed through the floor covering during the construction of the building;
- mortgages – used for floor panels that have hollow channels.
The size and type of hook is selected according to the weight of the device.
This method of fastening for suspended ceilings is considered simple and quite reliable, but there is always a risk that the base of the device will be uneven. The hooks are fixed in the black ceiling, and a hole is made in the tension fabric itself, through which the device is suspended.
Mounting plates and strips
Mounting strip - a fastening metal profile equipped with studs or side holes with threads and clamps. This structure is attached to the ceiling, and the chandelier is placed on protruding studs, secured with decorative nuts. The main load is taken by the floor slab.

Mounting plates have standard dimensions and similar characteristics, and there are several types:
- longitudinal – designed for light, small lamps;
- cruciform – consist of two long strips, used for medium-sized devices with a large base diameter;
- I-beam – necessary for fixing heavy, oversized chandeliers.
Installing a lighting fixture with a strip on a suspended ceiling is much more difficult than mounting it on a hook. But in this case it is easier to ensure that the chandelier hangs evenly.
Step-by-step instructions for installing a chandelier
All preparatory and installation work, including laying electrical wires, fixing embedded elements and main fasteners for the chandelier, must be carried out before installing the tension fabric. Let's look at all the nuances step by step.
Step #1 - preparing tools and materials
To install the lighting device, you should prepare a set of necessary tools.
First of all, you will need a hammer drill or a hand-held electric drill and a stepladder of sufficient height, which can be replaced with a regular table.

You will also need:
- switch and distribution box;
- appropriate wires and terminal blocks;
- stripper or other tool for removing insulation from wires;
- drills for concrete and wood;
- pliers or side cutters with insulated handles;
- a roll of insulating tape;
- stationery knife with a sharp blade;
- screws and dowels;
- decorative flask or glass;
- plastic rings for tension fabrics.
In addition, you should find a suitable wooden block or moisture-resistant plywood, which will serve as a mortgage structure.
Before starting the installation process, you should carefully read the instructions that come with the product. Typically, this manual provides detailed recommendations for connecting a specific model.
Step #2 - wiring
The main preparatory stage preceding direct installation is laying the wiring for connection to the electrical network. This work will require knowledge and experience in electrical installation work. It is also important to follow safety rules in this matter. If you have doubts about your own abilities, it is better to use the services of an electrician.
The first thing to do is make a plan with a diagram the location of all electrical devices that are planned to be connected. On the base ceiling, marks are placed in places where lamps can be potentially attached and areas where wires pass are marked.
It is important that the wiring is safe and can provide the required voltage to all devices. Therefore to choosing the right cable you need to approach it responsibly. The best option for these purposes is a VVGng format cable with a low-flammability sheath.
Cable cross-section selected depending on the power and number of installed lamps.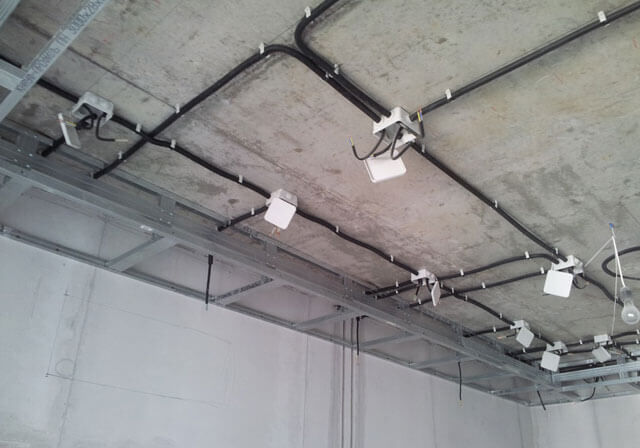
Before starting work, it is necessary to de-energize the room by turning off the power supply in the distribution panel. You can check whether there is current supply using a regular indicator screwdriver.
Then you need to lay the prepared cable to the calculated installation locations of the devices. Open installation behind a suspended ceiling is not recommended: it is wiser to insulate the cable with protective corrugation. This will ensure fire safety of the tension structure, prevent deformation of the coating, possible short circuits and breakthroughs. The corrugated casing is attached to the ceiling slab with brackets.
The wiring is fixed to the base ceiling using special clips or dowel clamps. They should not sag or touch the tension fabric. The recommended fastening step is 50-90 cm. If the wires intersect, they should be additionally insulated at the intersection points. Before stretching the fabric, it is important to check the voltage supply for each lamp.
We discussed in detail the main nuances of competent installation of electrical wiring with our own hands in this article.
Step #3 - preparing the base
Preparation of the base depends on the chosen option for hanging the chandelier.
In the case of hook mounting, it is enough to drill an opening in the concrete surface of the ceiling equal to the diameter of the fastener. Usually it is 6-14 mm, which depends on the weight of the device. If the length of the hook is not enough for fastening, you can supplement it with a strong chain.

In private homes, a through fastening method can be used:
- a through hole is made in the interfloor slab;
- one plate is placed in the floor of the upper floor or in the attic, and a second one under the ceiling;
- take a hook and screw on a nut that will hold the plate;
- the hook is pushed into the ceiling hole, another nut is screwed on top, which will tighten the plates.
For hollow-core floor slabs, another method is suitable.
It provides for the following types of work:
- a hole of the required size is made in the ceiling;
- reinforcement is inserted into the hole, the length of which is selected depending on the thickness of the slab;
- a hook with a ring at the end is made from wire rod;
- Reinforcement, previously placed in the hollow channel, is placed on the hook.
If the chandelier will be mounted on a mounting plate, you need to install a mounting made of a wooden block, durable moisture-resistant plywood or ready-made plastic platforms of a round, square or cross-shaped shape.

The wooden block is attached to the concrete base with long self-tapping screws and dowels, which are inserted into the holes made with a hammer drill.
If plywood is used as a mortgage, metal legs should be attached to it for fixation. For larger devices with a mounting cross, a more solid, thick support is required.
Step #4 - attaching the chandelier to the ceiling
After installing the stretch ceiling, you will need to cut holes of suitable sizes in the places where the hook or mounting strip is attached. A thermal ring is previously glued in this area, which will protect the material from overheating and prevent it from breaking apart.
The procedure is quite simple: carefully lubricate the adjacent surface of the ring with glue, attach the part to the ceiling and press lightly.The size of the hole should be slightly smaller than the diameter of the base of the chandelier.

After the glue has set, all that remains is to cut out the film in the inner space with a stationery knife. Electrical wires are pulled out through this hole. The neutral wires are connected into one bundle, and the phase wires are separated if a double switch is installed in the room.
You can check where the zero is and where the phase is using an indicator screwdriver by turning on the power supply. For convenience, it is worth marking the phase and neutral wires with different colors.

To install the crosspiece, five holes are made in the finished tension fabric: one large one in the middle for wires and four small ones for fixing the strip to a wooden platform proportional in size.
Thermal rings or cut out pieces of plastic are glued to the joints. The fastening of the I-beam is similar to the cross-shaped one, with the exception of minor differences in the method of connection to the platform.
The base of the chandelier should be placed on a bar, secured with studs and nuts, or hung on a hook by a loop.
Step #5 - connecting to the electrical network and eliminating deficiencies
Upon completion of all installation work, the chandelier is connected to the electrical network and its functionality is checked.
To do this you need to do the following:
- Turn off power.
- Check the presence or absence of voltage in the wires with an indicator screwdriver.
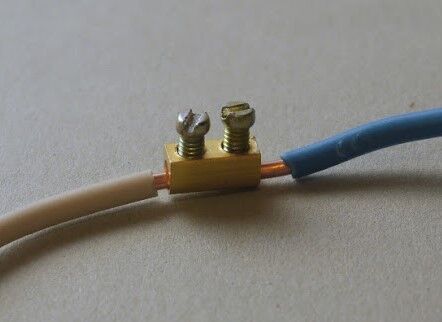
- Strip the ends of the wires of the installed lamp and the supply wire of the home electrical network by approximately 6 mm, connect them correctly and fix them in the terminal box. We recommend that you read the detailed guide to connecting a chandelier to a two-key switch.
- Turn on the power supply in the panel, make sure that the lamp is working and the lamps are burning normally.
- In case of problems with the operation of the device, check the light bulbs, the switch on the wall, the integrity of the contacts and wiring on the path from the switch to the device, and the wire connections in the chandelier.
The final step when hanging a chandelier on a hook is to install a decorative glass or ceiling rosette. In the first case, you need to hide the wires, carefully lift the cap as far as it will go and fasten it with decorative nuts. And we described in detail about the installation of a ceiling rosette in next material.

When screwing or hanging the lamp, you should not overdo it and use unnecessary force, since the tension fabric can easily deform.
At the end, you should inspect the surface, carefully checking its integrity. If there are tears, scratches or chips near the installation site, you should try to eliminate them. For example, use special thermal adhesives to hide defects, carefully glue the torn ends of the film with tape, and add a masking pattern along the entire line of damage.
How to hang a chandelier on a mounted canvas?
Installing a chandelier on an already installed tension fabric is very difficult. But such a need arises quite often.
In some houses, the hook for hanging the lamp is embedded in the ceiling. In this case, all that remains is to make a hole in this place with a sharp knife and glue a plastic ring along its edges, which will clamp the material, preventing possible divergence. Then you should tighten and connect the wires, hang the device and close the opening with a decorative element in the form of a concave plate or cup.
If there is no hook, you can solve the problem using an anchor bolt with a curved end. It is better to drill a hole with a hammer drill, having previously enclosed the work area in a ring.

When installing the device on a mounting plate, everything is much more complicated. It is difficult to do without a mortgage base with this method of fastening. To mount the platform into the base ceiling, you will have to remove the canvas or make a noticeable cut in it. You can try to cover the resulting hole with wide shades or a baguette frame.
When securing the device without a mortgage, it is necessary to select self-tapping screws of sufficient length and mark the attachment points on the canvas. Next, thermal rings are glued on, a film is cut out along their inner contour, and holes are drilled in the ceiling through the rings.

When using plastic tubes to fix the mounting strip, the base of the chandelier will become more stable.
Conclusions and useful video on the topic
Visual instructions for attaching a lamp to a mounting plate with a plywood mounting platform:
How to “drown” a chandelier in an already installed stretch ceiling:
Installation of lighting fixtures without a mounting platform:
You can completely handle the installation work when installing a chandelier on a tension structure yourself. This does not require special skills or complex equipment. All you need is knowledge of the basics of electrical installation and a set of available tools. The correct and easiest way to do the work is before stretching the ceiling fabric.
The main thing is to follow safety precautions when working with electrical wiring, choose the most suitable type of fastening and carefully check the stability of the mounted structure at the end.
Do you have experience installing a chandelier or lamps on a suspended ceiling and want to share it with other users? Tell us about it, dwell on the difficulties you encountered - the feedback form is located below. Also here you can show the result of your work by adding original photos of the installed chandelier.


