Do-it-yourself antenna for a summer residence: homemade options and diagrams + manufacturing instructions
Landscaping of a suburban area involves increasing the living comfort of summer residents.One of the constant attributes of passive entertainment is the television.
Far from the city, problems often arise with the signal and broadcast quality. A self-made antenna for a dacha allows you to solve this issue by spending a minimum of money and time. There are a lot of options for homemade devices, their choice is determined by the distance from the TV tower and the type of signal.
In this material we will look at assembling the simplest homemade models - the article provides detailed manufacturing instructions with diagrams and drawings. There is also a list of materials and tools necessary for the work.
The content of the article:
The nuances of making signal catchers
When starting to make a homemade device, you need to have an idea of the possible design options and the rules for their assembly.
The entire variety of television antennas is usually divided into several types:
- All-wave. A frequency-independent antenna is the cheapest and easiest to manufacture. The base is a metal frame, and tin containers or beer cans are used as receivers. The design does not have high performance parameters, but it is quite suitable for a summer residence if the broadcast tower is located nearby.
- Log-periodic. The principle of operation is comparable to a fishing net that sorts prey during catching.The device is easy to manufacture, and its parameters exceed those of all-wave models. The antennas are consistent with the feeder in any range.
- decimeter. Designs that function well regardless of reception conditions. Various designs are possible: zigzag, diamonds, circle, etc.
The antenna parts through which the useful signal currents run are connected welding or soldering. However, when placing the device on the roof of a house, such contacts will be corroded over time by corrosion.

In addition to this norm, when creating an antenna for a summer residence with your own hands, it is advisable to adhere to the following rules:
- The central core and braid are made of inexpensive alloys that are resistant to corrosion processes. However, they are difficult to solder - work is carried out with extreme caution so as not to burn the wire.
- To connect elements, you need to use a 40 W soldering iron, flux paste, and low-melting solder.
- It is not advisable to use aluminum wire to create structural parts. The material quickly oxidizes, losing its ability to conduct a signal. The best option is copper, an affordable alternative is brass.
The receiving area of the catcher must be large. In order to increase it, metal rods can be symmetrically attached to the frame that filters out ethereal noise.

Tandem homemade antenna and amplifier will provide the necessary receiving power.It is enough to take the structure onto the roof and install it in the direction of a nearby television tower.
Instructions for assembling the best antennas
You can assemble many interesting and effective antennas with your own hands. Let's look at detailed instructions for making the best and easiest to make models.
Homemade #1 - simple TV antenna
If the repeater is located within 30 km from the dacha, then the most common design, assembled from two tubes and a cable, will do. The wire is connected to the corresponding TV input jack.
Layout and selection of materials
A typical device for a primitive country antenna is shown in the figure below. It can be seen that two tubes of the same length are joined on a plate, which in turn is fixed to the mast.

The first thing you need to do is find out the broadcast frequency of the local TV tower - the length of the pipes depends on the parameter.
Broadcast band range – 50-230 MHz. Each channel requires its own length of antenna “whiskers”.

Pipes made of duralumin, steel, and brass are suitable for making the antenna. Their diameter can vary between 8-24 mm, most often they take 16 mm. The main condition is that the sections must be equivalent, prepared from pipes with the same properties.
Necessary materials:
- metal pipe – the cut is 6 cm shorter than the length determined from the table values;
- wire with a resistance of 75 ohms, the required length is the distance from the TV to the antenna plus 2 m for sagging and matching loop;
- thick electrical insulating getinax – thickness from 4 mm;
- metal strips, pipe clamps on the plate;
- antenna mast – this can be a corner; if the height is small, it is permissible to use a wooden block.
For work, it is advisable to stock up on a soldering iron, solder, and flux. It is recommended to solder the connections of the central conductors - this will extend the life of the device and improve image quality.
To protect against oxidation, the joint areas must be filled with silicone or epoxy resin. An affordable, but not reliable way is to wrap it with electrical tape.
Assembly and configuration of the invention
First, cut the required size of the pipe and saw it into two equal parts. You can use metal cutters.

The distance between the inner ends of the tubes is 6 cm, between the outer ends - the distance indicated in the table.
Subsequent work progress:
- Secure the antenna whiskers to the holder with clamps, and fix the getinax plate itself on the mast.
- Connect the pipes through a matching device - cable loop type RK-1,3,4. The element parameters are displayed in the right column of the table, the manufacturing principle is shown in the antenna design diagram.
- Solder the central cores to the ends of the tubes, connect the braid with a piece of a similar conductor.
- Connect the central conductors of the ends of the matching loop to the television cable. Connect the braid with copper wire.
- Fix the loop and the downward wire on the rod.
- Raise the mast to the roof of the country house and adjust the antenna.
Two people are needed to determine the optimal position of the device. The first rotates the antenna on the street, and the second monitors the change in the image on TV.

Having detected good signal quality, the structure is fixed in the selected position.
Homemade #2 - loop antenna made from pipe
The module is a little more difficult to create, but it expands the reception radius to 40 km. The main difficulty lies in the need to bend the pipe.

The length of the cable and pipe is calculated based on the broadcast frequency of TV channels.
Blanks are made to suit the required parameter - the vibrator and the wire for the matching device are measured and cut. The recommended pipe diameter is 12-18 mm.

Assembly begins by bending the pipe. The edge of the vibrator is flattened and sealed. The pipe is filled with sand, and the second end is sealed in the same way as the first. The edges can be sealed by placing the plugs on silicone.
The shaped pipe is attached to the mast. Matching loops are screwed and soldered to the ends of the vibrator, and the television cable is fixed. Secure the braid with copper wire and begin setting up.
Homemade #3 - Kharchenko signal catcher
The figure-of-eight or zigzag television antenna is suitable for DVB-T2 digital television, broadcasting in the UHF range.The module is easy to manufacture. To implement the project, you will need conductive metal.
Calculation and drawing development
The design of the TV antenna is very primitive - two squares/diamonds fastened together. In the original design, the Kharchenko module provides for a reflector located behind the figured elements.

To make a zigzag antenna, it is not necessary to calculate the wavelength. It is advisable to build a structure with more broadband - this will increase its capabilities.
If desired, you can calculate the device parameters. Divide the wave value of the transmitted signal by 4 - the resulting value is the side of the square.

The example shown shows a drawing of an antenna with side parameters: B1 - 14 cm, B2 - 13 cm. The difference in lengths of one centimeter gives the required distance between the squares.
The lower sections are extended by 1 cm. This gap is necessary for the loop for soldering the antenna cable.
Frame making and cable preparation
Subsequent calculations will be given in relation to the data in the drawing shown above. The total perimeter of the squares is 112 cm. You should cut the wire to the required length and form the part according to the diagram.
Work order:
- Bend the wire in the middle at a right angle.
- Next come two sections of 14 cm each, followed by sides of 13 cm each.After each bend, we check the evenness of the corners, it must be strictly 90 degrees.
- When the first square is formed, begin to create the second figure. Again there are versatile elements of 14 cm, and behind them are two parts of 13 cm + 1 cm.
Minor differences in side lengths are acceptable. The main thing is to maintain right angles.

The next step is preparing the cable. It is cleaned on both sides. An incision is made along the circumference of the cable, 2-2.5 cm from the edge.
The work is done carefully so as not to damage the inner braid. Along the cut line, the cable is slightly broken and remove insulation.

Solder the plug on the other side of the cable. The wire must be cleaned to 1 cm, the conductors must be formed and tinned.
In areas where soldering is performed, clean the plug with sandpaper and wipe with alcohol. Solder a monocore to the central output, and a twist to the side output. Crimp the grip around the insulation, screw on the plastic tip, or alternatively, fill it with non-conductive sealant. Before the composition dries, assemble the plug.
The order of connecting elements
The final stage of assembly is the joining of the frame and cable. If there is no connection to a specific channel, then it is better to do the soldering at the midpoint to expand signal capture.
The cut end of the cable is connected to the two sides of the square in the center. Before final fixation, you can check the performance of the antenna. If everything is normal, then seal the soldering area.

Holes are made in the mini-container for the square elements, a frame with a wire is placed and filled with a sealing compound.
Homemade product #4 – “double square” antenna
The narrowband design will solve the problem of a weak signal or clogging of the broadcast with a stronger broadcast. The antenna is also suitable for receiving digital television. The main condition for operation is a clear orientation towards the signal distributor.
Device diagram and dimensions
Structurally, the TV antenna is presented in the form of two frames connected at the top and bottom by arrows. The large square is a reflector, the smaller one is a vibrator.

The upper boom is made of metal, and the lower one is made of getinax, textolite or other insulating material.
Requirements for the TV antenna device:
- the centers of the squares must be on the same line, this straight line faces the transmitter;
- the smaller frame has an open contour, the ends are fixed to the textolite plate;
- The upper part of the mast for the antennas is made of wood.
The parameters for the manufacture of two-element frame television antennas are taken from the table. The dimensions of the working elements depend on the type of waves: decimeter or meter.

In a three-frame design, the distance between the ends of the middle frame is increased to 5 cm.
Assembly and connection
To connect the frame to the antenna cable, you will need a balun short-circuited cable.The device is constructed from sections of antenna wire.
The right element is a cable, the shortened left one is a feeder. A television cable is attached to the place where they are connected. The length of the segments is determined from the table, taking into account the wavelength of the signal.

The same actions are performed with the feeder, leaving the cable core.
Further sequence of work:
- Solder the central core of the feeder and the cable braid to the left end of the vibrator.
- Attach the feeder twist to the right end of the active frame.
- Connect the bottom of the cable to the feeder braid with a metal jumper. Solder the harnesses with low-melting solder.
- The cable sections must run parallel, the distance is 5 cm. To fix the distance, dielectric material is used. The matching device is mounted on a textolite plate.
- Solder the television cable to the bottom of the feeder, joining the corresponding elements - braid to braid, rod to rod.
The use of a matching device reduces the likelihood of interference and eliminates the double image effect. You cannot do without it if you are at a significant distance from the transmitter.
Homemade #5 - TV antenna made from tin cans
The original design of the antenna using improvised means significantly improves the signal quality. This option is suitable for a dacha in the suburbs, not far from a TV tower.
To create a primitive device you will need: 2 beer cans of 0.5 or 0.75 liters, self-tapping screws, a 3-5 m television cable, a screwdriver, a soldering iron, tin, a wooden pin or hanger, and electrical tape.
Subsequent actions can be divided into several stages.
Preparing the cable and making contacts
When preparing the cable clean insulation, retreating 10 cm. Separate the cable into two conductors - the central core and the braided twist. At the other end of the cable you need to install a regular plug.
When making contacts, the twisted cable screen is fastened to one can, and the copper core to the other. Self-tapping screws are suitable for fixing.
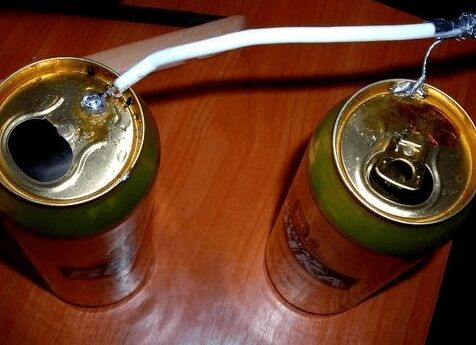
Assembling a homemade structure
During assembly, it is necessary to make a supporting structure for the signal receiver. In the simplest version, you can use ordinary coat hangers. A wooden stick will also work.
The cans are fixed to the mast with adhesive tape or electrical tape, the structure is lifted onto the roof and the setup begins, selecting the optimal location for the improvised antenna.

Conclusions and useful video on the topic
Step-by-step instructions for making a TV antenna from aluminum cans:
Calculation and assembly of a digital broadcasting antenna according to Kharchenko:
A homemade design will save your budget, because a primitive signal catcher can be built from improvised means. Manufacturing work does not take much time.
If you comply with a number of standards, assembly and connection technologies, you will be able to make an effective device to replace the standard TV antenna.
Do you have a homemade antenna installed at your dacha? Please share with other users a unique photo of your homemade product, tell us what materials you needed and how much time it took you to assemble.
Or maybe you assembled a TV antenna according to one of the schemes discussed in this material? Tell us about your experience using this model, add photos in the comments section.


I had to make homemade TV antennas both for the dacha and for the TV in the garage. I made a simple loop antenna out of coaxial cable. It's simple to do, it works fine, it catches several passes without much interference. In the material you proposed, I really liked and was impressed by the antenna made from beer cans. I'll make one for my garage, it will look perfect.
Previously, in my village, a standard antenna did not pick up a signal well, then I decided to make one. I had to make a lot of calculations and point it in the right direction, since I didn’t know the exact location of the TV tower. At that time, the TV barely picked up one channel, and when I installed this antenna, their number increased and the signal became more stable.
Does a homemade antenna with an amplifier need to be grounded? I've heard the theory that lightning strikes a grounded antenna with a much greater chance. The antenna is located on the roof on a mast.
If the television antenna is located on a mast on the roof, then it does not matter whether it is homemade or factory-made. In any case, you simply need to implement lightning protection. Many people here rely on chance, but when lightning hits an antenna on the roof, after which the TV, and sometimes other equipment, burns out, then the attitude towards lightning protection changes radically.
I am attaching for you a general diagram of the implementation of lightning protection for a mast with a television antenna.For grounding, I recommend taking a PUGV 1x16mm2 wire and a galvanized cable with a diameter of 8 mm. Many people use rod, but it is quite problematic during the installation process. If you have any more questions, ask them here.
An antenna made from two beer cans works ideally if the tower is not too far away. It catches much better than a simple piece of wire. I had this one for about 2 months until I made another one. I also tried to make the Kharchenko module, but you already have to calculate it, but the result is worth it.
As a rule, such antennas are made in people's homes, which means there is a lot of such rubbish lying around underfoot. As a result, we get a free antenna, the equivalent of which costs 800-1000 rubles. And anyone can make it in 30 minutes.