Do-it-yourself washing machine repair: overview of possible breakdowns and ways to fix them
A washing machine breakdown is a real tragedy for the housewife.Hand washing is gradually becoming a relic of the past, and you don’t want to go back to it because of equipment failure. You don’t always have the time or desire to wait for a technician; in half the cases, even a novice home craftsman can repair a washing unit.
We will tell you how to carry out a simple repair of a washing machine yourself. The article we have presented shows typical types of malfunctions in the operation of household equipment and describes in detail methods for restoring its functionality. Taking into account our advice, you will correct the situation without any problems.
The content of the article:
- Design and operation of an automatic machine
- Top common symptoms of malfunctions
- No. 1: the water in the drum does not heat up
- No. 2: The washing machine knocks and vibrates
- No. 3: water drips from the hatch or flows below
- No. 4: water in the drum before or after washing
- No. 5: washing does not start - no water
- No. 6: the washing machine does not respond when turned on
- No. 7: the drum does not spin or spins in one direction
- DIY Guide
- Conclusions and useful video on the topic
Design and operation of an automatic machine
To decide to repair a machine yourself, you must first of all have a good understanding of its structure and operating principle.
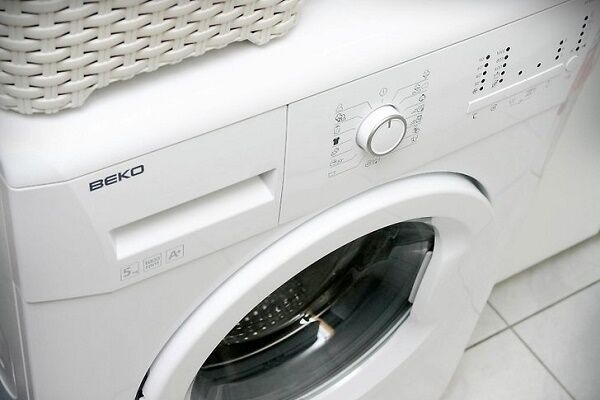
Main parts of the unit:
- engine;
- electric heater;
- drain pump;
- water tank and laundry drum;
- electronics (control panel);
- water intake valve;
- frame.
After selecting a program and starting it, the first wash cycle begins.It includes drawing water and heating it. Water can be heated to a certain temperature, which is controlled using a sensor and timer. Detergents are added.

Water is drawn in through a valve. When a signal is received that there is enough water, the valve closes. Depending on the selected mode, several cycles of filling and draining are carried out. After the last rinse, the spin cycle begins. Here the drum spins at full power.

The housing includes not only the walls of the washing machine, but also a hatch. The round door on the front wall allows you to observe the movement of the laundry in the drum and has protection against turning on if it is not closed tightly.
After switching off, the door does not open immediately. This protection is based on a bimetallic sensor. The latch opens only after the sensor has cooled.
Top common symptoms of malfunctions
A non-professional cannot immediately determine what exactly has gone wrong. But there are signs that may indicate the cause of the malfunction. The most common symptoms and possible causes of breakdowns listed will help with diagnosis.
No. 1: the water in the drum does not heat up
Often this failure is not detected immediately. Most machines behave as if nothing had happened: they start the washing, rinsing, spinning mode. You take the laundry out of the drum and don’t even suspect that all the processes took place in cold water.

If you encounter such a problem, conduct an experiment: while the washing machine is in active mode at a high temperature, carefully touch the glass of the drum door. It should heat up from the hot water. If this does not happen, most likely the water in the system is not heated.
There may be several reasons for this:
- heating element failure;
- thermostat failure;
- failure of the electronics - programmer.
Of course, there is also the option of choosing the wrong mode when washing in cold water is provided by the program. Before sounding the alarm, read the instructions and make sure that the mode is selected correctly.
A burnt heating element is a common story in the workshop. People deal with this kind of breakdown very often. Due to a power surge, short circuit or manufacturing defect, the heating element may burn out. The average service life of the heater is about 5 years.

If the temperature sensor is broken, the machine behaves differently. The heating element is operational and ready to heat the water, the programmer sets the desired temperature, but the regulator - temperature sensor - gives a false signal that the water has already heated up. Thus, the machine washes in cold water. Most often it needs to be replaced.

If the problem is software (the firmware has crashed or the board is damaged), the washing machine simply gives the wrong command and the water does not heat up. After the update, the wash is started again and, if the problem persists, the programmer is changed.
No. 2: The washing machine knocks and vibrates
Some washing machines make noise from the first wash. This may be a design feature of the device. This often occurs in older models, when during the spin cycle the washing machine looked like a rocket during launch. Modern washing machines are quiet.
Knocking may be a sign of:
- incorrect installation;
- getting a foreign object between the drum and the tank;
- bearing failure;
- failure of shock absorbers;
- uneven distribution of laundry.
The first thing you should pay attention to is washing machine installation. It is incorrect installation that causes knocking during washing in most cases.
The machine must be level with the floor and stand firmly on it. For adjustment, special legs are provided that allow you to separately adjust the height of each of the support points.
When you don't remove loose change, nails, and paper clips from your pockets before putting your laundry in the wash, you risk breaking your washing machine. The fact is that small things can easily get into the water heating tank through the gap between the tank and the drum.

Bearings ensure that there is no friction while the drum moves. They also have a service life and most often they fail before other parts.It’s easy to understand that the problem is in the bearings: in addition to knocking, the machine will make a creaking noise. If you hear such sounds, prepare for replacing bearings.
Shock absorbers dampen drum vibrations during rotation. If one of them breaks, it immediately affects the operation of the washing machine. The drum may visually move or tilt.

The reason for the knocking, which is not a malfunction, can occur when the laundry in the drum is unevenly distributed, that is, collected on one side. This often happens when washing bed linen in older machine models. This cannot be called a breakdown, rather a feature of the operation that may be the cause of the knocking.
No. 3: water drips from the hatch or flows below
If you notice a puddle under your washing machine, do not rush to grab your head and buy new equipment.
The most common cause of water appearing from the washing machine is:
- failure of the gasket on the supply hose;
- rush hatch cuffs;
- pipe burst.
These design elements are not that expensive and can be changed quite quickly if you have experience and knowledge in this area. Any depressurization of the joints, of course, leads to a leak. The technician’s task is to detect the source of the leak and eliminate it.

An excess of foam in the drum leads to the fact that it begins to seep through all the slightest cracks and minimal technological holes. The result is a puddle on the floor. If the machine does not leak when washing other things, then this can be attributed to a design feature and add less detergent for washing curtains.
No. 4: water in the drum before or after washing
If, after finishing a full wash cycle, you open the drum and see water there, your machine has a draining problem. During the spinning process, all water that can be squeezed out of the laundry must go down the drain.
If this does not happen, you need to look for the cause of the breakdown. Most often this is:
- clogged filter;
- broken pump.
Think about the last time you cleaned your washing machine filter. If you don't know where it is, most likely you already know the cause of the problem. A clogged filter can not only cause inconvenience in the form of water in the drum, but also cause a more serious breakdown - the drain pump.

Another problem: water in the drum before turning on. That is, you are going to wash, you open the door and everything is flooded. Rate the quality of this water: is it clean or dirty.
Clean indicates a broken valve in the area where the machine connects to the water supply. The dirty one comes from the sewer. Most likely, the siphon is clogged and the water simply has nowhere to go after washing.
No. 5: washing does not start - no water
The opposite problem is that there is no water. That is, you turn on the washing machine as usual, start the wash cycle, but the wash does not start and an error appears about the lack of water in the system.
If you have checked the water supply in the water supply and also opened the tap, look for the problem elsewhere:
- the supply hose is clogged;
- the intake filter is broken;
- software failure of water supply.
To diagnose a malfunction, you need to disassemble the device, wash each element in the water supply system, install it in place and try to start the wash. If water does not flow, repairs or replacement will have to be made.
No. 6: the washing machine does not respond when turned on
The worst thing for the owner of the machine is the moment when the device stops responding to the power button. Washing machine won't turn on - the hostess's worst dream.
There may be several reasons:
- the power supply burned out;
- the surge protector or socket is broken;
- The firmware has crashed.
Everything related to electrical and electronics must be repaired with extreme caution, and it is better not to undertake it at all if you are not a master. However, anyone with minimal knowledge of the basics of electrical engineering can repair or replace an outlet.

If the drum is not tightly closed, the protection is triggered and the washing does not start. And if the latch is broken and does not close completely, the selected program cannot start the cycle.
No. 7: the drum does not spin or spins in one direction
If the wash starts, but, looking through the window on the door, you find that the drum is motionless, look for the cause of the washing machine malfunction, most often it is:
- torn drive belt;
- the engine broke down;
- a foreign body has gotten between the drum and the tank;
- software failure.
One of these reasons can be detected without even disassembling the equipment.Unplug the appliance and try to manually rotate the drum.

If a foreign object interferes with movement, it will be enough to remove it. A more serious breakdown will require more time and money to purchase a new spare part.
DIY Guide
If you decide to make do with your own resources and knowledge, read the procedure for repairing or replacing worn-out parts of your washing machine.
Having in front of you a rough plan of what follows what, it will be easier for you to understand the technique and not make mistakes. However, keep in mind that it is better not to try to fix some types of breakdowns yourself, even if they really itch. Sometimes it is better and cheaper to contact a service workshop.
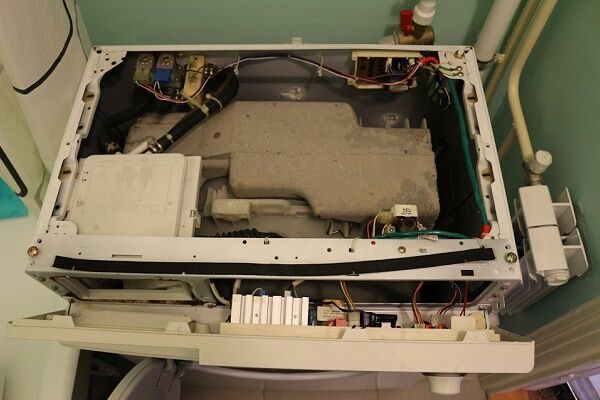
Most often, we encounter washing machine breakdowns during the washing process. In this case, any repair work will have to begin with the standard procedure - by draining the water from the tank:
Area of capabilities of an independent master
Whatever one may say, when you repair washing machines yourself, you risk adding even more troubles to yourself. This household appliance has a complex structure and a large number of components and parts.
When taking on repairs with your own hands, you must be aware of all the responsibility and not take on work without experience and knowledge in this field.
As a rule, do-it-yourself repair involves replacing a broken part with a new one, this could be a replacement:
- drive belt;
- pump;
- temperature sensor;
- filter;
- control boards;
- heating element;
- cleaning pipes and filters.
These works do not involve disassembling and repairing complex components; they can be handled without special tools.
If you diagnosed the problem yourself and found out that the washing machine requires replacing shock absorbers, oil seals, blocker, hatch cuff, it is better to seek help in repair from a professional.

Before repairing your washing machine, prepare the following set of tools:
- screwdriver (flat and Phillips);
- flat wrench (8/10 and 19);
- pliers;
- long nose pliers;
- ticks.
In fact, most home craftsmen have such a tool in their drawer.

To repair the control board, sensors and electronics in general, you may need a soldering iron and everything connected with it. But if you do not plan to repair the programmer, the ability to solder will not be useful to you.
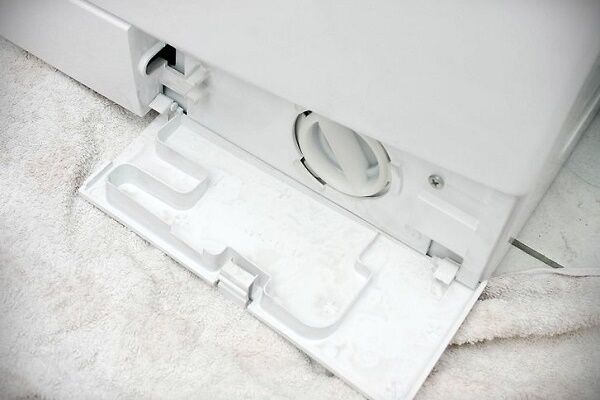
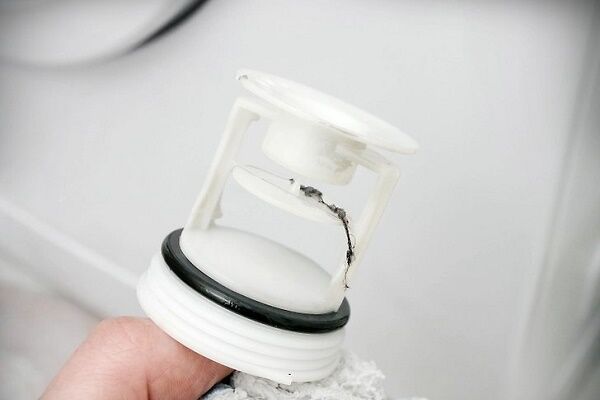
Cleaning filters - basic operations
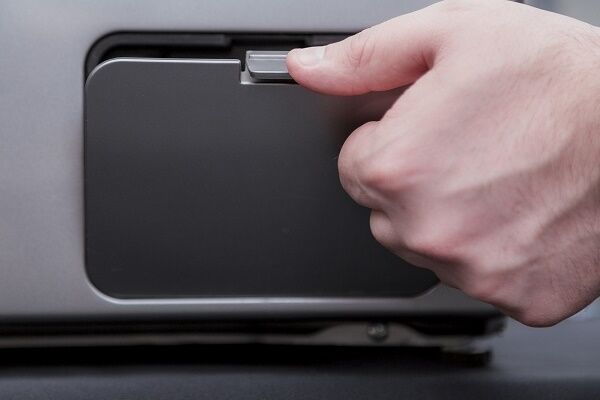
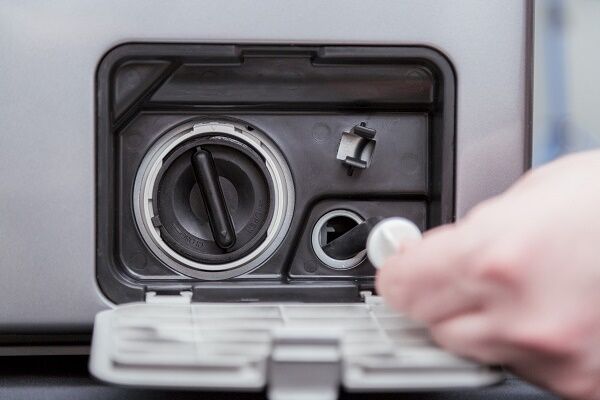
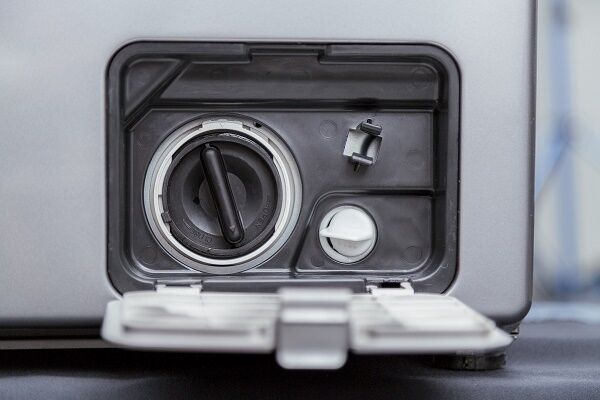
The simplest thing that the owner of an automatic washing machine can do with his own hands is to clean the filter. To do this, you need to open the small rectangular door at the bottom of the machine. If this is difficult to do, you can pry the door open with a screwdriver. Be careful not to scratch the paint.
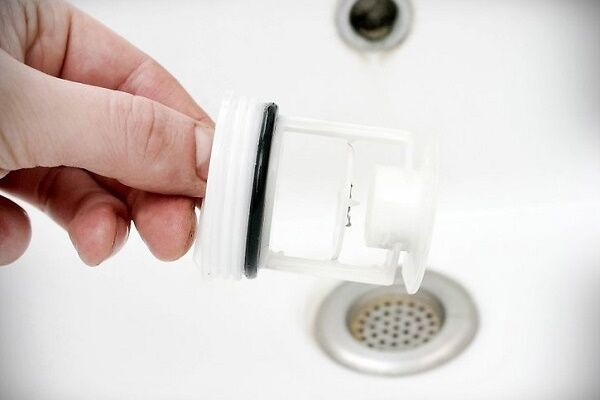
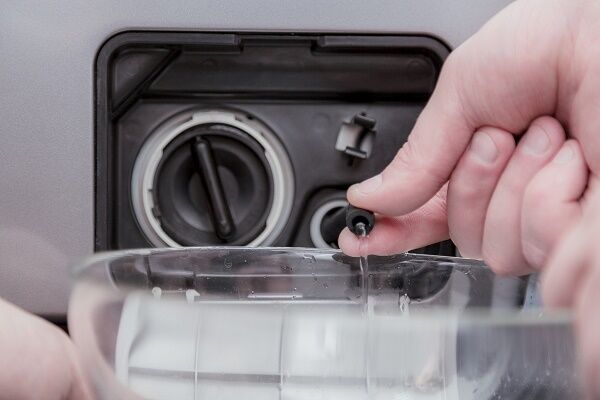
In front of you you will see a rubber or plastic plug. It should be unscrewed. You can do this with your bare hands by turning the cork counterclockwise several times.
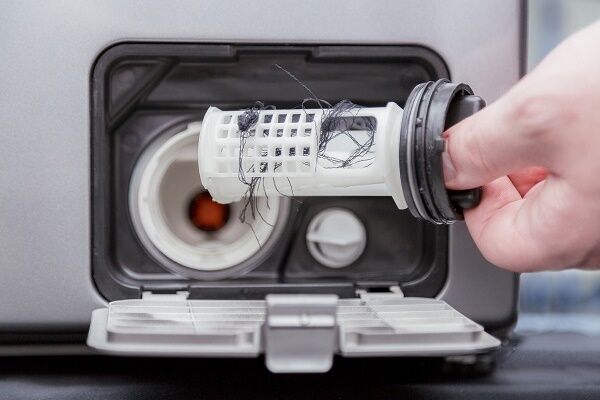
Then rinse the filter under running water. Look into the hole; debris often collects there, remnants of threads, wool, hair, and more. All this must be removed by hand.To see better, shine a flashlight on yourself. Place the filter in place, screw it on, and put the front panel in place.
In addition to this filter, some washing machines are equipped with a particle trap at the inlet. It purifies the water coming from the water supply from large particles of sand, dirt, and rust. This filter can also become clogged and cause equipment failure. Therefore, you need to clean it regularly.
It is located in front of the water intake valve. It looks like a small plastic mesh. To clean the inlet filter, remove the inlet hose and use pliers to pull the filter out of the hole.

After washing, everything is assembled in the reverse order, and the washing machine is connected to the water supply. The higher the level of water contamination in the water supply in your region, the more often you need to perform preventative cleaning of the inlet filter.
If, when removing the filter device, you find that it is damaged, you will have to replace the filter. The procedure is extremely simple, but requires proper selection of parts. Our recommended article will introduce you to the technical and technological intricacies of the process.
Replacing a worn or torn drive belt
If the drive belt of your washing machine is worn out or even torn, repairing it yourself will not help, all that remains is to change the part. Using the full model name of your household appliance, select the drive belt that matches the marking.

The process itself disassembling the washing machine and replacing the belt looks like this:
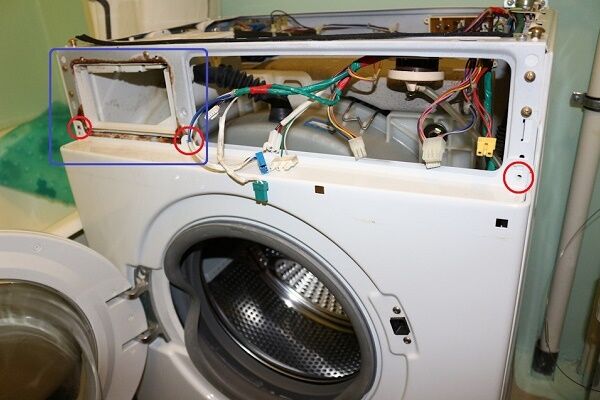
- Disconnect the washing machine from the power supply and water supply.
- Unscrew the bolts securing the rear wall.
- Just behind the back panel you will see a pulley and protruding motor shaft where the belt should be tensioned.
- Remove the old drive belt by turning the pulley with your other hand.
- Place the new belt on the motor shaft.
- Rotate the pulley and gradually put the belt on it. Make sure there are no twists.
- Check the tension. The belt should be tight enough, but bend when pressed.
After repairing the belt, give the pulley a few turns to make sure everything is as it should be. Close the back of the machine and try running a test wash cycle.
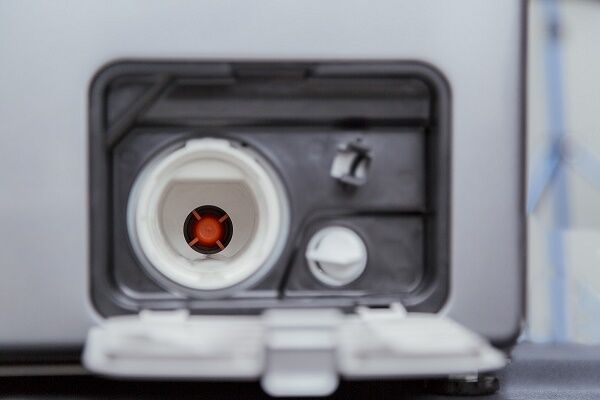
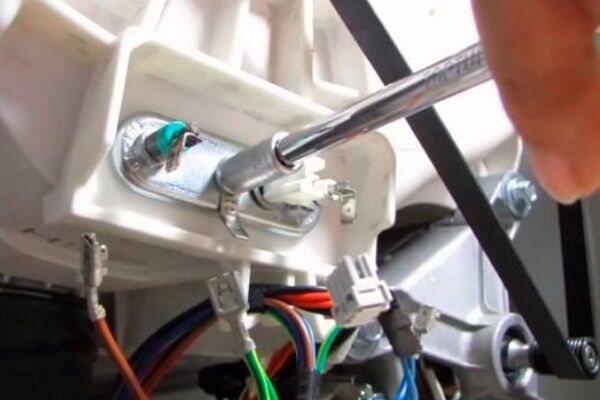
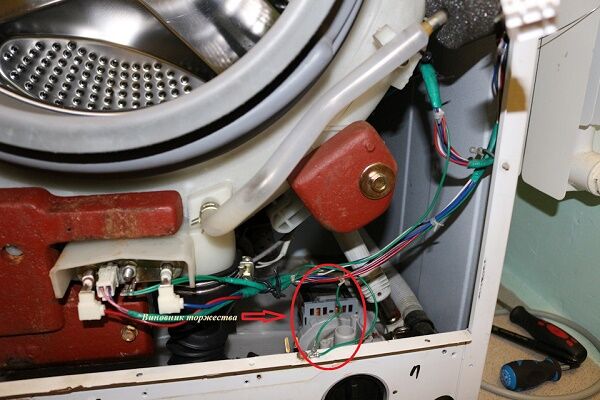
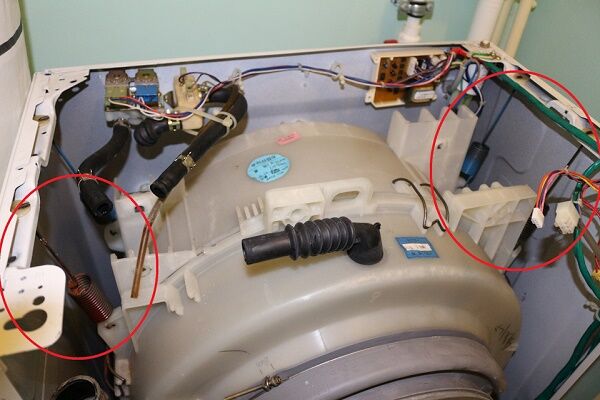
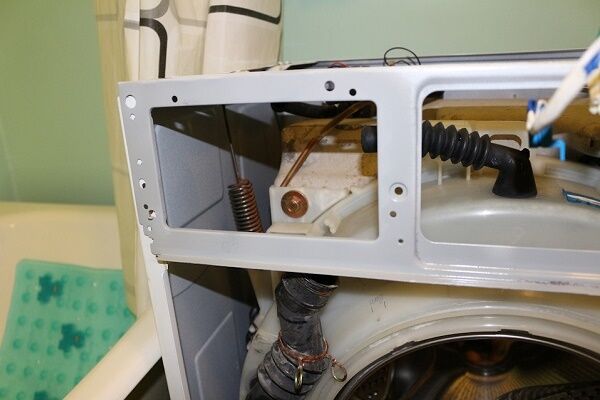
Water heater - replacing the heating element yourself
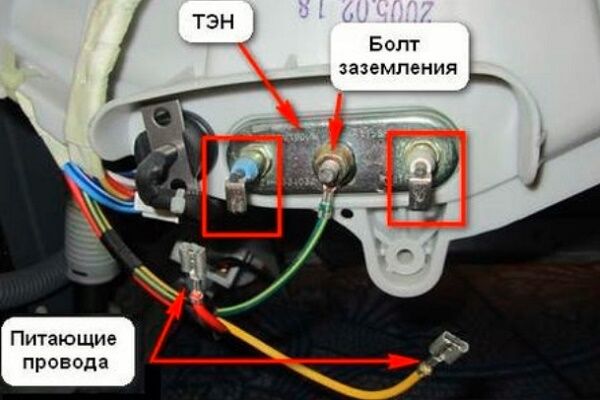
If the repair of a washing machine involves a complete replacement of the heating element, you will have to perform the following operations. Remove the back cover. Most often, the heater in washing machines is located at the back, but there are other placement options.
If you don’t know exactly which side the heating element is on in your car model, look at the instructions or start from the back cover at random. The fact is that it is much easier to remove it than the front one. Therefore, even in the event of an error, screwing the panel into place will not be difficult.
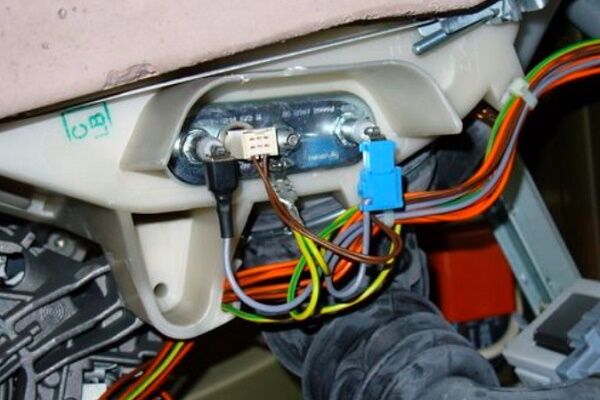
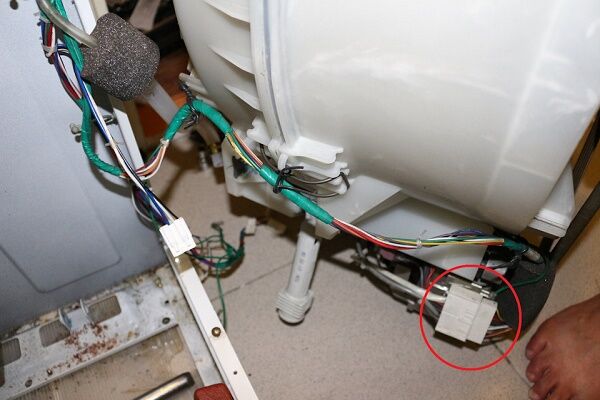
Disconnect the terminals. When you remove the cover, you will not see the heating element, but only its connection. The terminals need to be disconnected and the element checked for functionality. A multimeter comes to the rescue.

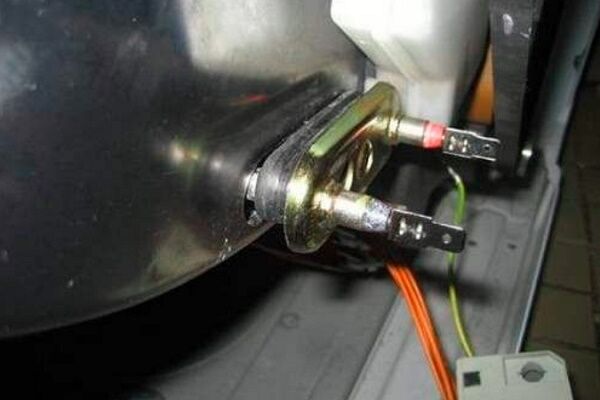
In order to remove the faulty heating element, unscrew the nut using a wrench. Then press on the pin, it is better to use a screwdriver.
To ensure that the heater is stable, it is installed using a rubber seal. To dismantle, pry up the rubber and begin to remove the part, little by little “picking” it out of the seal with a screwdriver.
It is recommended to remember, or better yet, photograph the location of the parts and the connection of the wires before dismantling. This way you can easily put everything back in place after completing the renovation yourself.
When the old heater is removed, you can proceed directly to replacement. Take the new part and install it in place of the old one in the same position. Then screw the nut onto the stud in reverse order. Make sure that the seal is not deformed and does not “bite”. The nut should be tightened tightly, but not too tightly, so as not to squeeze out or distort the heating element.
To check if the repair is correct, run the wash without laundry in hot water mode (above 50 degrees). Place your hand against the glass of the door after 15-20 minutes of operation. If the glass is warm to the touch, the heating element is working.
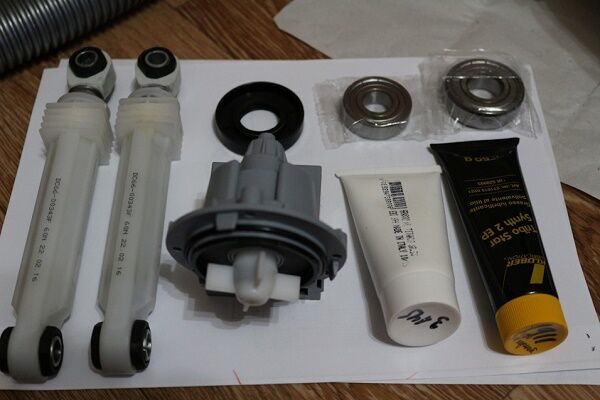
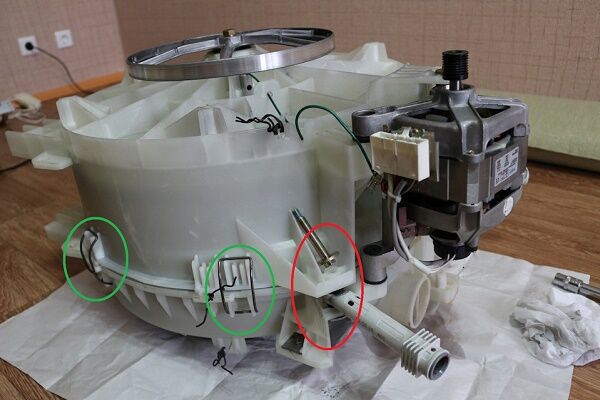
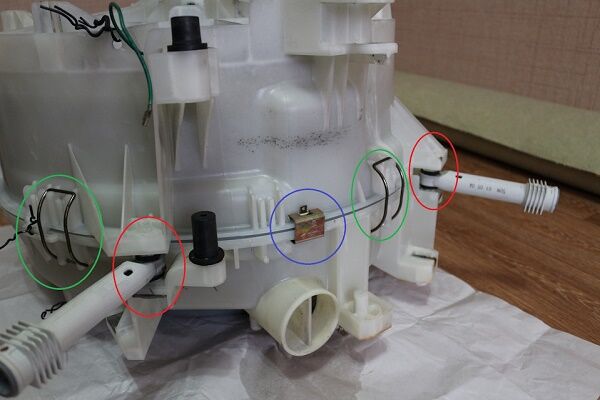
Installation of new shock absorbers
If your washing machine begins to make too much noise during the spin cycle and vibrate, then the problem will have to be solved by installing new dampers (shock absorbers):
We took the steps described above to remove the washing machine’s tank and drum from the housing, since changing the shock absorbers in such models without this step will not work. Next, we will deal with the change, i.e. Let's take out the drum, unscrew the worn damping devices and install new ones.
Replacing a washing machine pump
In most popular models of washing machines, a pump that has failed can be easily repaired with your own hands. For a person who does not often deal with the repair of various types of equipment, it is unlikely that it will be possible to repair a broken pump. It's much easier and faster to replace it. To do this, you need to buy a part of your brand.
Before you fix an automatic washing machine with a broken pump yourself, you should turn it so that you have unobstructed access to the bottom.

Remove the bottom panel. It can be secured with latches or bolts. The pump itself is attached to the housing with screws. They need to be unscrewed using a screwdriver.
Apply a little force and push the drain valve from the outside, pushing the pump inside the housing. Use your other hand to lift the pump out. Disconnect the wires connected to the pump.

To install a new pump, repeat all steps in reverse order: connect the pipe and hose, connect the wires, install the equipment in place and secure it to the body with screws. Then install the bottom of the washing machine and put it in working position.
Conclusions and useful video on the topic
Some types of DIY repairs are easier to show visually than to describe in words. Useful videos with step-by-step instructions for repairing washing machine parts such as the electric motor, control board and bearings will help you understand all the intricacies.
Electric motor repair: replacing brushes with your own hands:
Repair of the washing machine control unit. How to fix the programmer:
Simple repairs or replacement of worn-out parts of a washing machine can be carried out even by an inexperienced technician.
If your equipment is no longer under warranty and you are confident that you can handle the repair or at least not cause any damage, proceed to disassembling the washing machine. But when faced with a serious breakdown, there is no need to take risks, but it is better to immediately contact a service center.
Tell us about how you repaired a washing machine with your own hands. Share useful information and technological nuances that are worth sharing with site visitors. Please leave comments in the block form below, post photos and ask questions about the topic of the article.


I don’t quite agree about replacing the bearings, in the sense that you need to contact a specialist. I changed the bearings in my car myself, after watching several videos on YouTube. There is nothing complicated there, but effort is required, of course. It was more difficult to find a temperature sensor for our model, and that was another problem.
I don’t quite agree about the bearings: in the sense that they need to be replaced with the help of a specialist. I watched a few videos on YouTube and did it all myself. There is nothing complicated about it. But effort, of course, needs to be made. It was much more difficult to find a temperature sensor for our model of machine.This is a very big problem - spare parts for washing machines produced ten years ago.
From the owner’s point of view, I managed to fix a rather serious breakdown on my own. The tank started leaking. My wife is in a panic; she needs to buy a new washing machine. I took it apart and thought, what if I sealed the leak with cold welding? And it worked. The machine has been working for four years now, after my repair. And now you need to buy a new car just because this one has already turned a little yellow, and you want more.
Thank you for the interesting and, most importantly, useful material! Recently the handle on the machine broke - the lock worked, and the machine had not even begun to wash itself, i.e. in fact, all the things were left there in the typewriter and who knows how to get them out. I looked for the cable both in the top panel and in the bottom panel near the filter... in the end I had to remove the top cover, feel for the blocker and somehow open it. I bought a new pen, now I’m further studying useful information on repairs, I somehow became interested)
Hello. I live in a village, and it’s difficult to call a repairman. Maybe you know what's wrong? I didn’t want to add water, I started washing without water (even the pump didn’t turn on), then I didn’t do a good job of spinning (I had already filled in water), then during the spin cycle I wrote error F02, after rinsing I started writing this error. Now it doesn’t even allow me to select a function and when I close the door it beeps F03.
Hello. If an error occurs on the control panel, you need to look at its code in the device passport.If you cannot cope with the breakdown on your own, you need to contact a specialist, and not continue to stubbornly use the machine until the problem becomes stalemate. F3 in most washing machines - problems with the control or heating element sensor.
F2 - breakdown of the tachometer, engine rotor, control module, something with the wiring or contacts.
Immediately contact a service center or an experienced technician; a quality check of the system is necessary. So far it seems to me that the control module is stuck. But defining a “disease” without examination is problematic.
Recently my washing machine broke down and I couldn’t figure out what exactly was broken. I had to call a repairman to my house - it turned out that my pump was broken. It cost a pretty penny :((
Hello, is it possible to convert the machine to a village type on your own?... there is no central water supply
Search results for the query “The machine began to make noise during operation, light tapping. When removing the belt, the drum turns silently, there is noise with the belt, what could it be? The machine is Euronova 351.”
Hello, I have a Beko washing machine, it started to run, The screen shows that it is washing and does not take the powder, and water runs and the Screen turns off by itself after 0;28 seconds, what should I do?
Then End and turns off
Greetings.
I ask for advice, who knows. The situation is this:
The Electrolux EWN 820 washing machine has been working for 12 years.
During this time, we replaced the burnt ten, so periodically I take out a new one and clean it.
The problem is that during the “spin” cycle the machine freezes, stands there thinking... until the power is turned on/off several times, and then the cycle does not work.It can try to spin the spinning drum without freezing, but the drum beats and hits (namely, the drum weights) on the inside of the machine and it gets stuck. I observed this moment with the top cover removed.
I watched a video about replacing bearings - I completely disassembled it and cleaned EVERYTHING. The bearings and seals turned out to be fully functional, but when I washed the tank, water got into the outer bearing and it began to rust. Replaced everything.
The problem with running the cycle remains.
When I took it apart, there was little original lubricant in the lower shock absorbers - I added regular thick grease. It seems to me that if the problem is not in the software and automation of the machine, then it may be in the shock absorbers.
Question: who knows: the springs on which the tank is suspended tend to stretch over time and, accordingly, replacing them + the lower shock absorbers with everything NEW will solve the problem?
Or is it still the “brains” of the washing machine that should be given to specialists to diagnose?
My Samsung seems to work fine....but in the studio the spin buzzes and turns on the E5....can I fix it myself? Reprogram it...
No passport...
After the machine jumped from the wrong division of power, it became damaged by the program. Having changed the programmer, but nothing has changed, the water does not turn on and the machine does not change. After that, I move the programmer handle to the water pumping mode, the pump turns on, pumps water and squeezes. However, the programmer handle does not go to zero. I thought the whole problem was in the programmer, nothing else. You might want to please the Ardo A610. What could be the reason? Dyakuyu
Yesterday I asked for the sake of at least someone, but I bachu, for all that