Calculation of a plasterboard partition: types of partitions + examples of calculations
Are you planning to zone the premises? Would you like to calculate a plasterboard partition before going to the store? Agree, I wouldn’t want to order delivery of one missing sheet of drywall or overpay for extra material.
By spending a little time on preliminary calculations, you will be able to purchase everything at once, as well as estimate the cost of the future partition in advance. You will have the opportunity to make adjustments to the estimate and design, or choose a different partition option while nothing has been purchased yet.
There are online material calculators for plasterboard structures, but their calculations are very approximate and are not suitable for complex partitions. We have classified all types of partitions and will teach you how to calculate the amount of building materials for any of them.
The content of the article:
Types of plasterboard partitions
Online calculators will help you calculate the simplest, solid partitions, solid or with a doorway. In modern interiors, plasterboard designs are much more diverse.
They can have complex shapes and additional purposes other than dividing space. Next, we classify and organize all types of plasterboard partitions.
Form and purpose options
Based on the presence of openings, partitions are divided into deaf, which are a solid wall, and openwork. The second category includes not only partitions with decorative cutouts of complex shapes, but also those with doorways or windows, or shelves.
Depending on the location in the room, the partition can be solid - from wall to wall, or intermittent, with a free end. Also, the discontinuous partition may be low and not reach the ceiling. For the second type, the design and shape of the end is important.
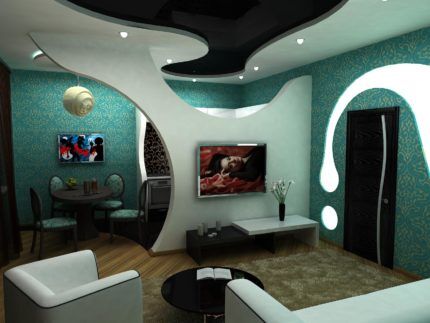
Partitions of complex shape are most often discontinuous and openwork.
The most common design solutions:
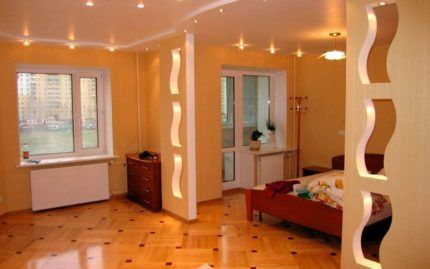
- end curved by a wave;
- through holes for various purposes: with lighting, shelves, windows, cutouts of complex shapes that form a pattern;
- curved plane of the septum;
- built-in sliding door;
- convex semicircular end.
The pliability of drywall allows you to realize the most daring ideas. It is most difficult to calculate the amount of materials for such structures, so a significant amount of waste is inevitable.
Load-bearing and functional characteristics
With relative lightness and thinness, plasterboard has high load-bearing capacity. If you need to build a full-fledged wall on which you can hang furniture or give other loads, use a wider profile, place it with smaller indentations, and sew gypsum board in 2 layers.
For solid partitions that completely separate a room, the organization of heat and soundproofing. Partially this function is also performed by 2-layer cladding, but more often mineral wool slabs are laid inside the partition, between the profiles.
Degree of septum mobility
Basically, structures for drywall are stationary; when installing a sliding door, they serve only as a box in which it is hidden.
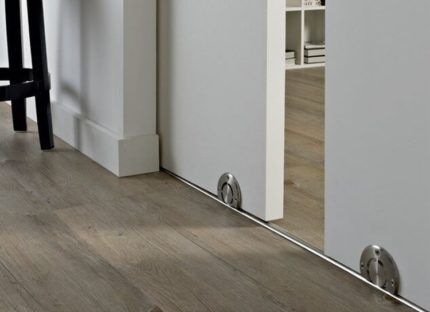
But sometimes the moving part can be made of 2 sheets of plasterboard, sewn through a thin profile. This solution is original and functional, but you will need to select reinforced guides and rollers.
List of materials and calculations
To calculate the amount of materials needed, first of all you need to think through the shape of the partition in all details, carefully measure all the parameters, and also prepare drywall cutting tool.
It is advisable to draw partitions of complex shapes on a convenient scale, for example, 10 cm = 1 m. This will make it easier to calculate or measure all the perimeters of holes and wavy lines. In addition, you will see and evaluate the result in advance, you will definitely not get confused during construction, and you will build exactly the form you planned. If you change the project during the work process, it is impossible to calculate the amount of materials in advance.
The basis of any partition is the frame onto which the plasterboard is sewn. As a rule, it is made from steel profiles - it is cheap, fast and reliable. You can use a wooden beam or combine these two materials - the calculation method does not change.
Guide profile UD
When calculating the profile for solid partitions, it is important to measure all sides of the perimeter. The geometry of a room may not be ideal; its width in the same place may differ by 3–10 cm, as well as its height.
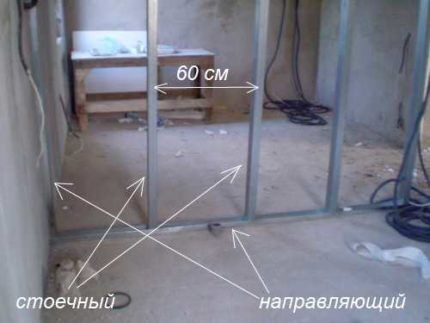
When buying a UD profile, decide on its width, because it determines the thickness of the future partition. It can be 50, 75 or 100 mm, that is, the maximum thickness of the partition, even with 2-layer cladding, is 150 mm. If this is not enough, lay 2 profiles in parallel, forming a double frame.
For a partition up to 4 m wide and up to 15 cm thick, 2 guide profiles are sufficient. In other cases, the total footage of the required profile is calculated and divided by the standard profile length, 3 m or 4 m.
CD rack profile
The PS is installed vertically, to the entire height of the structure, in increments of 60 cm. This way, each sheet of drywall will be fixed to 3 profiles, along the edges and in the center, and all vertical joints of the sheets will fall on the metal frame. If a structure of increased strength is required, for example, for hanging furniture, CD profiles are placed every 40 cm, each sheet is fixed on 4 racks.
To calculate the number of racks, it is enough to divide the length of the base of the partition by the selected step. There is no need to calculate the total footage; the length of the CD profile is selected according to the height of the partition so as to avoid the need for a connection.
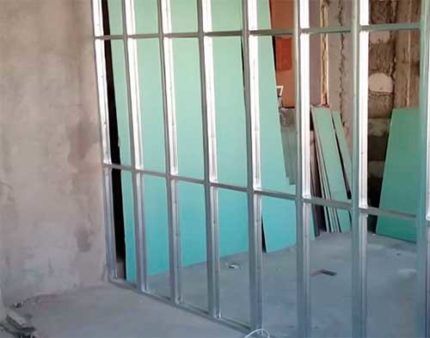
For structures with a door or window, the racks should limit each opening on the sides. In practice, the nearest rack, which falls in the middle of the sheet, is shifted to the edge of the opening, but it is better to purchase an additional profile. Also, an additional section of the profile will be needed to strengthen the convex part of the end of the partition.
Jumpers are also made from the rack profile. They are necessary in places of horizontal joints of sheets and holes to secure the edges.To increase the strength of large area partitions, such jumpers are installed between the racks every 40 - 80 cm.
To calculate how much profile to buy for jumpers for a reinforced frame:
- Calculate the number of horizontal rows of jumpers. Divide the height of the partition by the selected pitch. For example, with a ceiling height of 2.6 m and a pitch of 0.7 m, we get 3.7, rounded - 4 rows.
- Multiply the number of rows by the width of the partition. For example, with a width of 3.5 m for 4 rows you will need 14 m of CD profile.
- Add 20% for waste, we get 16.8 m.
- Divide by standard profile length. In our example, we get 5 pieces of 4 m each or 6 pieces of 3 m each.
If jumpers are needed only for horizontal joints of drywall, and not for reinforcement, calculations are carried out for 1 row of jumpers.
To calculate the total length of the jumpers limiting the holes or recesses in the partition, add up the width of all the holes. Then multiply the resulting number by 2, because the jumper should be both above and below the window.
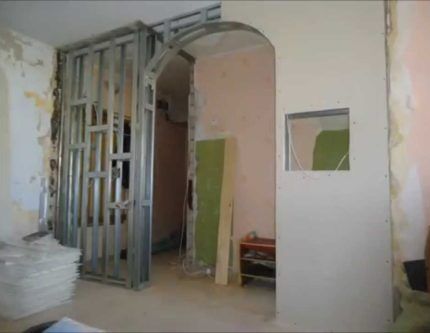
Do not forget to multiply the number of racks and lintels by 2 when erecting a thick partition on a base of 2 parallel guide profiles.
Other frame materials
The profile must be attached to the wall, floor and ceiling every 30 - 50 cm. For this, dowels or long wood screws are used, depending on the material of the walls.
To calculate their number, multiply the perimeter of the junction of the partition to the bases by 3. For example, for a solid partition 2.6 x 3.5 m you will need (2.6 + 2.6 + 3.5 + 3.5) x 3 = 37 pieces .
Between the profile and the wall, along the entire perimeter, a damper tape should be laid. The required length is equal to the perimeter of the junction.
To fasten the profiles together, a special tool is used - a cutter. If you don’t have it, purchase small metal screws. You will need to prepare 4 pieces for each rack and each jumper.
For the doorway, it is recommended to reinforce the pillars and lintel with wooden blocks. The cross-section of the beam is equal to the width of the profile, usually 100 mm.
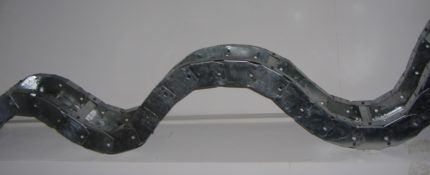
To form curved lines of the end or hole, there is a special arched profile. But it is not always on sale and is expensive, so it is often made independently from a PN or ceiling guide profile.
The number of such profiles corresponds to the total length of all curved lines.
Sound insulation is usually performed with mineral wool 50 or 100 mm thick. It is sold in slabs or rolls 60 cm wide, so it is conveniently located between the profile posts. The total area of the wool is equal to the area of the partition.
To achieve maximum sound insulation, they make a partition on a double frame with 2 layers of insulation, leaving a gap between them. If you add 2-layer plasterboard sheathing, the sound insulation will be 3 times better than with 1 layer of 50 mm wool and 16 times better than without it at all. True, the cost of such a partition doubles.
Calculation of drywall for sheathing
There are two ways to calculate the required amount of drywall: by total surface area or drawing up a diagram of the arrangement and cutting of sheets.
The first method is universal, it is much faster and simpler.The second method is more accurate, it allows you to minimize the amount of waste, and the resulting plan helps in the process of cutting and installing the material. But you need to draw up a diagram for each case individually.
First of all, you should calculate the surface area of the partition by multiplying its height by its width. We multiply the resulting number by 2, because the partition is sheathed on 2 sides.
For irregularly shaped structures, for example, with an uneven end, take the largest width and height. The trimmings will turn out to be of irregular shape, so they will not be used in further work.
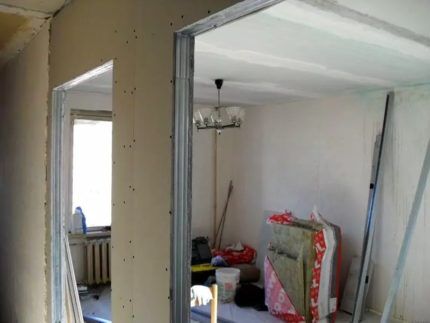
For a solid solid partition, a wall with a door or a window, these are all the necessary calculations. That is, in order to fence off a room 3.5 m wide with ceilings of 2.6 m, you will need 3.5 x 2.6 x 2 = 18.2 sq. m. drywall. Taking into account the standard dimensions of gypsum boards 1.2 x 2.5 m, with a margin for trimming of 15%, you need to buy 7 sheets.
For reinforced, 2-layer sheathing, multiply the resulting number by 2.
For discontinuous and openwork partitions, you should additionally count the plasterboard for covering the ends and walls of holes and shelves. Please note that only smooth, straight sections should be included in the total area.
For curved elements, you should buy arched plasterboard, 6.5 mm thick, or at least ceiling plasterboard, 9.5 mm thick. When creating an arch, only its curved part is measured; smooth slopes can be sewn up with plasterboard that is cut from the opening.
To calculate the amount of arched drywall, measure or calculate using formulas the total perimeter of all curved holes and the end.
For example, the perimeter of a round cutout is equal to the diameter of the circle multiplied by 3.14.Then multiply the resulting footage by the thickness of the partition, expressed in meters - this is how you calculate the total area. Add to it 20 - 40% for trimmings, reinforcement of shelves and unsuccessful bending attempts.
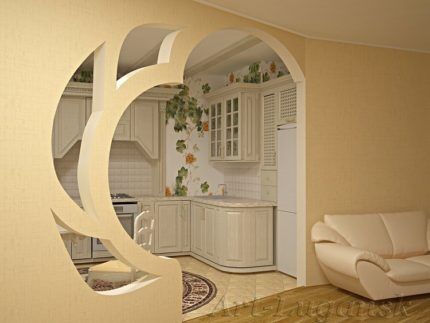
In the same way, you can calculate the amount of drywall needed to finish holes with smooth edges, for example, rectangular ones. In this case, the resulting number is added to the total area of the gypsum board, because material with a thickness of 12.5 mm can be used here.
If you decide to carry out the calculation by drawing up a layout diagram and cutting sheets, please note that the most common plasterboard dimensions are 1200 x 2500 mm, but sheets of other sizes are also available.
GOST 6266-97 “Drywall sheets. Technical specifications" allows products from 2 to 4 m in length, 60 or 120 cm in width. Using them, you can save money and reduce the amount of pruning.
In the diagram, place the horizontal joints of adjacent sheets staggered. When cutting a thin sheet, keep in mind that the drywall is bent along the length of the sheet. Buy material with a reserve in case the sheet breaks during cutting, bending or fixing.
In addition to the drywall itself, do not forget to buy self-tapping screws to fix it. Each sheet is screwed around the perimeter, in increments of 20 - 40 cm, plus 1 or 2 racks in the middle.
It takes about 30 pcs for 1 whole sheet. For curved and small elements, the fixation step is reduced to 10 - 15 cm, and for the 1st layer of double cladding - increased to 40 - 60 cm.
For simple blind partitions, take 20 – 25 screws per 1 sq.m. partitions, for complex shapes - up to 80 - 100 pcs/sq.m.
Materials for decorative finishing
After installing all the plasterboard parts, the partition needs to be given an elegant, finished look.
For this you will need:
- reinforcing serpyanka mesh - along the length of all sheet joints;
- primer – for the entire area of the structure, consumption depends on the manufacturer, indicated on the packaging;
- starting putty - for sealing joints and screw heads;
- finishing putty – about 600 g per 1 sq.m. squares;
- corner profile, metal or plastic, smooth and arched, simple or reinforced with mesh. The total length around the perimeter of the holes plus the length of the end, multiply by 2.
- Finish coating: paint, wallpaper, tiles, decorative plaster or a combination of these options. If necessary, glue.
Consumables can also include fine sandpaper for sanding putty before painting or pasting.
Examples of summary calculation of materials
To show all the calculations clearly, let’s take 2 common design options, the simplest and the most complex.
Calculation of a solid partition with a door
Let's take the most common simple option: a partition that separates a new room, 4 m wide, ceiling height 2.5 m, door 2 x 0.8 m.
A UD guide profile will be needed around the perimeter of the partition. For this option, it is convenient to use 2 pieces of 4 m each and 2 pieces of 3 m each.
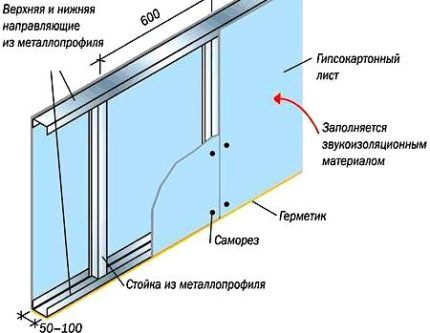
Sealing tape under the profile is needed around the entire perimeter. 2.5 + 2.5 + 4 + 4 = 13 m.
Dowels for fastening the profile are needed 3 pcs per 1 m of perimeter, 13 x 3 = 39 pcs.
The CD rack profile for such a partition can be used in 2 options: only racks with a pitch of 40 cm or racks with a pitch of 60 cm, reinforced with horizontal jumpers.
For the first option, you will need 4 m/0.4 m = 10 pieces of 3 m profile + 1 spare. For the second case, you need 4 m/0.6 m = 7 pieces of 3 m racks. For lintels located in 65 cm increments, you will need 2.5/0.65 = 4 rows of 4 m each, that is, 16 m of profile. With a reserve for waste, you need to buy 5 pieces of 4-meter-long profile.
To reinforce the profile around the door, a beam with a cross-section of 100 x 100 mm and a total length of 2 + 2 + 0.8 = 4.8 m is desirable.
Mineral wool for sound insulation is laid over the entire area of the partition: 2.5 x 4 = 10 sq.m.
The entire area on 2 sides needs to be covered with plasterboard, 2.5 x 4 x 10 = 20 sq.m. or 7 standard sheets of 3 sq.m.
Self-tapping screws for fastening drywall - 30 pcs per sheet or 210 pcs in total. Serpyanka tape for all joints of plasterboard sheets: 7 seams of 2.5 m = 17.5 m. Starting putty needs a little, 3 kg of packaging will be enough, and finishing putty needs 0.6 kg per 1 sq.m., 0 in total. 6 x 20 = 12 kg.
Partition with arch and windows
It is better to calculate complex structures by first drawing up a drawing. Let's calculate the materials for the partition from the drawing in the picture.
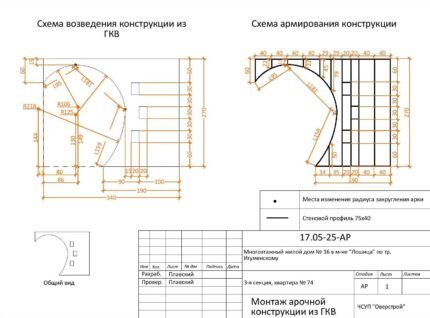
UD profile – 1 piece 4 m long and 2 pieces 3 m each. Sealing tape needed 0.6 + 3.4 + 2.7 + 1.9 = 8.6 m.
CD profile – 4 whole racks + sections 0.22 + 0.11 + 0.22 + 0.45 + 0.79 + 0.5 = 2.29 m. Jumpers are also needed at the top and bottom of each window: 0.2 m x 6 pcs = 1.2 m.In total, you should buy 4 profiles of 3 m each and 1 piece of 4 m.
An arched profile or an additional CD is needed for the entire length of the curved line. You can approximately calculate the length of half a circle of average radius, 125 mm. 1.25 x 3.14 x 2 = 7.85 m = total circumference, that is, the length of half is 3.92 m.
Our arch is slightly larger than half the circumference, so you need to buy 2 profiles of 3 or 4 m each. The drawing shows exact calculations of the length of each section of the arch, in total - 435 cm.
Regular 12.5 mm drywall is needed for the main plane and window coverings. For most of the partition you need 1.9 x 2.7 x 2 = 10.26 sq.m. For the top piece you will need 1.5 x 0.6 x 2 = 1.8 sq.m.
The thickness of the partition will be 75 + 12.5 + 12.5 = 100 mm. The perimeter of the windows is: (20 + 20 + 30 + 30) x 3 = 300 cm. To cover them you will need: 3 x 0.1 = 0.3 sq.m. In total, taking into account the reserve for trimmings, you need (10.26 + 1.8 + 0.3) x 1.2 = 14.8 sq.m., that is, 5 sheets.
Arched or ceiling plasterboard is needed for the curved end strip. It has dimensions of 435 x 10 cm, that is, less than 0.5 sq.m of drywall is needed.
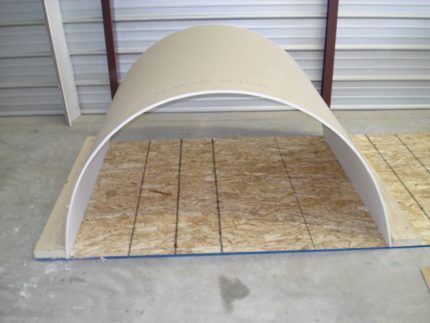
To strengthen the corners of the arch and windows on both sides of the partition, a special profile is needed. A total of 4.35 x 2 = 8.7 m of the arched corner and 3 m (the total perimeter of the windows was calculated earlier) x 2 = 6 m of ordinary corners.
You will need significantly more self-tapping screws than for a simple partition, about 50 pieces for each sheet of drywall. In total we have 6.5 standard sheets, that's 325 self-tapping screws.
You may also find our other article useful, where we describe in detail how install sockets in drywall.
Conclusions and useful video on the topic
The easiest way is to calculate the required amount of materials for a solid blank partition or wall with a door. However, knowing some subtleties and spending a little time, it is possible to independently calculate how much to buy even for the most complex openwork partition. For example, for one like in this video:
How to calculate a metal profile for any plasterboard structure is shown in this video:
If you carefully carry out all the calculations, you can quite accurately estimate the cost of materials for the future partition, save on their purchase and facilitate the installation process.
Have you installed a plasterboard partition? Have you carried out preliminary calculations of building materials? Share your experience in the communication block located below the article. There you can ask questions on the topic, and our specialists will try to answer them promptly.


