Attaching the tank to the toilet: a detailed description of the installation process
Do you prefer to save your family budget by creating comfort in your home with your own hands? Agree that many jobs can be done independently, without inviting unfamiliar plumbers, electricians and mechanics. Have you decided to attach the tank to the toilet, but have never done it and don’t know where to start?
We will help you understand the essence of the issue - the article describes in detail the installation process of various waste tanks. The features of fittings in wall-mounted, built-in and conventional compact-type plumbing tanks are considered. Fastening and assembly is accompanied by step-by-step photographs and explanations.
To help the home plumber, we have selected videos with video recommendations on assembling fittings, installing a tank and replacing a toilet. Thanks to a detailed description of the installation process, this task will be within the capabilities of any person who knows how to use simple home tools in practice.
The content of the article:
Subtleties of choosing a toilet
We will not delve into design nuances - everyone selects the color and shape of a faience friend, as well as other necessary plumbing fixtures, to their own taste.But it’s simply necessary to figure out which type of tandem “toilet bowl - flush cistern” will be most convenient for manual installation.
Let's look at the most common types of cistern by type of installation.
Compact — a flush cistern, which is located directly on a special ledge of the toilet and, after installation, forms almost a single whole with it. For those who cannot boast of a plumbing education, this layout scheme is the most preferable, since in this case the assembly is as simple as possible.

Built-in (hidden) cistern for a wall-hung or floor-standing toilet. Installed in a special niche or hidden behind a false wall. In principle, the installation itself is not too complicated, since the kit includes a special support frame - installation, to which the main parts are attached.
Still, some additional skill and extra care are required to get it exactly right. In addition, then you will also need to cover all the equipment with decorative materials, which also requires additional effort and resources.

Mounted or freestanding cistern. It is mounted separately from the toilet on the wall and connected to it using an additional overflow pipe.
The length of this pipe can be quite short, which allows you to use modern fittings (internal filling) of the tank and use a small lever or a familiar button to drain water instead of a Soviet chain with a handle. However, installing such a tank requires a lot of effort, skill and time.

It should also be noted that in terms of financial costs, the first option will be the most profitable - everything you need is already included in the purchase package. You just need to check the presence of all components.
But in the third and especially in the second case, funds are needed for additional parts, and it is far from a fact that they can be purchased in the same store where the main plumbing fixtures were chosen.
Before purchasing a new replacement plumbing tank, carefully examine its condition. It is possible that it is enough to cistern repair. To do this, in most cases the container will also have to be removed and then put back.
Preliminary work before installation
Before proceeding directly to installation work, it is necessary to prepare both the scene of action and the object of application of forces, in this case - the drain tank with all the auxiliary elements.
Moreover, preliminary work is carried out in several stages (although not all of them are mandatory - it all depends on the type of equipment chosen).
Step #1 - dismantling the drain tank before replacing
Before installing a new cistern, you must first dismantle the old one. And if your toilet is from the times of the Soviet Union, it is better to enlist the help of an assistant - it will not be easy to move the cast-iron tank alone and knock off the rusted bolts.

The disassembly itself occurs according to the following scheme:
- Turn off the water supply to the tank (close the central valve).
- We remove the remaining liquid from it, that is, we simply drain the water.
- We disconnect the container from the pipes - the water supply and the bypass, if there is one (it is at this stage that an assistant will be very useful).
- Unscrew the mounting bolts and remove the old structure. We carry out these operations with care so as not to drop the heavy tank and damage the tiled floor or toilet bowl.
- We clear the free space for a new installation. We try to completely remove rust and cement residues, leaving only a smooth, defect-free surface.
After carefully completing all of the above steps, you can begin preparatory work.
Step #2 - preparing the place and materials
Before installing a new tank, check the condition of the remaining plumbing and communications.

What to pay attention to:
- Toilet bowl. Even if you are only changing the tank itself, you need to make sure that the main element of the “tandem” is installed correctly.To do this, use a building level to check whether it is level - if there are significant deviations, it is better to eliminate the tilt. Such care is needed when installing a compact toilet, since due to the tilt, the tank in this system may not work correctly. At the same time, it is worth inspecting the connection of the equipment to the sewer.
- Failed communications. At this stage, the location and condition of the cold water supply pipe should be clarified, which then needs to be shut off. At the same time, calculate how long the flexible hose should be to connect the tank to the water supply, as well as the need to include a ball valve or additional water supply outlets in the system (for example, to a washing machine).
- Cistern. Make sure that the container itself has no defects, all spare parts are available and are ideal for installation. The length of the mounting bolts and flexible water hose must be sufficient for a reliable connection, and all gaskets and couplings must be properly sized. It is also worth checking the completeness and functionality of the internal fittings.
Now make sure that all the necessary tools and materials are at hand - this way you will spend less time and effort on the installation process.

To work you will need:
- To install a compact toilet tank, you only need wrenches - a flat open-end or socket and a cylindrical socket. Moreover, the carob one can be replaced with an adjustable one or even use pliers, and the end one can be either monolithic or composite.These wrenches are used to tighten the mounting bolts.
- When installing other types of flush tanks, you need to add a tape measure with a building level and a pencil (mark the location of the holes for fasteners), as well as a drill (or hammer drill) and a hammer for installing dowels under the bolts.
- Connecting the bypass pipe additionally requires an adjustable wrench to match the diameter of the coupling.
- To ensure waterproof connections, it is worth stocking up on silicone sealant and sealing tape, and to prevent corrosion of metal parts in contact with water (most often bolt heads) - and a special lubricant.
Before starting installation, do not forget to turn off the water at the central valve.
Features of the fittings of the main types of tank
Almost always, when installing a cistern yourself, you have to personally install the mechanism for collecting and draining water - the internal fittings.
Fortunately, for most modern designs this process is intuitive and does not cause difficulties, and instructions are present in any case. But just in case, we will look at a simplified diagram, paying attention to various fastening nuances.
Type #1 - internal mechanism of the compact toilet
IN compact toilet fittings Most often there are only two main elements - the inlet and outlet valve. An inlet (float) device is a part connected to a water pipe, which serves to collect liquid and adjust its level.
Installing it takes just a few steps:
- Before installing the mechanism in its internal cavity at the external outlet, you must first install a filter to purify the incoming water or make sure that it is supplied by the manufacturer.
- The device is attached to the bottom wall of the tank (according to the attached instructions), putting on the required sealing gasket from the inside, and securing it from the outside with a special nut included in the kit.
- The external outlet is equipped with a thread, to which, after installing the tank in place, a flexible water supply hose is connected.
There are two types of outlet valve or drain siphon - single-level or two-level. And if, when you open the first type, all the water from the filled tank is released into the toilet, then in the second case you can decide for yourself whether to flush the entire supply or only half of it.
The device itself can be divided into three parts: the connecting bowl, the main mechanism and the trigger button.
The installation is carried out by analogy with the inlet structure:
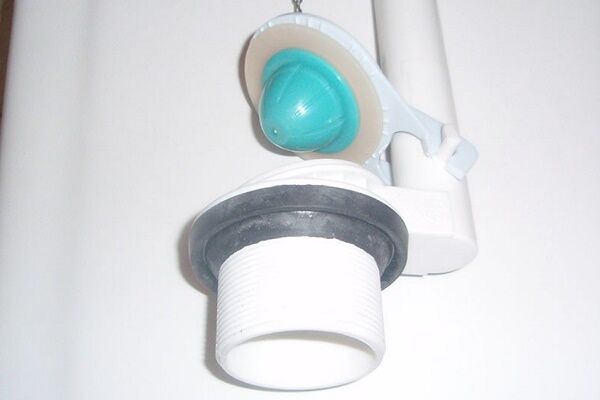
- The lower part is made in the form of a kind of supporting bowl, which is placed in the drain hole of the tank. A rubber (or silicone) gasket and a fixing nut are also used here.
- Once the reservoir is secured to the bottom piece, the main piston system is added by simply turning and snapping into place.
- The last step (after installing the cover) will be the installation of the push-button assembly.
As already mentioned, when choosing a compact system, you can be sure that all the necessary nuts and gaskets are included in the kit. But if you are not satisfied with the quality of materials, which are often used to equip plumbing fixtures from the middle or “economy” class, you can replace some spare parts.
For example, take reliable silicone gaskets instead of the “original” rubber ones or stainless steel bolts.

But such modernization should be carried out even before installation, using a model to verify the compliance of the new parts with the main components of the mechanism.
Type #2 - hanging cistern fittings
Most often, the difference between the internal structure of an autonomous tank and a compact one is the output intake valve on the side wall using a lever release unit. Because of this, both the type of float device and the release valve system change.

However, this does not make the installation itself more difficult - just follow the instructions exactly.
Type #3 - built-in cistern mechanism
A big advantage when purchasing a wall-hung toilet with a built-in cistern is the absence of work on installing fittings into the flush tank. You receive a fully assembled mechanism; all that remains is to attach a double button to the front panel. But we will consider this stage in more detail when describing the process of installing the tank.
Basic installation work
After the preparatory work and assembly of the interior, you can begin installing the plumbing. But since each type of toilet cistern needs to be installed in its own way, choose from three different step-by-step diagrams the most suitable one for your case.
Instruction #1 - attaching the tank to the compact toilet
The easiest to use is the installation of a flush cistern on a toilet shelf of the compact type. The installation and fastening process includes a number of traditional actions:
Here you don’t need a full set of tools, and you can even do without an assistant.
- The necessary fittings components are inserted and secured into the inside of the tank (this process is described separately above).
- A sealant is placed on the shelf (special protruding part). When the fastening bolts are properly tightened, the gasket hermetically closes the connection hole for draining water, but for reliability, you can additionally place it on silicone glue.
- The flush container is installed on the toilet so that the gasket is exactly under the bottom of the outlet valve (drain), and the holes for the connecting bolts in the tank and toilet coincide.
- Plastic washers and rubber cone-shaped gaskets are put on the bolts (cone down), then they are threaded into both holes, after which the second set is pulled on - flat rubber gaskets and plastic washers - and the nuts are tightened by hand.
Since it is not possible to tighten the nut tightly enough by hand, tools are used - wrenches. The bolt head is tightened from above with a socket wrench, while holding the nut from below with an open-end or cap wrench.
When tightening the bolts, you should not be particularly zealous - the greater the load on the sealing gasket, the shorter its service life. In addition, if the bolts put too much pressure on the ceramics of the tank, cracks may form.
The next stage of installation is the ideal alignment of the installed tank using a building level, for which the fasteners are tightened or loosened on the desired side.
After finishing work with the bolts, their heads are covered with plastic caps or treated with anti-corrosion lubricant. After making sure that all fittings are completely installed inside the tank, configure it. Place a lid and a water drain button on top.
Lastly, the protruding part of the inlet valve and the water pipe are combined with a flexible hose with attached rubber gaskets. For greater reliability, you can additionally use sealing tape or plumbing tow.
In this case, it is not advisable to use glue - what if you have to change the hose? At the final stage of installation, a check is made for tightness and adequate operation of the tank's drain mechanism. To do this, turn on the water supply to the drain tank.
If everything is in order in the area of the sealing gasket, the junction of the flexible hose with the water pipe and the inlet valve, a test drain of water is carried out. After which they again monitor possible leaks. At the end of the test, the toilet-cistern system is ready for use.
The first stage is the assembly of internal fittings.

An important point is that when both devices are fully installed, their moving parts should not touch each other.
Then it was time to directly mount the tank on the toilet shelf.

At the very end, we replace the tank cap and the push-button assembly connected to the outlet valve of the fittings.

If you have not yet encountered plumbing problems face to face, then it is worth learning from more knowledgeable people.
Instruction #2 - installing an autonomous tank
As already mentioned, installation hanging cistern more difficult, so consider hiring an assistant.
Basic installation steps:
- An overflow pipe is connected to the toilet and the location where the tank is attached is marked on the wall, after which the pipe is removed from the toilet until work on the tank is completed.Moreover, it is necessary to at least approximately calculate the height of the drain structure, that is, the length of the connecting element, in advance.
- At the selected height, the location points of the fastening elements are calculated, checking them using a tape measure and level.
- Using a drill or hammer drill, holes are drilled according to the marks made and dowels are installed.
- The fittings are inserted into the tank and the overflow pipe is connected, not forgetting about the sealing gaskets.
- The assembled tank is attached to the wall by screwing the bolts into the prepared holes.
- The pipe is connected to the toilet, and the tank to the water supply, taking care of the tightness of the connections.
The use of various washers, gaskets and other sealing elements is no different from those with the previous installation method.
Test tests of installed equipment are also carried out according to the same scheme.
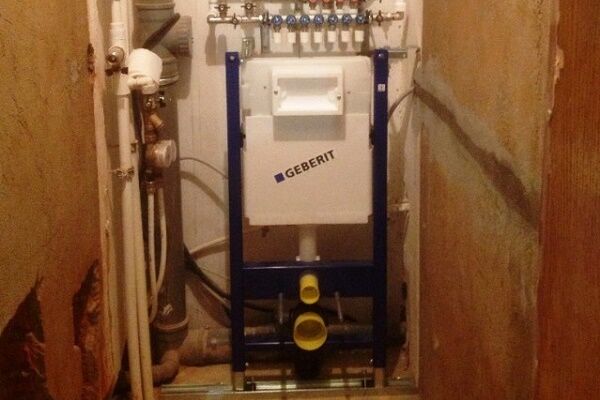
Instruction #3 - built-in assembly
The main difference between the tandem of a wall-hung toilet and a built-in cistern from previous designs is the presence of a single installation system - a frame frame on which all components are installed.
If, in addition to replacing a damaged tank, it requires repair installation, it must be carried out before covering the supporting structure of the plumbing with sheathing.
The general installation diagram is as follows:
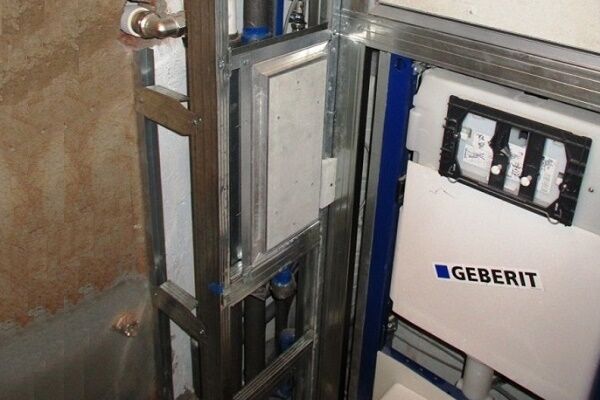
- By alternately test connecting the main elements (tank, adapter to the sewer outlet and others), the most convenient positions of the frame frame relative to the walls, floor and sewer pipes are calculated. In this case, the clarity of horizontal and vertical bars must be verified using a level.
- After the final formation of the installation system and securing the set frame dimensions using a locking mechanism (or ordinary bolts), the location points of the fastening elements are marked on the wall and floor.
- Use a hammer drill to make the necessary holes. For various finishing materials, special drills are used - for example, separately for concrete, brick or ceramic tiles.
- The mounting frame is securely fastened to the wall and floor with dowel bolts or anchor bolts.
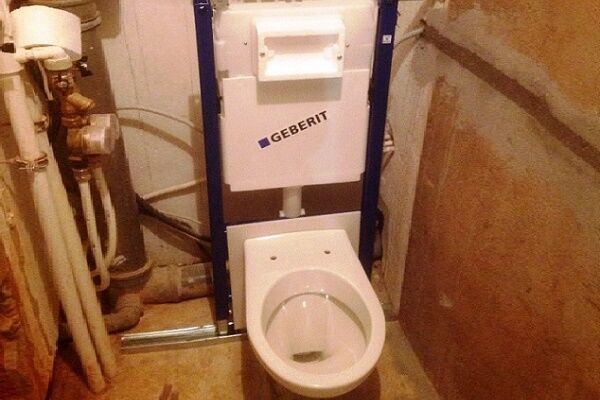
- All the constituent elements of the structure are installed on the frame already fixed to the surfaces - from the tank to the sewer siphon.
- The drainage container is connected to the water supply.
- The frame is covered with finishing materials (this can be plasterboard followed by a decorative coating, or various types of panels).
- A double flush button is placed in the holes cut in the trim and the toilet is hung.
But, despite the versatility of the proposed scheme, the priority should always be the instructions for your system - take the trouble to study it before installation, because failure to follow this rule can lead to expensive mistakes.

Conclusions and useful video on the topic
To make the process of installing valves in a tank more understandable, watch the video instructions, which discuss the assembly and configuration of several types of valves:
We invite you to watch a video where a compact toilet is completely installed by a professional plumber, explaining the nuances for beginners:
Here is one of the installation instructions.See how polished your actions should be:
As you can see, some systems can be installed by a person completely uninvolved in plumbing. But if you understand that you do not have enough experience or time for repair work, and the purchased kit cost a considerable amount, it is better to invite a knowledgeable specialist.
Please write comments in the block below. We are interested in your stories about how you fixed the flush tank to replace the seal or completely changed the container. Ask questions if you have any while reading the text.


