Do-it-yourself technology for welding polypropylene pipes: an overview of methods and nuances
Do you want to repair or replace communications made of polymer pipes? Agree that it’s not a bad idea to save on calling a technician by assembling a new pipeline yourself. But you don’t know how you can connect the individual elements of the system to each other and what you will need for this.
The article we presented describes in detail the technology of welding polypropylene pipes - any novice plumber can connect them with his own hands. We will tell you what you need to consider, how to use a soldering iron to join plastic elements. We will tell you in what cases other methods are used.
To help the novice master, we have selected detailed videos demonstrating the step-by-step process of welding polypropylene, and photo illustrations.
The content of the article:
Pipes and auxiliary elements for assembly
One of the undeniable advantages of polymer pipes is their ease of assembly.
The elements can be installed almost anywhere: laid openly on the walls or placed hidden under the floor.

Polymer pipes are produced with diameters from 20 to 110 mm.For household purposes, products of sizes 20/25/32/40 mm are most often used. The area of application determines the nominal pressure of the material.
In the marking it is indicated by the letters "PN":
- PN 10 – chosen for arranging cold water supply.
- PN 16 – used for cold water, but with higher pressure, as well as when installing a “warm floor” system.
- PN 20 – products the only limiter of which is the temperature regime of the liquids transported through them. It should not exceed 75 °C.
- PN 25 – universal products used for arranging both “cold” and “hot” systems, the temperature of which reaches 90 °C.
On sale you can find polymer products equipped with additional reinforcement.

The main feature of polymer pipes is their inability to bend.
Therefore, all changes in the trajectory of the laid highway are carried out only from straight sections connected to each other by auxiliary fittings:
- crosses – for the possibility of branching the main flow;
- tees – flow multipliers;
- couplings – for connecting pipes in a straight section;
- bends – for changes in pipeline direction.
Fittings can be equipped with fused metal threads, which make it possible to connect a polymer pipeline with metal elements.

When choosing auxiliary elements, two parameters should be taken as a basis: the internal cross-section of the products and the thickness of their walls. These parameters must correspond to the technical characteristics of the polypropylene pipes used.
Methods for connecting polymer pipes
When joining pipes made of polymer materials, depending on the installation conditions, one of two methods is used:
- Soldering – involves heating and joining the molten ends of the elements.
- No soldering – involves connecting pipes using compression fittings or by implementing so-called “cold” welding.
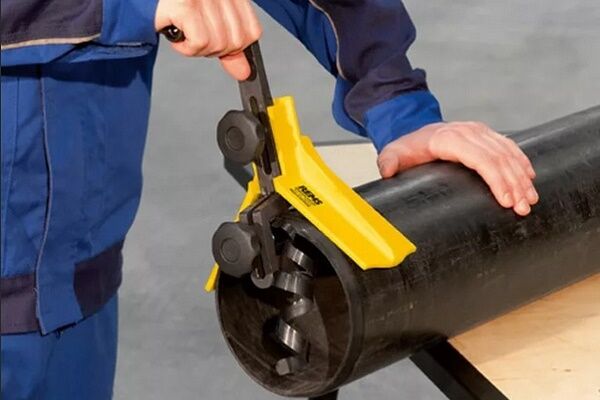
The second installation method is convenient in the sense that there is no need to use special equipment to implement it. All work can be done using a simple tool - a crimp wrench.
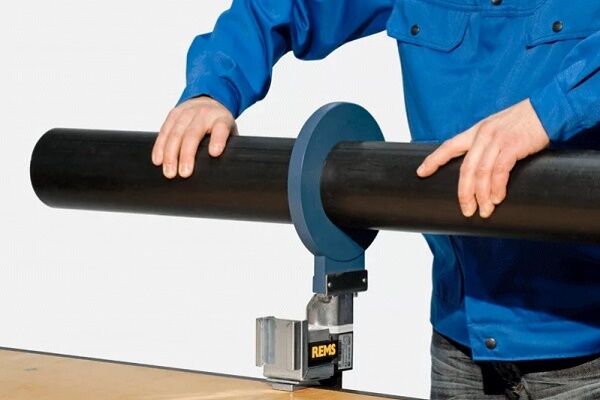
A polypropylene pipe with a wall thickness of more than 4 mm and a diameter of more than 50 mm is connected using the butt welding method:
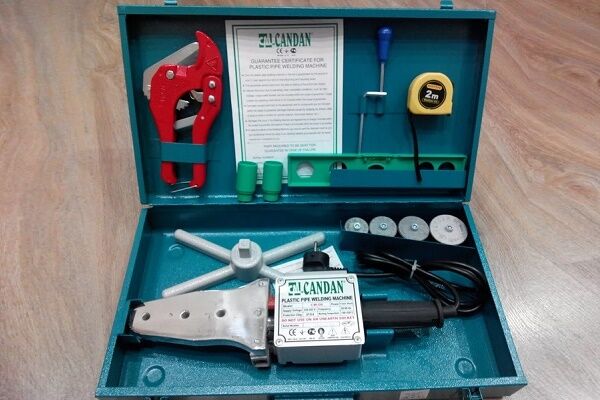
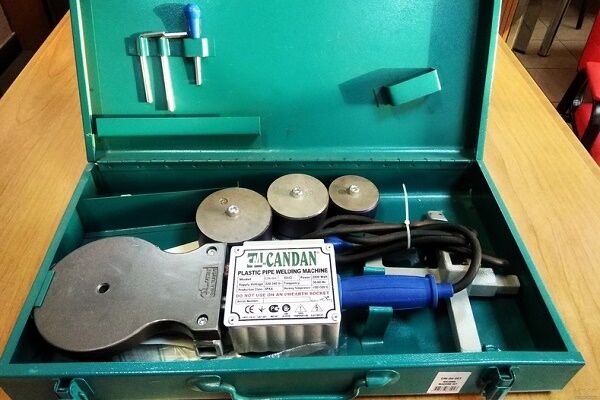
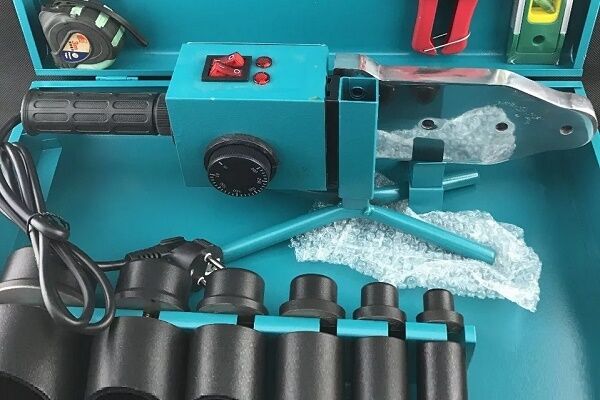
Connection Tools
The main tool used to join plastic pipes is a welding iron. This is a kind of soldering iron that operates from a 220V network. The principle of operation of the device is quite simple. The role of the heating element of the iron is performed by a welding heating element placed in a metal casing.
It heats the stove to a predetermined temperature, which heats the nozzles. The thermostat is responsible for maintaining the optimal temperature of the nozzles. Soldering and typical mistakes made when joining polypropylene pipes are covered. next article, which we recommend that you familiarize yourself with.

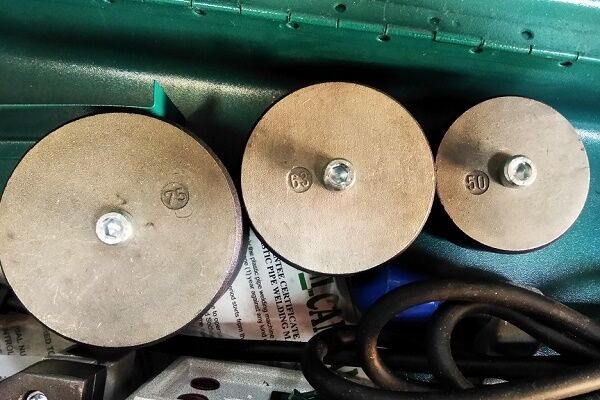
The iron comes with heating attachments of standard sizes.Heating to a certain temperature, they soften propylene to a viscosity that will ensure a tight connection of the elements.
Nozzles are selected depending on the diameter of the pipes used:
- 20th size - for pipes with a diameter of half an inch;
- 25th – for products with a diameter of 0.75 inches;
- 40th – for elements with a cross section of 1.25 inches.
Since the cost of such a welding machine is quite high, and it is not necessary to use it very often, there is no point in purchasing equipment. It is better to rent the tool for a day or two.
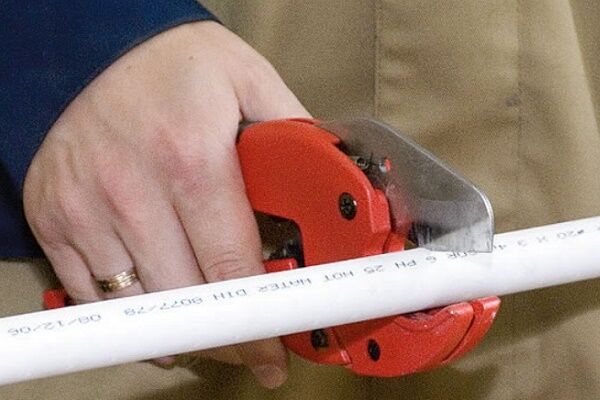
For high-quality cutting and preparation of welded areas, it is best to use a special tool designed for this purpose - pipe cutter. With its help you can get an even, smooth and beautiful cut.

In the absence of a pipe cutter, the work can be done with a grinder or a hacksaw. The only thing is that after such tools a fringe remains at the cut site. But it won’t be difficult to remove by sanding it with a strip of sandpaper.
In addition to the basic tools for the work, you will also need:
- square;
- construction tape;
- a simple pencil or marker.
When planning to connect pipes using the “cold” welding method, it is necessary to purchase in advance a thermoactive adhesive made on the basis of polyester or epoxy resin, or its thermoplastic analogue made on the basis of rubber.
Main stages of soldering technology
The key conditions for successful installation of plumbing or heating system from polymers are a careful calculation of the required material and competently performed welding of the elements.
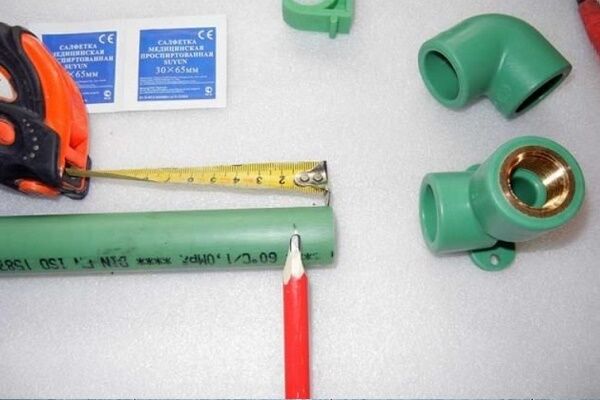
Stage #1 - calculation of materials and components
To make your work easier, thereby minimizing errors during installation, the first step is to draw a diagram of the future system, indicating on it the number of turns and branches. When calculating the number of pipes, 25-40 mm spent on “penetration” should be added to each length of the segment.

If you have never welded polypropylene pipes, experienced specialists recommend purchasing several pieces of pipe for preliminary training. Such costs will be inexpensive and will allow you to avoid gross mistakes when installing the system.
Feature polypropylene pipes is an increase in the coefficient of linear expansion under the influence of high temperatures.
As a result, when heated or pressure increases inside the system, the pipes elongate and begin to sag over time. To prevent this phenomenon, when laying sections longer than 4-5 meters, it will also be necessary to use compensators.

Compensators are installed on both horizontal and vertical sections, mounting them between two fixed supports. If necessary, special modifications of compensators can be purchased that can eliminate linear expansion at corner bends of the pipeline.
Let's find out how to properly weld polypropylene pipes so that there are no leaks at the joints.
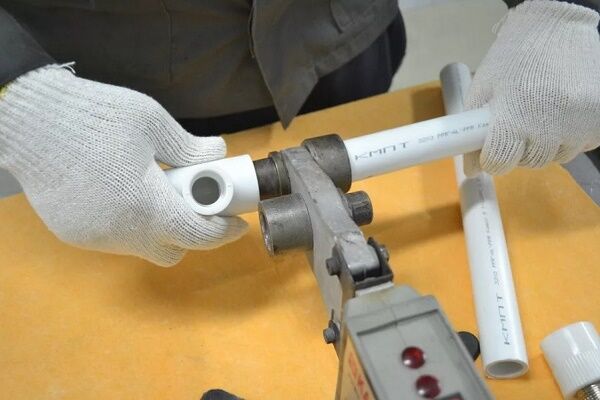
Stage #2 - soldering of pipeline elements
Briefly the essence of welding technology polypropylene pipes consists in the fact that, under the influence of high temperature, the ends of the joined elements are heated and connected by tightly pressing them together.

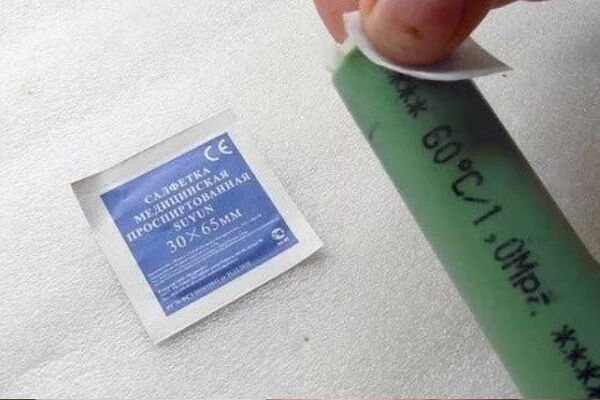
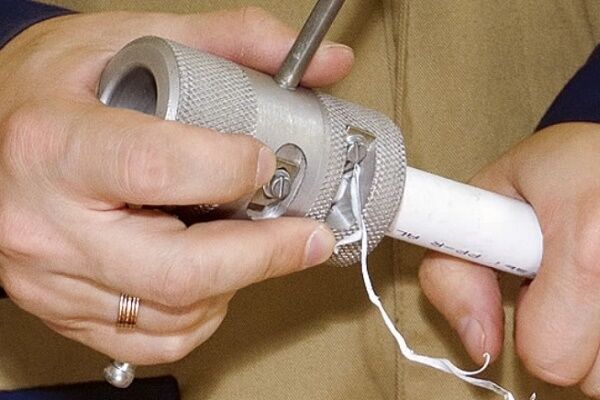
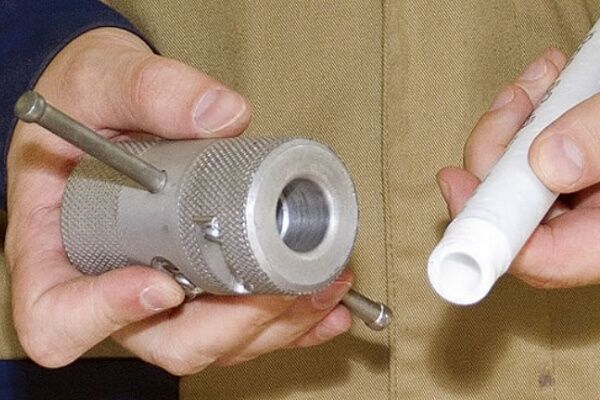
Before starting work, pieces of pipes cut to the specified length eliminate irregularities and burrs. If the pipe has a layer of internal or external foil, it must first be cleaned with a trimmer equipped with well-sharpened and adjusted knives.
When stripping using a trimmer, the pipe must be buried into the tool until it stops.
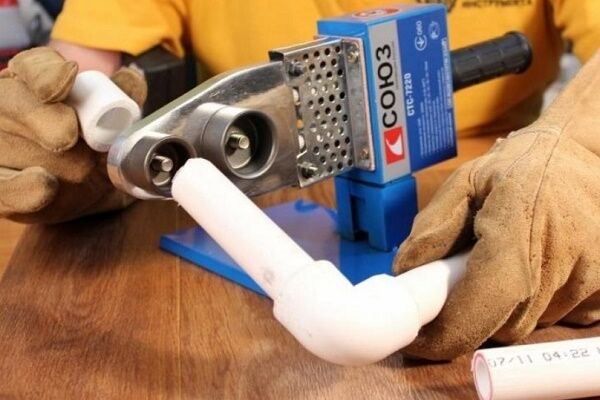
The work of welding plastic pipes with your own hands is carried out in the following sequence:
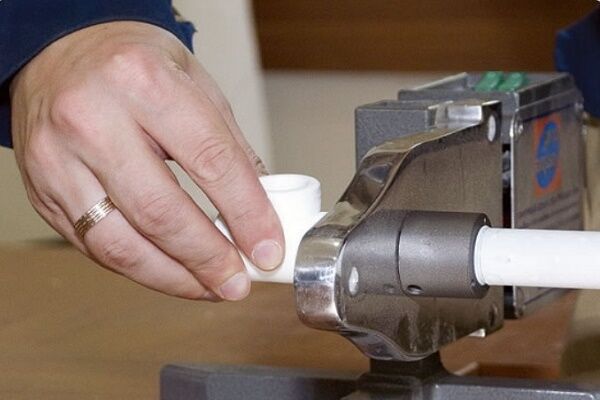
- Connect soldering iron for PP pipes to the power supply in order to heat the equipment to the optimal temperature of 260-270 °C.
- The pipe sections to be connected are simultaneously put on the nozzles, ensuring the most even fit. This work must be performed quickly and confidently.
- After waiting the time specified in the instructions until the fittings and pipe ends melt, remove the elements from the heating nozzles.
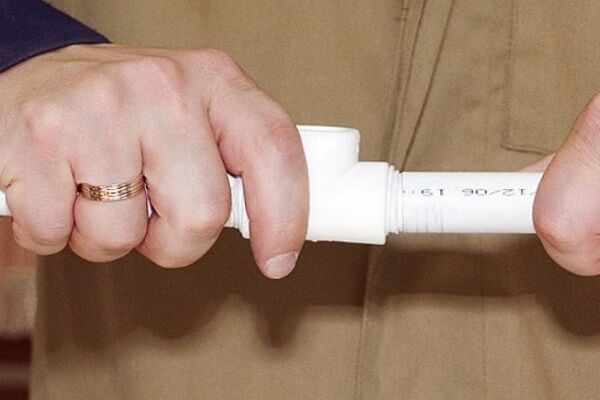
- Dock the molten ends together, gently pressing them into each other for 15-20 seconds.
- The fastened parts are left in a static position so that the seam cools completely and the joint becomes monolithic.
You can determine the heating duration from the instructions supplied with the equipment or using the table below.

The heating time requirements indicated in the table cannot be ignored. Insufficient heating is not able to ensure a reliable connection. Excessive overheating will cause the polypropylene to “leak” and parts to become deformed.
As a consequence: protrusions are formed on the inner surface of the welds, which will significantly reduce the diameter of the pipeline.

After polymerization is complete and hardening, which takes about 20 seconds, the joint is ready. Using the same technology, all subsequent nodes are soldered until the bitter end, until the heating system or polypropylene water supply will not be fully assembled.
Temperature parameters soldering PP pipes are given in the article, which independent home craftsmen should definitely read before starting work.
Brief photo guide to welding PP pipes
The following selection of step-by-step photos will help you visualize the sequence of work on assembling a polypropylene pipeline and connecting its parts:
Typical installation mistakes
The main mistakes that novice craftsmen make when working with polymer products:
- Heating of parts. When heated, the parts should be positioned as level as possible. The slightest displacement can negatively affect the performance parameters of the entire plumbing system.
- Joining polymerized ends. When applying pressure to the molten ends of the elements, you cannot rotate the parts around their axis. This may result in the seam not being strong enough.
- Alignment adjustment. When joining elements, only a slight adjustment of their alignment is allowed, the duration of which is no more than 1-2 seconds.
Another important point: when soldering fittings with fittings, it is necessary to take into account the location of the valves, ensuring they have free full movement.

If, after joining the elements, there are doubts about the quality of any seam, it is better to cut out the joint and redo it again.
It is better to eliminate defects at the stage of installation of the structure, since replacing a leaking joint in a neglected system is much more problematic.
Assembling elements without soldering
The use of compression fittings and modern adhesives makes it possible to install polypropylene pipes efficiently, quickly and with minimal material investment.
Option #1 - installing a compression fitting
To implement this connection method, you will need to purchase compression fittings and use a crimp wrench.

Installation of a compression fitting includes three main steps:
- Place a blue nut on the end of the pipe, cut at a right angle and cleared of burrs. When placing a white crimp ring, it must be given a position in which the thickened part is directed towards the tail of the pipe.
- The pipe is inserted into the fitting until it stops, pushing the clamping ring to the maximum.
- Tighten the blue nut, “tightening” it first by hand, and then tightening it with a wrench.
Assembly of compression fittings does not require special knowledge or skills. Products are supplied for sale completely ready for installation. Their installation can be performed under any temperature conditions.
Option #2 - gluing elements
The adhesive method is used to assemble a water pipeline through which it is planned to transport only cold water. To apply the “cold” welding method, you will need to use an “aggressive” adhesive composition such as LN-915.

To protect the skin of your hands from accidental contact with the composition and “corrosion” by its active components, it is better to perform gluing operations while wearing protective gloves.
Sequence of actions when gluing products:
- Check the correspondence of the cut angles of the joined sections and mark the places for gluing with a pencil.
- Clean and degrease the ends of the pipes to be connected.
- An adhesive composition is applied evenly to the ends of the pipes and the area of the fitting sockets.
- The pipe sections are inserted into the fitting holes, focusing on the marks made in pencil. The structure is kept in a fixed position for three minutes, after which excess compounds are removed with a napkin.
- The combined elements are laid out on a flat surface and left for 5-6 hours until completely dry.
You can run water to check the quality of gluing only a day after completion of installation.
When implementing this PP pipe installation technologies It is important to observe two basic conditions: temperature and humidity conditions. All work must be performed at air temperatures between +5 and +35 °C. When gluing in hot weather conditions, the work should be done as quickly as possible so that the glue does not have time to dry before installation is completed.
Conclusions and useful video on the topic
You can learn about the intricacies of the processes of soldering and gluing pipes from the following videos:
Video #1. How to solder pipes correctly:
Video #2. Assembling a water pipeline without soldering:
The work of independently joining polypropylene pipes should not cause any particular difficulties even for a novice master. You just need to strictly and conscientiously follow all technological standards. And then the pipeline assembled by yourself will delight you with trouble-free operation.
Please write comments in the block below. Ask questions on controversial issues, share information that may be useful to site visitors.Leave posts with your own opinion, post photographs related to the topic of the article.


The article will be useful for people who have never dealt with plastic pipes and methods of connecting them. I'm not new to this, but I have a question. There was a problem with the autonomous heating. We are guilty of a leak in the system. So, can a polypropylene pipe expand when the system heats up, but this happens not after 30-40 minutes, but after 3 hours? They say it can, but I think this is the manufacturer's reinsurance. Tell.
Hello. First of all, I’ll tell you that you need to use reinforced pipes, which have a much lower coefficient of linear expansion. It is also worth considering the fact that PP pipes soften at +140*C, although it is stated that they can withstand temperatures up to +170*C.
For a clear example, I will attach diagrams and tables:
— with linear expansion coefficients;
— change in pipe length when heated from 0 to 60*C (different materials);
— structure of reinforced PP pipe.
This information will help you resolve your issue.
Yes, with a regular threaded connection, you can check it visually and, in case of a leak, tighten or seal it yourself. But how can you control the quality of welds when accepting work from a master? Who should you file a claim with after the connection breaks in your absence and floods all the lower floors? You really need to do this kind of work yourself.
So the master must check the quality of the work done himself.To ensure the reliability of all connections and the functionality of communications, pressure testing of the heating system is carried out. The website has there's a whole article about this.
I also recommend carrying out a similar procedure after replacing equipment, adapters, and seals. And in general, check the heating system by pressure testing before each season so that there are no unpleasant surprises. In principle, an ordinary car tire pump, adapter and pressure gauge will be enough for this.