Soldering temperature of polypropylene pipes: main stages of self-welding + table of values
One of the stages in the construction of private houses and apartments is the installation of communications responsible for supplying water or draining wastewater. Assembling polypropylene pipes is much simpler than installing metal structures. To connect them, fittings are used, welded using specialized equipment - an iron.
The article we propose describes the technology for making connections and provides the standard temperature for soldering polypropylene pipes. We will cover the preparatory steps required to produce strong and sealed joints. Taking into account our advice, you will assemble the pipeline without any problems.
The content of the article:
Soldering as a method of connecting PPR pipes
In the welding process, everything is important: diameter, soldering temperature of PP products, exposure time to the welding machine. But first you need to get acquainted with the basics of technology and learn how to use the tools.
You cannot begin the soldering process without determining the type and dimensions of the material. We invite you to familiarize yourself with useful information that will help you choose the right one. polypropylene pipes and fittings, as well as install them, knowing the nuances and sequence of the process.
What do you need to know about polypropylene pipes?
Welding technology (or soldering - both terms are equally applicable) is ensured by the properties of polypropylene, a universal-purpose technical polymer.It is fusible, but after cooling and hardening it returns the characteristics of strength and tightness.
Pipes differ in diameter, wall thickness, color, and characteristics. Thanks to the range of diameters – 16-110 mm – any technical solution can be implemented.

You can ignore the color of the polymer, since it is chosen by the manufacturer at its discretion, but the color of the stripes matters:
- blue – for cold water supply;
- red – for hot water supply and heating.
However, the basic information that you should rely on when purchasing and soldering pipes is indicated on the labeling. Polypropylene pipe material is designated by letter combinations PPR, PP-H, PP-B, PPRC.

Classification according to the nominal pressure, the maximum permissible for installation in specific conditions, helps to select products for home or industrial systems.
Based on this, there are 4 types of PPR pipes:
- PN-10 (with a nominal value of 1.0 MPa) – designed for transporting cold water. Sometimes they are used to install heated floors, provided that the coolant does not heat up above +45 °C.
- PN-16 (with a nominal value of 1.6 MPa) – used for assembling hot/cold water supply systems. The maximum permissible temperature is +60 °C.
- PN-20 (with a nominal value of 2.0 MPa) – withstand temperatures up to +80-90 °C in pipelines protected from water hammer.
- PN-25 (with a nominal value of 2.5 MPa) - suitable not only for autonomous, but also for centralized water supply. The recommended maximum temperature is +95 °C, but higher temperatures can be tolerated.
It is better to overpay and purchase reliable pipes with a slightly superior value than to save money and buy material limited by temperature parameters.
When making pipes, the principle is applied: the higher the temperature of the coolant and the pressure in the system, the thicker the walls.

This is the minimum knowledge needed to properly use PPR pipes. Let's move on to a brief description of the process.
Technological description of the soldering process
There are two types polypropylene soldering – butt and coupling. The first is practically not used for the installation of home communications, since it has a complex technology and is used exclusively for connecting large-diameter main pipes.

The principle of welding is that two sections of pipe, approximately equal in diameter and wall thickness, are heated with a special tool and connected using a socket method.
The main feature: when cold, the coupling should be slightly smaller in diameter.

When heated, a melting zone of the polymer is formed. It is important that it covers only working surfaces adjacent to each other.
Here it is important to quickly remove the parts from the tool and connect them to each other, due to which two segments are fused into one, followed by polymerization. The reliability of the connection depends on the time spent on the heating process and the correctly selected temperature.
Standard temperature parameters
Both overheating and insufficient heating have a bad effect on the welding result. In the first case, the elements will deform, the roller will swell, and the internal diameter will decrease. In the future, scale and plugs may form in areas of uneven joints.
In the second case, the connection will be weak, and due to insufficient tightness there will be a risk of leakage.

It is precisely because of the risk of a pipeline breakthrough that it is necessary to follow the welding technique and be sure to take into account such parameters as:
- diameter of welded products;
- heating and cooling time;
- equipment temperature;
- ambient temperature.
It is believed that the process welding PP pipes It is not advisable to carry out at temperatures below -10 °C, the upper limit is +90 °C. The most favorable ambient temperature is from 0 °C to +25 °C. For ease of remembering, the required temperature and time values were compiled into one table.

If the air temperature indoors or outdoors is below +5 ° C, the heating time is increased by approximately 50%, that is, twice. The heating temperature is the same everywhere – +260 °C. The acceptable range is +255-280 °C.
It is interesting that the choice of parameter does not depend on the diameter of the pipe - the same values are used for both 16 mm and 50 mm. Only the time periods change. For this reason, the welding temperature of polypropylene fittings and pipes is usually not indicated in technological tables.
Detailed installation instructions
The soldering process is fast. You can verify this by analyzing the data in the table. For example, to connect two elements with a diameter of 20 mm, at room temperature it will take 5 seconds to heat up, another 4 seconds to connect, then 180 seconds to cool down. Total – 3 minutes 9 seconds.
In this regard, it is important to practice all movements so that there is no hitch in the process of joining already heated elements. Let's consider the nuances of each stage installation of polypropylene pipes separately.
Stage #1 - preparing special tools
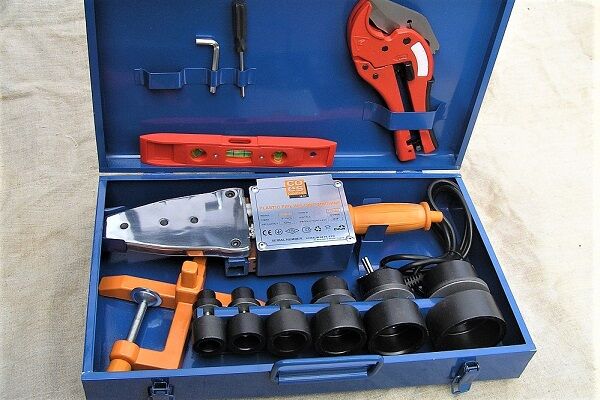
For soldering at home, you will need equipment designed only for welding polypropylene parts - pipes, angles, couplings, tees, plugs.
It makes sense to purchase a new tool if you plan to assemble a water supply system from scratch with further maintenance. For one-time work, equipment can be rented iron for welding PP pipes or borrow from friends. In addition to special tools, you will need a level, marker, ruler or tape measure.
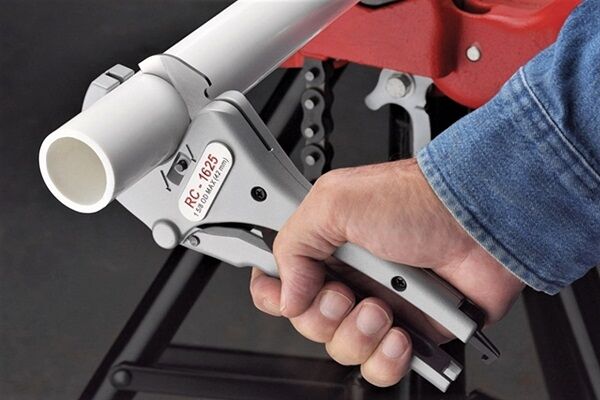
Stage #2 - marking and cutting pipes
The pipes are cut in advance, before the first soldering begins. We recommend preparing all the elements and putting them together according to the diagram. It is part of a heating system or plumbing installation project.

We measure pipe sections of the required length and carefully cut them off pipe cutter. Then we select fittings of suitable diameter - most often these are couplings, tees and angles. If the elements are reinforced, remove the aluminum layer.
As a result, the edges of the parts to be welded must be perfectly smooth, cut perpendicular to the axis of the pipeline, cleaned and degreased.
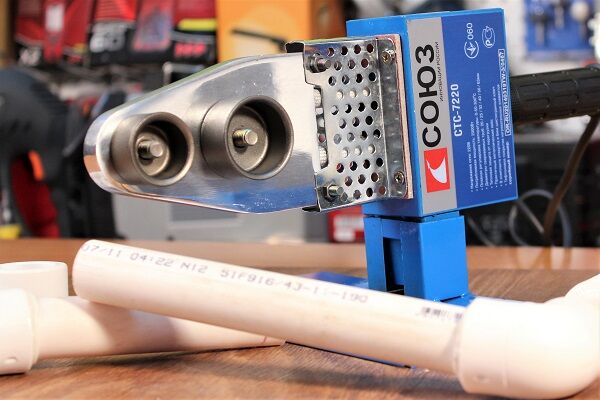
Stage #3 - connecting elements and heating
We install the device, select couplings and mandrels of the required diameter. We plug it into the network and heat it up, since we already know at what optimal temperature polypropylene pipes should be soldered - +260 °C. This is exactly what is indicated in the operating instructions for soldering irons.
Please note that some manufacturers produce devices with a scale up to +320 °C. This does not mean that you need to heat it to maximum. Read the instructions carefully - they indicate the conditions under which high heating values are permissible.
At the ends of the parts that need to be connected, we make marks indicating the heating depth. We check once again that the working surfaces are dry and free of grease, since moisture or a slippery surface can cause the connection to depressurize.

From the moment the parts are installed, we begin counting the seconds - according to the values indicated in the table. After the required time, remove the parts and quickly insert the pipe into the fitting - up to the same mark. We try to position the parts coaxially; only a couple of seconds are given to correct the position. Distortions and rotation of elements must not be allowed!
We hold the knot in the correct position until polymerization occurs. Usually this is 3 minutes or more - we check the cooling time according to the table. Cooled and properly welded parts form an integral connection, tight and durable.
We weld the key components one by one so that we can then assemble and weld them together in place heating circuit installation, sewer or water distribution.
Conclusions and useful video on the topic
Video #1. PPR pipe soldering technology:
Video #2. Analysis of common errors:
There are a huge number of master classes on soldering polypropylene pipes on the Internet. Some of them were taken by unskilled amateurs, so advice on welding technique and temperature may be misleading.
The manufacturer knows the capabilities of the welding machine better than others, so before you start soldering, be sure to read the instructions - this will protect you from technical defects and unprofessional advice.
Tell us about your own experience in assembling polypropylene pipelines and making solder connections. Share technological subtleties that may be useful to site visitors. Please leave comments in the block below, ask questions, post photos on the topic of the article.


... heating time is increased by approximately 50%, that is, twice. Bravo! 2+1 = 4.
... increase by 50% - it will be 150%, that is, 1.5 times. And by 2.0 times - it will be 200%)))
50% is 1.5 times, 100% is 2 times, and 200% is 3 times.