Do-it-yourself faucet repair: popular faults and how to fix them
The problem of faucet leaks is relevant for bathrooms that we use several times a day.Small droplets dripping slowly and continuously from the faucet are the first signal that urgent repairs are needed.
It is not difficult to fix a breakdown if you have an understanding of the structure of the device mechanism. As they say, repairing a faucet with your own hands is an everyday matter. In this material we will talk about the most common causes of faucet breakdowns and consider in detail how to eliminate them.
The content of the article:
Valve mixer repair
Typical problems with faucets are leaks caused by:
- shower malfunction;
- defects of the conical plug;
- wear of the crane axle box.
But most often the rubber gasket wears out, the integrity and strength of which determines the condition of the faucet.
Gasket replacement process
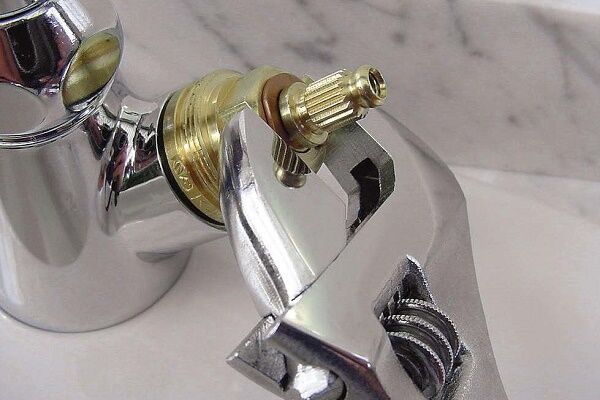
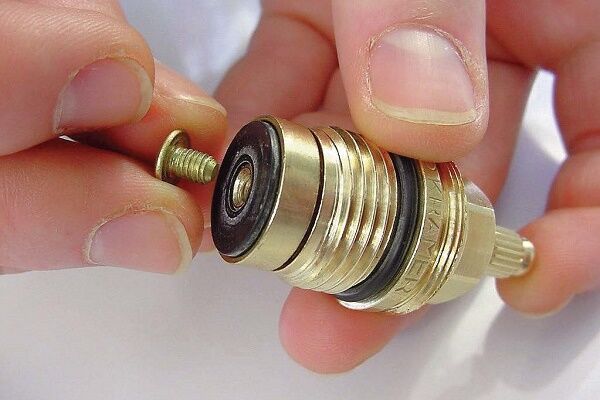
Most often, a leak from a valve is caused by wear of the rubber gasket in it. This is the most common situation. Both faucet taps may leak.
You will need the tools shown in the photo:

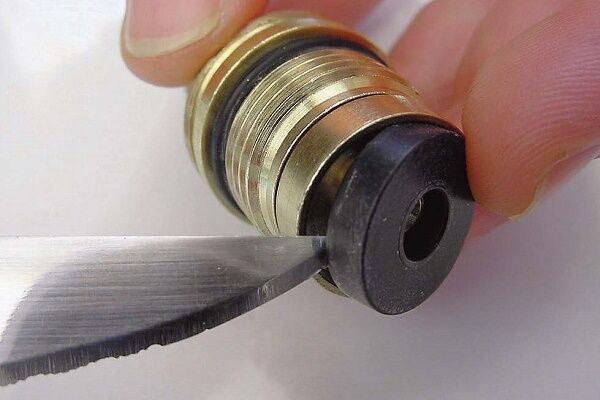
The thickness of the new gasket is from 4 mm. It can be made from a piece of sheet rubber. The process of cutting it is simple, but if there are doubts about the quality of the homemade gasket, then in the future it is advisable to exchange the homemade gasket for a factory product.
The one that needs to be replaced is suitable as a template for cutting the gasket. If it is too deformed, then it should be noted that the sealing part being manufactured must be 1 mm larger in diameter than the previous one.
The resulting edge as a result of increasing the Ø should be modified: cut along the circumference from the side adjacent to the seat at an angle of 45º so that this seal “fits” tightly into the hole being closed and the faucet with the new gasket does not buzz.
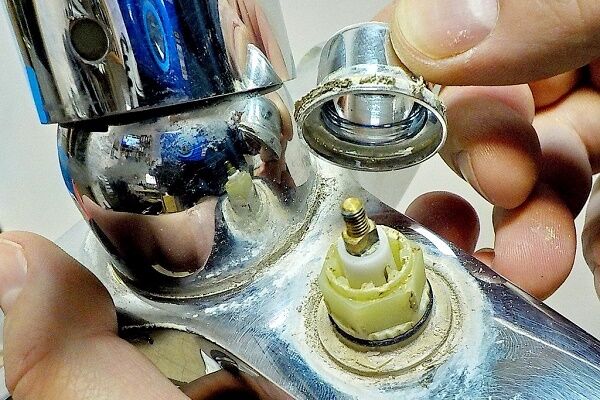
After replacing the gasket, everything needs to be returned to its place. We insert the valve axle back. Usually, when removing the valve axle box, it is always recommended to treat the internal cavity from plaque. This plaque is usually a consequence of water hardness. To reassemble the faucet, a plumber's adjustable wrench is used.
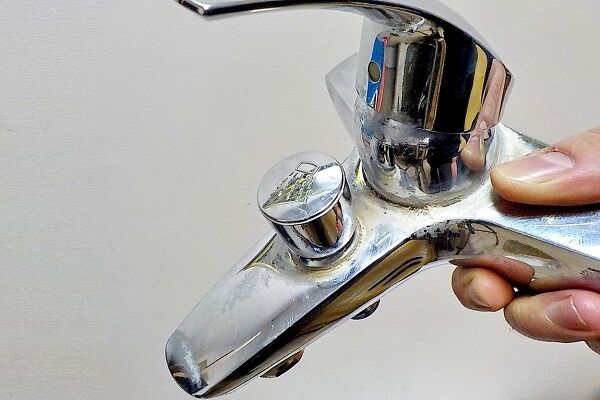
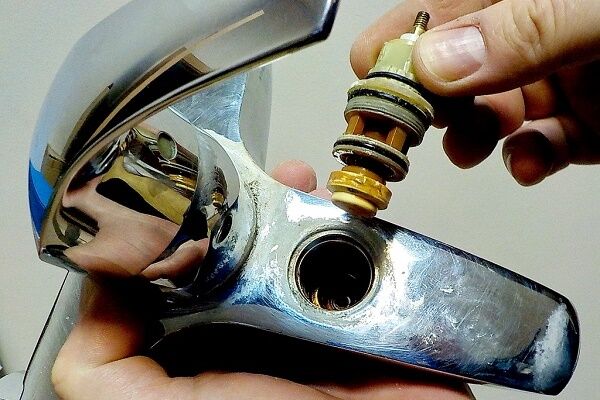
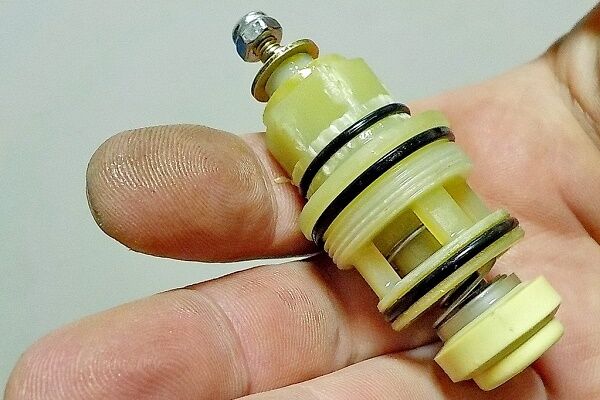
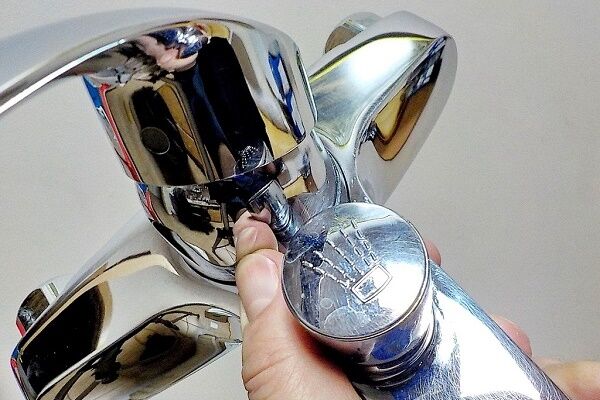
Half turn valve repair
In most cases, faucets have problems with valves, especially with half-turn valves. The valve can be changed or repaired. There are particular difficulties in how to repair a broken one yourself. bathroom faucet, No.
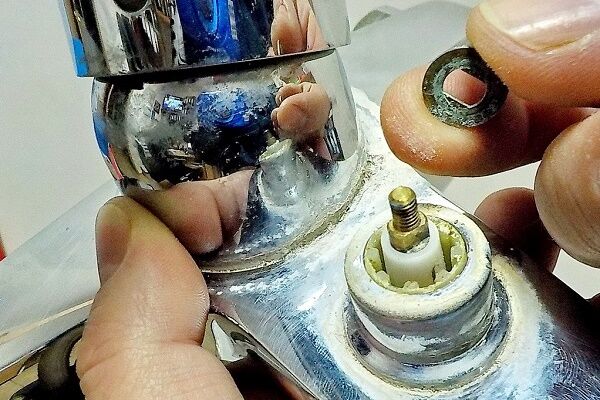
In a conventional valve that unscrews in a circular motion, most often it is necessary to change the gasket or stuffing box. Brief instructions for replacing the gasket are posted above, and if there are problems with the stuffing box, they usually try to tighten the stuffing box.
This will involve a small nut located at the base of the crane axle box. The cross section of this nut is square. In a clockwise direction, you need to tighten the nut until it stops.
If these manipulations turn out to be useless, then you will need to unscrew the oil seal ring. After unscrewing, a special stuffing box is wound onto the valve stem. Then the ring will need to be screwed back well. All of the above actions help stop the leak.

Repair of the valve seat - the cavity into which the faucet axle is screwed - is necessary if, after replacing the gasket or faucet axle, water does not stop flowing from the faucet.With prolonged use of the mixer, it often becomes deformed, which causes leaks.
Any nicks and scratches that appear can be removed by milling. You need to slightly rotate the deformed area with a milling cutter. After this rotation, the mixer is assembled, and if the seat is properly polished, there will be no leaks.
Water switch failure
To solve this problem you need to do the following:
- buy a switch;
- disassemble the tap;
- replace the broken part.
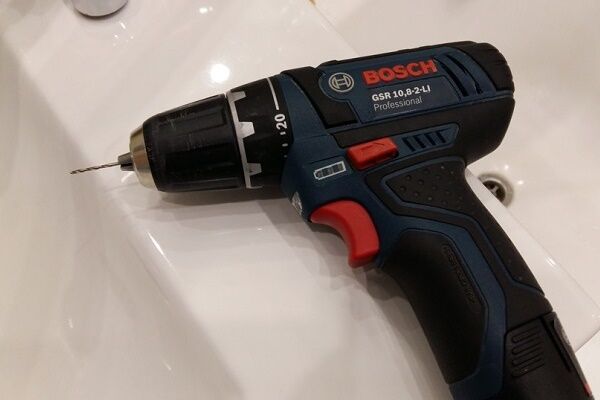
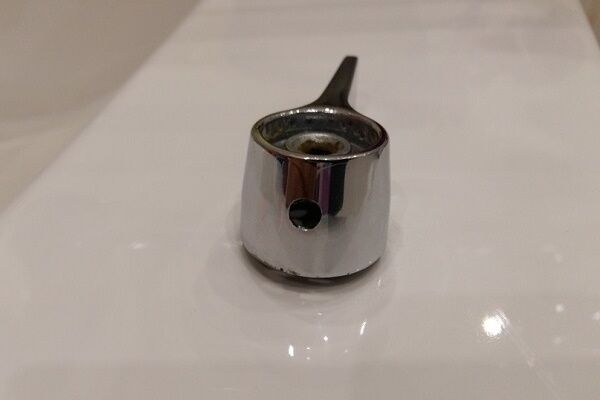
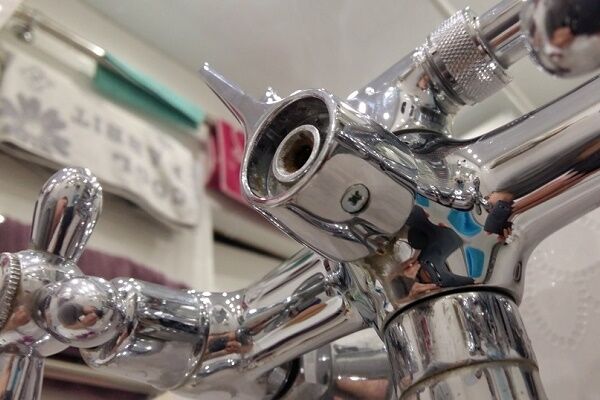
If deformations are detected in the conical plug used for mixing water from hot and cold water supply pipes, it must be replaced. When fixing any breakdown, the water supply is always cut off. The following photo shows how the switch is removed:

When eliminating the malfunctions described above, there is no need to remove the mixer from the mount. But there are also more global problems with valve mixers, which are also completely solvable.
Learn more about some problems with plug taps and how to fix them.
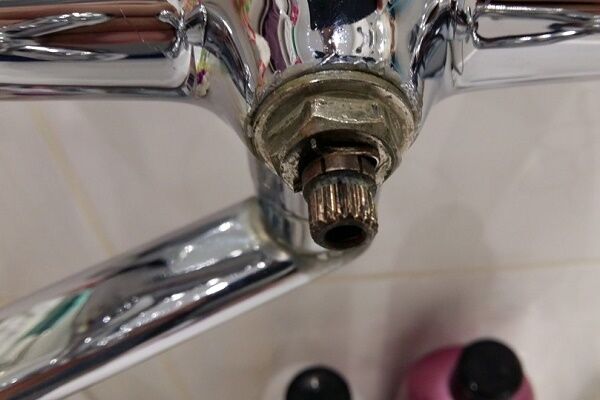
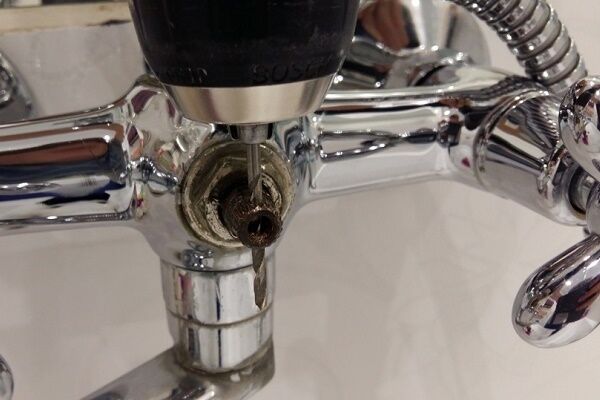
The shower-spout switch mechanism can be repaired without replacement. Let's consider an original way of fixing the switch flywheel on the rod:
Now all we have to do is drill a hole on the switch rod and assemble the mixer:
The appearance of a leak at the junction of the coupling and pipe
They eliminate the leak following a certain algorithm, and then change the mixer.
Algorithm:
- Initially, in this situation, the water is turned off. Special shut-off valves are located on the water supply pipes.
- After shutting off, the taps are turned towards opening to the maximum to check.
- Then the connecting nuts are very carefully unscrewed. Modern faucet designs break easily. Regular brass nuts are easier to unscrew. They will not crack or break. For a broken nut, you need to look for an analogue in shape.
- Next, remove the mixer.
When removing the mixer, turn out the pipe at the border of which a leak is detected with the coupling. When turning the edges of the pipe, hold it with a wrench or by the collar. A nut is screwed onto the removed pipe. You need to screw it in correctly, all the way. The new nut is taken from the old mixer. The reliability of the nut installation is determined in comparison with its original position.
When it comes to replacing the mixer, be sure to determine the size of the pipes. The mixer is always sold complete with them. If differences are found between the old and new pipes, both are replaced, not just the one that is leaking. If they are identical, then only one can be changed.
To understand how the leak is removed in this case, consider the diagram:

There may be some nuances during the installation of the pipe. When screwing in, this part is held by the collar. In this case, the thread should remain free for two turns. Sealing threads are wound around all the others.
Usually it is recommended to impregnate this seal with drying oil or oil paint.After such wetting, you must immediately screw in pipe to its proper place - this serves as a guarantee against re-formation of a leak.
Leak between sidewall with slip-on nut
Having turned off the water, they first try to simply tighten the nut, and then, after supplying water, check for leaks. If the leak persists, the nut is unscrewed and the mixer is moved along the pipe closer to the wall. Then you need to remove the hose attached to the bracket.
This is necessary to adjust the position of the mixer. When moving the mixer, look at the end of the pipe, because it is in relation to it that the location of the device is changed.
This is done until it becomes possible to remove the old gasket, which is adjacent to the nut and ensures a tight seal. You can try to remove the gasket without touching the faucet. Often this fails. The reason for this is the gasket sticking to the pipe (to its end).
It is also impossible to pull out the pressed gasket. Then the shower is unfastened from the wall. This will help to turn the faucet. To make turning easier, loosen all the nuts on the mixer.
The replacement gasket is simply cut out of rubberized sheets. Its thickness should be from three to five millimeters. It is necessary to prudently leave space on the nut for two threads. After replacing the gasket, everything easily falls into place.

Sometimes a leak appears between the body and the sidewall. The mixer is separated from the pipe supply, then from the shower. Remove the nose. The sidewall turns out. Then it is lubricated with putty. You can use paint instead of putty.Do not use the mixer until the lubricant has completely dried.
Water does not flow into the drain spout or shower
Usually the problem is related to blockages in the faucet line. The pipes and sides may be clogged. To correct the situation, you will need to clear the blockage. To do this, the valve head is turned out. Then a steel wire is inserted into the resulting hole. We take out all the garbage and sand. After which you can clean the cavity with a vinegar solution to remove plaque.
Similar trouble - Ra sharp decrease in water pressure from the spout. Usually the cause of the problem lies in a clogged aerator. It can be solved by unscrewing it and cleaning the mesh. They are purged and then washed. You can use a needle to remove sand from the mesh.

What to do if the water flows but the spout falls off? This is due to the fact that the fixing ring has broken. There is a temporary solution until you purchase a new spare part.
After closing the valves, you need to make an expansion ring. It is usually made from copper wire. The diameter of the material for the ring must match the diameter of the old product. After making a ring using a soldering iron, it is advisable to treat it with liquid oil. This will prevent rust from forming.
Do the faucet valves rotate 360°?
This situation is associated with the loss or breakdown of the limiter. Knowing exactly where this part is located, it is easy to return it to its place.To do this, disassemble the mixer, find the fault and return the element to its place, applying gentle blows with a hammer to the protruding part of the limiter. You can also replace the limiter with a small piece of brass wire - this will at least temporarily solve the leak problem.
Ways to solve shower problems
Sometimes troubles happen with the shower hose and watering can, more often due to wear of individual elements or poor water quality.
Poor water supply through the shower screen
Typically, water does not pass through the mesh very well if the holes in the mesh are clogged. Here, after removing the mesh, it is easy to clean it with an ordinary awl or needle.

After screwing the mesh back, the water supply and direction of the streams are restored. Both the plastic panel with holes and the remaining parts of the shower and faucet can be wiped with a vinegar solution to remove plaque and stains.
Leaking shower hose and drain
If the leak appears due to wear of the internal part or winding, there is no point in repairing the hose; it is easier to buy a new one. Its cost is low, and the service life of new modifications is much longer.

If both the drain and the shower are leaking at the same time, the problem is a loose joint between the plug and the body. To correct the situation, first remove the locking screw. The next step is pulling up slip-on nuts This reduces leakage, but switching water from the drain to the shower is a bit difficult.
To completely eliminate the leak, you need to grind the plug onto the mixer body using special grinding pastes. They are sold in many stores.
We also recommend reading our article about other common breakdowns faucet in the bathroom with shower.
Repair of faucet with lever
Most people preferred lever joystick mixers. They are very convenient to use, since only the mixer handle is turned to achieve the desired water temperature. It is also very easy to create the desired water pressure by moving the lever up and down.
To understand how to fix single lever faucet, you need to have an idea about its structure.
Instead of valves with gaskets that close the water channels, there are special cartridges. They are usually ball or disk. They do not need to be changed as often as the same gaskets. You cannot replace a disk cartridge with a ball cartridge. For a ball lever mixer, only your own cartridges are suitable, and for a disk mixer - your own.
Cleaning the switch and aerator
Articulated, also known as single-lever or joystick, faucets are extremely sensitive to the quality of tap water. Therefore, malfunctions often occur not due to a breakdown or failure of the locking device, but due to the appearance of sediment and clogging of the mating parts of moving parts.
Let's look at how the Grohe Eurosmart 3300001 bathtub model with the 08915 mechanism located on the spout, which switches the shower to the spout, was cleaned. This device did not work; water flowed into both the shower head and the gander at the same time.
Note that the master did not have to replace parts and seals; it was enough to simply remove rust and calcium build-up.
After cleaning and washing the switching mechanism, all that remains is to “deal” with the pressure. As it turns out, all you need to do is clean the spout aerator:
Disassembling the ball mixer
After the traditional shut-off of the water, unscrew the mixer mount. Then you will need to remove the lever as carefully as possible, and this must be done carefully, slowly loosening it. Raise and pull out the lever only when no resistance is felt. To continue working, you need to unscrew the thread connection.
After dismantling the mixer dome, the plastic component will be visible. Behind it you can usually see a seal that needs to be cleaned or replaced. It is a regular rubber gasket. If the ball element is damaged, it also needs to be replaced.
The ball is secured with seals, the suitability of which must be monitored.

Faucets with a lever (joystick) need careful handling, they need to be easy and smooth to use.
Replacing a replacement cartridge
When installing any cartridge, you need to make sure that the protrusions on it are identical to the protrusions on the mixer.

Disc cartridges rarely need to be replaced, as they last up to 10 years. But faucets with such consumption are not cheap, although they are fully justified.
Faucet care: how to extend its service life
A little about how to postpone faucet repair for a long time. One simple solution is to monitor the quality of the water supplied to the mixer using modern mechanical filters. Solid particles of sand and pebbles will not spoil the parts, and they will work much longer.
Installation recommended coarse filters at the beginning of a fork in the home's water supply. Today, a self-cleaning filter is available to consumers. All filtered sediments from it are sent directly to the sewer.
It is not always possible to install a large filter. Where it is not available, the mixer itself is connected to connecting taps, where cleaning filters are already built-in.
There are filters that help reduce water hardness. This is important for ceramic faucets, since they suffer more than others due to the presence of salt deposits in the water.
And finally, advice from experienced plumbers.If the pipes hum when you turn on the mixer, you need to check how well they are fixed and, if necessary, secure them with clamps.
In some cases, the humming is caused by high pressure in the pipes, then it will be necessary to install a special reducer to reduce the pressure. Often this noise is caused by worn valve gaskets; after replacement it disappears.
There is a whole article on our website dedicated to the problem. buzzing pipes, we recommend reading it.
Conclusions and useful video on the topic
Before replacing the gasket, it will be useful to watch the following video:
In some cases, problems with faucets consist of an incorrectly installed sink or the wrong choice of model. Most of the troubles can be solved on your own, but if difficulties arise, it is better to call a plumber - professional advice or repairs have never hurt anyone.
Please leave your comments, share your experience of using and repairing faucets, and ask questions in the block below. We are always ready to clarify unclear points and help in solving the problem that has arisen.


That's how many times I tried to repair faucets, I became convinced that independent maintenance can only consist of replacing the gaskets. But for half-turn and lever valves, it is better not to buy repair kits, but to change the entire valve or cartridge. Actually, there is only one reason for such a replacement - repair kits last less than new elements. The whole question here is the feasibility of repairs.
Igor, I categorically disagree with you! Experience is a gain. I, too, once understood nothing about plumbing in general and about faucets in particular.And then it became embarrassing. And I started studying. The eyes are afraid - the hands are doing, you know this expression? This is just the place. Now I can both repair and replace the mixer on my own.
And, by the way, I don’t agree with you about repair kits. It depends which one to buy! If you want to spend as little as possible, then yes, you will soon go to the store again. And not the cheapest sets last quite a long time. Another thing is that if the entire mixer as a whole is outdated, and you try to revive it again and again, this will not help. It will break down somewhere else anyway.
To avoid having to repair the faucet, you need to choose a reliable manufacturer such as Ibergrif