Repairing a single-lever mixer with your own hands: step-by-step instructions
Single lever, or as it is also called joystick, The mixer confidently takes the place of obsolete valve devices.It is simple, easy to use and quite reliable. You can repair it yourself, without turning to a plumber for help.
After reading the article we presented, you will be able to repair a single-lever mixer with your own hands. We have listed all types of breakdowns typical for this type of plumbing fixtures. We describe in detail how to fix breakdowns. Taking into account our recommendations, you can easily repair a device with one lever.
The content of the article:
Advantages of a single lever mixer
Like any mechanism, the mixer sometimes breaks down. The failure of a plumbing fixture in the bathroom or kitchen is the most common breakdown, which is impossible not to notice - puddles on the floor and the irritating sounds of falling drops that do not stop day or night will not leave anyone indifferent.
The above troubles can be eliminated quite simply and quickly on your own. Of course, for this you need to at least theoretically become familiar with the internal structure of the mixer, know the reason for its failure and how to eliminate it.

All these issues will be discussed in detail below.
However, first let’s look at the advantages of this plumbing fixture, to which it owes its popularity:
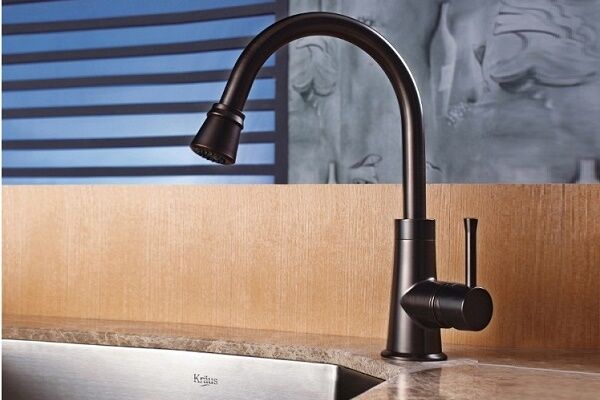
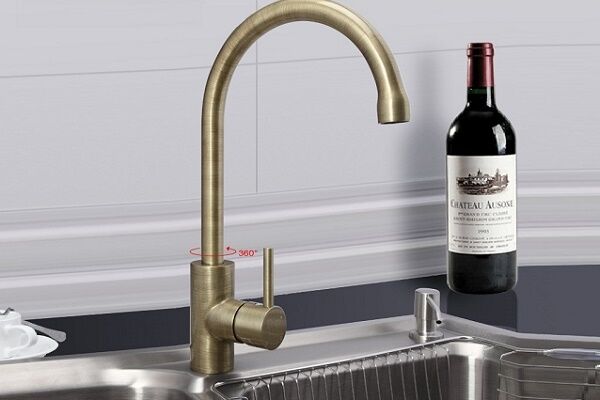
- Simplicity and maintainability. This has already been mentioned above - due to its simplicity, a single-lever mixer lasts a long time, and this period can be extended by timely repairing the product.
- Ease of use. There is no need to turn the valves; just lift the mixer joystick up in one motion to let the water flow. To adjust the temperature, the lever is turned left and right, and the pressure is adjusted by vertical movement of the lever.
- Durability. The simpler the design, the less often it breaks - a single-lever mixer consists of a small number of parts, and if you treat it with care and install a filter on the water, the product is guaranteed to last more than 10 years. Of course, this only applies to high-quality faucets.
On sale you can often find products made from fragile, short-lived, but very cheap silumin. In the best case, such a mixer will work for two years.
It is worth mentioning simple repairs. Simply put, any smart housewife can do a simple repair of a single-lever mixer with her own hands. Basically, it all comes down to a banal replacement of the disk cartridge or ball, depending on the design of the device. But let’s not get ahead of ourselves and consider the internal structure of the mixer.
Device design with one handle
Let's repeat it again: single lever mixer simple enough. There are no traces of constantly breaking crane boxes here.
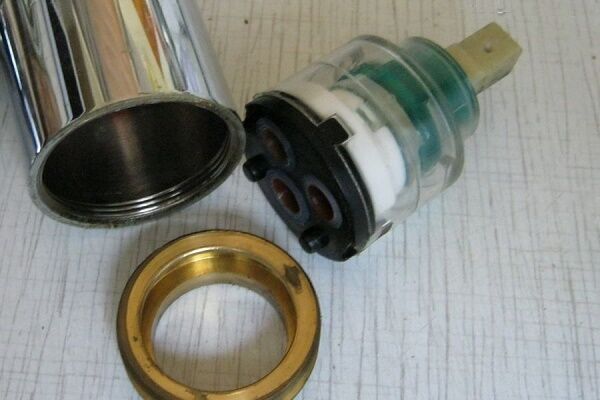
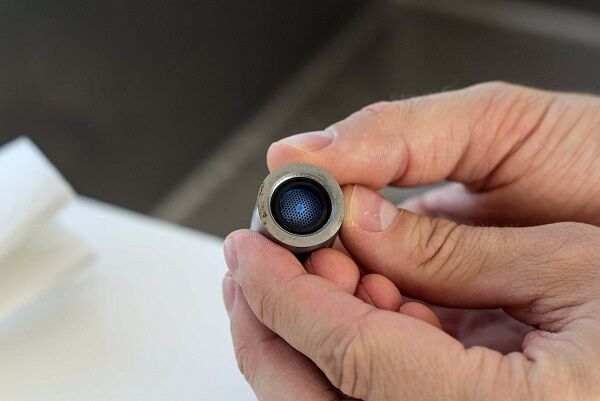
If you do not take into account the presence of spouts, shower heads, and various types of switches, the device consists of only two main parts: a monolithic metal body and a cartridge with a locking device consisting of two disks or a ball. They are “responsible” for controlling the flow of water and regulating its temperature.

The cartridge is placed in a housing and securely secured inside with just one nut, which is neatly hidden under a decorative cap. The cartridge control joystick is installed directly on its lever. Everything is simple, no tricky elements, therefore no serious damage.
The internal structure of a single-lever mixer may differ - a disk cartridge and a ball can open/close the water and regulate its temperature. Let's consider the structure of both designs.
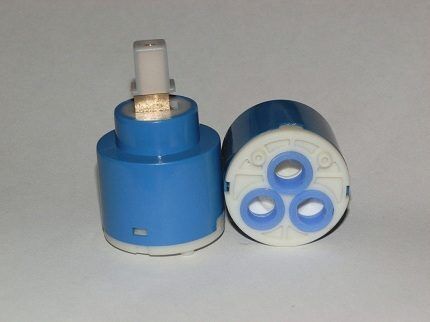
Disk design option
As the name implies, inside such a device there is a special cartridge bulb with a locking and adjustment mechanism. In expensive faucets, the cartridge is made of high-quality ceramics; in budget options, it is usually plastic.
Cartridge The mixer is very easy to operate, but those people who are accustomed to a valve mixer will need to practice a little at first, since the joystick turns very easily.
But you get used to the good things quickly: the desired temperature and water pressure can be adjusted with one easy movement. When the disks are partially or completely combined, a stream with the characteristics required by the user is formed.
Cartridge mixer consists of:
- Spout, or, as it is also called, “gander”.
- Switch equipped with a fixing screw.
- Lock nut.
- Actually, the cartridge.
- Housings with a seat for a cartridge.
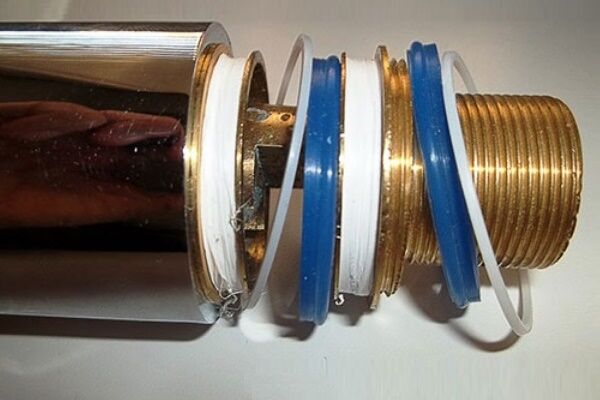
- Gaskets, studs, nuts - parts to ensure tightness.
The locking mechanism discs are most often made of ceramic, less often of a steel alloy. There are protrusions on the top and holes on the bottom, their shape is complementary to each other. When fully aligned, the projections overlap the holes, resulting in a sealed connection.
When partially blocked, water flows into the spout. The smaller the protrusions of the upper cartridge cover the holes of the lower part of the shutter, the stronger the jet.

It should be noted that the plates are ground together very tightly - this is a necessary condition for the normal operation of the mixer. For this reason cartridge models really “do not like” dirty water with foreign mechanical suspensions, since miniature particles get between the plates and lead to their rapid wear, resulting in premature failure of the valve.
To extend the life of the product, some manufacturers immediately install it at the factory in front of the inlet pipe of the mixer filter for rough water purification. It is recommended to follow their example: install a good filter on the water supply yourself and safely supply purified water to all plumbing fixtures.
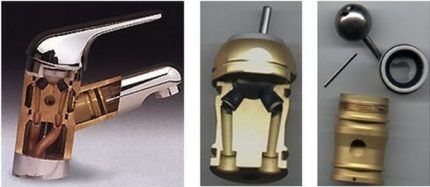
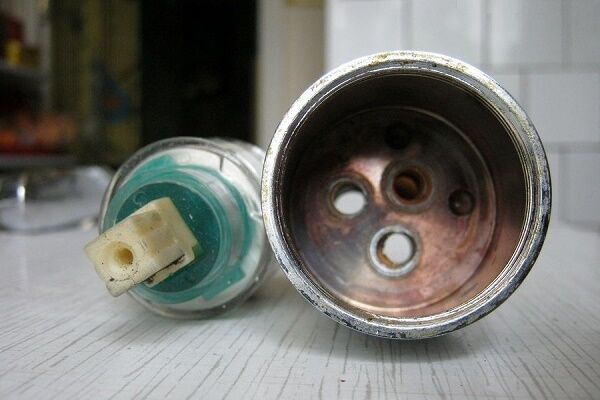
What does a ball mixer consist of?
As in the case of the disk model, the name indicates the design features of the shutter mechanism of the device. In the ball model of the mixer, the water pressure and its temperature are regulated by a special ball.
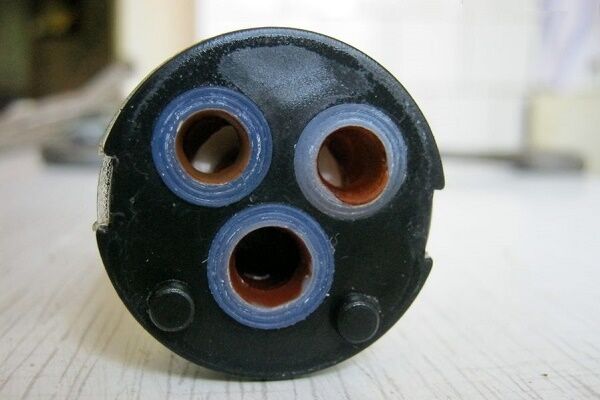
The part is made of metal, the ball is hollow inside. The outer part is perfectly polished. The ball has three holes - two for cold and hot water, the third for mixed.
The rod is rigidly attached to the part, its other end is attached to the mixer control handle. Thus, when you press the handle, the rod rotates the ball, opens/blocks access to water and regulates the temperature of the stream.

Operating a ball mixer is much easier and more convenient than disk, since the parts are smooth and fit perfectly, the joystick moves very smoothly and softly. The ball is installed in a kind of sleeve cartridge, which can be easily removed from the device in case of repair or replacement.
Similar to a disk device ball mixer very demanding on water quality, reacts poorly to hard water and high iron content.
Most ball valve leaks occur due to debris getting into the gaps between the ball and the rubber seats that hold it. Installing a water filter in front of the mixer in this case is also considered a mandatory procedure.
General Troubleshooting
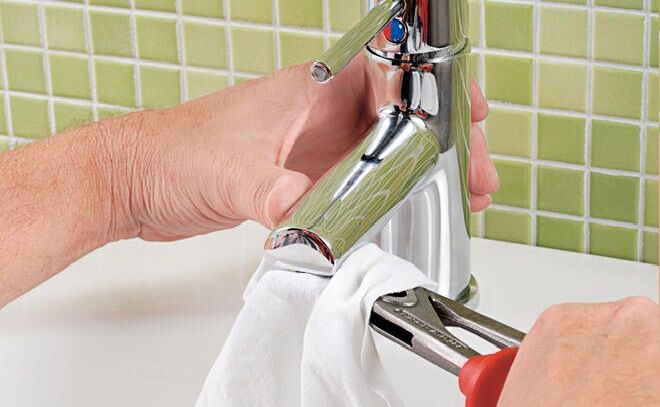
If there is a puddle under the sink, the first thing you need to do is inspect the spout. If it is completely dry, then the problem lies in a violation of the tightness of the water supply. You'll have to crawl under the sink and look for the leak. To make this easier, you need to wipe the pipes dry with a cloth, and then see where the water seeps out. Most often, the problem is resolved by tightening the nut.

If the thread on the pipe is damaged, the part must be replaced. If the internal threads in the faucet body are damaged, the problem becomes much more serious. You can try to eliminate the leak by wrapping the threads of the pipe with sealing tape or oakum with sealant, but this is a temporary solution; most likely, the entire mixer will have to be replaced.
Dripping from pouring out, although pthe lever is completely blocked - the reason may be damage to the locking mechanism, becauseabrasion of sealing parts has virtually no effect on the operation of single-lever devices. If there are cracks in the body, the mixer needs to be replaced - it cannot be repaired.
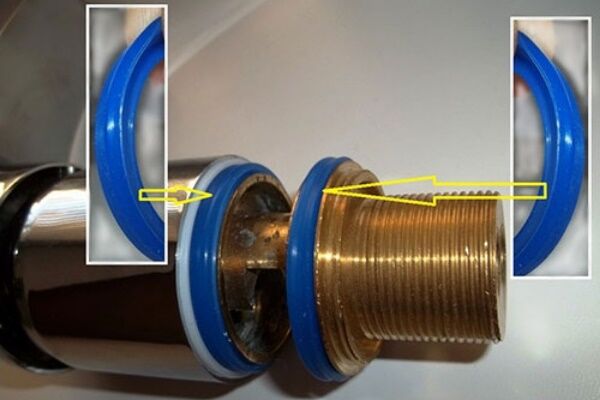
A puddle of water on the sink near the base of the faucet body. The reason is a crack in the housing or wear of the gasket in the turning part spout.
We sorted out the gaskets for the single-lever mixer. All that remains is to assemble the device and install it at the workplace:
About what to do if the faucet is leaking, described in detail in our proposed article.
Repair disk device
Let’s immediately make a reservation that “repair” in this case is not quite the appropriate word, since, most likely, you will only have to replace the cartridge, or, in a particularly difficult case, the entire mixer itself.
Rubber O-rings constantly accumulate debris and deposit salts, which are found in abundance in city tap water. Gradually, the tightness begins to break down and a leak forms. To eliminate it, the device must be disassembled, cleaned and reassembled in the reverse order.

Before you begin to disassemble the mixer, you must turn off the water supply. Next, the operating algorithm is as follows.
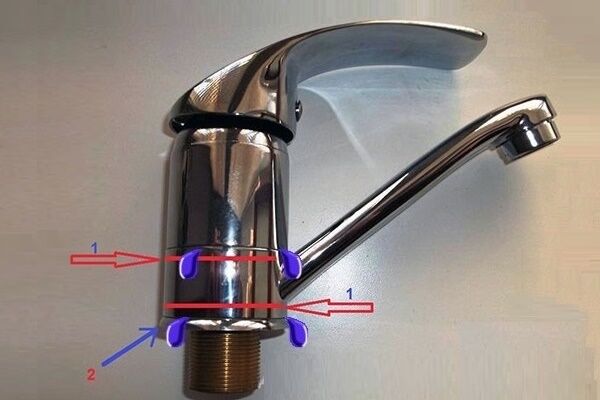
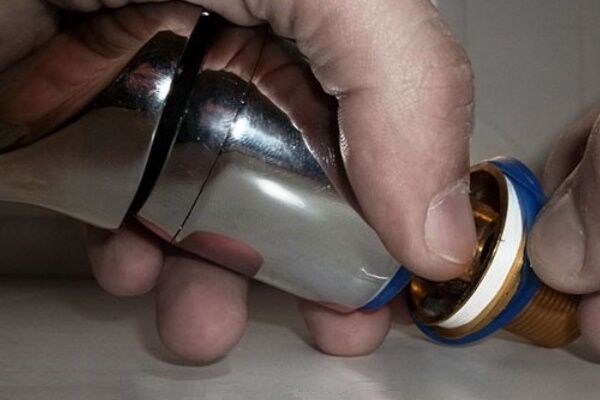
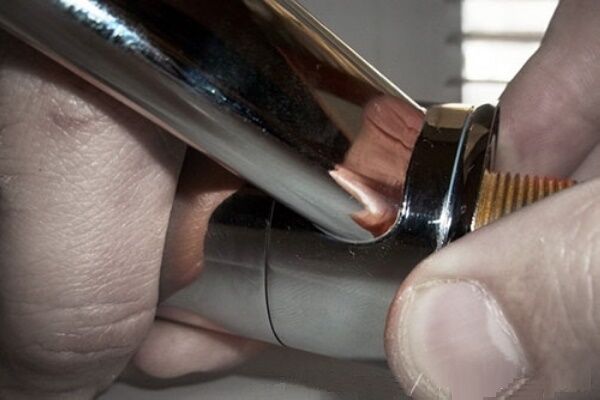
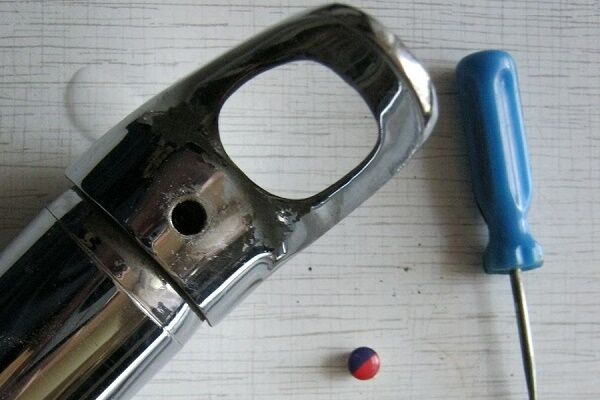
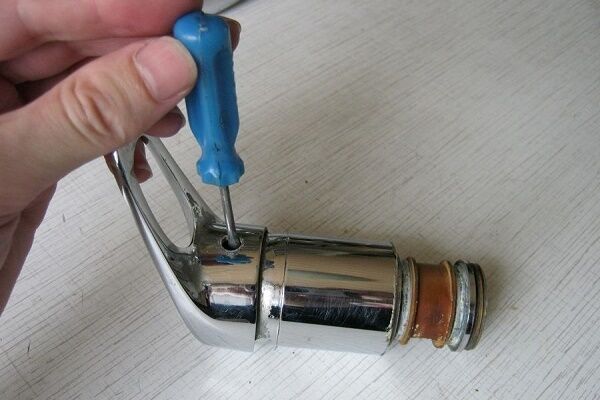
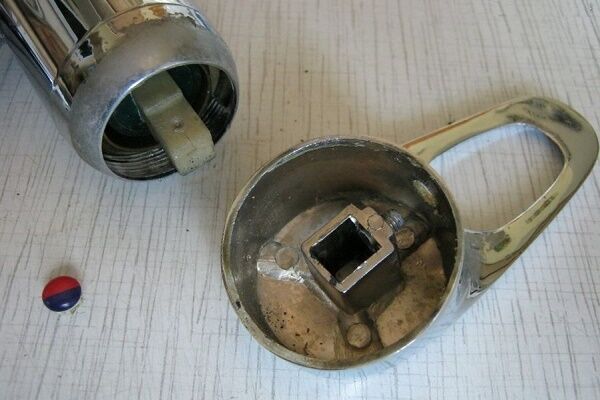
First of all, remove the decorative plug on the side of the case. It can be removed very easily, you just need to pick it out with a knife or screwdriver. After the plug is removed, access to a small mounting screw will open, which can be unscrewed either with a hex key or a screwdriver.
The screw must be completely unscrewed and pulled out, after which you can remove the mixer lever by gently pulling it up.
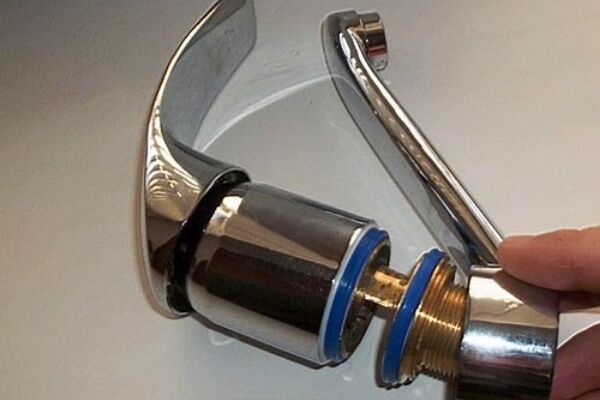
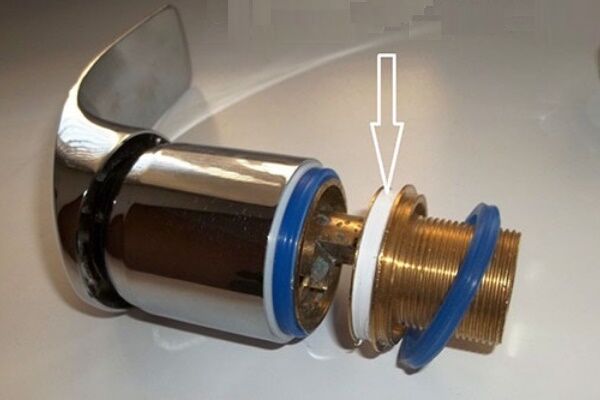
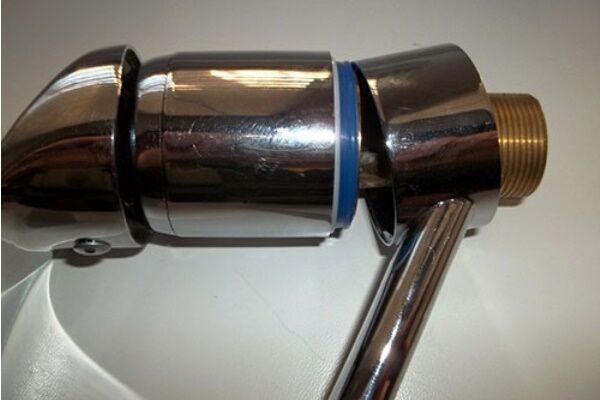
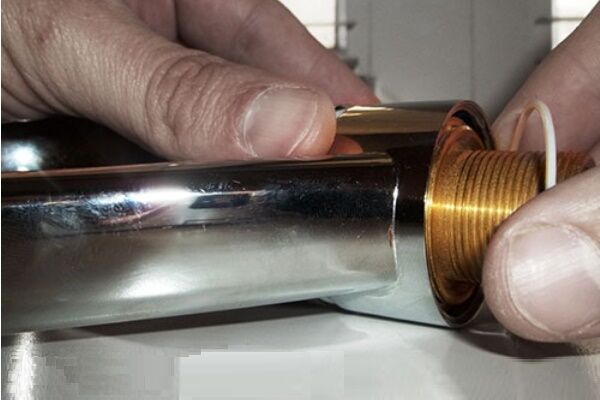
A decorative washer is usually screwed onto the mixer body or loosely installed. You need to remove it, and then unscrew the clamping nut that secures the faucet to the sink.
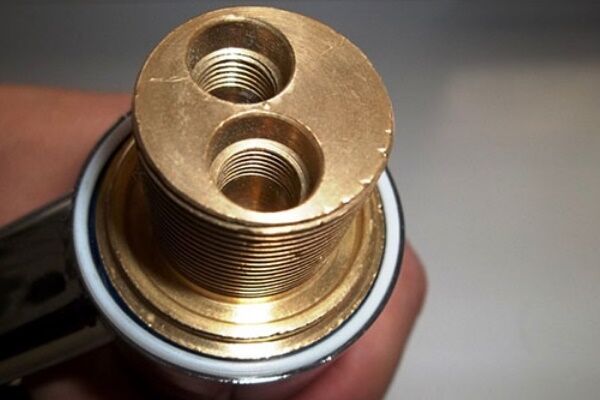
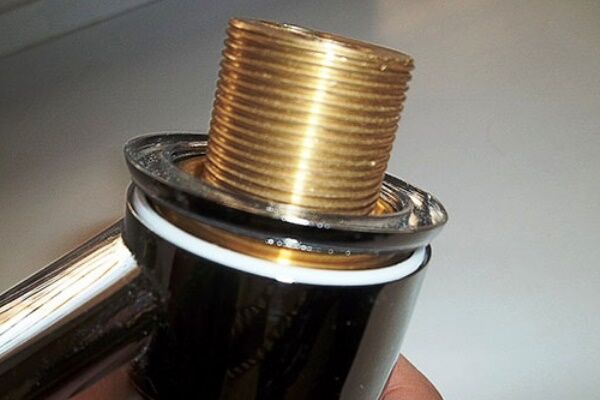
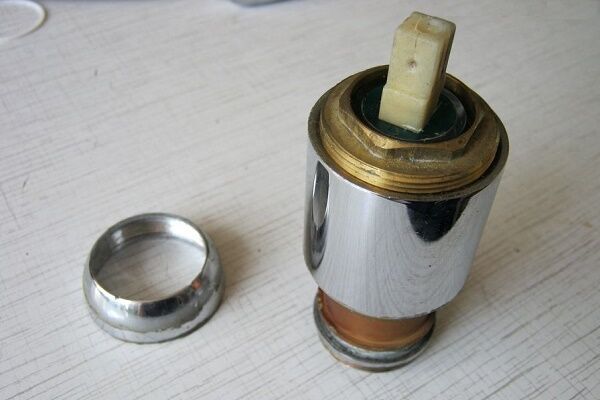
The nut has a large diameter - you will need an adjustable wrench or open-end wrench of a suitable size. After this, the cartridge can be removed from the housing and examined for damage.

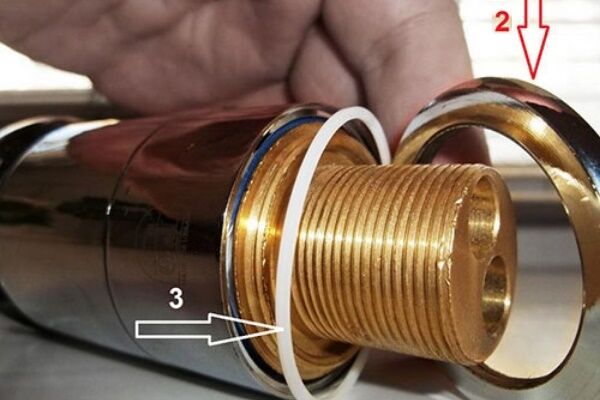
At this point, disassembling the mixer can be considered complete. There are very few parts, and there shouldn’t be any “extra” parts during reassembly.
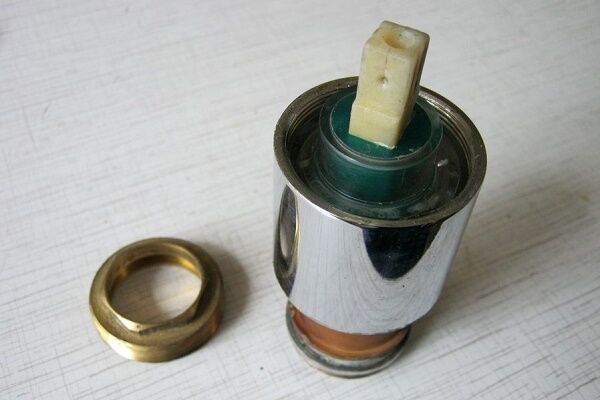
For the cartridge, inside the mixer body there is a so-called “seat” with a rubber seal - in other words, an ordinary rubber gasket, which over time can become clogged or lose elasticity.
As a result, water begins to ooze from under the base of the faucet.If after cleaning or replacing the gasket the problem does not disappear, then the problem is most likely in the cartridge itself and it will have to be replaced. Replacing the cartridge this article is dedicated to.
Please note: discs in cartridges do not have standard sizes. They may also differ in the location of the holes for water supply and outlet.
Therefore, if you decide to replace them, the old parts need to be removed from the case and taken with you to the store, where you need to show it to the seller for comparison. You need to buy the same cartridge, without any differences.

After the clamping nut is tightened, you can connect flexible liner, turn on the water and check the new cartridge for functionality. You need to use a rod to regulate the water pressure and its temperature without a handle. However, for convenience, you can immediately put a handle on the stem.
How to fix a ball mixer?
Ball The mixer was invented almost half a century ago, and since then its design has essentially not changed. It is very simple and quite reliable - there is nothing to break here.
If any problems arise, most often they are associated either with low-quality materials from which the plumbing fixture is made, or with bad water. As is the case with disk mixer, the gaskets must be removed, carefully examined for damage, then either replaced or cleaned of dirt, washed, dried and reinstalled.

For ball valve faucet models, the disassembly and repair process is similar to the one above. The only difference is the position of the ball, which rotates relative to the rubber seats tightly pressed to it. The contact density of the parts is ensured by the water bursting the mechanism.
The lever itself, which transmits movement to the control rod, is removed in the same way as in disk models: you need to uncork the decorative plug, unscrew the screw, remove it, and then remove the mixer lever.
Next, you need to unscrew the clamping nut and remove the washer that is located under it. This opens up access to the ball. The ball itself is easy to remove - you just need to pull the rod.
At this point, disassembling the mixer can be considered complete and we can begin inspecting the parts, replacing them or cleaning them from contaminants.
As noted above, most often the problem consists of deposits of salt and grains of sand on rotating parts and the mixer elements in contact with them. All dirt must be carefully removed and the springs must be inspected - they can also be dirty. In addition, the springs may lose their elasticity and need to be replaced.
The cause of a faucet breakdown may also lie in the ball itself. Ideally, it should be made from high quality stainless steel. In this case, it only needs to be cleaned of dirt.
In fact, manufacturers, especially Chinese ones, skimp on expensive materials and produce parts from low-quality metal. Over time, the surface of such a ball begins to peel off and rust, the water holes become clogged with rust particles and the mixer fails.
In this case, cleaning the surface will not help; the ball will have to be replaced. The old part, as in the case of a disk cartridge, needs to be taken with you to the store for comparison.
Gather ball The mixer must be installed in the reverse order, work very carefully and center the parts. An incorrectly installed element will wear out quickly and may cause another breakdown.
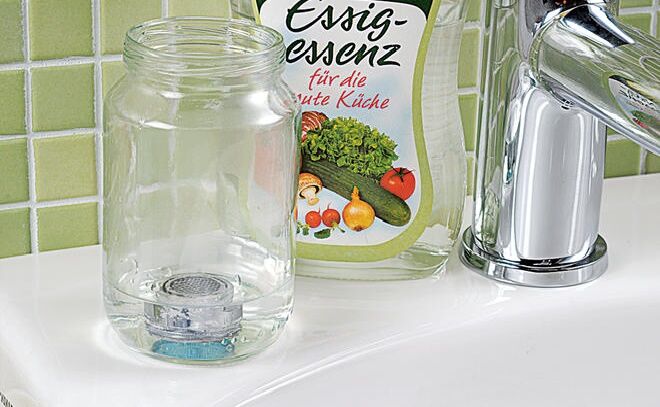
A separate point needs to be mentioned the most common and, at the same time, insignificant problem - clogging mixer aerator. This small part is a regular mesh and is designed to prevent splashes. Over time, the mesh cells become clogged with salt deposits and miniature particles of debris.
Removing the aerator is very simple - you need to unscrew the washer at the end of the spout and pull out the part. If the mesh has not become completely unusable, but is simply clogged, it needs to be cleaned and replaced.
The aerator can be replaced if you can find an analogue that is suitable in size, or, as a last resort, use a mixer without it.
Another problem is clogging of the flexible mixer connections.

Considering the state of modern water pipes and the quality of city water, there is nothing unusual here. In this case, you need to turn off the water, unscrew the inlets, clean them, inspect them for damage to the threads and install them back.
Conclusions and useful video on the topic
After watching the training video, you will better understand the process of disassembling/assembling a single-lever mixer.
How to disassemble the device and replace the cartridge:
Thus, in fact, repairing a single-lever mixer is not as difficult a task as it might seem at first glance. You can solve it yourself if you have the desire and a minimum set of tools.
We hope that the material presented in this publication will help readers save a lot of money, since most people, at the first problem with a faucet, simply buy a new one or call a plumber, and buying a high-quality faucet and professional services for replacing it is not a cheap pleasure.
Would you like to tell us how you repaired a single-lever faucet yourself? Is there any useful information for us and site visitors? Please write comments in the block below, ask questions, share the intricacies of the repair process not covered in the article, photos, and tips on the topic.


This question probably arose in almost every family, of course, in which they do the repairs themselves. Compared to faucets with wings, this faucet can be easily repaired.The lever is removed by first unscrewing the bolt, then unscrewing the nut and changing the cartridge. The cartridge is inexpensive, about 100 rubles. No gaskets) However, it is not very convenient to regulate the temperature and water pressure.
I'm a big fan of single-lever faucets, so I have them everywhere. They are very easy to regulate the water temperature. Over time, you simply remember the position of the lever you need in a given situation and set it automatically. By the way, in the kitchen specifically, precise adjustment of the water temperature is most often not required. This is not a shower, where the body is either too hot or too cool. In the kitchen you usually need either cold water or just warm water, in general terms, so to speak.
According to my observations, a single-lever kitchen faucet is at greater risk of breakdowns than the one in the bathroom, because... In the kitchen the water keeps turning on and off. Accordingly, the lever constantly moves up and down. Repairing a kitchen faucet is a little more difficult due to its location. It can sometimes be very problematic to crawl under the sink in different apartments (from time to time I earn money doing this).
They have two weak links - cartridges and handles. Cartridges periodically crack or start leaking out of nowhere. The handles wear out at the junction from constant turns and displacements when turning on the water. Replacing these parts is not difficult and not very expensive, but what is really surprising is their widespread fragility, no matter how much they cost and no matter how reputable the manufacturer is.
Hello! I have two single-lever mixers and both have the same problem: when opening the water, water flows for a few seconds at the temperature that was opened before, i.e. if I opened hot water, and having closed the tap, I opened it again, but this time cold water, then I drained the hot water for a while, and then the cold one flowed and vice versa. What could be the problem? Thank you!
Alexander, apparently you have an autonomous boiler. So it's normal. Don't worry - get used to it!
If the power/pressure/throughput and/or is not enough, your wife in the kitchen will spoil things for you, constantly turning on the water briefly (The sensors in the boiler are inert). Be wisely tolerant! Get used to it.
By the way, single-lever boilers are not recommended for autonomous boilers...
You open the tap, the water that was in the pipes before you flows under pressure, and then it’s different! I don't see any problems!
The faucet does not let water through, regardless of the position of the lever.
It doesn't even look like full proof. The cartridge lever is broken, no? Changed?
Are you sure it doesn't let water through? Was the water turned on?
I can’t figure out how to remove the spout from the faucet (there are no nuts on the bottom or inside)
A decorative washer is usually screwed onto the mixer body or loosely installed. You need to remove it, and then unscrew the clamping nut that secures the faucet to the sink.
I can’t find how to remove the lever - there are no plugs
Single-lever grohe faucet, after cleaning the water began to come only from the hygienic shower head, but not through the spout at all, I disassembled it and reassembled it several times, it did not help, the parts simply cannot be assembled incorrectly (combining all kinds of grooves, etc.), tell me what to do?
Yes, the water is bad, the cartridge was from Rubineta, they don’t have the same rubber bands, one is triple and has a larger diameter in the end. Underneath it, shells ate through the metal, new cartridges with three rubber bands whip.
I'm talking about a bathroom set - I have a faucet without a spout, you can't buy those for a piece, 5-15 times more!
I plan to fill the shells with glue, sand, polish and try.
What are your opinions and recommendations?
Xilumin, like its new analogues, is Evil!!!!!!!!!!!
Even on funny door latches - Analogues/alloys - will not overwhelm the metal!
Bl, I’m tired of redoing, incl. and from the Chinese!
Even a Chinese shovel is better!
If there was a body made of copper alloy, I would solder it, i.e. Easily repairable on brass!
From alloys - horseradish!
Toko glue or standard asax marinated in cabbage brine for about three months, like soldering paste…. I hope they bring at least a sample from the outskirts!