Membrane for a geyser: purpose, operating principle + replacement instructions
Geysers are reliable water heating devices, however, like other devices, they have wear parts.Therefore, there are times when the water stops heating. If the reason for this is a leaky membrane for the geyser, then it is not necessary to invite a specialist to repair it. You can do the replacement yourself, don’t you agree? But what is needed for this and where to start?
In this article we will analyze in detail the process of replacing the membrane and the features of repair work for different generations of speakers. But first, let’s get acquainted with the structure of the water block, which will have to be dismantled and disassembled in order to get to the membrane. We will provide replacement instructions with visual photos, useful tips and videos with an example of replacing the diaphragm of various speakers.
The content of the article:
- Purpose and structure of the water unit
- Reasons for diaphragm failure
- Membrane Failure Determination
- Selecting a replacement membrane
- Detailed replacement instructions
- Replacing old type speaker membranes
- Features of membrane replacement in new models
- Is it possible to get by with repairing the diaphragm?
- Conclusions and useful video on the topic
Purpose and structure of the water unit
The membrane is an important part in regulating the gas supply. To understand its purpose and operating principle, you should study in detail the structure of the water block of the column, of which it is a structural element.This knowledge will help when replacing the membrane, because in order to get to it, you have to dismantle the entire assembly and disassemble it.
We also recommend that you familiarize yourself with the general geyser device, to make it easier to find the water block in its design. But first things first.
Water reducer device
One of the components of almost any gas heat exchanger is a water reducer (water unit - WU, water regulator). It is designed to regulate the uniform supply of water and gas. The practically designed shape of the regulator (in common parlance – “frog”) facilitates compact placement of the unit in the speaker body. The technically simple device works automatically.
The functions of the gearbox are as follows:
- starting and stopping the operation of the gas water heater when opening/closing the tap;
- regulation of water and gas supply;
- protection of the column from overheating when there is insufficient water pressure.
The design of the gearbox is well thought out and visually uncomplicated. The body is made of brass, polyamide (containing fiberglass), silumin or plastic.

Operating principle and importance of the regulator
The hollow cavity of the gearbox, divided in two by a membrane, is filled with water. Water enters the cavity from the water supply. From the bottom, passing through the fitting Venturi, it enters the upper compartment through the bypass hole.However, water coming from the water supply to the lower part always presses on the membrane with the force of water pressure in the pipeline, and in the upper part the pressure force changes, depending on whether the water flows through the heat exchanger.
The fact is that in pipelines that have narrowed sections, the pressure of the flowing liquid in a bottleneck decreases. When the tap is opened and water flows through the fitting Venturi, the pressure in front of the local narrowing (nozzle) of the fitting increases.
Due to the increase in flow velocity in a bottleneck, the pressure decreases both in the fitting and in the upper cavity of the frog. This is similar to flattening the end of a garden hose. With a difference in the diameters of the nozzle of the fitting (0.3 cm) and the main chamber (2 cm), the pressure drop reaches 1 atmosphere. This is enough for the membrane to bend upward and press on a plastic plate rigidly fixed to the axis of the rod. The rod presses forcefully on the gas valve, causing the valve to open and gas to flow to the gas burner.
When the membrane is lifted, water from the upper compartment begins to exit through re-pass channel where the steel retarder ball is located. The ball, moving to the right, partially blocks the channel, so the gas is turned on and supplied to the burner smoothly. Smoothness is adjusted using an adjusting screw.

When the hot water (HW) tap is closed, the water flow stops and the pressure in the nozzle Venturi is compared with the pressure in the cavity under the membrane.Due to the action of the springs, the rod together with the plate moves down, and the membrane returns to the middle position.
The gas valve closes automatically. The gas valve is turned off quickly, since the reverse flow of water in the culvert moves the ball to the upper cavity (to the left) and ceases to impede the flow of liquid. We recommend that you look at information about what to do if gas valve does not work.
If the hot water flow rate is less than 2-3 l/min, the required pressure drop does not occur, and the springs do not allow the rod to open the gas valve at all or enough to fully heat the water. Also, the necessary pressure difference does not arise when the integrity of the membrane is violated.
Water regulator based on nozzle principle Venturi, is a safety device, since it allows you to turn on the water heater only when a sufficient water flow flows through the heat exchanger. Thus, the reducer automatically protects the geyser from overheating.

Reasons for diaphragm failure
Membranes are consumables with a service life of 5-8 years (on average). The elasticity of the material decreases over time. As a result of the action of alternating stresses, fatigue occurs over time in each material subject to bending—the formation and accumulation of damage. If the membranes operate in an intensive mode, when the gas water heater is used frequently and a lot, fatigue occurs earlier. Microcracks appear in the body of the diaphragm, then breakthroughs form.
The scale that forms inside the frog also contributes to rapid wear of the diaphragm. Another reason is the use of clandestinely produced diaphragms. Often such products are made from low-quality rubber.
Therefore, information on how to correctly replace the membrane in a household gas water heater, if it fails, it will come in handy. With such knowledge, you can repair the water unit on your own, without involving specialists.

Membrane Failure Determination
The operation of the gas water heater may deteriorate gradually or stop instantly. The malfunction does not always lie in the wear of the rubber heart of the water block. Sometimes the reason is extraneous. Therefore, before you start with a screwdriver or a key to the insides of the unit, it is more rational to diagnose it.
Diagnosis of the reason for the automatic shutdown of the column
Column failure can occur for various reasons. Therefore, if a column malfunction is detected, you should not immediately begin dismantling and disassembling the water unit.
The column automatically turns off in the following cases:
- there is no draft in the chimney;
- the heat exchanger overheats;
- the flame above the gas burner does not ignite;
- The membrane does not work properly.
We have given other reasons for column attenuation in next material.
In modern household heat exchangers equipped with digital displays, the main control board displays an error code expressed in numbers on the screen.He will tell the technician what to check first.
This is not the case with older devices. The error code won't mean much to the average user. Therefore, when searching for the cause of a breakdown, you should be guided by a practice-tested method - the method of verification and exclusion.
Checking the correct connection of communications
So, first you need to make sure that there is water in the water supply network at home, the gas inlet is not blocked, the valves supplying water and gas to the water pump are open in operating mode, and the batteries are not dead.

That is, you need to find out whether the column has turned off for reasons independent of its performance.
- Check the water pressure in the water supply and the presence of natural draft in the chimney. To enable the membrane to operate, the water flow must be at least 2-3 liters per minute. About the reasons for weak pressure we talked here.
- Clean the contacts of the power compartment, replace the batteries.
- Imported units are sensitive to how the phase is located in the sockets. Reverse the position of the plug in the socket.
- Check fuses.
- If a filter is installed on the cold water supply pipe, check whether the filter is clogged. You should also check the mesh installed on the faucet tap. Clean if dirty.
- Check for a spark at the ignition electrodes when the hot water mixer is on. In units with a closed chamber, the clicking of the discharges can be heard from the outside. The presence of a spark means that the membrane is triggered.
Once you are convinced that the reasons for the main valve failure lie within the system, proceed to further diagnostics.
How does a membrane malfunction appear externally?
In some GC models, the rod, including the column, is located above the body, so the movement of the rod can be observed. If the rod does not move or does not extend completely, then the membrane and plate should be checked for integrity. On some models, the movement of the rod can be seen when the housing is removed.
If, after cleaning the filter mesh, the gas burner does not fire, but ignites only when the hot water tap is fully opened or several such taps connected to the hot water valve are opened at the same time, then it will be necessary to replace the old gas water heater diaphragm with a new one.

During normal operation of the membrane, the flames rise 3-5 cm and are located exactly above the edges of the burner. Otherwise, especially if cleaning the nozzle did not help (if ignition is carried out from the wick), the culprit may be a leaky diaphragm. This is also the most likely reason if you do not hear characteristic clicks from the batteries when you ignite the speaker.
A red, high flame may indicate that the gas is not suitable. If a blue flame, burning sluggishly, produces hot water at first, then rapidly cooling water, we have another symptom of a “membrane disease.”
The gearbox must also be disassembled if water leaks from the water block. This malfunction can be caused by scale, wear of the gasket on the screw bushing of the rod, failure of the membrane itself or the plastic parts of the combined membrane.
Selecting a replacement membrane
Diaphragms are made of elastic material - black rubber or silicone. They can be solid or composite, for example, the product can be rubber-metal or come complete with plastic parts. Most often, diaphragms have a simple round shape. But there are models of geysers whose gearbox membranes are distinguished by a complex, “bizarre” configuration.
You are lucky if the speaker is domestic, and “native” membranes are available for sale. Even luckier is if the required spare part is made of silicone, which means it will last longer (about 10 years). But it is also likely that you will have to purchase a “native” diaphragm through dealers or an online store. You may have to get a complete repair kit or a new frog. It all depends on the model of the gas heat exchanger - not all gearboxes have the same operating principle.

European companies produce water heaters with membranes whose shape is difficult to fake. In the worst case, if spare parts for “foreign cars” are not supplied, you will have to buy a new speaker or invent something and make something from the means at hand. There are universal diaphragms that fit a wide range of models.
If you have to wait for a membrane suitable for the column to be sent, and the column diaphragm does not have a complex configuration, you can make a part yourself for a temporary replacement. Rubber 1.5-2 mm thick is suitable, for example, from thick dielectric gloves or an old car camera.
Using the old product as a template, cut out a new gasket. Holes for the bypass channel and screws are made with a punch from a metal tube with a thin wall. The diameters of the bypass hole of the lid and the diaphragm must be equal so that the flow of water between the cavities of the frog is not hampered.
Detailed replacement instructions
Next, we’ll look at how to properly replace the diaphragm. But before starting work, it is important to remember that working with gas equipment belongs to the high-risk class. Therefore, repairs to the column must be carried out by a qualified specialist.
You should not overestimate your skills and strengths - if in doubt, you need to contact the gas service. It is also necessary to contact gas workers if you smell gas in the room, because if safety measures are ignored, the column may explode.
Stage #1 - preparatory work
First of all, cut off the flow of gas and cold water to the column. The gas must be turned off before starting work, even if you do not plan to inspect the gas part of the equipment. The water unit is connected to the gas unit, and if you touch it, you can get into big trouble.
Water is drained from the system by opening the tap into which hot water flows from the boiler. If several hot water taps are connected to it, open the one located below the device. Then the maximum amount of water will drain from the system. To drain the remaining water, place a basin under the water regulator.
There is no need to mention that the replacement membrane needs to be purchased ahead of time. It is also better to purchase gaskets to seal the rod and union nuts of both pipes. You can purchase a complete repair kit.

Prepare tools for work: screwdrivers, wrenches or gas wrenches, pliers. Fine-grit sandpaper may be useful. It is also worth stocking up on rags and a rust dissolving agent (frog screws often turn sour).
To open access to the water unit, open the column housing. Removing the casing is usually not difficult; it doesn’t take long to find and unscrew the mounting screws.
Finding the water regulator is also not difficult - it is the first block on the path of cold water entering the column.

Stage #2 - step-by-step description of membrane replacement
You can get an idea of the process of replacing a worn membrane in a gas water heater using the example of a household flow-through heat exchanger “Neva”.

Next, consider the process of dismantling the water unit:
- Armed with a wrench, first unscrew the union nut of the inlet pipe on the left side of the gearbox. We take the phone away so that it does not interfere with further actions.
- Holding the frog with your hand, unscrew the nut of the outlet pipe. Let the water drain.
- Using a screwdriver, unscrew the three screws connecting the water and gas blocks. It is not necessary to completely unscrew the fastener; just release the rod. We remove the gearbox.
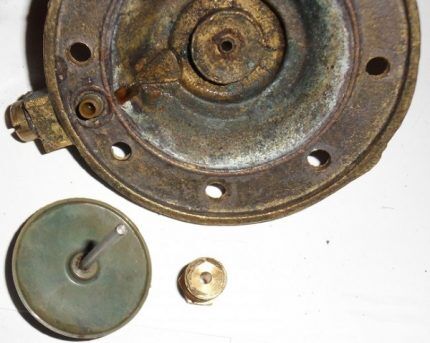
Now we unscrew the screws securing the cover and base of the block (8 screws). If the bolts are soured, use WD-40. We open the cavity of the block and remove the damaged membrane.
We inspect the condition of the removable parts - plates, rod and bushings, filter mesh, fittings. If necessary, clean the cavity and other surfaces of the frog and its parts from scale or rust. We replace unusable parts or install old parts in the appropriate places.

We install the membrane, not forgetting to accurately align the hole in the rubber part with the hole in the bypass channel. If the channel is blocked, then water will not flow into the upper cavity. The water pressure on the gasket from below will keep it in a curved position, the gas will be open by the rod even when there is no water flow.
We return the cover to its place, install and tighten the fastening screws crosswise (one against the other). After making sure that everything was done correctly, tighten all the screws in the same sequence.
Then we install the assembled block:
- We mount the gearbox in the reverse order. It is advisable to install new sealing gaskets with a diameter of half an inch on the pipes.
- We check the quality of the connection by opening the hot water tap. If there are no leaks when the tap is open, turn off the water and check for leaks under pressure. Then turn on the gas supply. After applying a soap solution to the gas connections, we check for gas leaks.
- If no leaks are found, we check the column in all operating modes.
After making sure that everything is done correctly and the column is working, we mount the removed housing cover.

Stage #3 - putting the entire water block in order
To avoid the situation that you replace the gearbox gasket, and in a few days you will need to disassemble the water heater to eliminate another malfunction, it is more rational to linger and do preventive maintenance.
While the gearbox is removed, in addition to replacing the membrane, you need to check the ease of movement of the rod. The rods of the water and gas units interact.
Due to leaks, the gearbox rod may become covered with scale or become sour. It must be cleaned, polished with 240 grit sandpaper, lubricated with mineral oil, e.g. lithol. The stroke of the rod should be smooth and easy.
You should also check the nozzle for cleanliness. Venturi (union). Even slight contamination greatly affects the performance of the frog. You can clean the fitting with a thin wooden stick. The O-rings on the Venturi tube may need to be replaced.
Then it is advisable to check the following elements:
- Check the operation of the magnetic switch button.If the button is working, but the burner does not ignite due to lack of gas supply, the reason may lie in the reed of the switch. It can be slightly pressed to ensure a tight fit.
- Replace the defective filter mesh or install a new one if it was missing before.
Preventative inspection of the water unit should be performed at least once a year. Just as we should not forget about cleaning and regular maintenance all structural elements of the gas water heater.
Replacing old type speaker membranes
There is no stagnation in technology, the design of modern gas water heaters and old water heaters (GVA, L, WPA) are different. Therefore, there are nuances in replacing the gasket. The following description is given for KGI-56.

To replace a worn or stretched diaphragm in the KGI-56, a series of actions are performed sequentially:
- After unscrewing the nut, remove the burner located above the gas block and set it aside.
- Dismantle the gas block by disconnecting it from the gas pipe and loosening the three screws that connect it to the water block. When unscrewing the union nut, hold the gas block with your hand.
- Unscrew the bolts securing the water block housing cover. Remove the cover.
- Replace the worn part, insert screws (to facilitate subsequent screwing), and install the gearbox cover in place. The screws are first tightened, doing this in opposite pairs, then tightened in the same order.
- Install the gas block, then the burner.
Be sure to place a basin, because when removing the gearbox cover, water will flow out.
Features of membrane replacement in new models
The water units of modern speakers work on the same principle. The main differences between new designs of instantaneous water heaters are the saturation of control units, monitoring units, touch screens, and wires.
Some fasteners have changed. For example, now screws are tightened and unscrewed with special screwdrivers with an asterisk. Innovations affected both the shape of the frogs and their connection to the gas block.

On branded In Bosch and Junkers columns, the water unit is located at the bottom right. To remove it, you need todisconnect the terminal of the draft sensor located in front of the control unit.
Having turned off the water supply to the column and opened the hot water tap, use a screwdriver to remove the bracket that holds the pipe running from the heat exchanger to the heat exchanger. Pulling the pipe slightly to the right from the water unit, wait until the water from the system pours out through the tap, after which the pipe is removed completely. After this, use a wrench to unscrew the nut securing the water block to the water supply.

Unscrew the VU fastening screws with a Phillips screwdriver. They are located at the bottom of the structure. There is no need to unscrew them completely. After this, the water block is at the owner’s disposal. It can be inspected, cleaned, and consumable parts replaced (the coarse filter mesh can be cleaned without removing the VU).
There are much more consumable parts in such a frog than in the gearbox of the Neva Group of Companies.Firstly, the water block itself is made of plastic, the mounting screws are screwed directly into the plastic (no brass inserts). The connection is not designed for many cycles of assembly and disassembly. If there is a leak along the VU rod, the cover will need to be replaced completely (maximum service life is 2-3 years).
Secondly, in addition to the functions described above, it additionally regulates the amount of water flowing through the column, so a stable liquid temperature is maintained at the outlet of the hot water tap.

To regulate the water flow, the lower part of the frog is equipped with additional transfer channels, faucet, mechanical regulator of water flow. If the brass valve axlebox is soured, it is replaced with a new one. To replace the diaphragm, you will need to purchase a “native” one. All spare parts branded water heaters are expensive. It might be cheaper select and buy a new speakerthan to find the required unit and wait for it to be delivered and installed.
Is it possible to get by with repairing the diaphragm?
DIYers couldn't pass up the opportunity to try and repair a leaky rubber part.
Practitioners have tried the following methods:
- applying patches using various adhesives;
- puttying the surface of the diaphragm with silicone sealant;
- use of silicone compound Pentelast.
Experience has shown that such measures will not help for long, perhaps only for a day or two, since the membrane works under strain. A new failure of it could worsen the situation. Therefore, there is no need to resort to gluing and patching the gasket.
Conclusions and useful video on the topic
How to replace the diaphragm in a Bosch speaker, see the following video:
Features of replacing the diaphragm in the water block of the Neva column:
Replacing the membrane is quite possible for home craftsmen. The article provides detailed instructions, following which beginners can understand the principle of operation of the water reducer, as well as replace the membrane in common speaker models with their own hands. If you doubt your own abilities, it is better to call a specialist to diagnose the breakdown and fix it.
Would you like to share your own experience of replacing the membrane with other users? Tell us about the difficulties you encountered in the process, add unique photos, your experience will be of interest to many beginners. Write your recommendations for replacing the membrane and disassembling/assembling the water unit - the comment form is located below.


