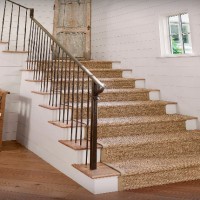
How to choose and install beautiful railings for stairs in a private house
Almost all flights of stairs installed in private houses require the installation of handrails or railings to ensure traffic safety, especially if children live in the house. Of course, it’s easier to hire a craftsman who can quickly make railings for the stairs, but it’s much more pleasant to do it yourself. How to do it and what you need to consider when assembling it yourself?
There are several methods for making stair railings. To do this, you can choose to purchase ready-made parts or make them yourself.
The content of the article:
Which railings to choose
Initially, it is important to consider the material of the staircase itself. If it is wood, then a similar material or metal would be a good option. The choice may be influenced by the design of the room. If it is made in high-tech or techno style, then it is unlikely that a staircase with wooden railings will fit into the overall design.
Attention! Only by choosing the type of railing, you can decide whether they will be made independently or all the actions will be performed by a master.
Homemade or ready-made
Some will say that it is easier to buy ready-made parts and assemble them on site. It is impossible to disagree with this. However, what is captivating about making themes yourself is that you need to apply your imagination and strength to do this. Pros and cons of homemade and ready-made railings:
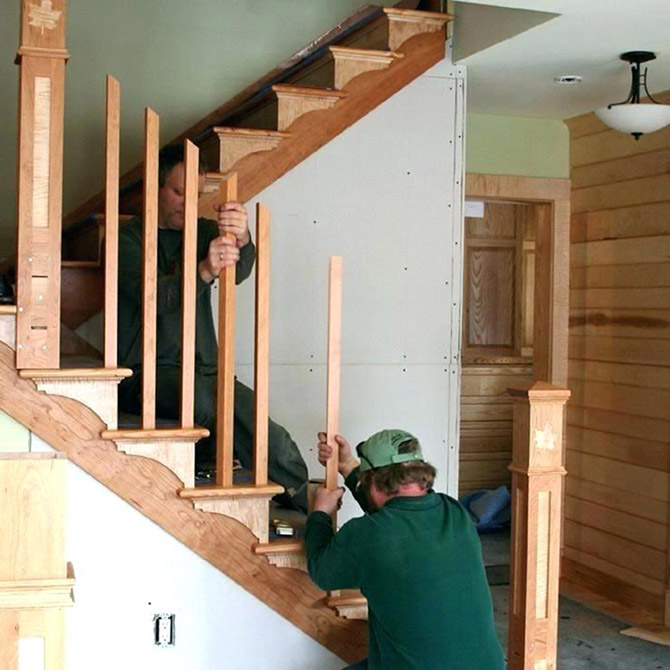
- DIY stair railings. By choosing this option, you can save on hiring and paying for the services of a master.You can start self-assembly only if you are completely confident in your own abilities. However, remember that the work will likely require turning equipment. That is, an ax and a hacksaw cannot assemble a good ladder. You will also need good knowledge of geometry and drawing to take measurements and correctly record them on the finished drawing.
 Assembling stair railings requires a lot of care and patience.
Attention! You shouldn’t tempt fate and try to assemble a staircase railing without drawing up a good drawing. Small miscalculations can play a cruel joke, and when everything is almost finished, an error in the calculations will definitely make itself felt. It’s not for nothing that they say: “Measure twice, cut once.” - Prefabricated railings for stairs. This option is practical and reduces the risk of miscalculations to a minimum. When purchasing a structure, you take parts that can be adjusted to the assembly conditions. For example, movable brackets are attached to metal balusters, allowing you to secure handrails for stairs at any angle of inclination.
Attention! Ready-made staircase railings eliminate the possibility of independently choosing the design of the structure. Of course, with money in your pocket you can make custom railings, but this is an additional waste of money.
Metal or wood
The choice of material is primarily influenced not so much by the preferences of the home owner, but by the skill of a specialist in this profile of work:
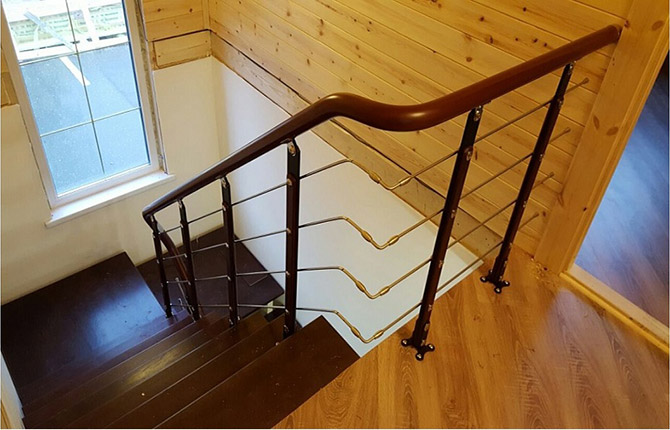
- Metal railings. There are several options for assembling metal railings for stairs - forging, welding and installing ready-made stainless steel models. All finished options, with a sufficient level of skill, look beautiful and elegant.The strength of such a structure is assessed as high. However, to assemble a railing for a metal staircase, even if it is assembled from simple materials, a lot of experience is required.
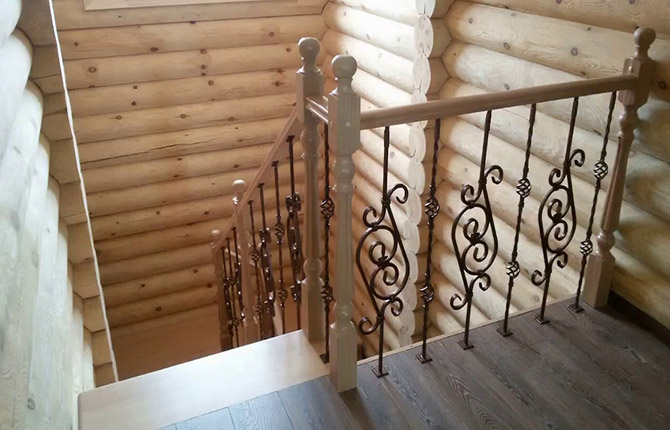
 The combination of forged parts and wood elements for staircase railings fits well into a classic and country style interior.
 - Wooden railings for stairs. Models suitable for placement in country or Provence style interiors. If the craftsman has sufficient experience with woodworking machines, turned decorative balusters and semicircular railings will decorate the room in a classic style. In cases where the staircase railings are assembled without decorative processing, even an inexperienced worker can cope with the task. If you have no experience in carpentry, you can order ready-made parts.
Next, we will consider a master class and advice from craftsmen on selecting parts and installing wooden railings for stairs.
This is interesting! How to make a staircase to the second floor with your own hands: step-by-step manufacturing and installation instructions. How to make a spiral staircase with your own hands.
Wood selection
Having chosen wood as the main material, all that remains is to select the grade. Everyone has their own differences. Some are expressive with an emphasized texture, others are less noticeable, but with excellent strength indicators.
Recommendation! For flights of stairs placed inside the house or on the porch, it is important to pay attention to the strength of the material. After all, it is this that determines the durability of the structure being manufactured.
Tree species suitable for making railings:
- If the goal is to install railings on the stairs in a utility room, then inexpensive tree varieties are suitable: pine, spruce, birch or aspen.But at the same time, you need to take into account the humidity of the room - high levels negatively affect the safety of the finished model. Masters may recommend treatment, but this is an additional cost.
The quality of the lumber determines the reliability and durability of the finished stair railings. It is important to consider storage conditions. - You can save on processing finished parts if you use coniferous trees, alder or aspen to make railings.
- Wood types such as oak, beech, larch and pine have good resistance to rotting.
- If money is not a problem, then choose varieties such as oak, beech, ash or walnut. They have excellent strength indicators. Stairs made from them are designed for a long service life, and the texture will delight the owner with its attractiveness.
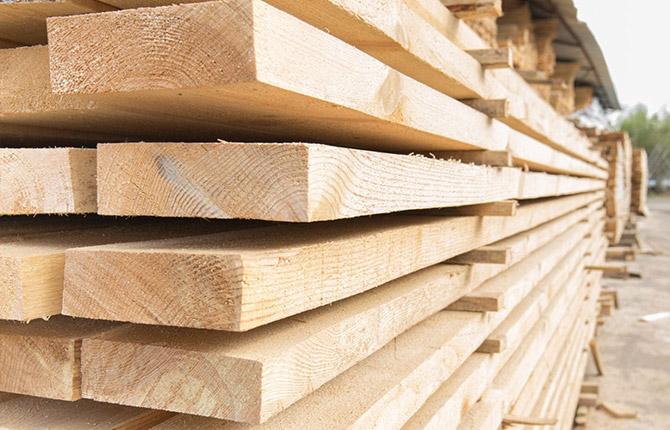
Before purchasing stair railing material, evaluate its moisture content. This can be done with a special device or take the seller’s word for it. Visual assessment of weight and tactile contact will also give results, but with this method of assessment errors are possible.
Wood moisture content should not exceed 12-16%. Otherwise, during natural drying, the wood may begin to deteriorate and may crack or become deformed. Therefore, if a purchase is made without testing with special equipment, it will have to be kept in a dry and ventilated place until suitability.
Recommendation! If you do not have enough experience in combining different types of wood, then use the same species to make stairs and railings.
Design selection
The determination of the shape of the future structure is formed at the level of mental perception.Come up with an image, then sketch it out schematically on a piece of paper. If you like it, then you can move on to building a drawing of the staircase.
Next, the stability and strength of the invented model is analyzed. Remember that the main load falls on the support pillars. Consequently, they should look more massive, and the most durable tree species are used for their production.
The support pillar is usually installed at the beginning and end of a flight of stairs. To avoid sagging of handrails in large spans, it is recommended to install one or more additional supporting elements. The appearance will not be spoiled by this. The standard distance between posts cannot exceed 150 cm.
The chosen shape for the balusters also affects stability. If these are thin slats, then in this model they relied on appearance, without thinking about reliability. It will be useful to install support pillars a little more often - every linear meter. For massive balusters, the span can be expanded to 170-180 cm, depending on the reliability of the manufactured elements.
The following types of filling are distinguished:
- solid - the entire square is filled with plywood, glass or other sheet material;
- cross-shaped - the design is close to the Scandinavian style, bars are packed diagonally:
- rectilinear - involves vertical or horizontal filling with bars, slats;
- combined is a combination of several types in one model.
When installing stair railings in order to get a reliable and aesthetically pleasing structure, craftsmen recommend remembering a few rules. They relate to sizes:
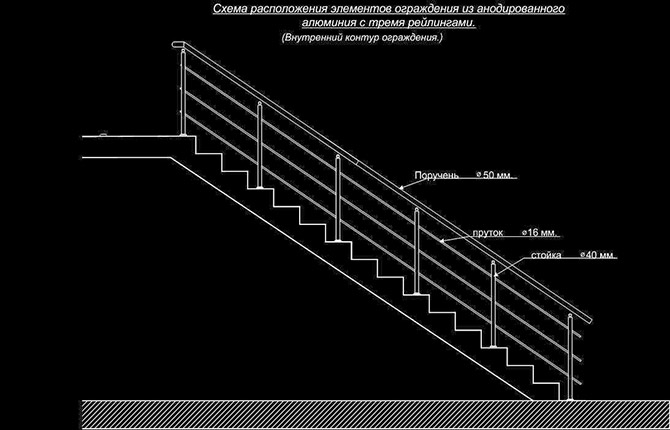
- height of the handrail (about 90 cm) - for calculation, the distance from the plane of the step to the top point of the handrail is taken;
- cross-sectional size of the support column - not less than 10x10 cm;
- the cross-section of the balusters is determined by the span distance and the frequency of the installed elements - 4-8.5 cm;
- the diameter of the handrail should be comfortable for the palm of a person of average build - within 60 mm;
- the distance between straight bars is no more than 20 cm.
Attention! If there are small children in the house who move independently along the steps, it is better to play it safe and choose the minimum dimensions for the distance between the vertical balusters. As a rule, they do not exceed 12-15 cm. But it is better to refuse horizontal jumpers, since a child can easily climb up and over the fence on them.
How to make the necessary parts
The choice of method for manufacturing parts is determined by the availability of specialized equipment in the home workshop. Naturally, if it exists, the owner will want to make the railings for the stairs a more complex and attractive configuration. However, in most cases this is a standard carpenter's set: a hacksaw, an axe, a drill and other hand tools.
Support pillars
There are two possible options for pillars: hollow and made of solid wood. The first type is a prefabricated support column in the form of a hollow box. For production, plywood sheets or narrow boards can be used. For decoration, glazing beads and slats of separate fastening are selected.
The second type, made of solid wood, is easier to manufacture.A solid timber is taken and a finished part is made from it. In this case, decoration is done immediately, without stuffing individual elements. This option is more reliable, but has two significant disadvantages - the high price and an increase in the load on the flight of stairs due to the large mass of the part.
Recommendation! In the places where the handrail contacts and fixes the support post, it is recommended to make a face of a strict geometric shape. It is much more difficult to install a figuratively joining edge than a square or rectangular one.
Handrails
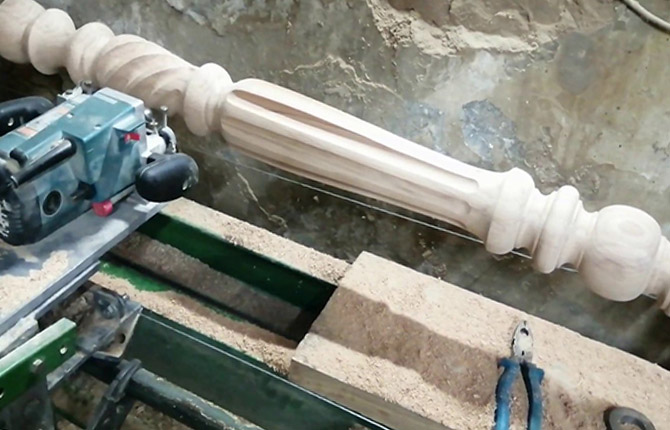
Craftsmen offer many options for handrail shapes for consideration. These are a semicircle, a curly shape with a longitudinal cutout for fingers, a strict square section and other models. You can choose one or another method for forming a handrail based on your experience. How professionally savvy are you to make a shaped part of a staircase railing yourself?
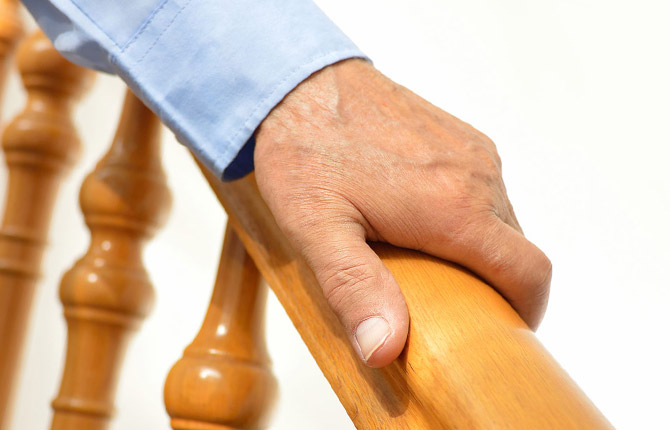
Of course, it’s difficult to repeat a brilliant idea if you don’t have the necessary turning equipment at hand. You can sit and grind out all the elements by hand, but it will take a very long time. I would like to note that the shape of the product can be anything, but one requirement must be met: the hand must slide along the top of the handrail without feeling any obstacles or discomfort.
Recommendation! To get a semicircular workpiece and spend a minimum of time, make hexagon-shaped parts, cutting off the excess parts. The resulting workpiece is polished to form a semicircle.
Filling
The most difficult stage of assembling the railing for the stairs to the second floor is the manufacture and adjustment of the filling. If we consider simple manufacturing methods as an option, then this category includes shaped flat dies cut with a jigsaw and straight crossbars. They do not require complex adjustments, and their manufacture requires a minimum of tools.
If you want to make balusters in a classic style, but do not have special turning equipment, then you can make round or square blanks from timber. And to give relief, go through a manual milling machine.
To attach shaped boards, fasten one guide at the top and bottom and fix the parts on top. In order not to distinguish between the front and back sides, it is recommended to install flat balusters on both sides of the guides. In this way you can get a three-dimensional structure.
Recommendation! Considering that the angle of inclination is adjusted to the location, the baluster blanks are made a little longer.
How to install railings
Before installation begins, the installation sites and fastening of future parts are marked. It is more convenient to do this with a marker or chalk, which can be wiped off with a damp cloth upon completion of work. Regardless of the choice of filling type, the installation of railings always begins with the installation of support posts.
Installation of pillars
This is a very important stage, the accuracy of which will determine the reliability and aesthetics of the stair railing. To begin work, you need to understand where the first support pillar will be installed: on the step or near it. As a rule, this does not affect the installation of the next support, unless, of course, the length of the flight of stairs allows you to expand the boundaries of the balustrade.
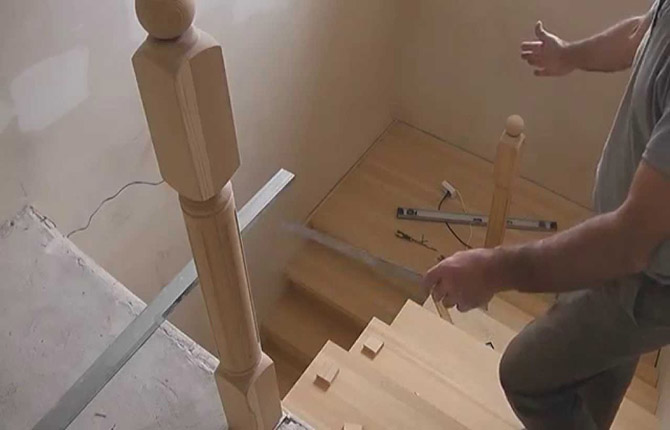
Attention! If the design of the staircase to the second floor involves an intermediate platform, it means that there is a turn in this place and two support pillars are needed here. One will be the end of the lower balustrade, and the second will be the beginning of the next one. In cases where the structure does not involve a rotary extension, the final support column will be installed in a single copy.
How to secure a pole depends on the type of its structure. For hollow models there is an effective way using a boss:
- take internal measurements from the support post;
- according to the data obtained, cut the boss from timber or hemp;
- fix the resulting part using wooden dowels into the floor;
- To secure the post, the edges of the boss are coated with wood glue and placed on the workpiece.
Recommendation! To ensure reliable fixation, the lower part of the post is coated with silicone sealant.
Supporting pillars made of solid wood are fixed with dowels, pins or furniture ties. All cases require the use of wood glue.
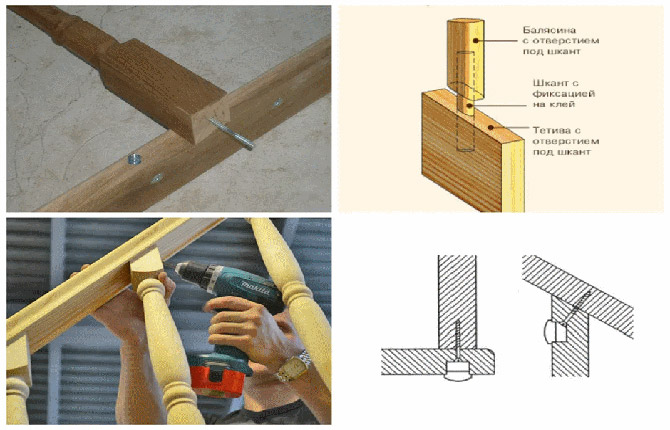
Installation of balusters
First, the installation sites for balusters are marked according to the example of support pillars. Only in this case, so that the alignment of the elements is not disturbed, it is necessary to apply a guide rail when marking the central center line. How to do it:
- place marks on the lower and upper steps;
- place the guide rail, aligning both marks;
- place risks in the places where other balusters are supposed to be installed or draw a continuous center line along the entire span.
Recommendation! It is convenient to use a template to determine the transverse center line. Make a blank that will determine a clear distance from the edge of the step to the center of the baluster. Applying it to the edge of the step, place marks in all places where the balusters will stand.
To move on to the next stage, fastening the parts, it is necessary to determine the method: to the step, to the top or side of the bowstring (guide). Let's look at the first option:
- Drill dowel holes in the center of the crosshairs. To improve the stability of the parts, it is recommended to use a dowel of large diameter, for example 15-20 mm.
- Secure the fasteners with wood glue. It is better to give time for the glue to harden. Half an hour is enough.
- Apply adhesive solution to the dowel heads and install the balusters.
- Temporarily install a handrail. This will make it easier to align the balustrade with the center centerline.
- Wait until the glue hardens. Proceed to the next step.
- The holes in the balusters must be drilled in advance. Following the example with the lower part, we install dowels.
The final stage is installing handrails and attaching them to support posts.
Installation of handrails
The difficulty in installing handrails is that they need to be adjusted in relation to the balusters and support posts. The easiest way to cope with this task is to fix the handrail into the support post using self-tapping screws.
But the structure does not always allow this to be done without losing overall attractiveness, so the best option would be to make a sole. However, it requires verified precision, which not every master can do.
Pre-fixing the balusters helps maintain the correct geometry of the staircase railing.
When it comes to attaching handrails to balusters, there is no better way than using a railing strip. It is so simple that even an untrained youth can cope with the task. To do this, you need to fix the underrail to the balusters using self-tapping screws.
After that, install a handrail on it. For convenience, there is a groove along the entire length of the handrail. Fix with self-tapping screws.
Unfortunately, the manufacture and installation of railings for the stairs to the second floor or porch require experience, without which it is better not to start implementing the plan. You can always purchase ready-made models and, after adjusting them to size, install them in your home.
However, you don’t always want to solve problems at the expense of someone else’s mind. It is for people who, even without sufficient experience, will try and ultimately do what they intended, and this material was written.