Do-it-yourself vertical wind generator: how to assemble a wind turbine with a vertical axis of rotation
The wind has incredible energy capabilities.Failure to use its powerful potential must be boldly recognized as unreasonable waste. But you can easily build a vertical wind generator with your own hands and receive virtually free energy to cover your household needs. This is quite real, don’t you agree?
This article will help you understand in detail a complex technical issue. Systematized, accessible information covers in great detail the principle of operation of popular systems that convert the energy of air masses into electricity.
Without a doubt, you will be carried away by the idea of creating a windmill, the specifics of its assembly are described in the article. We examined in detail the different types of vertical wind generators, touching on their differences, advantages and disadvantages. The text part of the material is perfectly complemented by photos and video instructions.
The content of the article:
Advantages and principle of operation of wind turbines
A modern vertical generator is one of the options alternative energy for home. The unit is capable of converting gusts of wind into an energy resource. For correct operation, it does not require additional devices that determine the direction of the wind.

The vertical type device operates at a low height. Its maintenance does not require various devices to ensure safe high-altitude repair and maintenance work.
A minimum of moving parts makes the wind turbine more reliable and operationally stable. The optimal profile of the blades and the original shape of the rotor provide the unit with a high level of efficiency, regardless of which direction the wind is blowing at any given moment.

The generator operates absolutely silently, does not disturb owners and neighbors, does not create harmful emissions into the atmosphere and reliably serves for many years, carefully supplying energy to living quarters.
A vertical wind generator operates on the principle of magnetic levitation. As turbines rotate, impulse and lift forces are generated, as well as actual braking forces. The first two cause the blades of the unit to spin.This action activates the rotor and it creates a magnetic field that produces electricity.

The device functions completely independently and does not require the owner’s intervention in the process.
Classification of vertical generators
There are some structural differences between vertical type wind collecting devices. It does not make the units better or worse, but simply allows you to choose the most convenient option for performing specific tasks in a certain area.
#1: Features of orthogonal systems
Structurally, an orthogonal wind generator consists of a strong axis of vertical rotation and several parallel blades located at a certain distance from the central base.
The device does not require additional guiding mechanisms and works normally, regardless of wind direction. The vertically located main shaft makes it possible to place the drive equipment at ground level, which greatly facilitates operation, repair and maintenance.

The disadvantages of orthogonal devices include an overly massive blade system and low efficiency compared to the efficiency of horizontal-axis modules.
The simplest wind turbine for powering low-power consumers can be assembled from ready-made components:
#2: Generators with Daria rotor
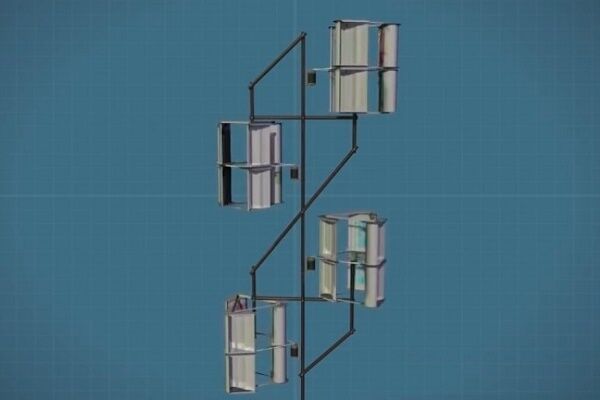
A wind generator equipped with a Darrieus rotor has a vertical axis of rotation and 2-3 flat blade strips without a characteristic aerodynamic profile, fixed at the base and at the top of the rotation axis.
The unit in its operation is not guided by the strength or direction of the wind, has a high rotation speed and allows the drive devices to be located on the ground, which facilitates and speeds up the process of scheduled maintenance and possible repairs.

The supporting and rotating components of a device with a Darrieus rotor are vulnerable to increased dynamic loads, and the efficiency of the blade system is inferior in many respects to axial horizontal installations.
#3: Units with Savonius rotor
The vertical wind turbine with a Savonius rotor has a semi-cylindrical blade system and differs from similar installations in its high starting torque and the ability to operate effectively in low-speed winds.

The vertical complex with a Savonius rotor is criticized for its increased material consumption and lower efficiency compared to horizontal-axis wind generators. That is why the production of high-power equipment of this class is considered inappropriate.
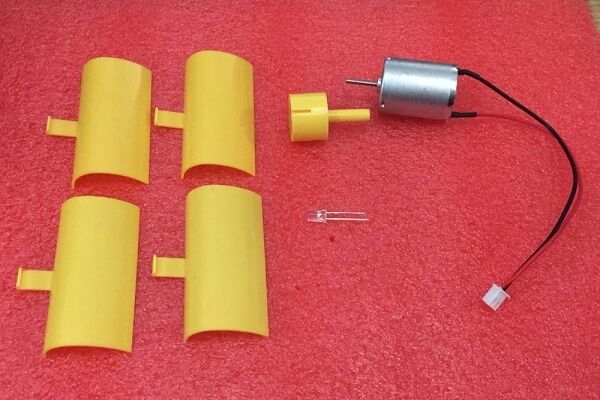
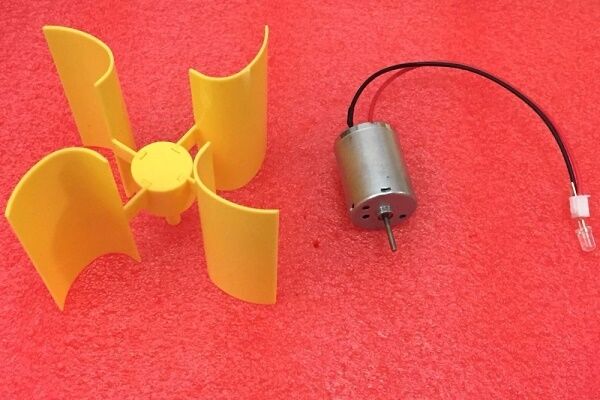
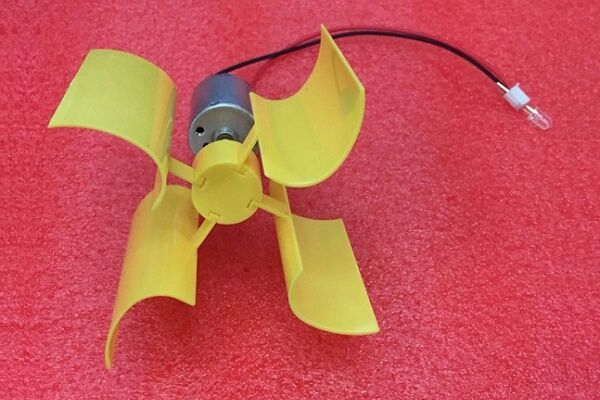
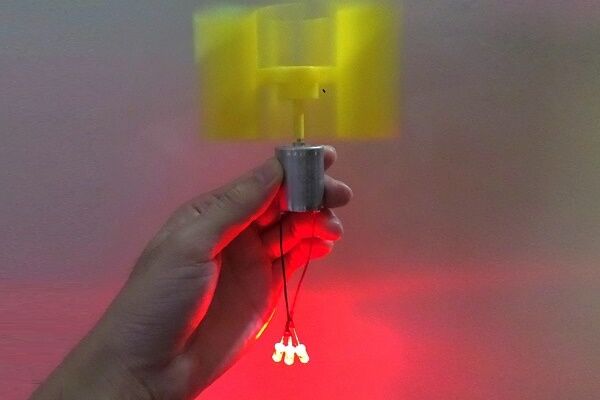
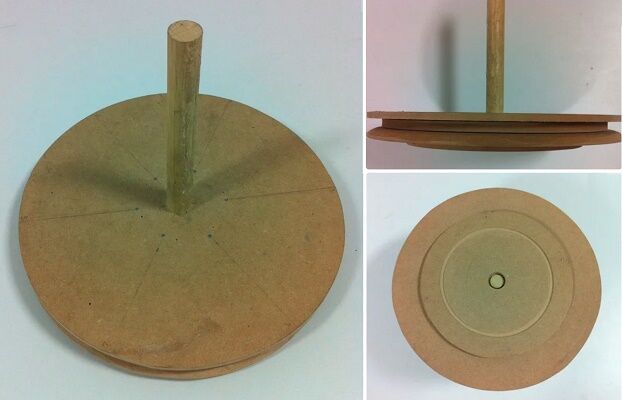
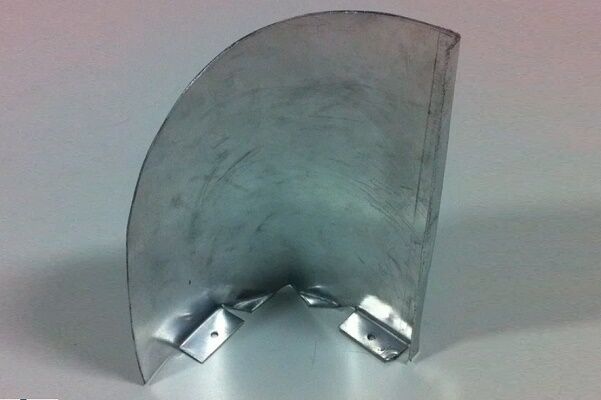
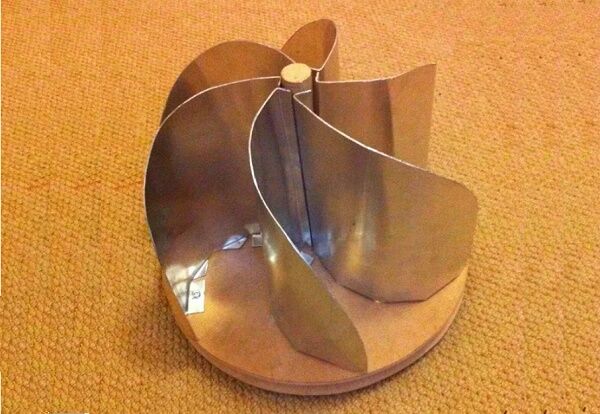
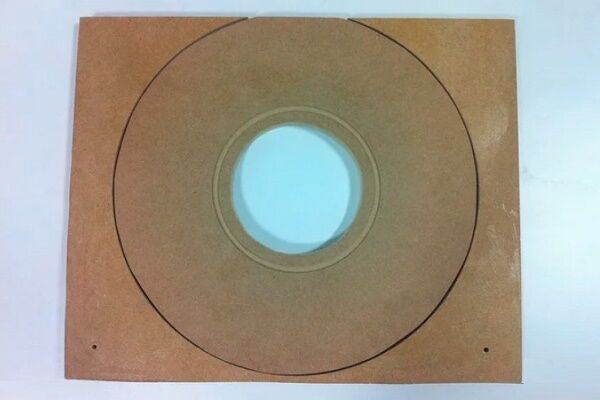
The following photo selection will introduce you to the steps of manufacturing the Savonius windmill:
All parts of this Savonius windmill model except the 3200 rpm and 24 V generator are made by hand.
#4: Windmill with multi-bladed rotor and guide
This type of device is an improved version of the classic orthogonal wind generator. The rotor complex here consists of blades arranged in two rows.
The outer blade tier remains static and acts as a guide vane. It captures the wind flow, captures it, compresses it and in this way noticeably increases the actual wind speed.
The inner row of blades is a movable structure, which receives air flow from the first rotor unit at a certain angle.

Experts call this type of device the most efficient in its class and emphasize that the specific design allows it to operate even at the lowest possible wind speeds.
#5: Characteristics of devices with a helicoid rotor
A helicoidal wind turbine or Gorlov generator is another modification of the traditional orthogonal rotor system. The model's blades are twisted in an arc. This design feature makes it possible to quickly capture the air flow and rotate smoothly without jerking.
This operating principle significantly reduces the dynamic load on the base and moving units, thereby increasing their service life.

Spun rotor blades for a helicoidal windmill are made using a very progressive, but complex technology. Because of this, the units are quite expensive and are not widely popular among private consumers.
#6: Characteristics of vertical-axis rotors
The main difference between a vertical-axis generator is its vertically positioned blades, whose profile resembles an aircraft wing, whose axis is clearly parallel to the vertical shaft. The design is somewhat reminiscent of the Darrieus rotor, but in production conditions it is manufactured much faster and easier.

Windmills with a vertical-axis rotor are reliable and durable, can easily withstand significant operating loads and do not cost too much money. These qualities make them relevant for use not only for industrial, but also for domestic purposes.
Features of choosing wind generators for a private home and an overview of the best offers are presented in this article.
Making your own windmill
It is not too difficult to create a wind generator with a vertical axis of rotation at home with your own hands. It is enough to purchase the required components, assemble them in the correct order and install the module in the chosen location. As soon as there is a minimum breeze, the product will work and begin to provide the owners with the necessary energy.
Step 1: Procurement of components and materials
To make a vertical wind generator with your own hands, you will need the following components:
- rotor – moving part of the unit:
- blades – parts that catch the wind flow;
- axial mast – for attaching the rotor and blades (can be in the form of a long pole, pyramid or tripod);
- stator – designed to accommodate a coil of durable copper wire;
- battery – capacious capacity for accumulating the received resource;
- inverter – a device for converting direct current into alternating current;
- controller – a device that brakes the generator at the moment the unit develops actual power that exceeds the basic indicators.
Light, high-quality sheet plastic with good elasticity is suitable for the manufacture of blades. Other types of materials are too susceptible to various damages and deformations and simply cannot cope with such a high dynamic load.

Small blades can be made from medium-density PVC, but large, wide parts will require the most durable material that can withstand strong winds blowing at a speed of 15 m/s or more for a long time.
Step 2: Preliminary preparation of elements
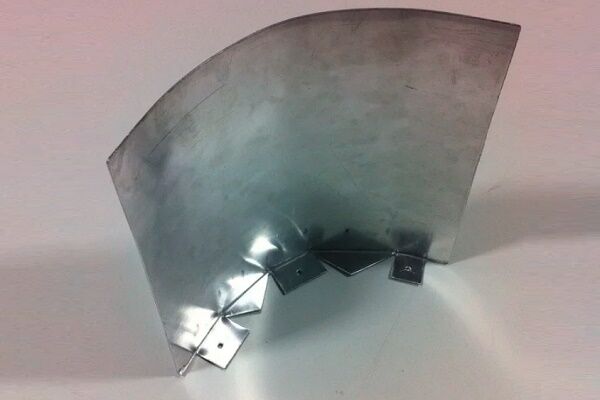
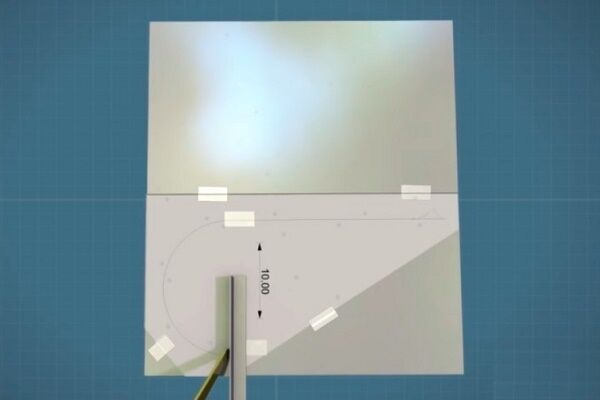
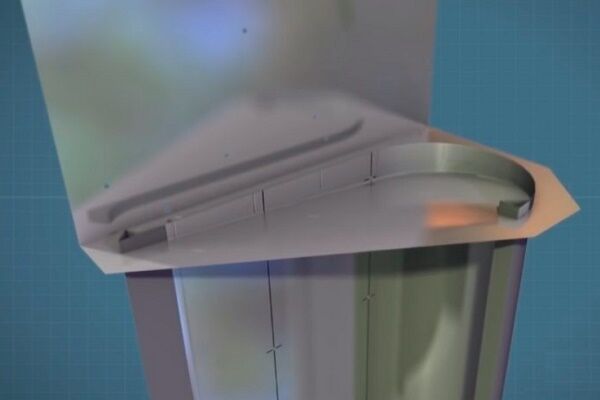
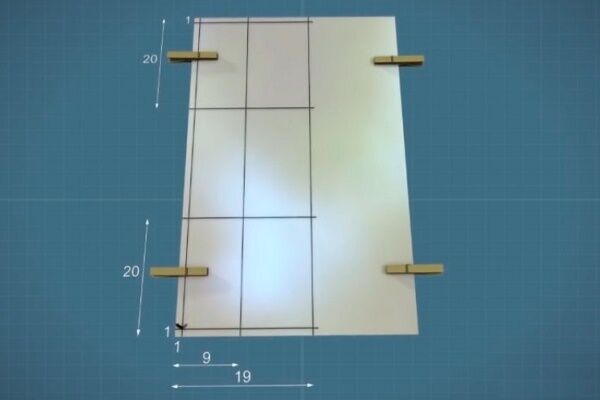
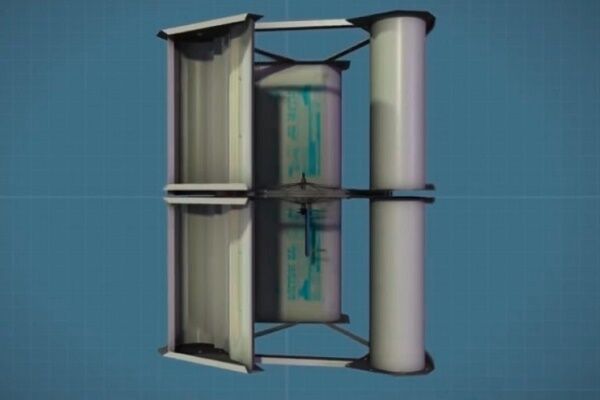
For creating blades For a vertical wind generator, 4 identical parts are cut out of high-strength PVC pipe. Two semicircular fragments are cut out of tin and attached to each side of the pipe. The radius of rotation of the blade parts in this case will be 690 mm, and the height of each blade will be about 700 mm.
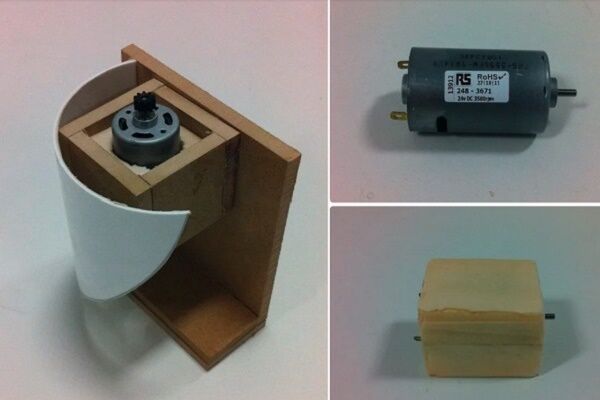
To assemble the rotor system, take neodymium magnets (6 pcs), ferrite disks with a diameter of 230 mm (2 pcs) and glue. Magnets are placed on the first disk, alternating in polarity and maintaining an angle of 60 degrees between them with an arrangement diameter of 165 mm. Using the same scheme, a second disk is made, and then the magnets are filled with glue.
For the stator, 9 coils are prepared and 60 turns of copper wire with a diameter of 1 mm are wound on each of them.
Subsequent soldering occurs in this order:
- the beginning of 1 coil with the end of 4;
- start 4 with end 7 reels.
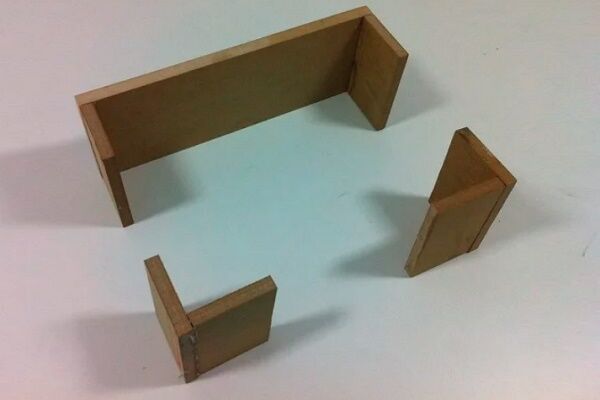
The second phase is assembled according to the same principle, but work starts with 2 coils, and the third - with 3 coils. A special shape is made from a sheet of plywood, the bottom is lined with a piece of fiberglass and phases soldered from coils are placed on top.
Fill the structure with glue and leave it for 1-2 days so that all the parts set and take the right places. Then they begin to connect the individual parts into a single working system.
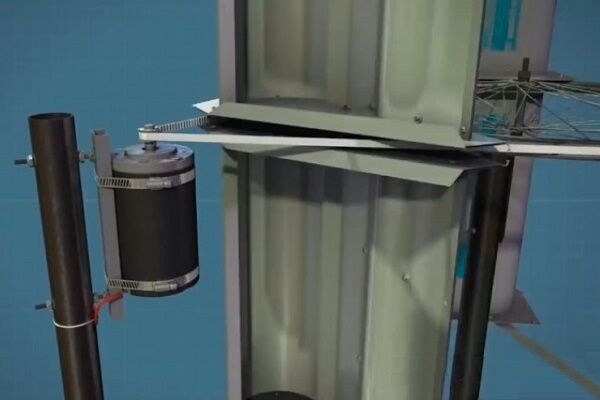
Step 3: Assembling all generator parts
To connect all elements of the generator, 4 holes for pins are made in the upper rotor. The lower rotor is placed on the bracket with the magnets facing up. Next, the stator is placed, having previously made holes in it for fastening to the bracket.
The pins are pressed into the aluminum plate and then covered with the second rotor, placing it with the magnets facing down.

The studs are rotated alternately using a wrench so that the upper rotor falls onto the lower one evenly and without jerking. When it takes its proper place, the studs are unscrewed and the aluminum plates are removed. At the end, the entire structure is fixed with nuts and tightened firmly, but not too tightly, so as not to break the thread.
Step 4: Final installation of equipment
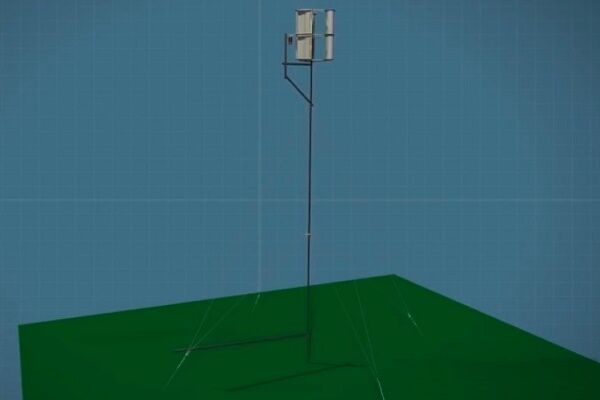
For the mast, take a strong metal pipe 4-5 meters long and screw a generator that you have already assembled with your own hands onto it.Then the frame with plastic blades is attached to the generator and the mast structure is installed on a pre-prepared site with a three-point reinforced foundation.
Additionally, the position of the system is fixed using a stretcher.

The electrical network is connected to the windmill in a certain sequence. The controller takes the resource from the generator and converts alternating current into direct current, which is necessary to charge the battery. Can assemble the controller yourself according to a simplified scheme.
The battery stores the released energy, and the inverter converts direct current into alternating current, which powers the bulk of household appliances and home service systems.
On our website there is a selection of articles about homemade wind generators of various types.
We advise you to read:
- Do-it-yourself wind generator from a washing machine: instructions for assembling a windmill
- Do-it-yourself wind generator from a car generator: wind turbine assembly technology and error analysis
- How to make a wind generator with your own hands: device, operating principle + best homemade products
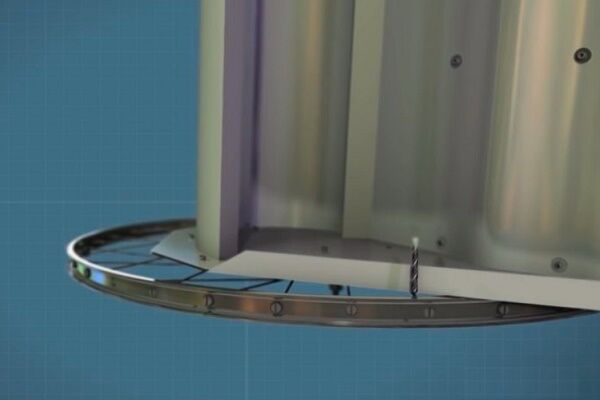
Another interesting option for constructing a vertical windmill can be assembled from waste materials, spending no more than 250 rubles on the purchase of additional components. Do-it-yourselfers will need a bicycle wheel, 12 more bicycle spokes, an axle from the rear bicycle wheel with three nuts, a steel strip, 11 aluminum plates.
You will also need 150 rivets, 18 M4 bolts with nuts, 3 M6 bolts with nuts, 27 larger washers and 24 small ones.
The following gallery will briefly demonstrate the assembly steps:
The following video instruction will present all the steps in detail:
Choosing a location for a wind generator
Choosing the right location for installing a wind generator is an important step. It is best to place the device at the highest open point and carefully ensure that it is not below the level of adjacent residential and outbuildings. Otherwise, buildings will become an obstacle to air flow and the efficiency of the unit will greatly decrease.
If the site faces a river or lake, the windmill is placed on the shore, where the winds blow especially often. Elevations on the property or large empty spaces where there are no artificial or natural barriers to air flow are ideal for locating the generator.
When residential real estate (house, cottage, apartment, etc.) is located within the city or is located outside the city, but in densely built areas, a wind energy complex is installed on the roof.
To place a generator on the roof of an apartment building, the written consent of the neighbors is taken and official permission is obtained from the relevant authorities.

In a private house with a large garden plot, choosing a suitable location is much easier. The main thing is to take into account that the structure is located at a distance of 15-25 meters from residential premises. Then the sound effects from the rotating blades will not bother anyone.
Maintenance of a vertical device
In order for a vertical wind generator to work efficiently, accurately and as efficiently as possible, all moving parts of the structure must be lubricated. This procedure is carried out at least 2 times during the entire calendar year.
At the same time, during maintenance, nuts that have become loose as a result of operation are tightened, electrical connections are strengthened, mechanical components are checked for corrosion, loose tension cables are tightened and the blades are carefully inspected for rupture or damage.

Parts are painted as needed, and once a year a complete inspection of the entire structure is carried out to identify faults. Such care ensures the correct operation of the wind turbine and extends its service life.
Assessment of the feasibility of installation
Before starting to manufacture a vertical wind generator, they study the weather situation in their region and try to determine whether the unit can provide the required amount of resource.
Experts recommend evaluating the following parameters:
- number of windy days — take the average value for the year when the gust exceeds 3 m/s;
- volume of electricity, consumed per day by a household;
- appropriate place on its own site for wind equipment.
The first indicator is learned from data obtained at the nearest weather station or found on the Internet on the relevant portals. Additionally, they check with printed geographical publications and create a complete picture of the wind situation in their region.
Statistics are taken not for one year, but for 15-20 years, only then the average figures will be as correct as possible and will show whether the generator will be able to fully satisfy the household’s need for electricity or whether its power will only be enough to power individual household needs.
If the owner has a large plot of land located on a slope, near a river bank or in open space, there will be no problems with installation.
When the house is located in the depths of a populated area, and the yard has compact dimensions and is closely adjacent to neighboring buildings, it will not be easy to install a vertical model of a windmill with your own hands. The structure will have to be raised 3-5 m above the ground and further strengthened so that it does not fall in the event of a strong gust.
All this information needs to be taken into account at the planning stage to make it clear whether the wind generator can take over the full energy supply or its role will remain as an auxiliary energy source. It is advisable to carry out wind turbine calculation.
Conclusions and useful video on the topic
Video No. 1 will demonstrate how to make a vertical wind generator with a Daria rotor system with your own hands at home. The video clearly presents the features and interesting nuances of the assembly process. There is a definition of the maximum power of the manufactured unit:
Video No. 2 will show how a vertical wind generator works and how much energy it produces. It provides a detailed overview of the module and a description of the work required to correctly measure actual power and other parameters:
Video No. 3 presents testing of a homemade vertical wind generator. What a device made with your own hands from scrap materials is capable of:
Such a modern and practical source of alternative energy as vertical windmills is easy to assemble with your own hands. With the proper experience in housekeeping, it is possible to manufacture each part, and then connect all the components into a single, integral structure.
If you don’t want to complicate the task, it is quite appropriate to purchase ready-made components and, at home, without haste or fuss, install a reliable wind turbine capable of ensuring uninterrupted supply of electricity to a living space.
When you are not 100% confident in your abilities, it is better to entrust the work to professionals. They will do everything very quickly and in full compliance with basic operational requirements.
Do you have experience in constructing and operating a wind generator? Please share information with our readers and suggest your method of assembling the unit. You can leave comments and add photos of homemade products in the form below.


Some advanced households have long been using the power of wind to provide their household with the necessary energy. To get rid of utility bills, and more out of curiosity, I assembled a windmill with my own hands. I needed a rotor, plastic blades, a mast (it's on a tripod), a battery and a controller. During the rotation of turbines and blades, two forces are generated: lift and electric. The blades spin, the rotor is activated and electricity is generated.
Well, what are the results? Is there even an exhaust from it? I myself have long had a desire to try to assemble a wind generator at my dacha. Of course, I don’t rely on it as the main source of energy. For now I view it more as pampering and an interesting experience, but what the hell is it? Another thing is that I have not yet progressed much further than the idea. I’m gradually collecting parts - I’ve already found normal blades and know where to get a long mast. This summer, of course, I won’t have time, but next year I’ll try to get more involved with the windmill right from the spring.
Well what can I say? Vertical wind generators are not a promising direction in the future. Yes, such a design is easier to assemble, but such wind generators are practically not used on an industrial scale. Why? Here are a few main points:
— The entire surface of the blades is not used (1/3 is used by the wind, 1/3 provides resistance, 1/3 is not used);
- you will need a long shaft to transmit torque;
— Low output power.
But for a start, such designs are quite suitable to at least start with something.At the same time, vertical wind generators have their advantages:
— There is no need to “catch the wind” (strong winds are not scary and there is no need for collectors);
— Cost of project implementation;
— Ease of maintenance.
But in the future, it is better to focus on the classic design of wind generators.
The description of the generator's manufacture incorrectly states the ratio of magnets to coils! For 9 coils you need 12 pairs of magnets (24 pcs.). Maybe that’s why the result in the video is deplorable.
Is it even necessary to fence a vegetable garden with coils?
What’s stopping you from just putting an automatic generator on your butt and attaching blades to it?