Do-it-yourself electric heat gun: pros and cons of homemade products + assembly guide
The scope of application of thermal electric guns is quite wide.Industrial units are used to heat production, warehouse and even residential premises. And in small areas, you can get by with a homemade heat generator design, which is quite capable of heating a garage or country house.
If you make an electric heat gun with your own hands, it will cost literally pennies. However, in making useful homemade products you must follow the rules. Only in this case will the device serve no worse than the factory product.
We will tell you how to properly make an electric gun. From the article we have proposed, you will learn what materials and components will be required to assemble the unit. Our advice will help in the manufacture of efficient and economical equipment.
The content of the article:
What you need to know about the electric gun?
Unlike other types of heat guns, an electrical device can be made by almost any home craftsman familiar with the basics of electronics.
Although the efficiency of an electric gun is much lower than diesel or gas devices, but it does not emit combustion products harmful to health and can be installed in any room - a residential building, greenhouse, outbuildings.
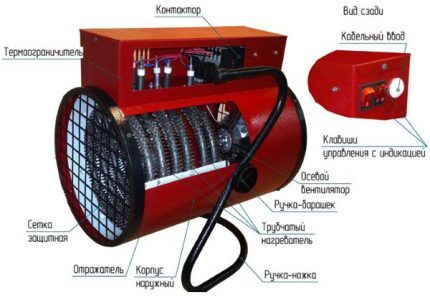
Let's look at how an electric unit works.
Design and principle of operation of the heat generator
Any electric gun consists of three main components: a housing, an electric motor with a fan and a heating element. The varieties of this type of devices are described in detail in the article, dedicated to the classification and principles of operation of heat guns.
Additionally, the device can be equipped with any “bonuses” from the factory units - speed switch, heat regulator, room thermostat, housing heating sensor, engine protection and other elements, but they increase not only comfort and safety during operation, but also the cost of the homemade product.
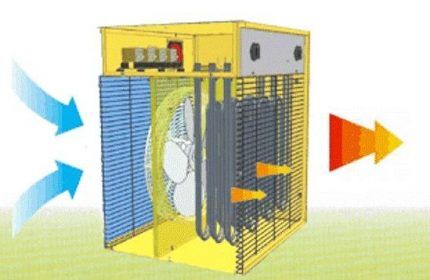
An electric gun works like this:
- when connected to the network, the heating element converts electric current into thermal energy, due to which it heats itself;
- the electric motor drives the impeller blades;
- the fan forces air from the room inside the case;
- the cold air flow comes into contact with the surface of the heating element, heats up and, forced by the fan, is removed from the “barrel” of the gun.
If the appliance is equipped with a thermostatic element, it will stop the heater when the programmed temperature is reached. In primitive devices you will have to control the heating yourself.
Advantages and disadvantages of homemade guns
The main advantage of a thermal electric generator is the ability to use it in any room where there is a network of at least 220 W.
Such devices, even in homemade versions, are mobile, weigh little and are quite capable of warming up an area of up to 50 m2 (theoretically, more is possible, but it’s better not to experiment with high-power devices and buy a ready-made unit, and a gun from 5 kW will already require connection to a three-phase network).
Pros of a homemade electric gun:
- Saving money – factory units are not cheap, and a heating device can be assembled with a minimum of purchased parts or even entirely from improvised means, removing the missing elements from old devices.
- Safety – of all the homemade heat generators, the electric device is the easiest to operate, since it does not require a connection to gas or refueling with flammable fuel. With proper assembly of the electrical circuit, the risk of spontaneous combustion for such guns is minimal.
- Fast room heating – the operation of a heat gun is much more efficient than other options for homemade electric heaters, for example, fireplaces or oil radiators.
One of the disadvantages is the high energy consumption (the amount depends on the power of the engine and heating element). In addition, the operation of the fan is quite noisy, and the larger the wingspan and rotation speed, the stronger the noise produced will be.
Well, any drawback of a homemade electrical device is the likelihood of an error during assembly or connection, which can cause a short circuit in the network, electric shock and spontaneous combustion of the device.
Electric gun manufacturing options
The most difficult stage when assembling a device is to draw up the correct electrical circuit diagram for connecting the device to the network.Therefore, we suggest using a ready-made example, taking it as the basis for a future heat gun. As can be seen in the diagram, the toggle switch and thermostats must be connected in series, and the circuit must be closed on the heating element and the electric motor with the fan.
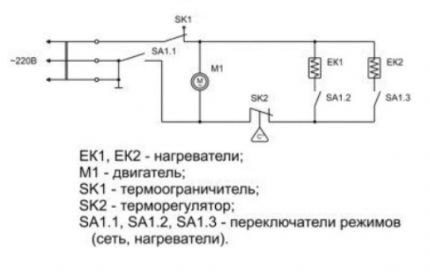
Let's look at the manufacturing features of two simple options.
A simple fan heater with a ready-made heating element
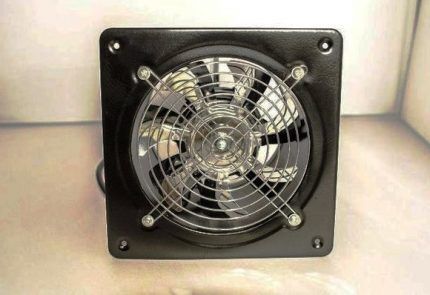
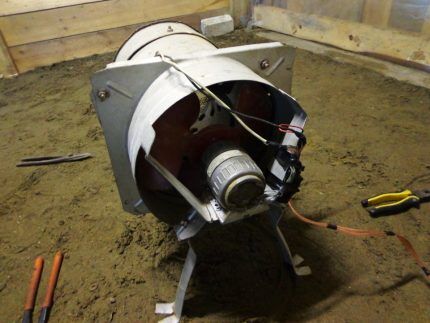
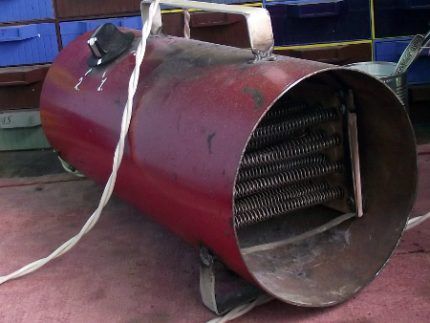
For the body of the future gun, you can select a piece of metal or asbestos-cement pipe of a suitable diameter. It is best to adjust the size according to the span of the fan “wings”, because it should overlap one of the ends of the device.
If desired, the heat generator can be made from a small metal tank, a galvanized bucket, an old saucepan or a waste gas cylinder, the main thing is that the walls of the “casing” are not thin.
As for the heating element, you can remove this element from a used tile or boiler, or purchase it in a store - now it’s not a problem to find a heater of any shape. If you buy ready-made, the best option would be a finned part, specifically designed to quickly warm up the moving air flow.

In addition to the three main elements (housing, motor and heating element), for work you will need a three-core cable, bolts, safety devices And residual current devices (RCD), disconnecting the network in a dangerous situation.
Step-by-step work plan:
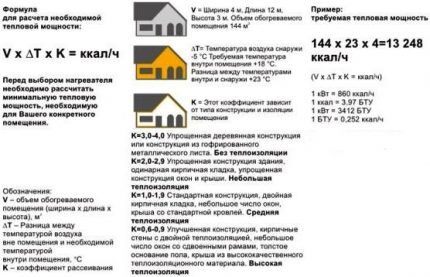
- Determining the required power for a future electric gun. As a starting point, you can take the common formula, according to which at 10 m2 1 kW is required (with a ceiling height of 2.5-3 m). And if the room is not insulated, is located in the basement or has a large glass area, feel free to add another 20-30% to the data obtained. But if the required power exceeds 2.5-3 kW, think about whether your wiring can withstand such a load.
- Case manufacturing. If it is a metal sheet, it needs to be bent and fixed in shape by welding, hoops or rivets. For a bucket, cylinder or pan, saw off the bottom and lid. In short, the result should be a cylindrical or rectangular frame with two open holes at the ends.
- Checking the resistance of the heating element and comparing it with the calculated one. If necessary, you can add 1-2 more elements by connecting them in series, or increase the power by shortening the element.
- Mounting the electric motor with fan (you can use standard fasteners). The impeller should close the gap as tightly as possible, but at the same time rotate freely. The wires are connected to the network through a 6A fuse and are equipped with a switch.
- Securing the heating element inside the pipe (approximately in the center) using rivets or plates made of refractory materials. The distance should be far enough away from the fan so as not to overheat the electric motor. The wires are led out of the housing and are also connected to the network, but through a 25A fuse.
After checking the insulation of all connections, you can test run the device. If everything is assembled correctly, when you plug the plug into the socket, a fan will begin to rotate at one end of the gun, and warm air will come out of the other, gradually increasing in temperature.
Device with nichrome heater
If you don’t have an old household appliance in your home craftsman’s arsenal from which you can remove the heating element, but for some reason you don’t want to buy a ready-made heater, you can make it yourself from a nichrome spiral.
In addition to low cost, such an element has an important advantage over factory-made copies - the ability to independently adjust the desired size to the body format and increase the heating rate to a safe maximum.
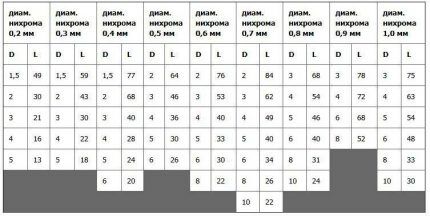
For homemade products, you will need to buy nichrome wire with a suitable diameter and resistance parameter. And this depends on the planned power of your device (for household devices and a 220 V network, it is advisable not to exceed 5 kW).
For example, for a gun up to 2 kW you will need wire with a resistance of 27-30 ohm, which must be wound on a ceramic rod or other heat-resistant material (in extreme cases, you can break off a plate of refractory brick).
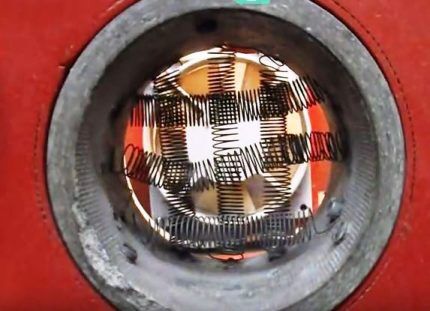
Another option is to make a homemade heating element from a small piece of asbestos-cement pipe, placing a coiled spiral of the same nichrome wire inside. The coils can be arranged horizontally and vertically to cover a larger area.
The assembly of the structure is carried out by analogy with the instructions described above, so we will not repeat the same points, but will only consider the nuances of connecting a homemade heating element:
- To keep the spiral in the correct shape, make special notches on the rod for each turn. The wire must be wound tightly enough, but always in one layer.
- The ends of the wire must be connected to electrical wires using bolted connections and insulated.
- The wires brought out through the holes drilled in the housing must be connected to the network through a 25A fuse.
A significant drawback of such a homemade product, in addition to energy consumption and other disadvantages of electric guns, is the unpleasant burnt smell that arises from the combustion of dust on an open coil.
Many people recommend installing a grate at the ends - such a barrier, of course, will not cope with small debris, but will protect against accidental contact with the heating element or operating impeller.
Some important tips for assembly and operation
The rules for the safe operation of a homemade gun are practically no different from the operation of other electrical appliances: you must avoid tipping the device and getting moisture inside it, do not touch the heated body and do not leave the unit working unattended.
One of the important features is that before turning it off, you must first stop the operation of the heating element, let the fan run idle for a few minutes, and only then pull the plug from the power supply.
Tips for assembling homemade products:
- The body for any type of electric gun is best made of metal with a wall thickness of at least 1 mm or asbestos cement. Although you can buy a thermoplastic container of suitable size, such a “casing” can emit unpleasant odors when heated, and will require strict control over the temperature of the coil.
- The annoying noise from the operation of the impeller can be reduced if relatively quiet car fans are used for the design.
- To prevent the hot surface of the housing from causing a fire, it can be installed on a frame made of reinforcement, an asbestos-cement stand, or a heat-absorbing coating can be applied.
- The power supply to the fan and heating element is always carried out separately.
- Monitor the quality of the insulation of all wires protruding beyond the gun body.
Grounding the metal body of the device will help prevent accidental electric shock.
And the last piece of advice - if your knowledge of electrics is at the level of an amateur beginner, then before connecting your homemade device to the network, consult with a specialist who will evaluate the performance and safety of your creation with a professional eye.
He will introduce you to the criteria for choosing a factory-made electric fan heater. next article. If you doubt your own abilities or you don’t have time to assemble a homemade product, read the material we recommend.
Conclusions and useful video on the topic
To better imagine the process of assembling the entire structure, as well as possible options for the housing and heating elements, we suggest studying a selection of videos with finished works of home craftsmen.
Video #1. How to make a heat generator for heating a garage from heating elements from an electric stove:
Video #2. Electric gun made of asbestos cement pipe and nichrome spiral:
Video #3. 2 kW heat gun from an old fire extinguisher:
As you can see, making an electric gun with your own hands is really not difficult. But if you are not confident in your skills in working with the electrical part, it is better to consult an experienced electrician or buy a ready-made device.
If you have recommendations or have any questions while reading the material, leave posts in the block below. Please comment on the material we present and post photos on the topic. Perhaps your advice will be useful to site visitors.


It’s a useful thing, and it’s quite possible to assemble it yourself. There is nothing complicated in this, I think, the main thing is to do everything wisely and safely. The same one was assembled at work, since the room is large and poorly heated.All missing materials and parts are sold in stores. If you put everything together according to the rules, then it will heat very efficiently, cheaply and cheerfully.
I assembled such a gun, approximately according to the same scheme as described here. I already carried out interior finishing work in the fall. The thing is, of course, necessary and necessary. But here’s my opinion: you shouldn’t assemble such things yourself; for example, I didn’t succeed. It warmed so much that it was impossible to find anyone in its area of action. The electricity was so bad that it would have been better not to have turned it on. To the above comment from my personal experience - why invent a wheel? This equipment is on sale, and, as for me, it is better to buy high-quality equipment than to assemble it yourself and suffer, and even overpay (this was the case in my case).
Hello, Alexey. I partially agree with you. If you plan to constantly use a heat gun, then it is better to purchase factory equipment. But many people may only need a heat gun once or twice, in which case the assembly recommendations are quite relevant.
As for the excessive heat in your homemade heat gun, in this case it can be controlled using the fan speed. There is a more radical solution - replacing the spiral with another one with a lower power rating.
I can share my self-assembly. There is nothing complicated, I collected it from improvised means without spending a penny.
I looked through many forums on this topic - the MOST important information is missing - when the spiral burns out, it breaks, and the remainder of the spiral falls onto the body. ALL suggested options DO NOT take this fact into account.This is a DEFINITE electric shock/fire/etc., etc.
Dear people, buy a NORMAL mass-produced device in the store!
Take care of your life and the lives of others!