How to repair the “Rucheek” pump yourself: eliminating popular breakdowns
Summer residents have been using the inexpensive “Rucheek” submersible pump for more than half a century.Due to active use, a structurally simple device sometimes turns out to be faulty or performs unsatisfactorily. In some cases, it is impossible to do without the participation of repair specialists, and more often you can repair the Rucheek pump yourself.
To do this, you need to understand the structure and operating principle of the pump, be patient and have the necessary set of tools. The recommendations presented in the article, illustrations and video tutorials will provide effective assistance.
The content of the article:
Characteristics and scope of application
The electric pump “Rucheyok”, produced by the Russian company OJSC “Livgidromash”, belongs to the class of household vibration devices. It is intended for supplying water from wells and water wellshaving an internal diameter of at least 10 cm. Can be used for work in open reservoirs, where it is capable of transporting water from a depth ranging from 1 to 40 m.
The maximum distance over which the pump can transport water horizontally is 100 m. That is. the water intake point can be significantly removed from the consumer. The temperature of the pumped water is no more than +35ºС.“Rucheek” should not operate in an aggressive environment or in water containing more than 0.001% contaminants.

Technical characteristics of the vibration pump “Rucheek”:
- supply voltage - 220V;
- power - 3.4 W;
- maximum immersion depth - 3 m (for a low-yield well, the immersion depth can be increased to 5 m);
- operating pressure range - from 4 to 60 m;
- dimensions - 250x99 mm, weight - approximately 3.5 kg (depending on modification).
The pump is equipped with a power cord from 10 to 40 m and a nylon cable for hanging the unit when installation in a well or a well.

Of course, such a small pump cannot provide water supply for the entire country house with a large number of water consumers.
"Rucheek" successfully serves to perform such tasks as:
- Water supply for a small country house with 1-2 water consumption points.
- Water supply for baths, watering the garden.
- Temporary replacement of the main pump in case of breakdown.
- In slowly filling water sources with low flow rates;
- First or periodic well cleaning;
- Filling the heating system.
The performance of the pump directly depends on the depth of the water source: the deeper it is, the higher the performance of the unit.

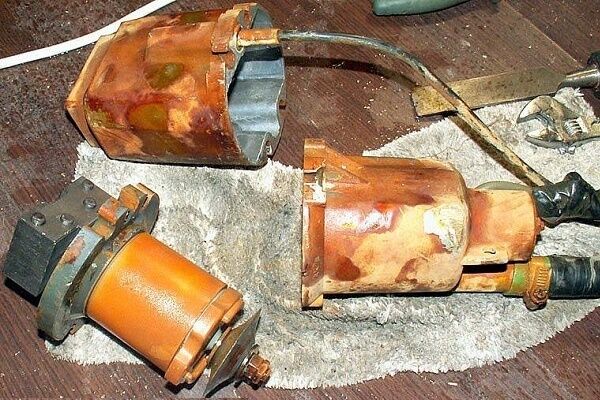
Design and principle of operation
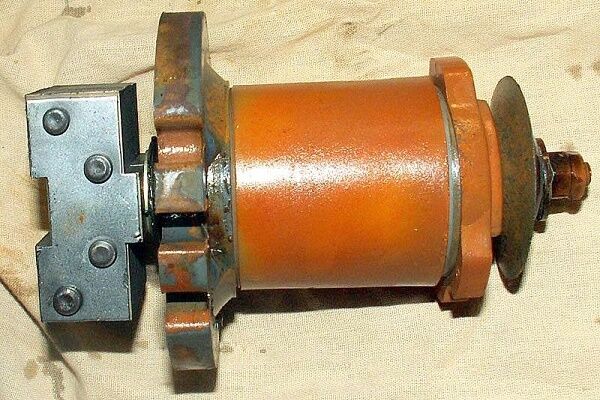
Submersible pump "Rucheek" consists of the following parts: electric drive, vibrator and housing, which are connected to each other using four screws. The electric drive of the unit includes a core with two coils and a power cord.
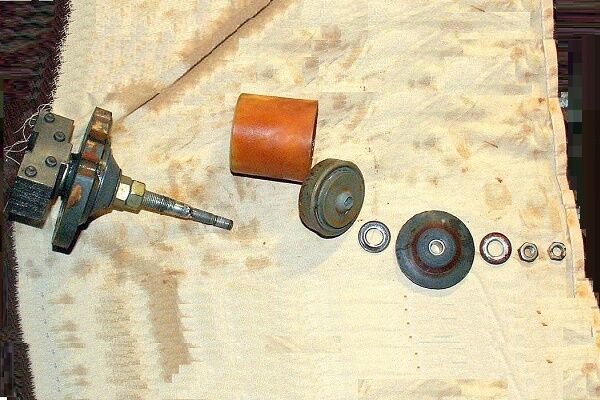
The vibrator consists of a shock absorber, diaphragm, stop, coupling and rod. An anchor is pressed into the bottom of the rod, and a piston is attached to it at the top.
The pump body is a casing, in the upper section of which there is a glass with holes for water inlet and a pipe for water outlet. The existing valve serves to open/close the inlet openings.
The pump pumps water due to the vibrations of the piston and armature. They are driven by an elastic shock absorber, which converts the alternating current received from the network into uniform mechanical vibration.
The rod transmits movement to the piston, which, when vibrating, creates a mini-hydraulic shock in the glass with holes. The valve closes at this moment, and the water is pushed out into the outlet pipe.

Due to the fact that water is taken from the top of the unit, the system is cooled and does not heat up during operation.
Another advantage of the water intake pipe located at the top is that sludge from the bottom is not sucked in by the working element. As a result, the unit is much less likely to become clogged with a turbid suspension, due to which the pump must be periodically disassembled and cleaned.

Setting up the “Rucheek” submersible pump
The Rucheek pump is considered reliable equipment. With proper use and timely maintenance, it rarely breaks down. In some cases, problems can be resolved by adjusting the pump.

To do this, first of all, a non-working or unstable pump must be removed from the well (well) and hang it without a hose in a container of water. Next, you need to plug in the device and check the voltage, it should be at least 200V.
If the voltage in the network is normal, then turn off the pump, drain the water from it and blow out the outlet. Blowing can be done by mouth, without using any special tools.
A properly configured “Rucheek” pump can be blown through without any problems, and if you blow harder, you can feel the piston moving inside. The air must also flow in the opposite direction. If this does not happen, then it is necessary to adjust two parameters of the unit after disassembling it.
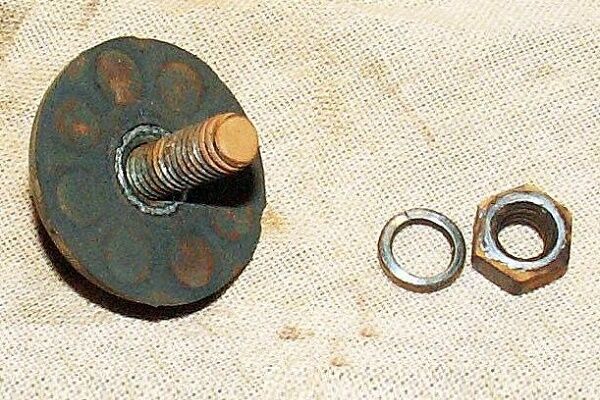
Disassembly of the household pump “Rucheyok” is carried out using a vice, which compresses the ledges on the body located next to the screws. The screws must be loosened gradually, one at a time. During the first disassembly, it would be a good idea to replace the screws with similar screws with a convenient hexagon head; this will greatly facilitate assembly and disassembly during the next repair.

From the principle of operation of the “Rucheek” pump described above, it follows that the two parameters are adjusted in the following order:
- Setting the piston position. It must be parallel to the rest of the unit. Parallelism control is carried out using a caliper. Distortion of the piston body can occur due to the gap between its metal sleeve and the rod. To eliminate it, you need to wrap the rod with foil until it is completely parallel.
- Checking the coincidence of the axes of the rod and piston. When they are displaced, the inlet glass usually “fidgets” along the gasket. To eliminate it, it is necessary to disassemble and reassemble the assembly, temporarily securing the glass to the gasket with pieces of tape during assembly.
- Setting the distance between the piston and the seat. It should be approximately 0.5 mm. Adjustment is made by changing the number of 0.5 mm thick washers placed on the rod. This indentation is necessary so that when blowing air, and subsequently water, it passes into the outlet pipe without obstacles, and when the pressure increases, the outlet hole is blocked by the piston.
As the number of washers increases, the piston moves closer to the seat, so no air will pass through when blowing through the mouth. Only during suction in both options should air circulate freely.
It happens that the piston rod is bent. It's unlikely to be fixed. However, if this does not affect the operation of the unit, you can slightly correct the position by turning the gasket relative to the rod by 180º.
A correctly configured and assembled vibration pump without a hose, when immersed in a container of water, should produce a pressure of 0.2-0.3 m and operate uninterruptedly at a normal voltage of 220V plus/minus 10V. If, after setting up, the equipment does not work or does not work satisfactorily, then it is necessary to determine the cause of the failure and eliminate it.

Typical faults and solutions
If you follow the operating rules recommended by the manufacturer, the Rucheek pump rarely breaks down. Most malfunctions are associated with violation of equipment operation rules; they occur after 3-4 years of operation without the necessary maintenance.
In order to prevent clogging of the engine and the intake pipe of the vibration generator, you need to scrupulously monitor the condition of the water source and promptly remove silt and sand deposits from the walls and bottom. Required pump a new well before putting into operation.
Please note: if your pump is under warranty or service, then you cannot open the housing and perform repair work yourself! In this case, you must contact the service center or equipment dealer.
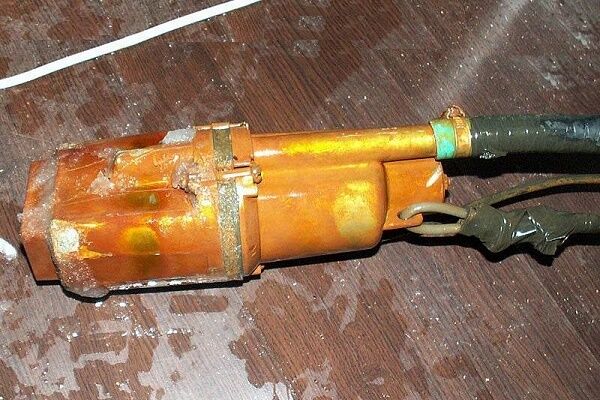
The following photo selection will help those wishing to restore the device’s functionality with their own hands:
Let's look at the most common breakdowns of the household pump "Rucheyok" that are not related to manufacturing defects and occur during operation.
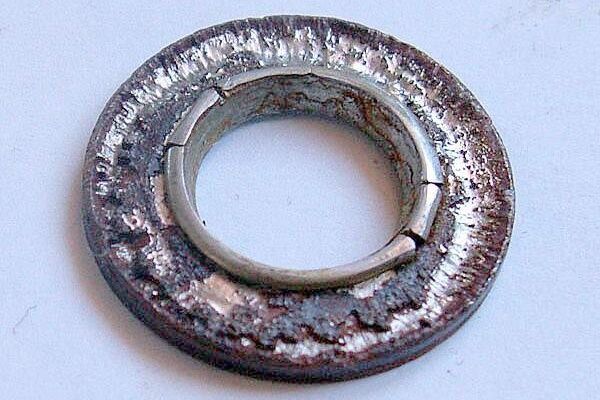
#1: Replacing a Worn and Broken Valve
Small stones and other foreign bodies often enter when using a pump to pump drainage water from a basement, clean a well, etc. To avoid this, it is necessary to install an additional fine-mesh filter, which is pulled over the water intake part of the pump, where water is sucked in.
If a foreign body gets inside the mechanism, then most likely it will pass through the built-in filter and get stuck at the valve, becauseThe valve is made of waterproof rubber; after a while it will collapse.
A sign of valve failure or excessive wear is a significant and increasing decrease in performance. The hum of the pump when the valve is damaged, as a rule, remains normal.
Repairing the pump in this case is not difficult; it is enough to replace the rubber valve after disassembling the pump. Some users claim that instead of a faulty valve, you can use a stopper from a medical bottle.
This is not recommended, because... This design will not last long; it is best to use a special repair kit for the vibration pump.

#2: Peeling of the electromagnet filling
Electromagnet separation occurs when a running pump comes into contact with the walls of a well, well or water tank. Such blows will be synchronous, and their number exceeds 100 beats per minute.
The body of the unit cannot withstand such a load and begins to heat up, which leads to detachment of the filling from the electromagnet (core). The same thing happens if the pump runs dry without water for more than 5 seconds.
A sign of detachment of the magnetic part is overheating of the pump and excessively intense vibration. To resolve this problem, you must do the following:
- Turn off the pump and raise it to the surface.
- Disassemble, separating the electrical part and remove the electromagnet with coils. To do this, use a grinder to cut shallow 1-2 mm grooves around the magnet
- Cut several similar grooves on the inside of the body.
- Lubricate the element first with glue, then with sealant, which is used for auto glass.
- Mount the electromagnetic part into the housing and wait until it hardens completely.
Reassembly of the pump may only begin after the adhesive has completely cured.
#3: Preventing case depressurization
Depressurization of the housing leads to noticeable interruptions in the water supply. To prevent this, it is necessary to select the correct dimensions pump for a specific well or a well. The unit should not come into contact with the walls during operation.
Diagnosis of problems based on “symptoms”
Do not allow the pump to run dry! To prevent such situations, the system is supplemented with an automation unit or a dry running sensor.
It is also necessary to regularly carry out preventive inspections of the well; if friction occurs on the walls, you must immediately raise the pump to the surface and eliminate the cause of friction by moving the pump.

Reason #1: The pump hums and does not pump
This is the most common complaint from owners of Rucheek pumps: the unit hums, but does not pump water and the housing does not heat up. There may be several reasons for the malfunction:
- Loose piston fasteners. This occurs due to vibration and is, in principle, inevitable after 2-3 years of operation. Using additional washers will help extend the life of the fastener. Repair in this case consists of screwing in the piston nut or replacing it.
- Valve damage. To fix the problem, you need to disassemble the pump and inspect the valve. It can be deformed or ruptured by small gravel or grains of sand that enter the pump. In this case, replacing the rubber valve with a new one will also help, but this replacement will have to be done regularly once every 1-2 years, depending on the intensity of the pump.
- Rubber piston wear. This can be determined by a decrease in the volume of pumped water, accompanied by an increased hum of the pump. It is treated by replacing the damaged flexible part.
- Poor shock absorber mounting. With this breakdown, the shock absorber does not perform its function, the rod dangles and the armature knocks on the electromagnet. Repair - tightening and/or replacing shock absorber nuts.
- Broken or damaged rod. Occurs due to intense mechanical influences. This is the most difficult case of failure. Repair consists of complete replacement of a non-functioning part. In this case, it would be advisable to consider purchasing a new household pump.
If you find that your “Rucheek” is humming, but does not pump water, you must immediately disconnect it from the power supply, raise it to the surface and look for the cause of the malfunction. In this case, you cannot leave the pump running!

Reason #2: The pump gets hot and makes a loud noise
This malfunction is most often associated with the fact that the equipment was operated without being immersed in water. A trickle like any other vibration pump, has a design in which the cooling of all its elements occurs due to the liquid pumped by it.
When the water level drops or is absent, the unit stops cooling and overheats. Most often, under such conditions, the electromagnetic part fails: the winding of the electromagnet burns out and it completely loses its properties, which means it does not provide vibration.
Repairing an electromagnet yourself is difficult, but possible. For repairs you will need the following tools and materials:
- copper wire for winding with a diameter of 65 microns;
- PVC tube with a diameter of 4 mm;
- fast-curing epoxy resin;
- soldering iron and hotplate;
- winding machine;
- hammer, flat screwdriver;
- protective equipment: welder's mask and gloves.
Repair work involving the use of a soldering iron and epoxy resin is best carried out outdoors. Do not inhale tar vapors under any circumstances, they are toxic and have an extremely negative effect on the lungs! The work must be done with gloves, avoiding contact of the substance with the skin.
When repairing the electromagnetic part of the pump, it is useful to have an assistant who can hold the pump in his hands while removing the electromagnet from the coils.

Step-by-step instructions for repairing the electromagnet of the “Rucheek” submersible pump:
- We disassemble the pump and remove the electromagnet with coils by heating the housing with an electric stove. The epoxy resin surrounding the electromagnet will become soft under the influence of temperature and the element can be easily removed by gently tapping the unit on a wooden block.
- While the epoxy resin has not hardened, it is necessary to clean the inside of the pump from its remains.
- Remove the electromagnet from the coils using a wooden block and a hammer. An assistant should hold the electromagnet in his hands, and you point the block at the electromagnet and carefully knock it out by striking the block with a hammer. Why is it necessary to keep the element? This will prevent the coils from splitting, because Impact force can be better controlled.
- We unwind the burnt windings of the coils and clean the remaining parts of the remaining epoxy substance.
- Using a winder, wind the spool to make 8-10 layers and secure the last layer with cotton tape. Place a PVC tube at the beginning of the winding, and secure the coil frames to the electromagnet core.
- Clean the ends of the windings located outside and solder them with a soldering iron to obtain the required connection. Bite off excess winding.
- Route the cable into the pump housing through the seal to the place where the electromagnet will be installed. Cut the end of the cable into separate wires and strip their ends.
- Twist the ends of the cable with the beginning of the electromagnet windings and coils and solder. Lower the solenoid and coils into place while removing any excess cable. To securely seat the electromagnet, use a hammer, making gentle, targeted blows through a wooden block.
- We clamp the unit body in a vice and level it using a building level. Mix the epoxy resin and pour it around the coil to the top edge of the electromagnet. We wait 10-15 minutes for the epoxy to fill all the voids.
The resin requires at least 24 hours to harden. After this time, assemble the pump and test its operation by immersing it in a container of water.
Please note that repairing an electromagnet is a labor-intensive process.In most cases, it is more advisable to purchase a new “Rucheek” pump, but if you have the time and desire, you can try to make the repair yourself according to the step-by-step instructions.

Reason #3: The pump runs silently
The “trickle” is not a pump that operates silently in good condition, so the absence of a measured hum should alert you no less than excessive noise.
When the noise level is reduced, there is always a noticeable reduction supply water pressure. The reason for this malfunction is that the voltage in the electrical network has dropped below the minimum permissible limit, i.e. below 180V. When the voltage decreases by 10%, the pump performance decreases by 50%.
In this case, the pump must be disconnected from the power supply and measures must be taken to establish a normal voltage, for example, use a special stabilizer.
If the voltage in the electrical network is too high, the “Rucheek” pump does not turn on, because protection is triggered.
Prevention of pump unit breakdowns
By following the operating rules recommended by the manufacturers, you will reduce the risk of pumping equipment breakdown to a minimum, and it will serve you for many years.
Basic operating rules:
- Do not allow the pump to operate without water.
- Do not use the pump if there is unstable voltage in the electrical network.
- Do not operate the pump with a damaged power cord or housing.
- Do not move the unit by the power cord.
- Do not pinch the hose to increase pressure.
- Do not pump water containing dirt, impurities, or debris.
When installing the pump in a well, it is necessary to put a protective rubber ring on it, which will protect the equipment from hitting the walls.
The unit can only be turned on/off using a plug or a two-pole switch embedded in the fixed wiring system.

During the operation of the “Rucheyek” vibration pump, it is necessary to carry out timely preventive inspections and monitor the quality of the pumped water. If the water coming in is dirty, then the pump must be turned off and its position relative to the bottom checked.
Conclusions and useful video on the topic
Video #1. Repair of the “Sverchok” pump - a complete analogue of the “Rucheyok”:
Video #2. Visual demonstration of vibration pump repair:
The electric pump “Rucheek” is a simple and reliable unit. If it breaks, you can repair it yourself, saving significantly on repairs. But the best option is to prevent pump failure. This is not difficult to do; you need to carefully study the operating instructions and carry out timely maintenance and monitoring of the operation of the equipment.
Do you have any questions or want to share your experience gained using a country vibration pump? Please write comments. Post posts with your opinion and photos on the topic.


In the video the guy recommends installing the bolts from the bottom. You shouldn't do this.Since in the case of a pump being immersed in a well (usually there is a pipe slightly larger than the diameter of the pump), when the bolts are unscrewed, the nuts get between the pump and the pipe wall and the pump is “buried” in most cases.
Practical advice for those who will disassemble the pump for repair. There is nothing difficult in repairing this simple pump for a person with hands, but the main thing is not to confuse the assembly sequence. Therefore, do not repair on your knees! Place all the parts on the table and disassemble them, placing all the parts on the table one after another. Reassemble in reverse order, replacing the failed part. I had a sad experience of changing the bearing, now this is the only way.
At my dacha, I use “Rucheek” only to pump water from the sewer well into which the washing machine and dishwasher drain water. It has been working, thank God, for several years. It broke only once, when it sucked in a piece of polyethylene that somehow got into the water. I then took it apart, cleaned it, put a fine mesh on top of it and there were no more problems. The pump is quite inexpensive, but does its job quite well. The most important thing is to periodically take it out and clean it.
Simple curiosity. To quickly replace quickly wearing parts, manufacturers of vibration pumps produce repair kits that include a full set of necessary spare parts. Why do we need an armature, bearings, seals for this pump? )))
Pump Brook - the hose (watering) vibrates, the water comes out in jerks, the pressure has dropped almost by half. The hum is not the same as it was, but somehow small and disgusting. The pump is 2 years old, the water
not dirty. Tell me what to do. Thank you.