How to make a pool from a Eurocube with your own hands: step-by-step manufacturing instructions
The IBC container (or Eurocube) is widely used for transporting all kinds of liquids.The plastic container turned out to be so durable and reliable that owners of summer cottages began to massively build tanks, swimming pools and shower cabins from it. It’s not difficult to build a pool from a Eurocube with your own hands, but you will need to show a little skill and ingenuity.
The content of the article:
Advantages and disadvantages of a Eurocube pool
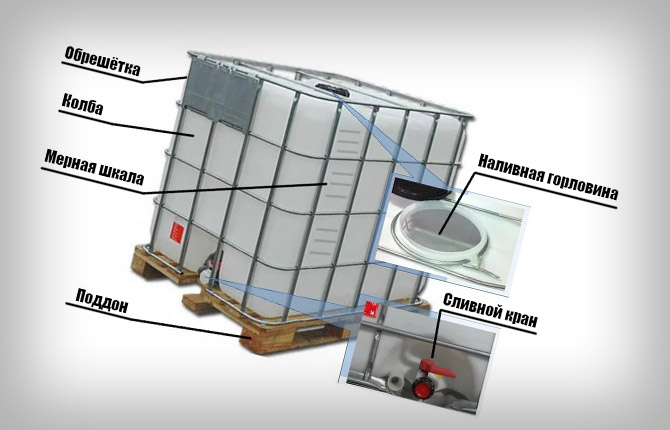
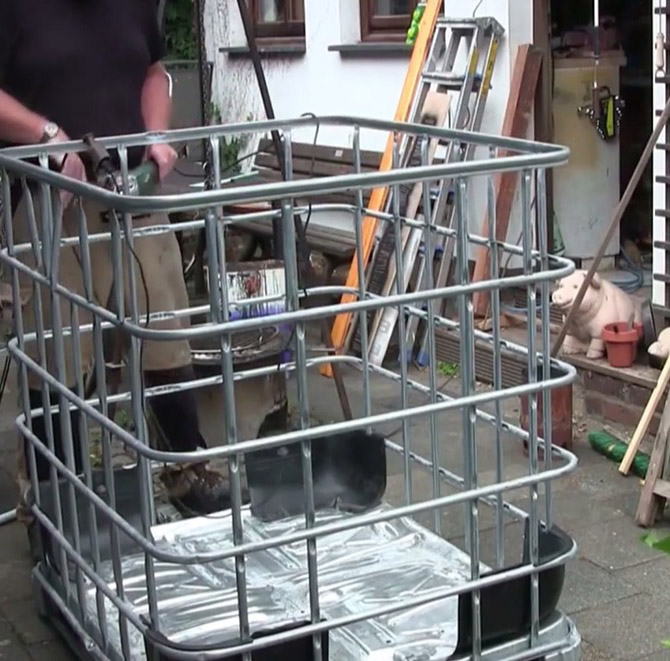
An IBC container is a nearly cubic shaped container mounted on a metal or wood pallet. Inside the steel rod sheathing there is a plastic container box made of high-density low-density polyethylene.
Container water capacity:
- The standard one is 1000 liters, but you should always check the capacity and material, since the container circulation includes models for non-food products with reinforced walls.
- Reduced (for food liquids) 600 l, 640 l. Obviously not suitable for a swimming pool due to its small size.
- Increased for non-food - 1200 l or 1500 l.
You can find a Eurocube with a capacity of up to 2000 liters. They are mainly used for storing liquids or as septic tanks. Wall thickness is up to 6 mm, container length is 130-140 cm. These models are best suited for building a mini pool. But the cost of a new Eurocube is too high - up to 15 thousand rubles.Whereas a standard pool with a reinforced polypropylene liner 180 cm long will cost 12 thousand rubles.
Advantages of using a Eurocube to build a pool:
- durability, the material will last at least 30-40 years;
- high chemical resistance of ND polyethylene, withstands temperatures from -60OFrom to 40OWITH;
- easy to process, cut without cracks, resistant to impacts.
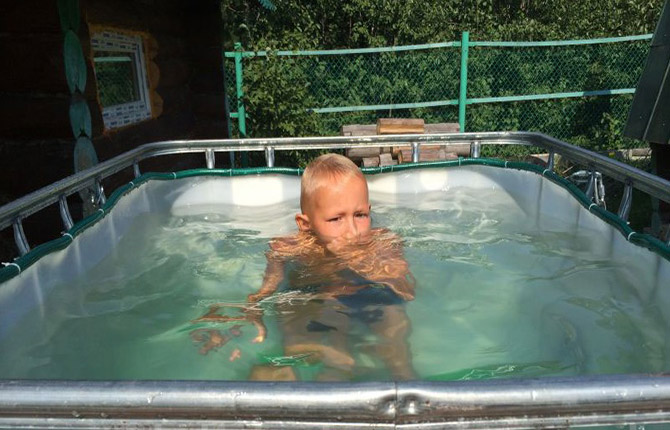
Among the disadvantages of the Eurocube, only the small dimensions of the container can be noted. That is, the result is a bathhouse that is more suitable for hardening or water procedures after a steam room.
But, despite its small size, the Eurocube will make a good pool for independent swimming for schoolchildren aged 9 to 13 years.
Another disadvantage is that deposits of salts and organic matter falling out of the water are clearly visible on the white polyethylene walls. But you can make a pool from a eurocube of black polyethylene.
Healthy: How to make a pool with your own hands.
What materials and tools will be needed?
Before you make a pool from a Eurocube, you need to choose a suitable location. For arranging a place for swimming, an area with sandy soil is best suited, preferably with shading and protection from rainwater. For example, under a tree or near a house, next to a gazebo.
Materials
The Eurocube itself can already be used as a font or small swimming pool. You just need to cut off the top of the container and refine the edge. But using the pool in this form will be inconvenient due to the high sides. Therefore, the optimal solution would be to install the container in a hole.
For this you will need:
- Red brick;
- masonry mortar;
- bitumen mastic;
- thick polyethylene film;
- slabs penoplex;
- crushed stone and cement-sand mortar.
Tools
The tools you will need are a grinder, a welding inverter, a hair dryer, a jigsaw, a measuring tool, and a container for the solution. In addition, you will need a garden wheelbarrow and a shovel. To build a pool, it is best to choose areas with heavy, dense soil. As a rule, in such soils the water is at a depth of more than two meters, so drainage under the pool may not be necessary.
Step-by-step instruction
First of all, you need to make a path to the site of the future construction of the pool. For example, make a sand and gravel pad and lay it with concrete tiles. This will simplify the process of transporting the Eurocube to the pit and removing soil with a wheelbarrow.
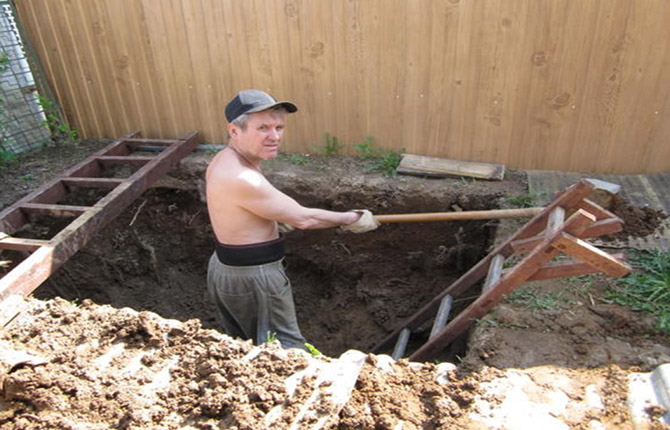
Pit preparation
Initially, you need to apply markings to the site. You can simply fill the contours of the future pit with dry sand or use a special tool for marking pits for buildings.
Since the dimensions of the pit are only 150x150 cm, it will be enough to drive four pegs in the corners, stretch a cord between them and adjust the shape of the square, measuring the length of the diagonals with a tape measure.
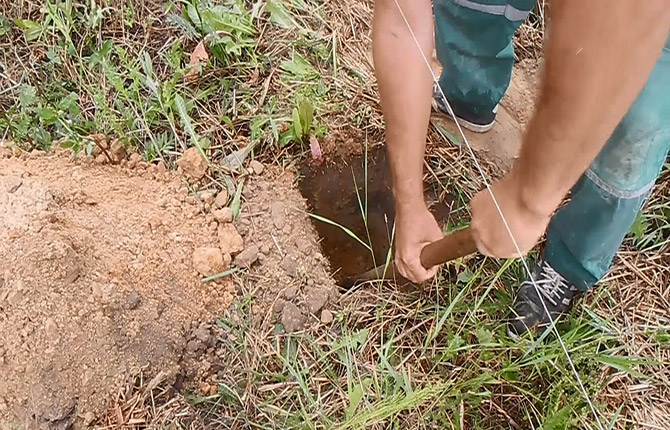
The next stage is digging a hole. First, we remove the top layer of turf with plant roots and transport it with a garden wheelbarrow outside the site. The depth of the pit must be at least 120 cm. Level the walls with a shovel.
A layer of gravel and sand at least 10 cm thick is poured onto the bottom, and red brick is laid on top. The joints are filled with a dry mixture of cement and sand. Next, fill the screed on top of the brick with a cement-sand mortar at least 5 cm thick and let it set for 4 days.
Next, we lay plastic film and two panels crosswise on the bottom of the pit. The film should lie on the walls, and the edges should be lifted onto the sides of the pit. At the corners of the pit you need to glue the panels with tape.
Insulated version of the pit
Heavy soils have high thermal conductivity. The wall of a Eurocube with a thickness of 5-6 mm is too thin to reliably retain heat in the pool. Therefore, the pit needs to be insulated, otherwise the water in the Eurocube will cool down very quickly, even in the summer heat.
The pit walls are insulated in two layers, each slab 25 mm thick. Sheets of insulation are laid on the walls with the seams staggered. Penoplex is attached with standard mushrooms. Dowels of 120 mm are placed on the bottom, dowels of 150 mm are placed on the walls. The joints between the plates must be taped.
Cold pool option
Often, the owners of the future pool believe that insulating the walls of the container with penoplex is not necessary. For example, if you plan to make a summer pool out of a Eurocube for hardening procedures after visiting the steam room. In this case, the pit will need to be equipped in a reinforced version, taking into account jumping into the water from the shore.
In this case, the size of the pit must be increased. If the dimensions of the Eurocube are 120x140 cm, then the pit will need to be dug to a depth of 170 cm with a side size of 160x150 cm. At the same time, along the perimeter of the pit, it is necessary to cut off the edges with a tape up to 30 cm wide and up to 20 cm deep. The tape must be filled with a mixture of gravel screenings and sand, thickness layer 5 cm.
Two layers of gravel are poured onto the bottom of the future pool, first 5-7 cm of crushed stone 2 cm in size. The top layer is poured from gravel screenings. A concrete screed with a thickness of at least 7 cm is poured on top.
Next you need to lay waterproofing. It is laid in one wide sheet on the bottom, walls and edges of the pit. Gravel screenings are poured onto the edges of the sheet laid along the perimeter of the pit and cement-sand tiles are laid.
The walls of the pit are laid out with bricks up to the level of the sides of the future pool. It is advisable to insulate the bottom, otherwise in winter the water will freeze and destroy the base of the pool. It is enough to lay one sheet of penoplex 20-30 mm thick on the bottom.
The walls and bottom are rubbed with cement mortar with the addition of liquid glass. This makes the concrete waterproof. If you stick 8-10 mm thick penoplex onto the walls and floor using mastic, then the Eurocube can be removed from the hole if necessary and returned to its place.
Pit option for quick pool construction
Often a large reservoir is not needed at a dacha; it is enough to build a pool from a Eurocube at the dacha for games in one day. In this case, a hole is dug for installing a Eurocube exactly according to the dimensions of the container, plus the size (height) of a wooden Europallet is added on each side. Accordingly, the depth of the pit must also be increased by the same amount.
All you need to do is cover the entire space of the pit with waterproofing film. The Eurocube will be installed in the foundation pit on Euro pallets; they will need to be treated in advance with oil impregnation or drying oil, and then dried in the sun until tacky.
Healthy: How to make a swimming pool at your dacha with your own hands.
Preliminary preparation of the container
The Eurocube will be installed in the pit as is, without steel sheathing and a “tray” base. Therefore, when preparing a container using a grinder, you need to get rid of all metal parts. After a few months or at most a year, the steel grate will rust and become a source of problems for the waterproofing of the pool. All that will remain from the Eurocube is a plastic container with a lid.
Important! If a Eurocube pool is planned in an insulated or cold version, then the upper part of the container with a lid cannot be cut off until it is installed and fixed in the pit.
In addition, you need to plug the drain valve at the bottom of the container.
If the pool is planned to be installed on wooden pallets, then the Eurocube needs to be modified:
- Screw the lid onto the container and place it on a Euro pallet.
- Wooden pallets pre-cut to size are installed on the walls, aligned and fixed in position with tape.
- Using a screwdriver and self-tapping screws, the wall pallets are tightened together and with the bottom Euro pallet. The container must be firmly secured in place.
- Using a grinder, cut off the top part with the lid and make cuts at the corners.
Next, you need to heat the top edge of the cut Eurocube container and bend it with your hands onto the end of the wall pallet.
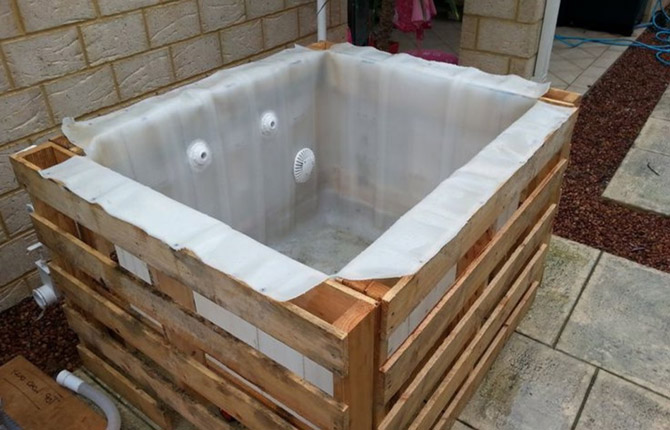
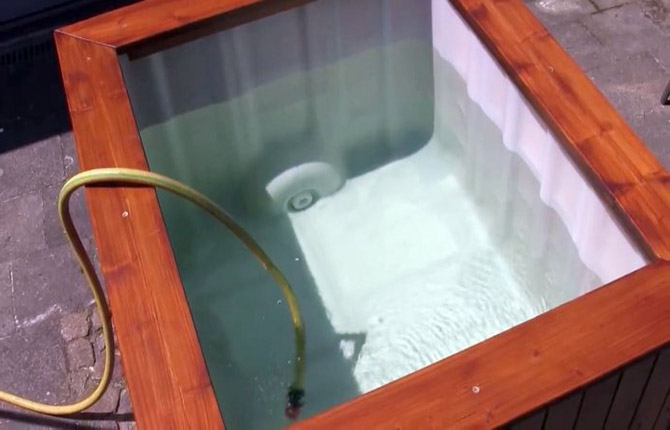
In this form, the Eurocube can be used for quick construction of a swimming pool.
Drawings and diagrams
Preparation of the pit before installing the Eurocube depends on the characteristics of the soil, the presence of surface water and the required level of insulation of the pool. The diagram below is universal for any soil.
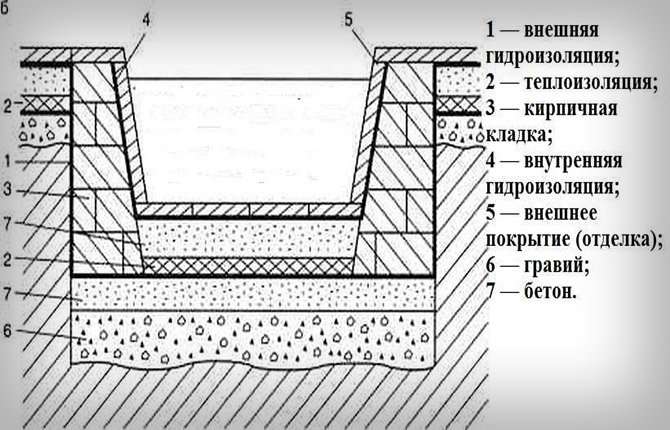
The only exception is in areas with high groundwater levels. In this case, a drainage pipe will need to be laid under the base of the pool, otherwise over time the Eurocube may sag by 10-15 cm. To remove water, you can connect a drainage well to the pipes. The only condition is that it must be lower in level than the depth of the base of the Eurocube.
Installing a cube in a hole
This is the most difficult stage of building a pool. The Eurocube has thin walls made of HDPE, so they can be easily damaged during the installation process.
The easiest way is to install a cube for an insulated pool. The plastic container is suspended by cords from the lid to the pole and raised above the pit of the pit. Next you need to settle the Eurocube into the hole. To do this, remove the pole (leave the cords), remove the lid and fill the container with water from a hose.
The future pool gradually settles into the hole under the weight of the water. Before the container finally falls into place, you need to cut off the top of the Eurocube and, if possible, bend the edges outward.
It is a little more difficult to install a container with pallets lining the walls. The weight of the plastic insert itself is no more than 15-20 kg. The total weight of four Euro pallets is 65-70 kg. In total it turns out to 90 kg. Therefore, the Eurocube is installed in a hole on canvas belts by a group of at least 4 people.
Final works
After the pool bowl has been installed in place, it is necessary to wash the walls, disinfect and improve the area around the reservoir. Initially, the container is filled with water and hydrogen peroxide for a day, covered with film and boards.
During this time, it is necessary to strengthen the edges of the pit, fill in the waterproofing film, lay the tiles, cut and secure a decorative edge made of lath or decking boards around the perimeter of the pool. It can be laid directly on the ground; the material is made of pressed shavings and polypropylene and is not afraid of water.
Is it possible to make a cube yourself?
There is a scheme for building a pool based on a Eurocube with a hopelessly damaged plastic container. The most common cause is a damaged side or corner area of the container.
In this case, the bottom of the container and a steel crate with a tray will be used to make the pool.The metal frame is carefully treated with polyester resin and dried to allow the coating to thicken.
Next, a geotextile fabric, previously coated with polyester resin, is wound onto the outer surface. You need to make at least 6 layers and roll each layer tightly to squeeze out the air. If you follow the technology, you will get an improvised Eurocube without a top part. But it can be used to build a swimming pool.
We read: Organization of pool ventilation.
Results
It is quite possible to build a pool from a Eurocube with your own hands. The quality of the reservoir directly depends on the funds invested and how accurately the pit construction technology was followed. If desired, you can make many useful buildings from a Eurocube: from a caisson to a homemade bioseptic tank.
Tell us about your experience building a pool. How successful was the pond? Share the article on social networks and add it to bookmarks so that you and your friends have it at hand.


I made a mini-pool for evening swimming after work. The water bloomed in two days. Every pool needs a filter. You can't chlorinate. You can't put it inside the container. I have to pump water through the filter every two days.
This needs to be done in the house, this is the only possible option, plus an additional supply of water for household needs.