How to make a cyclone for a vacuum cleaner with your own hands: device + detailed assembly instructions
Cyclonic designs of household vacuum cleaners are considered one of the most successful technology options in terms of operating efficiency.The cyclone system is a relatively simple separation mechanism that makes it possible to effectively filter suspended particles present in the air stream.
Based on the theoretical principles of constructing such a system, it is quite possible to create a cyclone for a vacuum cleaner, acting as an additional tool - for example, a construction separator. Interested in the question, but don’t know how to make a simple cyclone yourself? We will help you realize your plans.
The article provides detailed information about the design of the cyclone separator, as well as step-by-step instructions for assembling it and connecting it to a vacuum cleaner. A description of all stages of the work process is accompanied by visual photographs.
The content of the article:
How does a cyclone separator work?
Externally cyclone separator can be characterized as a cylindrical vessel, the lower part of which has a cone-shaped design. The upper part of the vessel contains two openings - inlet and outlet, through which the air flow enters and exits, respectively.
At the bottom of the vessel - along the edge of the conical part - there is also a hole through which the sifted (filtered) debris comes out.
One of the upper holes (inlet) is equipped with a channel, due to which the incoming air flow enters the cyclone along a tangential line.
Given the cylindrical shape of the structure, the incoming flow moves in a circle, creating a vortex effect. The resulting centrifugal force throws suspended particles contained in the flow to the periphery.
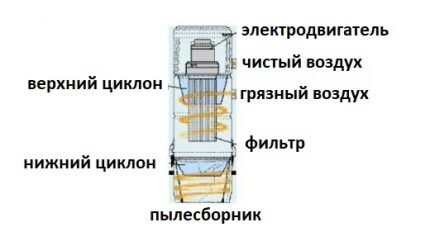
The other hole, the outlet, also has a channel, but located strictly perpendicular to the incoming channel.
Thanks to this arrangement of the second channel, the air movement changes from a vortex state to a strictly vertical one, which eliminates the capture of already screened suspended particles.
In turn, the screened particles of debris, once on the periphery, move down along the walls of the vessel, reach the conical part and through the outlet hole enter the garbage collector. This, in fact, is the simplest operating principle of a cyclone separator.
Step-by-step instructions for assembling a cyclone
There are many on sale cyclone vacuum cleaners. The units differ in power, purpose and cost. If you want to save money, you can try to assemble the separator yourself using inexpensive materials.
Such a separate filter can be successfully used as an addition to a construction tool:
- jigsaw;
- hammer drill;
- electric drills, etc.
The operation of such construction tools is often accompanied by a significant release of dust and small particles of various types.
Meanwhile, modern construction tool designs are equipped with a special channel for removing working waste directly during operation.
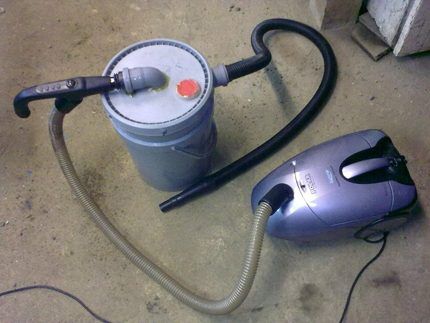
But in order to use this channel, you need a cyclone or, in extreme cases, a vacuum cleaner specifically designed for construction purposes.
Options for making a homemade cyclone may vary. It all depends on the material base used and the vision of the project by the performer.
However, in any case, it is necessary to adhere to the technological criteria that determine the correct operation of the separator:
- Body shape.
- Location of input and output channels.
- Proportions in the sizes of components.
That is, the cyclone design must provide both the flow swirling effect and effective waste separation. Let's look at a step-by-step do-it-yourself execution of one of the possible projects.
Step 1 - Tools and Basic Materials
Of the materials required for the production of a cyclone, you will need:
- plastic plumbing pipe 125-150 mm long, 50 mm in diameter;
- plastic plumbing corner 30°;
- two plastic buckets for 10 and 5 liters;
- sheet plywood;
- standard vacuum cleaner hose.
The set of tools for making a cyclone for a vacuum cleaner and assembling it yourself includes: an electric drill with a set of drills (including a 50 mm crown); electric jigsaw; measuring and drawing tools; screwdrivers, knife, clamp.
Step 2 - making the body and other parts
The first step is to make the cylindrical part. For this, a small (five-liter) plastic bucket is used. The upper part of the bucket, made in the form of a side, is cut off taking into account the remaining smooth edges along the cut line.
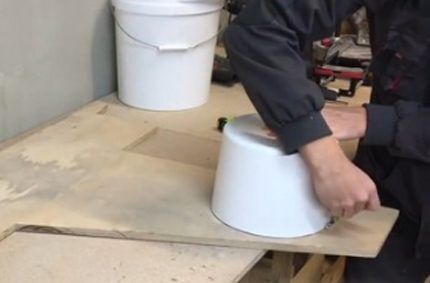
The resulting cylindrical container, resembling a small cone, is turned upside down, placed on a sheet of plywood and outlined in diameter.
Stepping back from the marked circle 30 mm to the periphery, mark another circle. Then a ring is cut out according to the markings.
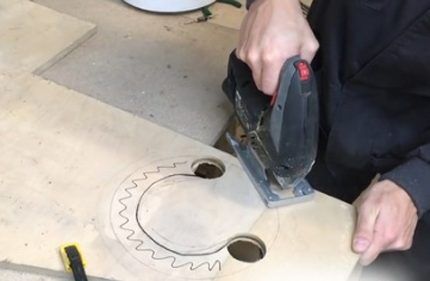
Next, you need to cut out the shaped element, for which you use a wood cutting bit with a diameter of 50 mm and an electric jigsaw. The outer diameter of the hub of the figured element is equal to the inner diameter of the previously cut ring.
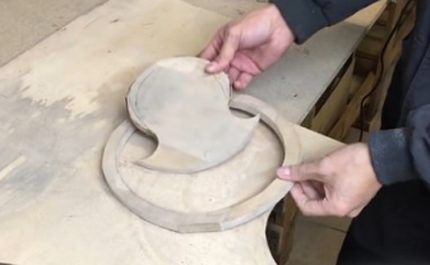
As a result of the work carried out, two parts (as in the picture above) of the future cyclone separator, made of sheet plywood, are obtained.
Step 3 - connecting the workpieces to the cylinder
At this stage, a ring cut from plywood is put on and secured along the line of the upper edge on the cylindrical vessel prepared earlier from a small bucket.
Fastening is carried out using self-tapping screws evenly around the entire circumference. The joints between the ring and the bucket in a circle are carefully sealed.
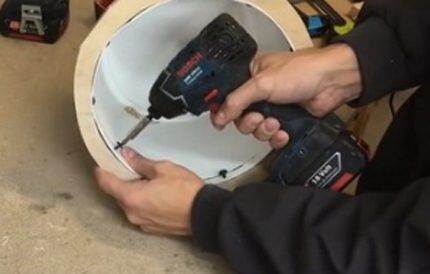
The installed plywood ring must be supplemented on the side of the open part of the cylinder with a lid from a large plastic bucket.
But first, the lid should be marked and a hole cut exactly in the center, equal in diameter to the inner diameter of the plywood ring. Place the cut out part of the lid on the ring and secure it.
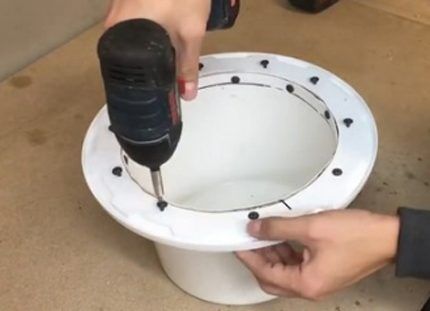
Step 4 - installation of the inlet pipe
The inlet pipe is mounted in the bottom area of the prepared cylinder. Considering that when fully assembled, the small cylinder will be upside down, the pipe will be at the top point of the cyclone.
Having retreated approximately 10 mm from the plane of the bottom, a hole of 50 mm is cut using a crown. In order for the plumbing corner to fit tightly, the shape of the hole is adjusted to fit the “drop”.
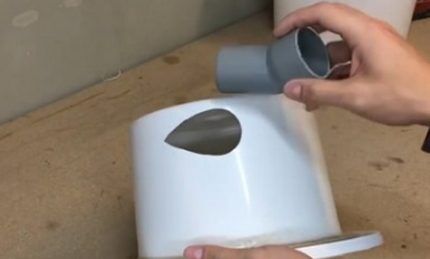
The plumbing corner is treated with sealant, installed in the hole and fixed with self-tapping screws.
A similar operation is carried out to install the second outlet pipe. This is a 100-150 mm piece of plumbing pipe, which is installed directly in the center of the bottom of the small cylinder.
As a result, after the measures taken, you should get a structure like the one in the picture below:
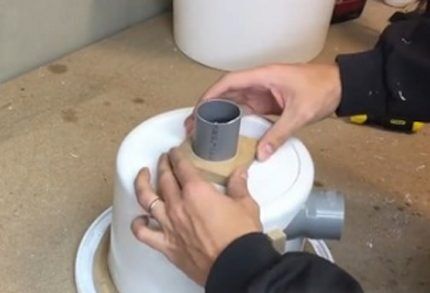
For strength, the plumbing pipe is equipped with an additional shell made of plywood. It is advisable to make two such elements and install them on both sides of the bottom. After installation, tighten the dies with self-tapping screws. Of course, don’t forget to apply sealant at the joints.
Step 5 - installation of the figured element
One of the important aspects of assembling a cyclone with your own hands is the installation of a figured element previously made from a sheet of plywood. It is thanks to this element that an environment is formed inside the small cylinder of the cyclone that promotes effective separation.
The shaped element is mounted at a distance of approximately 10 mm from the edge of the open area of the cylinder. In this case, the plane of the shaped plate, directed inside the cylinder, should not be in contact with the outlet pipe.
The distance between the end edge of the pipe and the plane of the figure is 25-30 mm, but it is permissible to experimentally select the optimal distance.
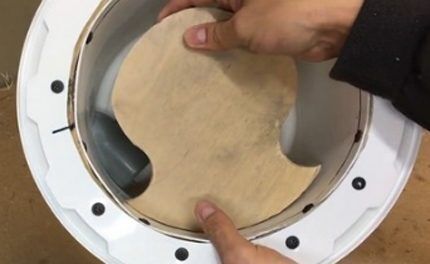
After installing the plate strictly parallel to the bottom of the small cylinder, fastening is done with the same screws from the outer part of the cylinder, screwing the screws into the area tightly adjacent to the inner wall.
Three or four screws are enough for fixation; it is not necessary to use sealant here.
Step 6 - complete assembly of the cyclone separator
Actually, after the installation of the figured plate is completed, the cyclone structure is actually assembled. All that remains is to “plant” the completed assembly of the small cylinder on the top of a large plastic bucket.
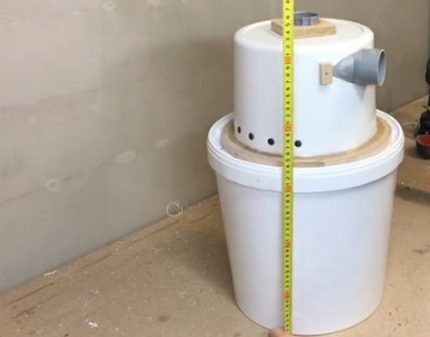
The tight fit in this case is ensured by part of the area of the lid of the large bucket, which was previously mounted on the lower plane of the plywood ring of the small cylinder.
As can be seen from the measuring tape, the total height of the structure is a little more than 50 cm. At the same time, the garbage collection (lower part) is quite voluminous.
Subtleties of connecting a homemade cyclone
A self-assembled cyclone (filter for construction purposes) is connected for operation in a simple way.
The input (side) channel is connected by a corrugated flexible hose or other similar accessory to a working tool, for example, to the channel of an electric jigsaw.
The output channel (upper pipe) is connected directly to the input socket of the vacuum cleaner instead of the working nozzle.
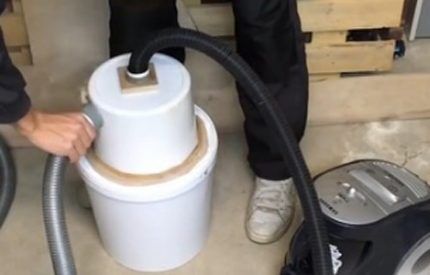
First, a vacuum cleaner is put into operation, then a construction tool is used for the necessary purposes. As a result, the action being performed, say, cutting a board with an electric jigsaw, takes place without releasing chips and fine dust into the environment.
The by-product of the operation is completely sent to the cyclone separator where it is properly filtered.
DIY enthusiasts can try to assemble a complete vacuum cleaner that can be used in the workshop or at home. Step-by-step instructions for making a practical unit are presented in this article.
Conclusions and useful video on the topic
The video below clearly shows and explains how to build another, simpler cyclone design with your own hands.
The author uses this homemade system in everyday practice and is extremely satisfied. A cyclone separator, made from an ordinary bucket, helps to work in clean conditions during economic and construction work:
Self-assembly of a cyclone for a vacuum cleaner is acceptable and quite possible. Moreover, there are projects of similar “homemade” systems that can actually be made, if not in 2 minutes, then in a couple of hours. Such a cyclone is really worth spending some time on its manufacture. Costs are fully reimbursed.
Do you have experience making a cyclone filter for a vacuum cleaner? Please tell readers about your method of assembling the separator. Comment on the post, participate in discussions and add photos of your homemade products. The feedback block is located below.


Interestingly, the assembly of such a cyclone looks quite simple. I could use a device like this for cleaning my workshop. Finding an old vacuum cleaner is not a big problem, other parts are even more so.
I assembled the cyclone as in the article. Works great. I just set the pipes to 40. Thanks to the author
Super. Works great. I just set the pipes to 40