Attaching the toilet lid: how to remove the old and install a new seat on the toilet
To make daily use of the toilet comfortable, a special pad is used - the seat. Moreover, most of them are equipped with a lid.It is the breakdown of the latter that one most often encounters. Agree, there is little pleasure in a broken fastener.
But even the usual fastening of the toilet lid often raises questions among people. No wonder, considering that depending on the model, the fasteners and configuration of toilet lids differ radically.
Why not call a plumber over such a trifle? Do you want to replace the seat yourself, but are you afraid of breaking the new one due to inexperience? We will help you figure out the secrets of installing a new seat - the article discusses the main designs of toilet seats and their features.
Detailed instructions for attaching the hinged lid and models equipped with a micro-lift are also provided. For a better understanding of the replacement process, the material in our article is supplemented with visual photos and a video that demonstrates the installation of a seat with a micro-lift.
The content of the article:
Design of a toilet seat with a lid
The sanitary fixture, which is an integral part of the toilet room in modern housing, is called a toilet. The device itself is quite simple, quite understandable to a person inexperienced in plumbing.
Modern toilet models are designs that wall mounted (hanging) or fixed to the floor (floor).
You may be interested in information about the intricacies choosing a toilet with installation, discussed in detail in another article.
In turn, floor-mounted plumbing fixtures are further divided into types:
- toilets complete with cistern;
- tank and bowl as separate components;
- devices tightly adjacent to the wall.
The materials for making sanitary ware are porcelain or earthenware. In terms of performance properties, earthenware is inferior to porcelain.

The toilet flush system operates on the basis of manual push-button control. There are also models where the drainage process is controlled electronically.
According to standards, the height from the floor to the top of the appliance cover should be 400 mm. The parameter for static load is 200 kg. This information may come in handy when it comes time to fix the toilet seat at home.
You may also find the information on toilet sizes discussed in our other article.
For modern models toilet seats with lids are made, as a rule, on the basis of plastic (Duroplast, polypropylene, ThermoDur, Supralit, etc.).
This material is considered positively hygienic and is therefore welcomed as optimal, despite its rather weak load-bearing properties. True, the properties of the toilet seat largely depend on the quality of the plastic structure, as well as on the design features of the fastening system.
Toilets can be considered universal products, because in most cases, due to their compatibility, the questions disappear: how to remove a broken seat from a toilet and how to install a new seat on a toilet.
In addition, it is possible to select toilet seats during the replacement process:
- soft;
- semi-rigid;
- hard.
In this case, the fasteners included in the seat kit can be plastic or metal. According to the design, fasteners are made in different shapes and sizes.
But in general, the principle of fastening remains the same, despite the variety of models.

Saddle lids on modern toilets come in an impressive variety of movement mechanisms. Variations - from the simplest hinge mechanisms to “Soft-closing” type mechanics and electronic bidet covers with presence sensors.
Depending on the specific model, there is a possibility of encountering such fasteners for a home toilet seat, when a careful study of the design features is indispensable.
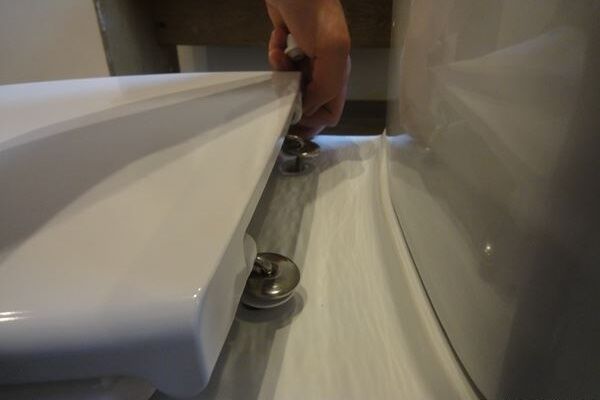
The procedure for removing a regular toilet seat is simple:
- Raise the toilet lid (the toilet seat remains down).
- At the bottom left, under the rear porcelain edge, unscrew the fastening nut.
- Perform the same operation on the right side.
- Remove the toilet seat-lid pair from the toilet.
Plastic nuts can usually be unscrewed easily by hand. By the way, it is not recommended to tighten such fittings too much, since the plastic bolts simply break off due to overtightening.

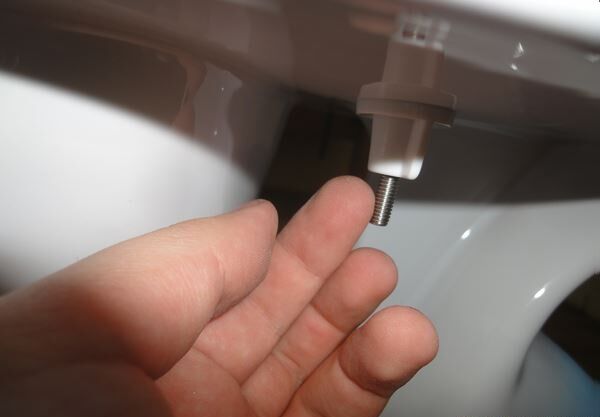
Installing a new cover is done in the same way. The holes on the cover must be aligned with the holes on the rear edge of the plumbing fixtures, insert the mounting bolts into the mounting holes and screw the nuts onto them from the bottom.
There are fittings with and without washers. For the “no washer” configuration, universal nuts are made in which one of the end edges has a washer shape.
You can often find a fastening option for a toilet seat: a metal bolt - a nylon nut. This tandem provides more reliable grip.
Type #1 - hinged mechanisms
Household toilets are usually equipped with seats, the lids of which are mounted on plastic, metal-plastic, or metal hinges. The design of a dynamic mechanism on a plastic joint is the most common.
On the one hand, the plastic option is good in terms of the absence of the influence of corrosion on the connection elements. But in terms of reliability, plastic hinges are inferior to metal products.
Plastic fittings have to be replaced more often. As a rule, seats from a range of inexpensive products are equipped with plastic hinges. Metal hinges are often a component of a perfect rotary mechanism - a microlift.

Removing the plastic hinges may be necessary, for example, if the cover is damaged and needs to be replaced with a new one. Here you do not need to remove the general fastening of the toilet lid; it is enough to remove the hinge shafts.
There are a lot of design solutions from manufacturers for fixing shafts in the landing groove. The simplest solution is to have a locking pin at one end of the shaft. You need to tighten the pin and pull the shaft out of the mounting hole of the hinge.
Often there are latches that remove the lock by turning them 90-180 degrees counterclockwise. There are also shaft locks with screws and screws.
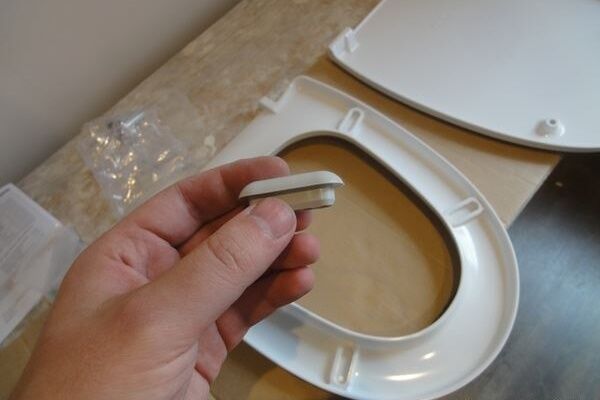
Installation of a toilet seat with one of the simplest hinge designs:
- Align the holes of the toilet seat ears and the lid.
- Insert the nylon bushing into the hole on the inside of the toilet seat.
- Place the end of a metal pin inside the nylon bushing.
- Do the same steps on the opposite hinge.
- Thread decorative washers and spacers onto the studs.
- Place the entire structure on the toilet, inserting the pins into the mounting holes.
The procedure ends with fastening by screwing the nuts onto the studs from the bottom edge of the toilet.
A short photo course will clearly introduce the installation procedure and the standard sequence of actions for attaching a toilet lid:
Type #2 - micro-lift series devices
Increasingly, sanitary ware for the toilet appears on the market, equipped with seats, the lid of which is driven into place by a semi-automatic mechanism - a microlift.
How to install a seat with a microlift on a toilet? Exactly the same as a standard toilet seat. The mounting scheme is practically the same. But the hinge mechanism of this model has some features that will have to be taken into account in case of repair.

The mechanics of the microlift are built on the following parts:
- stock;
- spring;
- piston;
- cylinder.
Usually, wear or breakage of any of these elements forces the toilet seat to be removed to install a new one. Repairing a microlift is quite difficult for people without relevant experience.
Meanwhile, a common cause of microlift failure is the banal “leakage” of lubricant from the surface of the piston cylinders. This defect appears as a result of forced pressure on the lid by the users themselves - an attempt to forcefully lower the seat.
If desired, some microlift designs can be disassembled and an attempt can be made to restore the uniform distribution of damper lubricant over the entire surface of the cylinder.
You might be interested in information about how fix toilet lid.
But for most owners it is easier to buy a new seat-cover along with a microlift. You can also try to order a separate microlift system from the manufacturer for a specific toilet model.
The installation kit usually contains two studs with pads, two gaskets, two nuts and two microlifts.

To install a new seat with a microlift on the toilet body, perform the following steps (one of the existing options):
- place microlifts on the pins of the platform patches;
- place the lid of the toilet seat with its top side on the floor;
- insert microlift bushings into the holes of the hinge ears;
- left microlift on the left (mark L), right on the right (mark R);
- Place gaskets on the rear edge of the toilet, over the existing holes;
- install the seat together with the microlift on the toilet, inserting the pins into the holes;
- secure the entire structure from below with the nuts from the kit.
There are developments, for example, by the well-known company Roca, where microlifts are rigidly fixed to the seat body. When installing the seat, the user only needs to insert the brackets into the mounting holes of the toilet and tighten them with the hex key included in the kit.
Then take the seat in your hands and carefully place it on the protrusions of the brackets with the holes that are on the bushings of the microlift mechanism. Finally, secure the insert with screws.
Selection criteria in case of replacement
If it happens that the question of replacing the toilet seat has arisen, you need pick up a seat cover under existing plumbing. It is recommended to take measurements of the plumbing fixture in terms of dimensions and shape. You should also clarify the location of the mounting holes under the seat.
The width size is measured at the points of greatest “run-up” of the structure. The length dimension is taken from the edge of the front part of the curb to the point of the center line passing between the centers of the holes intended for attaching the toilet seat.

Often, toilet owners who have had to change the toilet seat prefer to choose more advanced models instead of the standard design. This choice is explained by their desire for novelty.
Meanwhile, new products “with heating”, “with backlighting”, “with motion sensors” in practice turn into even bigger problems. A serious manufacturer of plumbing fixtures is not yet in a hurry to offer such an “exclusive” to the buyer. Such proposals usually come from Chinese companies.
Exclusive toilet seats
Plumbing fixtures for the toilet, equipped with electronics, have not been surprising for a long time. Recently, toilets have also come close to the electronic fraternity. Regulators for drainage, water intake, disinfection, filtration - these functions become integral parts of bidets and urinals.
Some of these functions are also used on toilet seats. Yes, they are quickly gaining popularity. electronic bidet covers and heated seats.
The installation of the electric model is basically the same as the standard version. The only addition is cable laying and installation of an electrical outlet.

The design of models with illuminated bowls is not entirely clear - what benefit do they bring to the toilet visitor? However, these solutions remain relevant due to the stability of their demand in the market.
The installation of a backlit seat must include the installation of an electrical network in the toilet area. At the same time, there are models of seat covers, where the backlight lamps are powered by batteries.
The batteries are built directly inside the seat structure. You cannot do without installing electrical communications in the case of using toilets with a motion control function.
Problems when replacing a seat
Some problems when replacing a toilet seat or lid may occur on plumbing fixtures that have served the owners for several years. Removing fasteners on an old toilet seat is especially difficult if metal bolts and nuts that are susceptible to corrosion were used.
The high level of humidity in the toilet area is created by the water present in the flush cistern. This is the main reason for the appearance of rust and oxides on threads.
In this condition, it is extremely difficult to unscrew the nuts from the mounting bolts, and sometimes impossible using traditional methods. We have to resort to radical measures.

So, if the thread of a bolt or stud is damaged by corrosion and twisting the nut is not possible even with a wrench, the problem can still be solved.
Why do the following:
- Use an electric drill.
- Place a drill bit with a diameter slightly smaller than the wall thickness of the nut into the drill chuck.
- Carefully drill the nut from its bottom edge to the top.
- Insert a suitable metal rod into the hole.
- Try to “break” the nut using the pumping forces of the rod.
Sometimes a similar situation occurs on plastic fittings. It happens that during installation (during cleaning) the threaded part of the stud is accidentally damaged. A defect in the plastic thread will also prevent the seat mount from being removed in the usual way.
If you cannot twist the nuts using a tool, you can cut them off with a sharp thin knife, after heating the knife blade to the melting temperature of the plastic (120-130º C).
Part of the fastening fittings for seats with covers is made of brass and bronze. This metal does not corrode, but has the ability to quickly oxidize in the presence of moisture. The oxides, in turn, form “growths” on the threads, which over time become comparable in hardness to the same metal.
It helps to unscrew such connections by pre-wetting them (and holding them for a while) with machine oil. Apply lubricant to the connection easily and conveniently with a plastic disposable syringe.
Conclusions and useful video on the topic
An installation video will help you quickly install the seat on gas lifts.
The toilet is a household plumbing fixture, the frequency of use of which is not comparable with the use of other household accessories.
It is not surprising that many citizens are puzzled by the problem of removing one toilet seat and then replacing it with another. But this task is solvable and can be done, if desired, with your own hands..
Have you repeatedly changed the fasteners without changing the cover? Or do you prefer to buy a new seat to replace the boring old one when it breaks down? Or maybe you use one of the exclusive lid options - with a bidet function or with illumination? Share your opinions and recommendations in the comments below.


I spent about 2 hours fiddling with the new toilet lid and couldn’t attach it correctly. When I got acquainted with this information, everything fell into place, I realized my mistakes, and eliminated them. This is my first time encountering a microlift system; this is a difficult installation job for me, since before that we had a regular plastic cover with the most common fastening principle.
Now there are many new models of toilets, but the principle of fixing the lids is the same everywhere. It's really simple and anyone can do it. You need to lift the toilet lid and unscrew the fastening nut on both sides below, under the porcelain edge. Then remove the bolts and remove the old cover. With the new one we do everything in reverse order. Just don't overtighten the nuts.
We urgently need your advice! If you have already placed the cover on these metal pins, is it possible to remove it from them? Or will it not work without breaking the lid hole? Forgot to install decorative wheels...
Now new versions of toilets have been released with stiffening ribs, which do not allow easy access to the wing nut installation location, as shown in your pictures. I came across this when I was replacing my toilet. No matter how hard I tried to get there, nothing worked. Neither by hand nor by pliers. There was a risk of either breaking the plastic wing itself (at best) or damaging the ceramics of the new toilet. In the end, I gave up, developed the device in 1/2 hour, and printed it on a 3D printer in another 4 hours. And fixed it in 5 minutes. If anyone needs a drawing or the device itself, please contact us by email. I can make a wing nut to your size :)