How to repair a ball mixer: a review of popular breakdowns and how to fix them
Most owners are accustomed to solving the nuances of household repairs with their own hands, without resorting to the help of various “masters for an hour.” And it’s not just about saving money; fixing minor problems with modern plumbing is an interesting task and quite feasible even for a beginner.
But to achieve success, you need to know the principle of operation of the device and its weak points. Let's try to analyze in detail one of the problems - how to repair a ball mixer in the bathroom or kitchen.
The content of the article:
Operating principle and design of the crane
The faucet with ball mixer has a laconic and modern look, which allows it to organically complement any kitchen or bathroom interior.
But its main advantage is comfortable use. Indeed, unlike the valve design, in order to adjust the pressure and temperature of the water flow, you do not need to turn the knobs in search of the “golden mean”, but simply set the switch in the optimal position and put it into operation with one movement of the hand.

The design of a typical ball valve consists of the following required elements:
- Control lever – a rotary handle that sets the flow force and water temperature.It is attached to the body with a screw, closed with a decorative plug, on which the designations of cold and hot water are indicated in color or letters.
- Metal cap, fixing the valve mechanism to the body.
- "Cam" – a plastic part with a shaped washer, which ensures the movement of the “ball” in a certain range. The washer itself is dome-shaped and equipped with rubber seals.
- Mixing chamber - a steel hollow “ball” fixed using a system of seat valves and springs. It has several holes: two for the entry of hot and cold water and one for the outlet of the mixed flow through the tap spout. In some designs, the “ball” is enclosed in a special protective capsule - a cartridge.
- Metal body with spout.
- Circle nut, fixing the body on the sink.
The system is activated by a lever. When it is lifted, the “ball” inside the faucet begins to rotate, and when the holes align with similar recesses in the seats, water is supplied to the spout. Depending on how complete this coincidence was, the pressure and temperature of the flow are adjusted.

Learn more about the troubles that happen with plumbing fixtures and how to eliminate them.
Problems with ball mixer
Although ball valves are considered one of the simplest and most reliable designs, from time to time they also fail due to natural wear and tear of parts or under the influence of external factors.Let's look at the most common breakdowns that can occur when using such a mixer.
It is impossible to adjust the jet temperature
If the mixing of hot and cold flow occurs chaotically, the problem lies in the failure of the ball cartridge or rubber “seats”. The cause of failure is most often a blockage in the space between the “seats” and the holes of the “ball”.
The faucet will have to be disassembled to inspect the parts for damage. If such are found, the gaskets or the entire “ball” will have to be replaced - no amount of sealant or other tricks will give a long-term effect.
Such breakdowns most often occur due to poor quality of water purification in the home water supply system. And we are talking not only about mechanical inclusions - particles of rust and other small debris. The problem may also be due to increased water hardness.
If your region is supplied with water with an excess of mineral impurities, before purchasing it would be a good idea to study the mixer's datasheet - many manufacturers specifically indicate the acceptable hardness for the smooth operation of their products.

For a bathroom where water is used primarily for technical purposes, the simplest mechanical filter is quite sufficient, which will simply protect the plumbing from foreign impurities.
But for the kitchen, you can install a system that improves not only the quality, but also the composition of water, enriching it with scarce microelements.There are many options here - from simple cartridge filters to systems reverse osmosis.
Weak water pressure at maximum opening
The reason may lie not in the mixer itself, but also in low pressure in the water supply system of the house or apartment. Therefore, before disassembling the structure, make sure that water flows from other taps with good pressure. If it is still confirmed that only one mixer is at fault, check to see if the aerator on the spout is clogged.
The water sometimes contains sand, rust particles from worn pipes or limescale, which accumulates on the mesh and interferes with the free flow. To make sure that the reason is precisely aerator – remove it and turn on the water again.

If the flow has increased to the required value, you just need to thoroughly rinse the mesh and install it in its original place. Of course, if a part breaks or rusts, it is better to replace it with a new one.
But if cleaning the aerator did not yield anything, and the water pressure has not been restored, most likely the reason lies in the internal blockage in the channels of the mixer, pipes, hard liner or heavily compressed gaskets on the liner. In short, you can’t do without disassembling the crane.
Noise during operation
Another common operational nuance of ball mixers is the annoying sound effects that accompany the flow of water. The reason for this phenomenon is the vibration of rubber gaskets due to the interaction of air and water flows.
There are several solutions to this problem: install a special filter, reduce the water pressure, or choose tighter fitting gaskets.
Water leak - repair options
Before starting repairs, it is important to determine the source of the leak, and at the same time pay attention to what position the control handle is in.
If water seeps out from under the lever when the tap is turned on, the cause of the breakdown may be a worn sealing gasket.
It can fail over time or due to poor-quality knurling of the tap cover - sharp edges easily damage the rubber. To eliminate the defect, you need disassemble the mixer and install a new gasket.

If water drips from the tap when the handle is in the blocking position, there are several options:
- The simplest one is when water appears from under the cap of the rotary lever. To fix this problem, just tighten the connection well with a wrench.Has the leak stopped? Great, that means the reason was precisely the loose fastening.
- If it flows from under the valve body, but no cracks are found on the metal itself, the problem most likely lies in the wear of the sealing gasket under the nut. To replace it, you need to unscrew the housing fixing nut and disconnect the mixer from the inlets (of course, first turning off the water supply). After this, the used consumable is replaced with a new one, and if the diameter of the gasket is selected correctly, it will be installed in the groove with force. The crane is then assembled and tested for functionality.
- If a crack is found on the body itself, allowing water to pass through, then the faucet will have to be completely replaced. Of course, you can cover up the defect with some kind of waterproof sealant and even “cold welding,” but such a repair can only be temporary—the leak cannot be eliminated using this method.
- A crack on the control lever - this problem can be solved by replacing the handle, which will cost much less than buying it new mixer.
Please note that external damage to the body may not be visible to the naked eye, but even microscopic cracks will leak and cause puddles to appear at the base of the faucet.
Therefore, examine the metal with a magnifying glass - with magnification, it is much easier to identify defects.
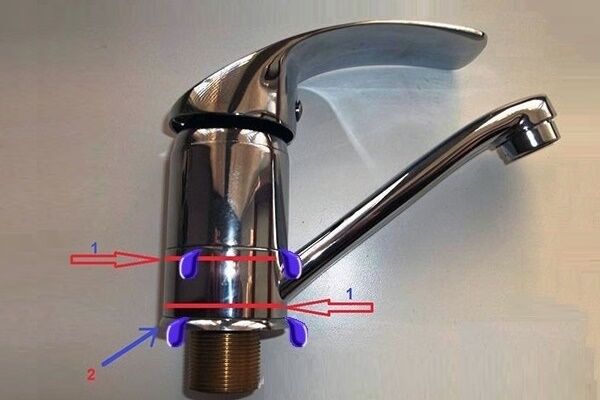
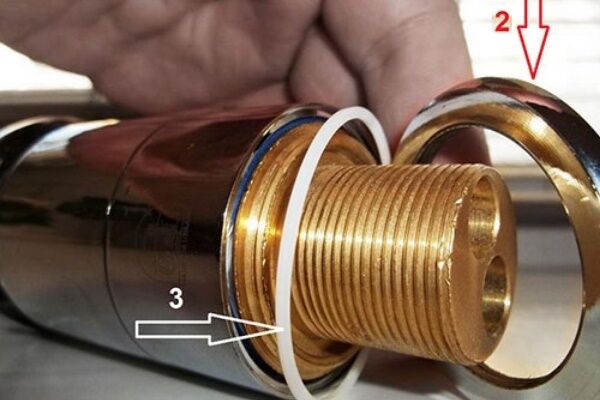
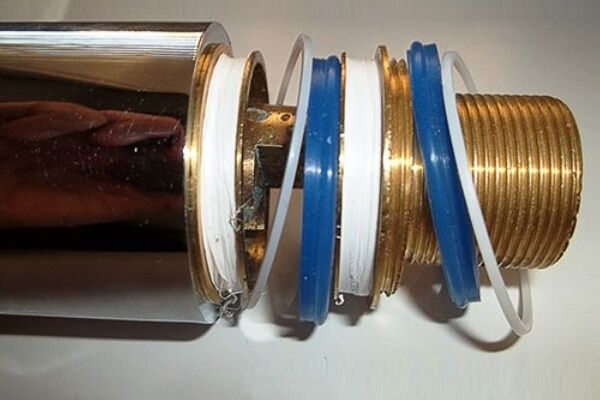
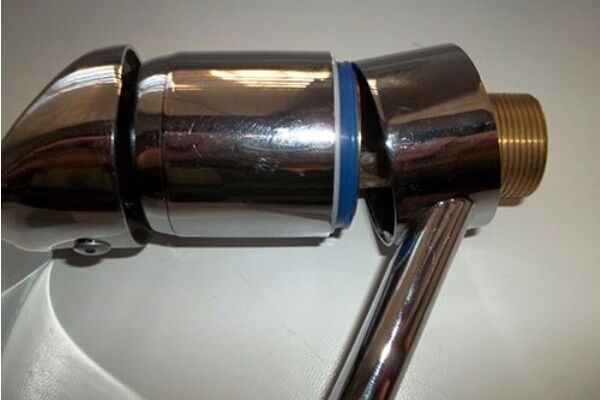
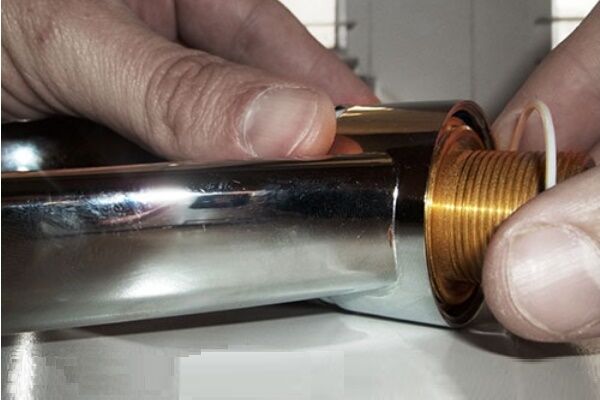
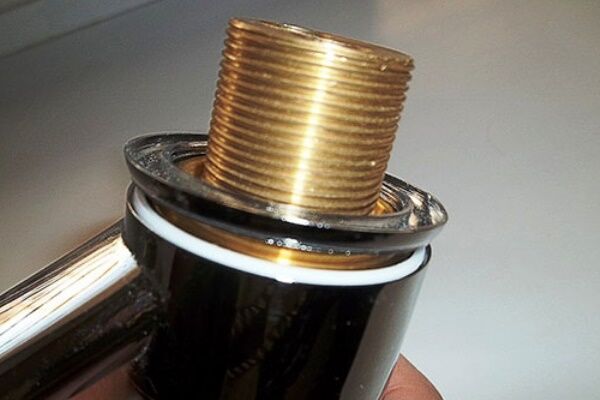
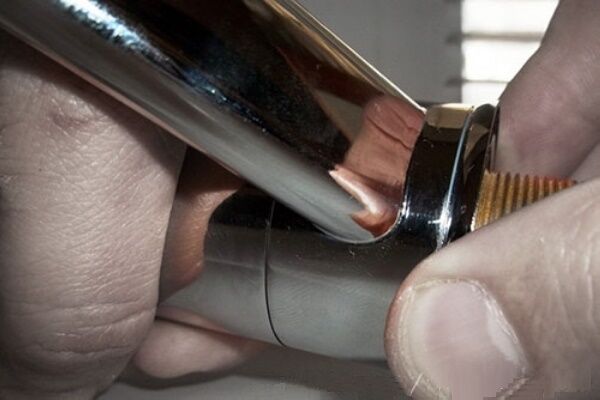
The following photo selection will introduce you to the features of replacing a hinged mixer:
Having ensured that the mixer parts adhere tightly to the seals, we assemble the device in the reverse order:
Next - about the intricacies of disassembly and diagnostics.
Rules for disassembling a ball mixer
If neither tightening the nut nor cleaning the aerator helped eliminate the problem, then you will have to change the gaskets or the “ball” itself.
As already mentioned, the mixing chamber cannot be partially repaired - it is not dismountable. And to replace it, you will have to disassemble the entire mixer, and at the same time check the safety of other internal elements.

To work, you will need the usual tools from a home craftsman's kit: an adjustable wrench, pliers, a screwdriver (straight, Phillips or hex - depends on the screw with which the faucet is equipped).

Step-by-step instructions for disassembling the ball mixer:
- Turn off the water supply, then open the tap to drain the remaining liquid from the pipes.
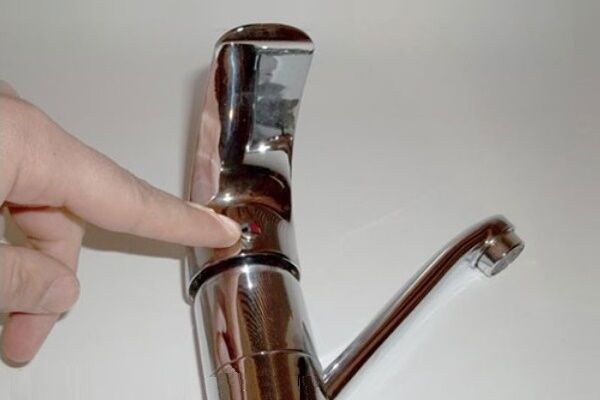
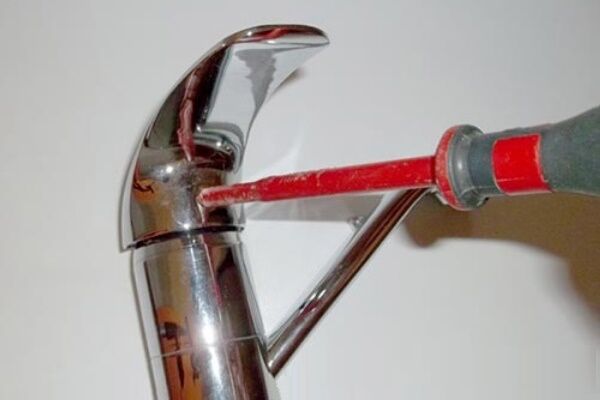
- Using a screwdriver or a regular knife, pry up the decorative plug on the mixer body and remove it.
- Unscrew the screw located under the plug.
- Remove the lever handle (if the faucet has not been unscrewed for a long time, significant force may be required). In order not to damage the chrome-plated outer coating of the case, it is advisable to work with a key or pliers through a thin cloth or napkin.
- Now you need to remove the cap. To do this, you can use an adjustable wrench or place the pointed end of a screwdriver at an angle to unscrew the part counterclockwise with light pressure. If the faucet is old, the cap may “stick” and not respond to light pressure. In this case, you can lightly tap the screwdriver handle with a hammer so that the part “moves away.”
- After the ring is unscrewed and removed, inside the faucet you will see a dome-shaped part - a cam and a washer. They need to be picked up with pliers, pulled out and washed to remove all dirt and lime deposits.
- Now you can remove the “ball” itself from the mixer, wash it from dirt and carefully examine it using the same magnifying glass. If microcracks, grooves, chips or other damage are found, the part should be replaced with a new one. In order not to make a mistake with the diameter, take the damaged “ball” with you - it will be easier to choose a suitable analogue in the store.
- After this, you need to remove the rubber valve seals - the so-called “seats”. They can also be damaged or simply lose elasticity over time, and a loose fit of the “seats” to the ball chamber can cause water to leak inside the faucet. Such parts are not difficult to find on sale, and they are inexpensive, so even if during a visual inspection you do not find any defects in the rubber, but the faucet has been working for quite a long time, you just need to replace the seals for preventive purposes.Applying plumbing lubricant after installation will help extend the life of the seals.
- Then inspect the tension springs located inside the “saddles”. If they are damaged, weakened or sagging, pick up new ones.
- The entire internal cavity of the mixer must be rinsed and cleaned, after which reassembly can begin.
- Springs are inserted into the “saddles”, then each element is placed all the way into the recess. A thin layer of silicone grease is applied to the ball, then the part is installed inside the body so that the limiting protrusion coincides with the groove.
- Now you need to put the plastic parts back in place - the “cam” and the dome washer. There shouldn’t be any difficulties at this stage, because there is a groove on the body that easily aligns with the protrusion on the “cam”.
Then all that remains is to assemble the upper part of the faucet: screw on the metal cap, install the handle, secure it with a screw and close it with a decorative plug.
Other crane problems
During the operation of the ball mixer, other problems may occur. For example, in the bathroom there is often a leak at the switch from the faucet to the shower. In this case, you will have to replace the worn out internal oil seal.
To eliminate this nuance, you need to turn off the water, close the lever and remove the flexible shower hose. Then arm yourself with pliers and a screwdriver, remove the button, and then the adapter that switches from the tap to the shower.
Now all that remains is to replace the old oil seal ring and reassemble the structure in the reverse order.

Replacing the gaskets is not difficult; it is much more difficult to find a suitable repair kit on sale. That is why conscientious manufacturers prudently include spare gaskets in the mixer kit.
If the “spare spare” has already been used or is lost, you can try to make this consumable yourself by cutting a part from a suitable sheet of rubber 3-4 mm thick.
Replacing spool gaskets is done as follows:
- If only the top gasket has failed, you can adjust the operation of the faucet without completely disassembling the mixer. After turning off the water, it is enough to disconnect the flexible shower hose, remove the decorative cap, remove the worn rubber band and replace it with a new one. But if this manipulation does not solve the problem, you will have to proceed further.
- You need to unscrew the fastening screw and carefully remove the spool from the valve body.
- Remove the old rubber bands and install new ones.
- Treat the gaskets with lubricant - this manipulation will increase both their service life and the operation of the unit as a whole.
- Assemble the structure and install the switch in place.
If the switch button itself from the tap to the shower does not work, most likely the internal spring is deformed or broken.
Updating this part is quite simple - you just need to remove the switch and use pliers to screw a new spiral onto the rod. You can read more about repairing a mixer with a shower in this material.

Conclusions and useful video on the topic
The process of disassembling and repairing the device can be studied more clearly in the video:
And the last piece of advice: do not save when buying a faucet, since its service life is affected not only by the quality of water and other external factors, but also by the materials from which the faucet structure itself is made.
If you choose a cheap model, most likely it will be made of silumin (an inexpensive alloy of aluminum and silicon). Although such taps look very attractive both in price and appearance, they quickly lose their original luster and fail. Therefore, for long service without accidents and regular repairs, it is worth taking a closer look at time-tested brass.
Please leave comments and ask questions in the block below. Perhaps you have already had to deal with the repair of a ball mixer and managed to successfully cope with the breakdown. Share with our readers how you managed to fix your plumbing.


In order to repair something, you need to know well the operating principle of this device. I recently changed the spool gasket myself. It seems like nothing overly complicated, but I spent a long time searching the markets for an analogue, because they didn’t include anything in the kit when I bought it. I had to buy a new faucet. This way I replaced everything much faster than running around looking for it, and it’s not a fact that I would have found it.
So far my only experience is replacing the cartridge. The process is simple, it takes a quarter of an hour, the cartridge itself is inexpensive - if that is the problem, then consider it easy. I call a plumber to fix more complex breakdowns. Although it’s time to learn yourself: if you understand the principle of how the mixer works, then most of the damage can be repaired with your own hands.