What to do if the faucet is leaking: causes of leaks and methods for eliminating them
Every home craftsman should know what to do if the faucet is leaking in the kitchen or bathroom.A prudent owner needs to be able to quickly and accurately determine the cause of a malfunction. After all, because of such a minor problem, it’s simply ridiculous to call a plumber and pay him money. Do you agree?
A set of tools for repairing faucets usually consists of screwdrivers, a set of open-end wrenches, an adjustable wrench and tape. This set, along with the necessary seals and components, will help anyone deal with most faucet leakage problems on their own. Here you will learn how to use them in practice.
We will tell you how to diagnose shut-off valves, mixing devices and adjacent water supply elements. For independent craftsmen, we have analyzed and outlined all the options for carrying out repair operations.
The content of the article:
Causes of faucet leakage
The sight of a leaking faucet evokes a variety of emotions in people: from a state of shock with a surge of adrenaline among housewives to a joyful anticipation of the upcoming repair among seasoned business executives. If the leak is strong, then you first need to completely shut off the water supply to the living space, and only then deal with the reasons for the breakdown of the mixer.
To diagnose a leak, you can gradually open the supply valve to determine the exact location where the water is dripping.
The variety of faucet designs allows us to classify leaks only according to typical breakdown locations:
- Dripping water directly from the gander.
- Leakage from under the valve (flywheel).
- Leaks in the places where pipes or hoses are attached to the mixer body.
- Leaking at the base of the spout tube.
When diagnosing the source of a leak, you need to remember that any faucet is a hollow, sealed device, and the only reason for water leakage is the depressurization of its constituent parts. Let's look at how to fix it if the faucet is leaking in the kitchen or bathroom.
A common cause of leakage in hinged faucets is a simple grain of sand stuck in the gap between the moving parts of the device. This is the simplest case, requiring only cleaning:
However, in order to avoid such situations, i.e.sand grains entering the device, it is strongly recommended to install dirt filters in front of the articulated mixers.
If the breakdown is serious and the repair does not lead to the desired results, then only faucet replacement. How to change fittings is described in detail in our proposed article.
Water dripping from the gander
The first time the problem of water dripping from a spout is identified most often at night, when in complete silence the rhythmic sound of a drop falling prevents household members from falling asleep. There is no point in delaying repairs in such cases, because they are quick and easy. In most of these cases, the causes of leakage are worn gaskets or cartridges.
Repair of valve body
You need to start replacing the valve control head by turning off the water in the house. The problem of leaking faucets with valve heads is a defect or wear of the gasket adjacent to the seat of the mixer body. To replace it, it is necessary to carry out a series of sequential actions.
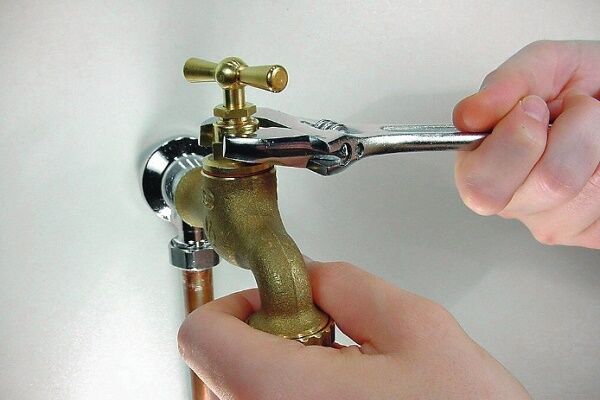
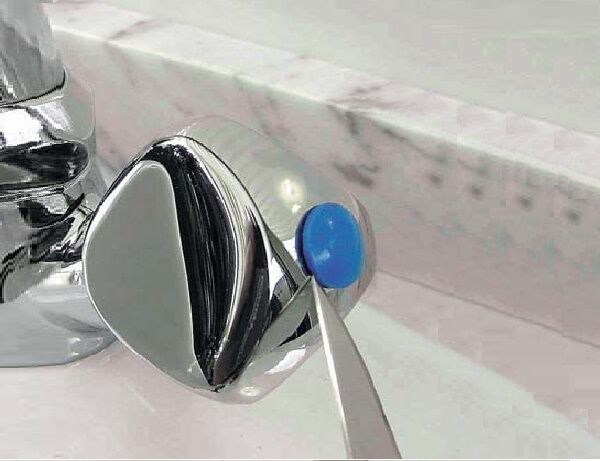
First. Unscrew and remove the valve body. Typically, the flywheel is secured with a bolt hidden under a decorative cap. You can pry off the cap that hides the bolt using a small flat-head screwdriver or an ordinary awl.

Second. Unscrew the head itself with an open-end wrench.

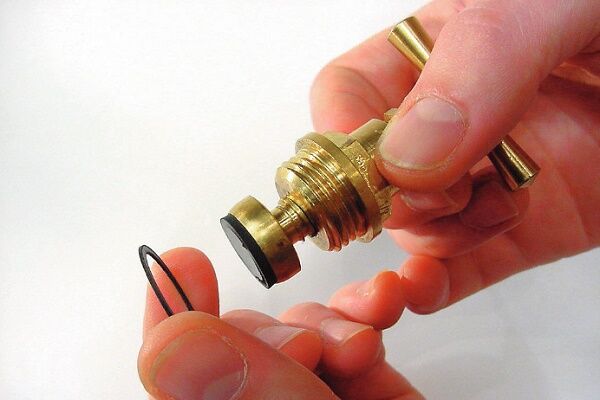
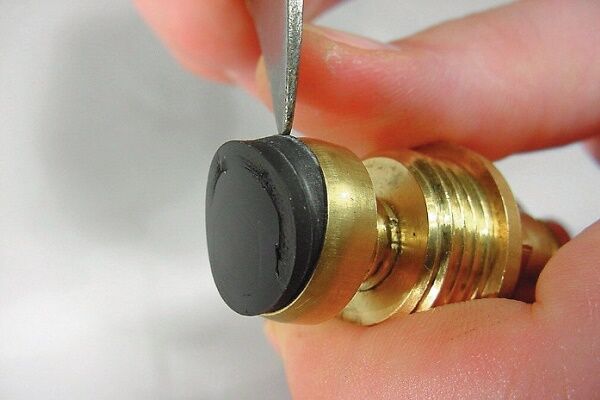
Third. It is necessary to remove the old worn rubber gasket and install a new one.An elastic band costs a penny, but it will provide several years of peace of mind to your nerves. And if you have a choice, you need to buy products from more reliable manufacturers.

Fourth. Dry and scrub the seat on the faucet body with a steel wool or other abrasive material, and then wipe it clean.
Fifth. Screw the head into place and close the valve with a decorative housing.
After the above steps, you can make sure that the faucet is not leaking and the unnerving rhythmic dripping of water into the sink has disappeared.
Photo instructions for replacing the gasket
In valves with a rod locking mechanism, by analogy with valve devices, the most wearing part is the rubber gasket. And although such devices are now difficult to find in urban environments, they are still actively used in dachas.
It is worth familiarizing yourself with the sequence of work for replacing the valve seal that blocks the flow of water:
Repair of a hinged mixer
Articulated (single-lever) faucets have become widespread because of their ergonomics: you do not need to turn the valves for a long time, smearing them with grease and flour in the kitchen. Despite the external simplicity and elegance of the forms of such cranes, the algorithm for their operation is quite complex.
To increase the level of maintainability of articulated faucets, manufacturers began to use a modular type of design: a special cartridge is installed inside the body, containing all the necessary mechanical filling.
Therefore, special knowledge is not required to understand how to fix a leak in a swivel valve: in case of most breakdowns, the entire cartridge is replaced.
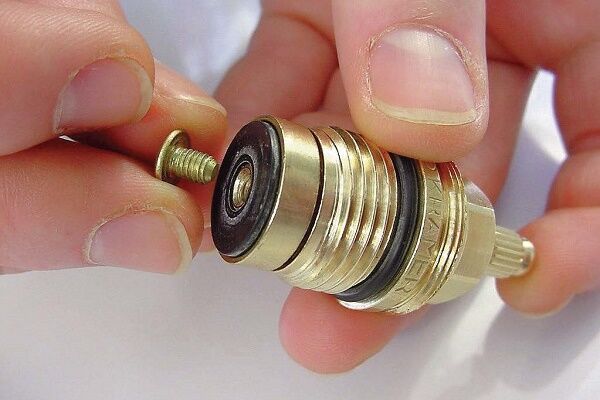
Water leaking when the tap is closed implies a violation of the seal between the seat and the plastic or ceramic regulatory parts of the cartridge. You can try to disassemble and clean some models, but the likelihood of returning the cartridges to functionality and eliminating leaks is very low. To quickly replace the internal filling of the swivel valve, do the following.
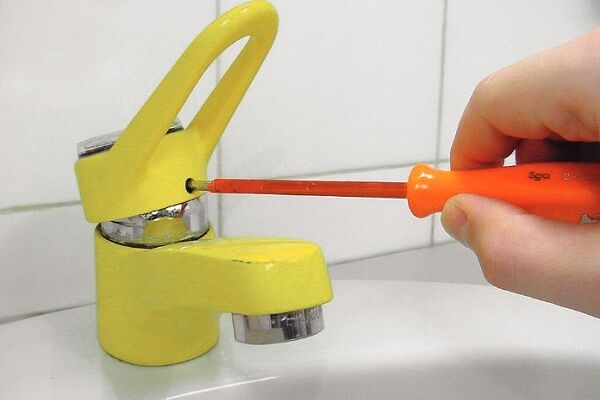
First. Remove the decorative colored cap. It serves not only to cover the bolt, but also indicates the position of the lever when supplying cold and warm water.

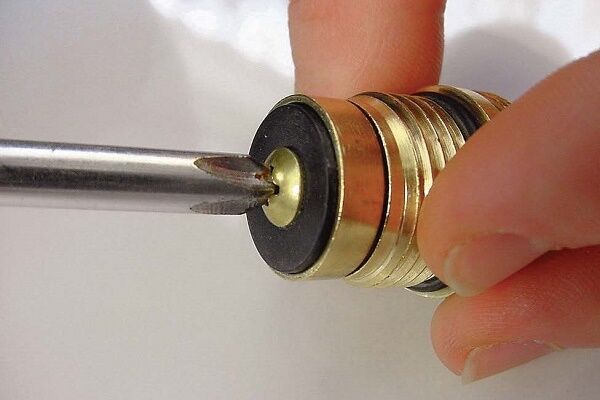
Second. In the opened hole, you need to unscrew the fixing bolt that secures the lever to the cartridge.

Remove the faucet handle.

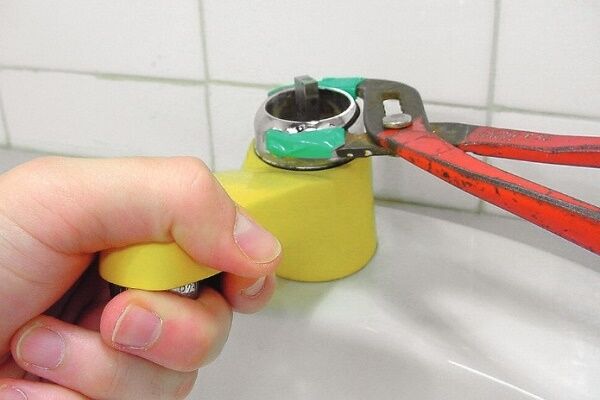
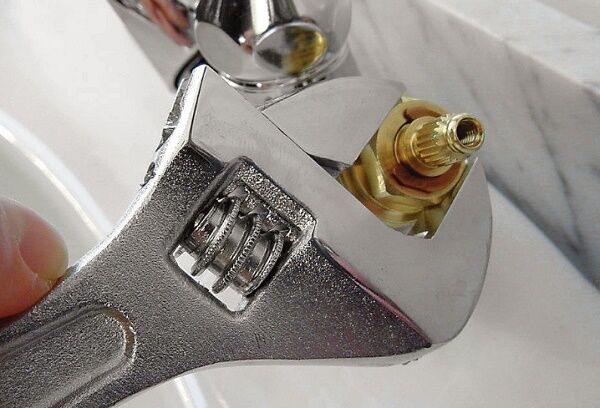
Third. The cartridge is closed with a decorative cap, which must be unscrewed by hand. Under the cover there is a large circular nut, which poses the main problem for those who want to change the cartridge themselves.
To unscrew this nut, you need an adjustable wrench with a gap of 27-32 mm. Not every owner has such keys in the utility room, so you need to worry about their availability in advance.

For convenience, it is better to lay out the removed parts on a flat surface in this order. It is advisable to photograph the disassembly process so as not to get confused in the details during reassembly.

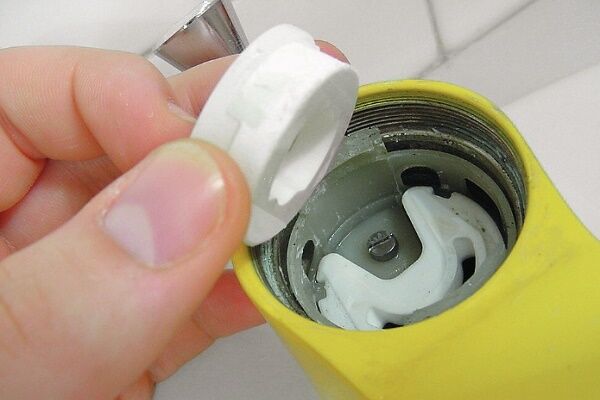
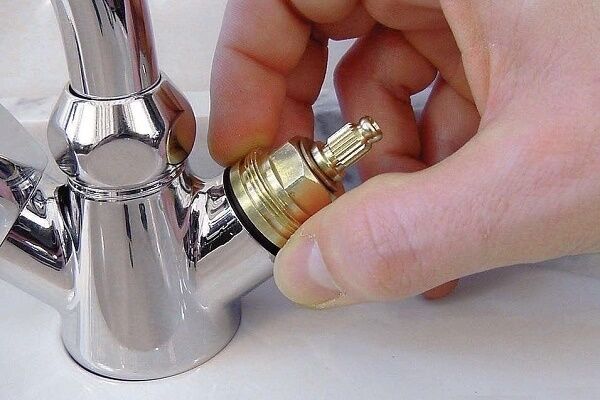
Fourth. After unscrewing the nut, the cartridge is pulled out and replaced with a similar new one.

If you have saved the packaging from the old faucet, then you can use it in the store to buy a suitable cartridge model in advance. If the type of mixer is unknown, then you will have to repair the faucet in the morning or afternoon, so that after disassembling it you can have time to go to the store and buy a similar part.
The cartridge has special protrusions on the lower half that correspond to the dimples on the seat. They are needed to fix the parts in a clearly defined position.

After installing the cartridge, the faucet components are assembled in the reverse order.
If the cause of water leakage is microcracks or grooves in the seat, you can try sanding the metal surrounding the hole with a drill with a small grinding head. Large cracks cannot be repaired and are a clear sign that you need to buy a new faucet.
Details on how repair ball mixer, you can find it in the article we offer.
Leak at the base of the valve
The flywheel, also known as a valve, is designed to regulate the flow of water through the spout tube. The adjusting head (faucet axle) is usually attached to the faucet body with a threaded connection and contains one or more o-rings to seal the internal area of the mixer.
Below are two diagrams of valve mixer locking devices in comparison with a single-lever faucet (right).

The flywheels are covered with decorative casings, which are attached to the heads with a screw or bolt hidden under a small cap.
Causes of valve leakage
The adjusting head has a complex internal structure.

Water may leak from under the valve casing due to the following breakdowns:
- Insufficient level of head sealing:
- the faucet axle is not pressed sufficiently against the mixer body (in modern models);
- poor-quality winding of the thread when screwing in the head (in older models of taps without o-rings).
- Damaged rubber gaskets or rings between the mixer body and the faucet axle box.
- Aged stuffing box packing of the rod. With this breakdown, an increase in leakage is observed when the tap is open.
Before diagnosing the causes of valve leakage, it is necessary to shut off the general water supply in the apartment and remove the decorative covers from the flywheel.

After gaining access to the adjusting head, you should open the water and determine the places where water is oozing. Then turn off the water again and begin repairs.
Troubleshooting Methods
It is necessary to consider methods for repairing the valve mechanism, taking into account the location of the water leak.
Option one: Water flows from under the stem.
If the crane has a non-separable adjusting head, then there is only one way out: buy and install a new crane axle box, there is no other option.However, most reputable faucet manufacturers usually include repairable heads in their products. If they have an oil seal bushing on top, you can try to tighten it with a wrench and check for leaks.
If water leaks with the stuffing box clamped as tightly as possible, you can disassemble the head, remove the seal and try to replace it. The adjusting valve axle boxes in most mixers are standardized, but it is not always possible to find a new oil seal of the required design on sale.
If it is impossible to repair a leaking head by replacing the oil seal, then it should be replaced with a new one.
Option two: water flows out at the junction of the mixer head and body.
The simplest way to solve this problem is to press the head against the mixer body with a wrench. If the result of this action is negative, you need to unscrew the valve axle and check the sealing gaskets.
It is possible that during the initial installation of the faucet they moved to the side or twisted, which eventually caused a leak. It is recommended to remove and reinstall the O-rings and then screw the adjusting knob back into the faucet.

If reinstalling the sealing gaskets does not lead to the disappearance of the leakage, then their complete replacement is required.
Instead of rubber seals in Soviet taps, tow with paint was often wrapped around the threads. If there is a leak from under the valve in such mixers, you must first completely clean the head of any remaining sealant, and then wrap a convenient fum tape or the same tow lubricated with silicone around the threads.
After this, you should tightly screw the head back into the tap and rejoice at the absence of leakage!
Another reason for a leak in the gap between the valve and the faucet may be the appearance of a small groove or scratch along the edge of the mixer body under the adjusting head gasket. If such defects are found, then you should carefully sand the entire annular surface until the scratch disappears, and then reinstall the valve axle.
If, due to serious defects in the faucet elements, it is impossible to stop the leak using the methods described above, then you need to prepare the family budget for the purchase of a new faucet. We advise home craftsmen to study the technology installing a faucet on the side of a sink in the bathroom or kitchen.
Leaking at the base of the gander
Due to differences in the design of valve and flag mixers, the causes of water leaks at the base of the gander and the methods for eliminating them differ for these taps.
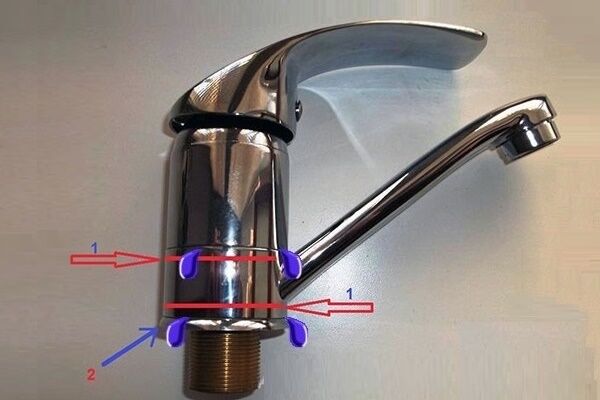
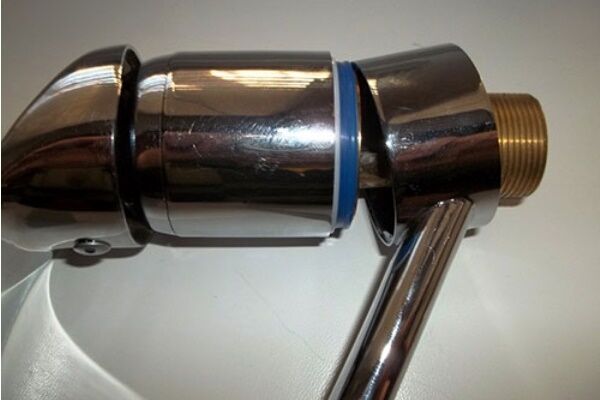
Leak near the faucet spout
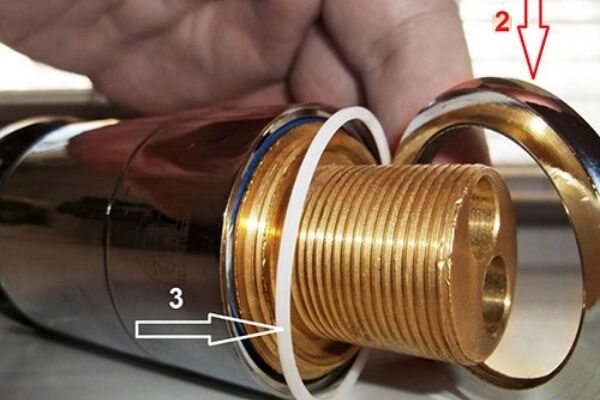
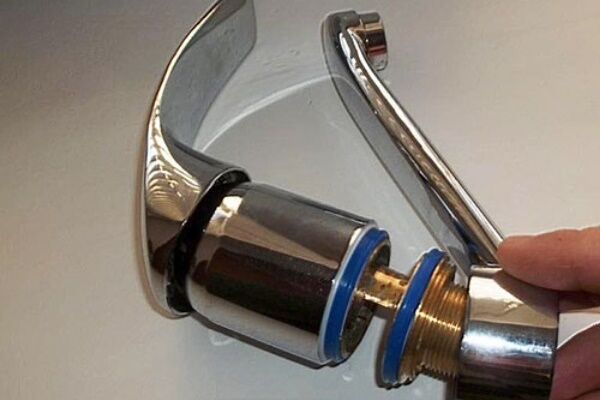
The shower hose and spout tube (in common parlance - a gander) are attached to the faucet body using a union nut, under which there is a rubber gasket. And if the faucet in your bathroom is leaking, the reason usually lies in the wear of this rubber band. Often the gander has an additional 1-2 external o-rings.
To repair the leak in this case, it is necessary to unscrew the union nut and install a new silicone or rubber gasket, and also replace the rubber rings, if any. The tools for this procedure will require an adjustable wrench, as well as an awl or small screwdriver to remove the old rubber gasket.

You need to stock up on gaskets in advance.

If you need to fix the problem quickly, but there is no suitable new o-ring, you can simply wrap the fum tape tightly around the thread and tighten the union nut with the cleaned old gasket.
Water can ooze out at the base of the gander for another reason: over time, microcracks may appear in the body of the faucet or spout, through which water leaks. There is only one solution to such a leak - replacing the entire mixer.
To help independent plumbers, we have provided photo instructions on how to replace a valve mixer gasket:
Leak at base of single lever faucet
To get to the seals on the base of the hinged faucet, you need to completely dismantle it by removing it from the sink. This procedure is not easy and long, so we will consider it step by step.
The first step when repairing a faucet is to turn off the water in your home. After this, it is necessary to disconnect the flexible hoses from the supply pipe and open the mixer to allow the remaining water to escape.

The second step is to unscrew the fastening nut on the stud under the sink, remove the fixing bracket and pull out the faucet along with the hoses.

Then we unscrew the pin itself with a screwdriver, and use an open-end wrench to disconnect the flexible hoses. If their fittings and rubber tube are worn out, then it is advisable to buy new hoses or, at a minimum, replace the O-rings and gaskets at both ends of the hoses. The fourth step is to unscrew the threaded ring at the base of the tap that holds the spout. We remove the gander.
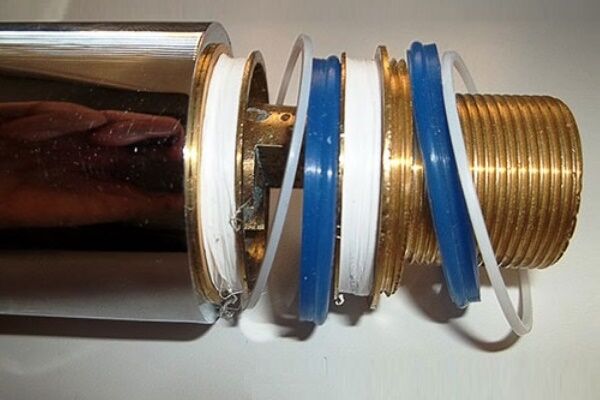
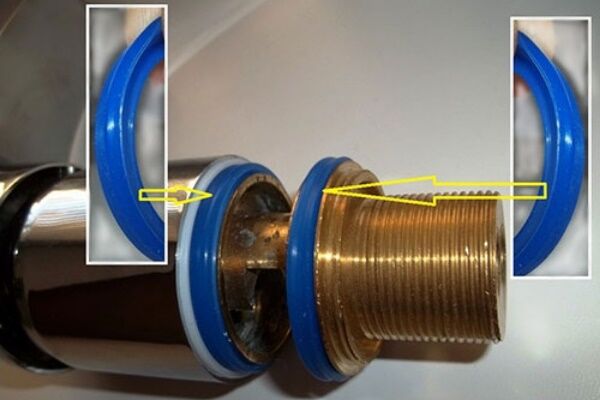
At the fifth stage of repair, you need to carefully examine and remember the location of the O-rings and seals in order to fit the new parts correctly the first time. After this, we remove the old gaskets, clean their locations and install new seals. It is convenient to clean the grooves with an ear stick moistened with water or oil.

Silicone gaskets usually last two to three years with active use. If you plan to use the faucet for a longer period, then it is better to look in stores for seals made of ordinary rubber, which will last several years longer.
The last thing you need to do is assemble and install back the constructor called the “flag tap”, not forgetting to put the gaskets.
If the store did not find gaskets of suitable size, and the standard repair kit does not provide them at all, you can eliminate the leak in the following simple way:
Now all that remains is to assemble the remaining parts of the mixer body and put the device in place:
After installing the faucet in its original place, you need to observe for several days that there are no leaks at the base of the spout and under the sink.It is advisable to look at the joints once after a long time of washing dishes.
If a leak appears under the sink and water flows down the connecting hoses, it will be necessary to dismantle the faucet again and eliminate the leak. We will examine this problem in detail in the next section.
Leak at the junction of the supply pipes
Water leakage at the points where the mixer body is connected to water pipes or hoses can occur for three reasons:
- Worn seals.
- Cracked faucet body or connecting fitting.
- Incorrect installation of flexible hoses.
If, upon inspection of the repair site, a crack in the faucet body is identified, then you can immediately begin choosing a new water tap, because this damage cannot be repaired.
Options for eliminating other causes of leakage will differ for faucets with flexible supply hoses and at faucets into which water is supplied from the nozzles of hard plastic or metal pipes.
Repairing leaking pipes in the bathroom
Water leakage at the junction of the mixer body and the pipes built into the wall is eliminated in the same way as a valve mixer leak at the base of the spout, instructions for eliminating which are described above. In both cases, the connection of the two tubes occurs due to a union nut, under which there is a sealing rubber band.

An important nuance of the gasket replacement procedure when installing a two-pipe mixer is the synchronous unscrewing and tightening of both union nuts.
Otherwise, a misalignment will occur, which can result in displacement of the gaskets and even licking of the threaded connection. And damage to the thread of the nut of an exclusive faucet can lead, at a minimum, to the need to install homemade parts with an unsightly appearance.
Eliminating leaks in supply hoses
Let's look at eliminating water leakage at the junction of hoses and the faucet body using the example of one of the most common faucet models.
The first step is to shut off the water supply to the tap and unscrew the flexible hoses from the water supply pipes. Then unscrew the mixer valves and drain the water from the pipes.
The faucet is attached to the sink body from below using a bracket pressed with a nut on a stud. It is necessary to unscrew the fastening with a wrench and carefully remove the mixer from the sink, pulling the hoses up through the hole.
In principle, you can not remove the faucet from the sink, but unscrew the water hoses directly below. But it’s unlikely that anyone will like to do gymnastic exercises in the limited space of a sink.

Next, you need to unscrew the hoses from the valve body with a wrench and replace the O-rings on the fitting, having first cleaned all the grooves with an awl and cloth.

If the supply rubber pipes are worn out, it is better to buy new ones, because during reinstallation there is a high probability of their complete rupture. Due to the variety of fitting designs, you need to take old hoses to the store with you as an example.
After installing new rings or purchasing new hoses, you can mount the faucet in place, following the reverse procedure. When tightening the hose fittings, it is very important not to clamp them too tightly, because the thin O-rings may come out or simply “smear.” Sometimes it is enough to simply clamp the hoses with your hands.
The main problem with installing and dismantling the mixer is the limited working space. Often, long open-end wrenches simply cannot be positioned to unscrew the nut. In such situations, you can lubricate the threads of the stud with oil and unscrew the nut with pliers.
If the mixer is connected with a rigid line, then most often it is replaced, the features of which will be familiarized next article.
If all the above steps were carried out correctly, the leak should stop. Although sometimes you have to unscrew and tighten the hoses again due to the poor quality of the O-rings and their displacement.
Conclusions and useful video on the topic
Videos will help you look at the internal structure of faucets and make it easier to understand how to fix a leaking faucet.
Video #1. Fixing a leak at the base of a single-lever faucet spout:
Video #2. Replacing flexible hoses on a tap:
Video #3. Dismantling and repair of the crane axle box:
The information we have presented about the features of repairing faucets will always help a good owner determine the reason why the faucet is leaking and choose a method for repairing it.
Would you like to tell us about how you repaired a faucet in your kitchen or bathroom yourself? Did you have any questions while reading the information provided? Please write comments in the block below.


Anyone who uses budget faucets often encounters situations where they need to repair a leak. More expensive branded faucets also leak, but much less frequently. No matter how anyone tries to insist that we overpay just for the name, it is a fact that the more expensive is usually of higher quality.
In my house, the faucets themselves usually leaked. And in such cases, I always went to the store for a new crane axle box. Yes, in principle, you can disassemble it and change a tiny ceramic part (I have ceramic ones everywhere), but why? Crane axle boxes are quite inexpensive, and a new one works many times better than a refurbished one. I have never had to repair the cartridges before. Nothing is flowing yet (t-t-t), but I’ll re-read this article if anything happens. Added it to my bookmarks.
If water drips from the gander, then consider yourself lucky; you just have to change the cartridge. But if it leaks from under the stem, then you will have to tinker, because there can be many reasons. In such cases, a lazy plumber may suggest replacing the entire faucet, but if you are doing the repairs yourself and saving your money, you can try to unscrew, clean, and replace the gaskets.