Do-it-yourself garden furniture for a summer house: ideas, drawings, step-by-step instructions
Outdoor furniture made from different materials is comfortable.They often choose simple models that can be made without any special skills.
The content of the article:
What material to choose for country furniture?
To prevent garden furniture from being destroyed due to exposure to the sun, moisture and other negative factors, you need to choose and prepare the material correctly.
Common options:
- More often they make various furniture from wood, taking into account easy processing techniques. For outdoor items, all parts are impregnated with moisture-resistant compounds. Suitable for use are boards, timber, pallets, stumps, etc.

- Metal furniture is durable and strong. But when working with this material, it is necessary to provide protection against rust.
- When making garden furniture from stone with your own hands, simple processing options are used. They get outdoor tables and benches that will not collapse for a long time. The disadvantage is the high weight, which makes it difficult to move to another place.
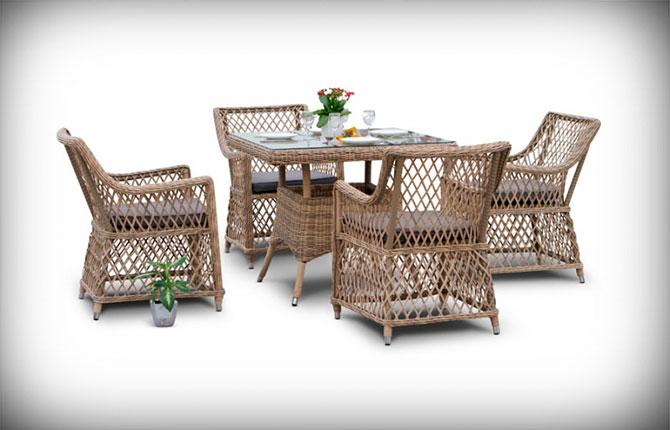
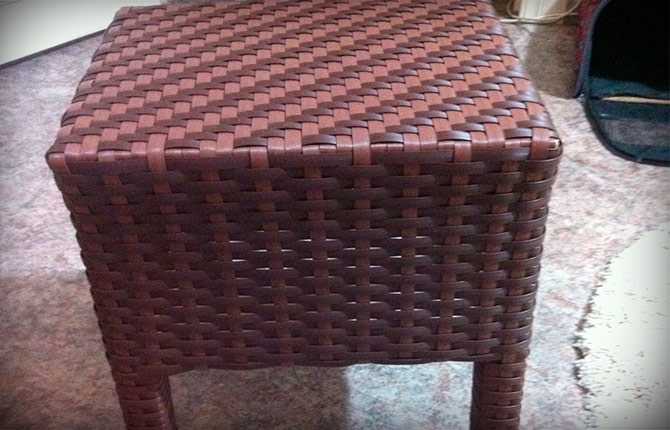
- Furniture woven from wicker or rattan looks beautiful. The material resists moisture well, but in the winter it is advisable to bring such items from the outdoor area into the barn or onto the veranda.

Implementation options
Outdoor furniture surprises with its variety. Before starting production, interesting options are analyzed:
- A simple bench made of polished timber will decorate a shady corner of the garden.
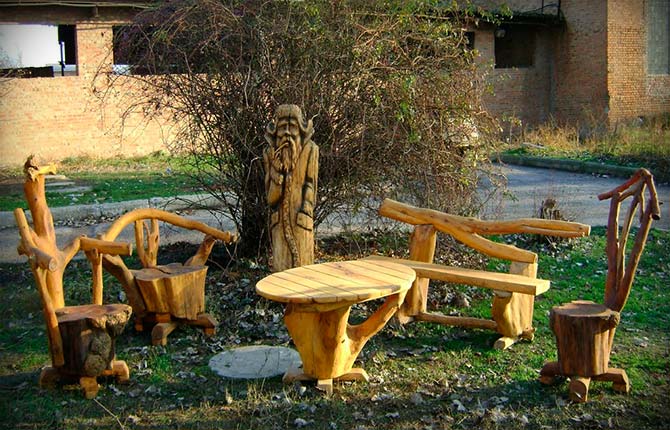
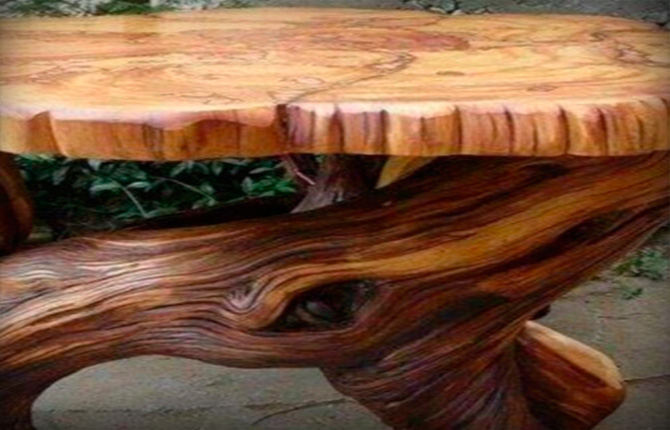
- Skills in working with natural materials will come in handy. Unusual sets of garden furniture are made from sanded, varnished stumps and driftwood.
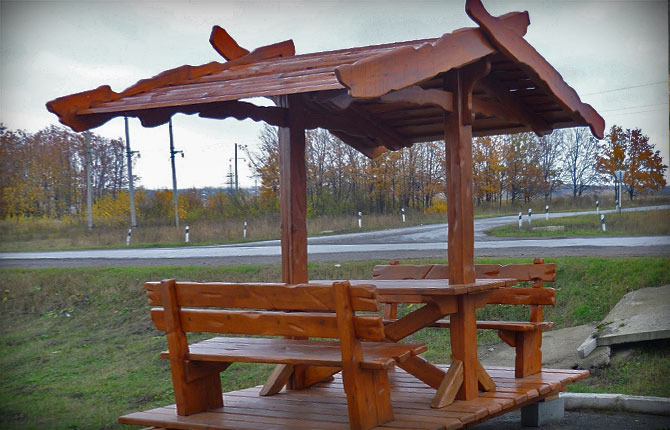
- A wooden outdoor set of tables and benches under a canopy fits comfortably into the landscape.
- On the veranda you can install a table and outdoor half-chairs made of wooden slats.
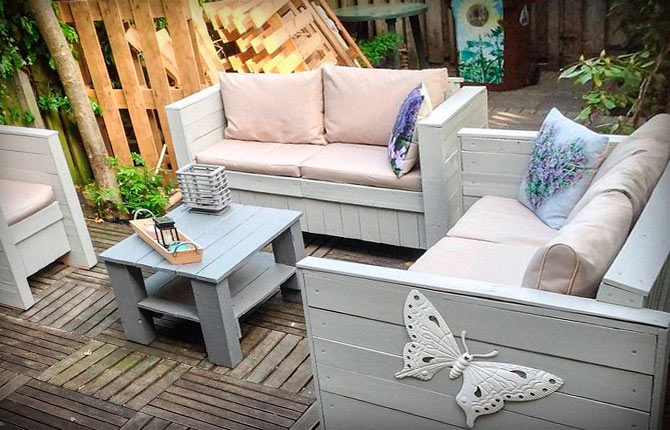
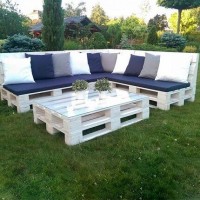
- Furniture ensembles made from pallets for summer cottages are attractive due to their convenience and ease of manufacture. Sofas, on which soft mattresses and pillows are placed, are conducive to relaxation. This design will emphasize the loft style.
- For a romantic setting, wicker outdoor furniture is made from rattan.
- A corner bench adds an unusual touch to any area. The supports for this type of furniture are wooden flowerpots with flowering plants.
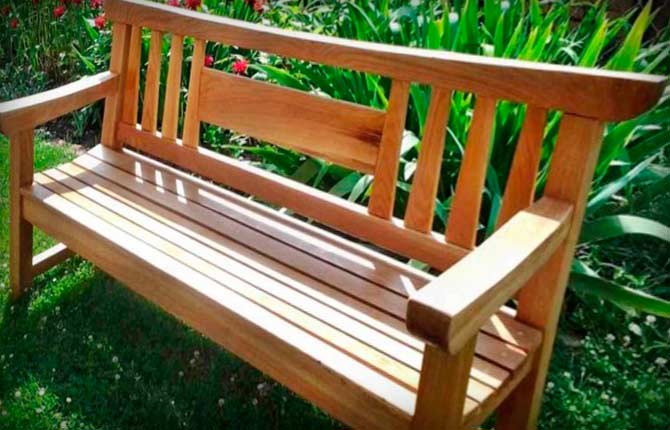
- You can make a comfortable outdoor bench. Wood is most often used for this furniture.
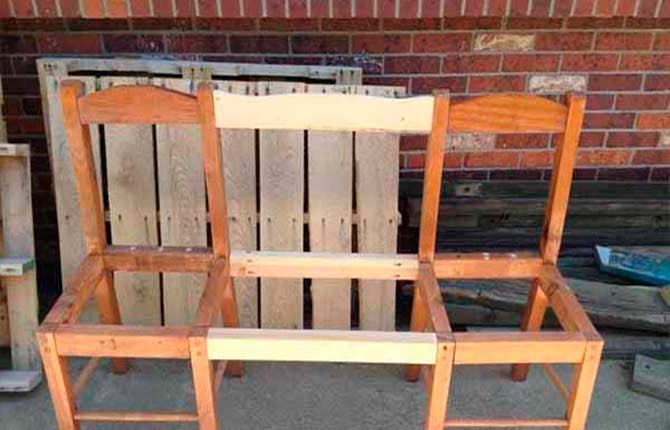
- The frame for an outdoor sofa can be chairs connected by slats and bars.
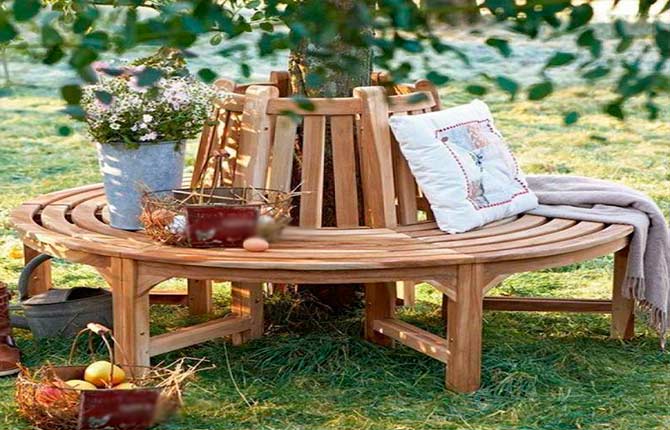
- A circular bench becomes an unusual attribute for the trunk of a garden tree.
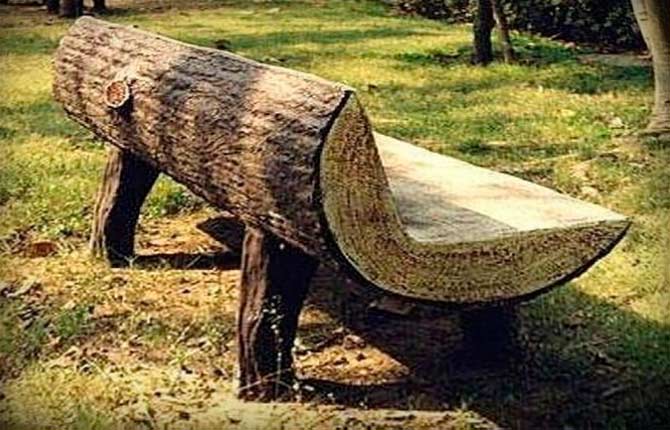
- A large diameter log can easily be turned into a street bench if you select a corner segment from it.
- Coils freed from cables will quickly allow you to create an outdoor dining area.
- Sanded large cuts of wood look unusual when making furniture. Such a table becomes an elegant decoration of the landscape.
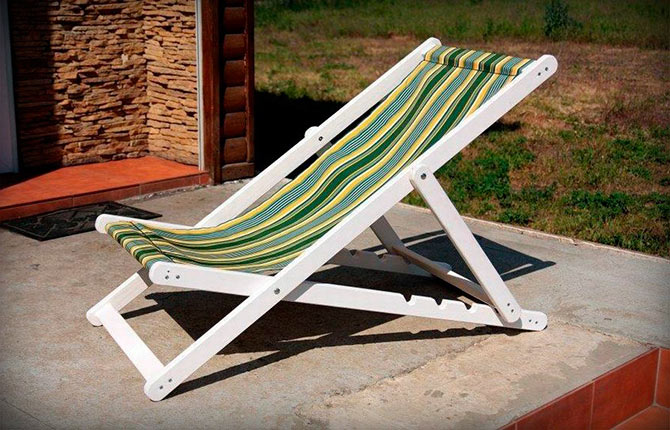
- For a comfortable rest, it is easy to make a mobile chaise lounge, the seat of which uses thick fabric.
- You can make such an outdoor piece of furniture from wooden slats.
- Sun loungers are made in different sizes, providing, for example, a comfortable extension for the legs.
- Cozy wooden rocking chairs will provide relaxation.
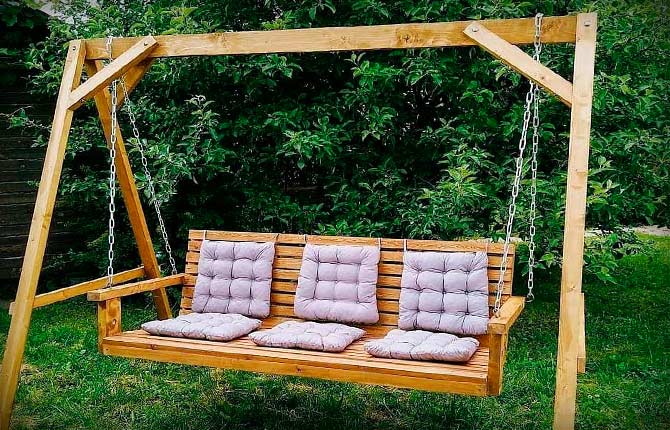
- A country swing will allow all family members to relax.
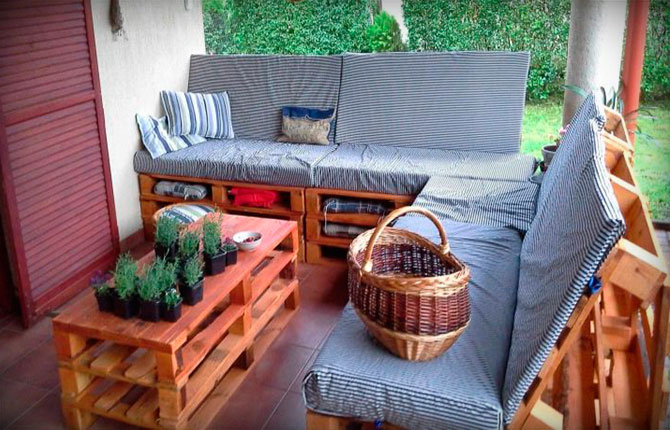
Interesting: DIY furniture from pallets
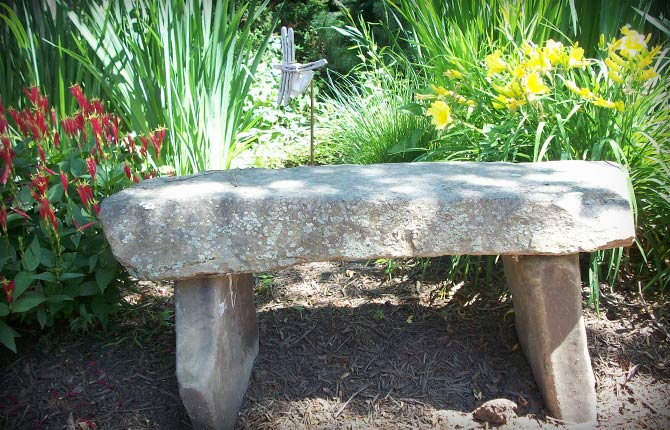
We make furniture from natural stone
If a stone is chosen for the manufacture of a street bench or table, the following working methods are used:
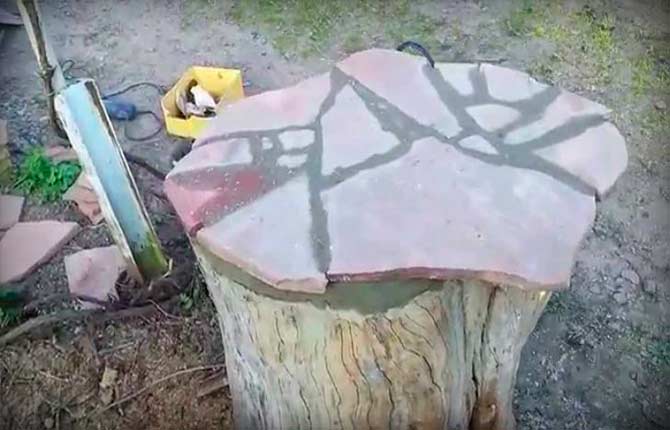
- Taking the stump by the base, make a tabletop from several flat cobblestones. They are fastened with cement, resulting in durable furniture.
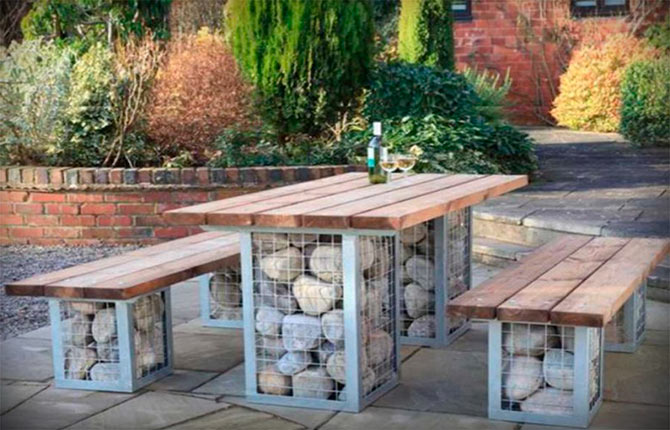
- Gabions look interesting. More often they are used as a base. By placing a wooden board on top, you get an unusual outdoor table. Nearby, benches are made to create a set of furniture using a similar technology.
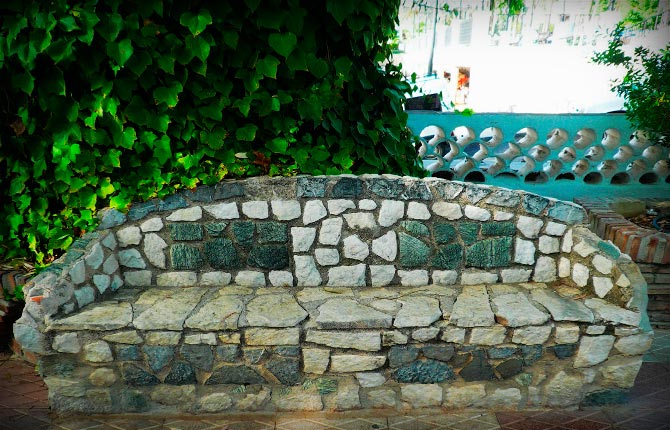
- By fastening stones of different sizes with cement, you can lay out a spacious outdoor sofa.
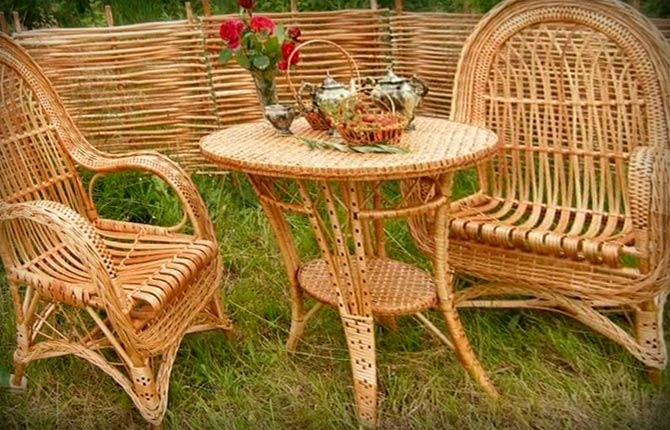
Options for wicker garden furniture
Before you start making beautiful wicker furniture, you study different patterns. They will allow you to correctly complete all stages of the work.
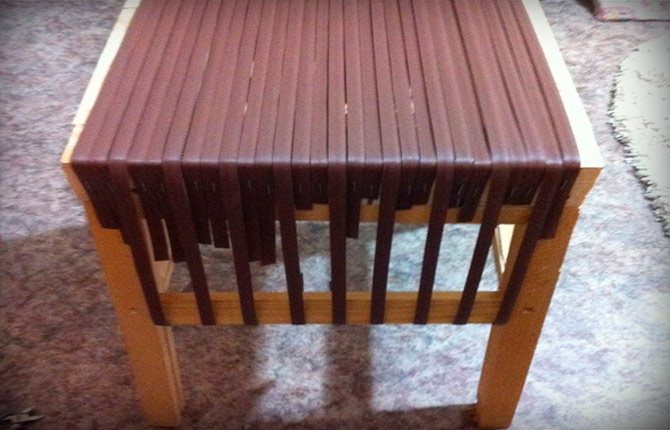
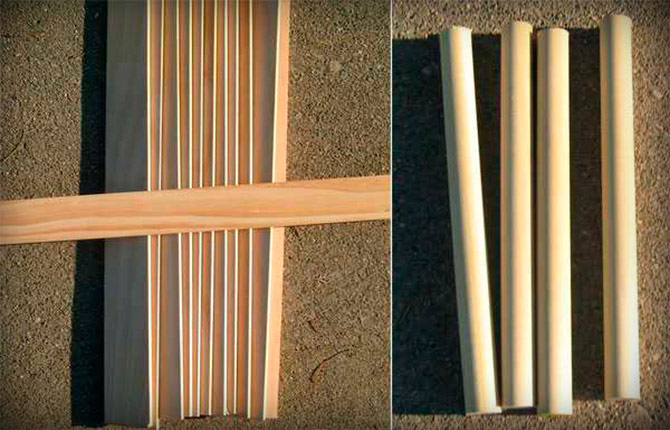
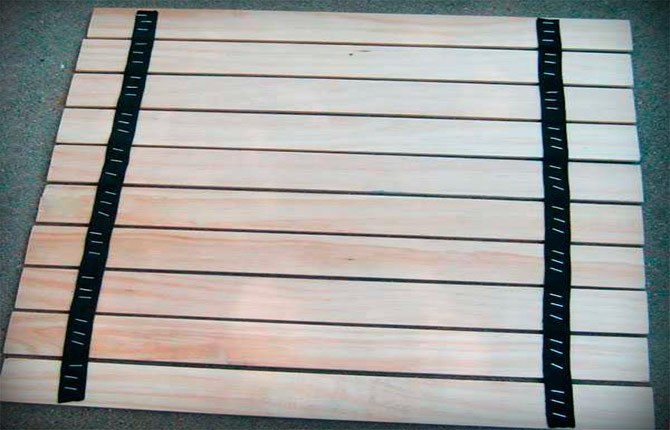
It is more convenient for novice craftsmen to begin mastering the art of weaving with rattan ribbons. For decoration, take a stool.
Algorithm:
- Such an outdoor piece of furniture is made from 4 bars fastened into a frame. The legs are fixed from below with self-tapping screws.
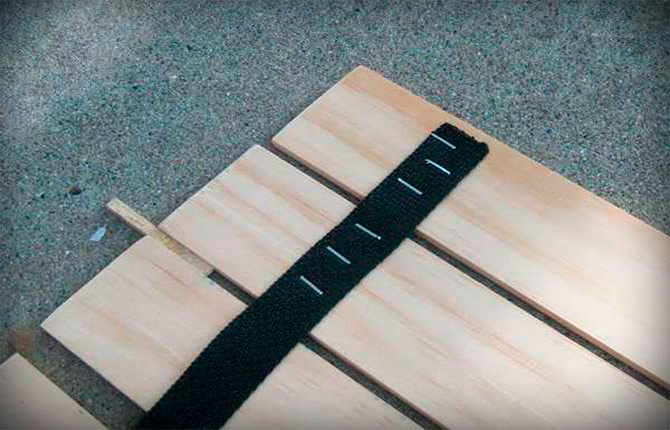
- The frame is reinforced with strong braid, which is fixed with a stapler to the side bars.
- Long and shorter strips of rattan are laid tightly. Observe the correct order by placing two short (fixed on the seat bars) and then one long (fixed on the back side of the crossbar between the legs) strip.
- For weaving, ribbons are also alternated. After one long segment there are two short strips. In the first row, they pass through every two stripes, either from above or from below. Each subsequent row involves a shift of one lane.
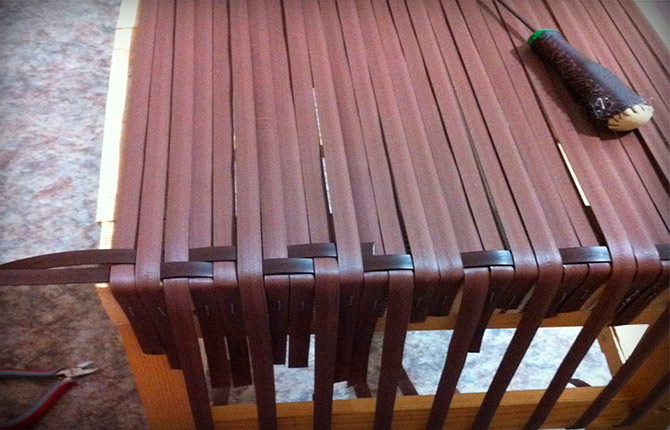
- After completing the design of the seat of the outdoor stool, the ends of the woven ribbons are fixed with a stapler.
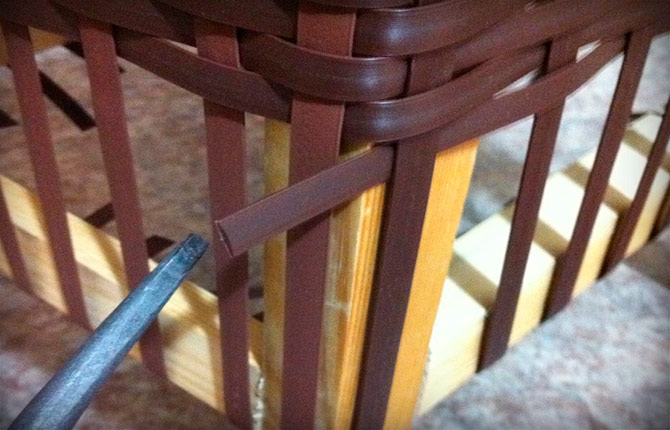
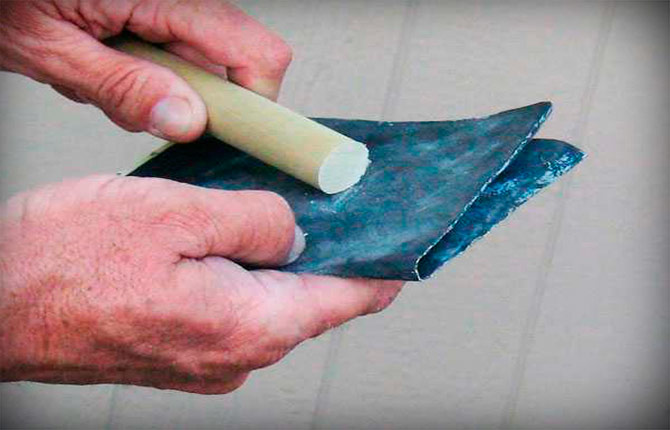
- A long ribbon is braided around the sides in a checkerboard pattern. The tape is extended during the work using a soldering iron.
- The sides are braided approximately to the middle, securing the ends of the long ribbons at the bottom of the legs.
- Furniture legs are braided separately.


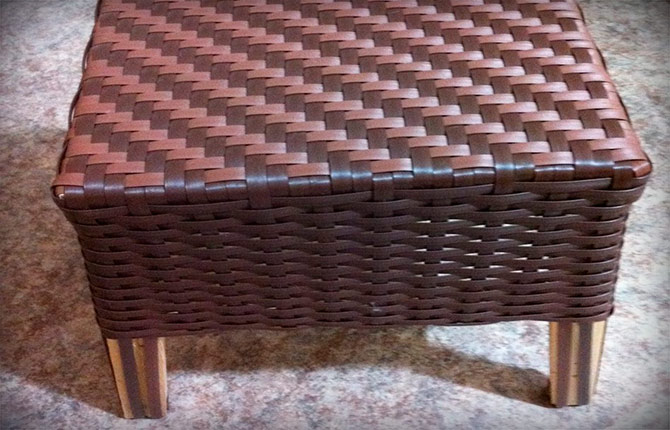
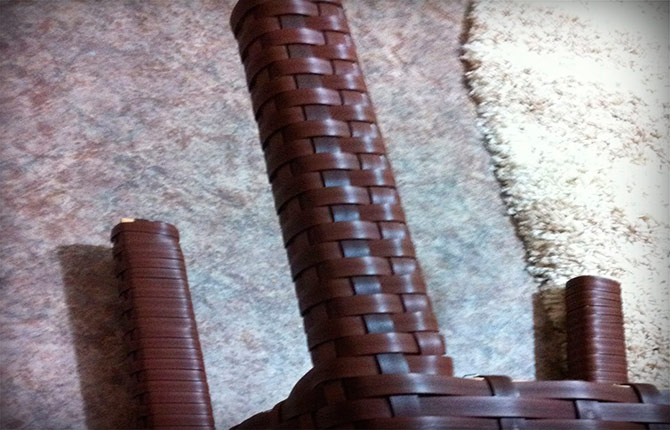
The finished product produces a beautiful outdoor stool.
Wooden garden furniture
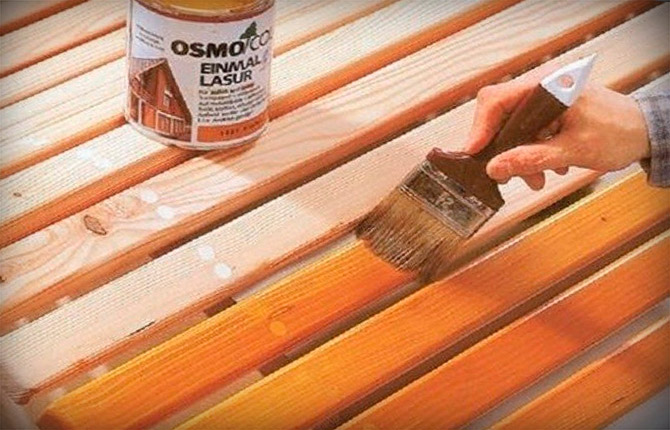
By analyzing drawings and photos of different types of wooden furniture, you can understand the sequence of operations, which makes your work easier. Take into account that finished items need to be painted, varnished or other protective material. This procedure will protect outdoor furniture sets from rapid destruction.
Shop
Simple bench designs suitable for relaxation can be made in different ways.
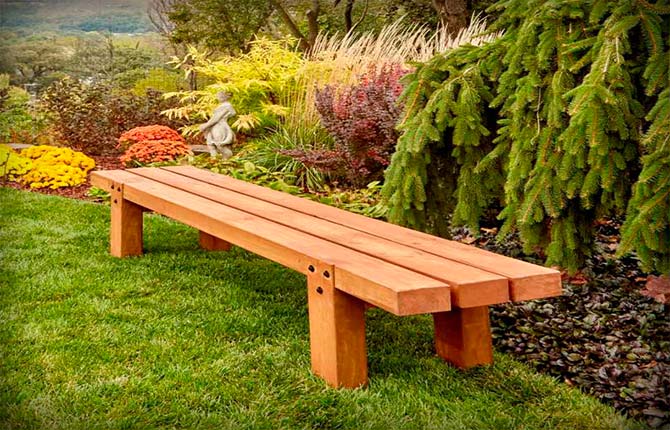
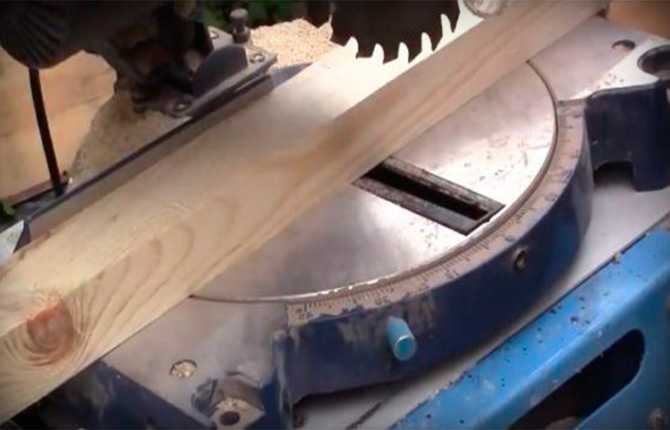
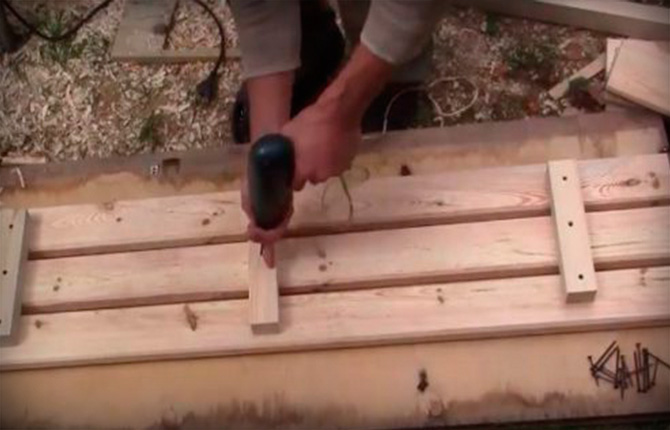
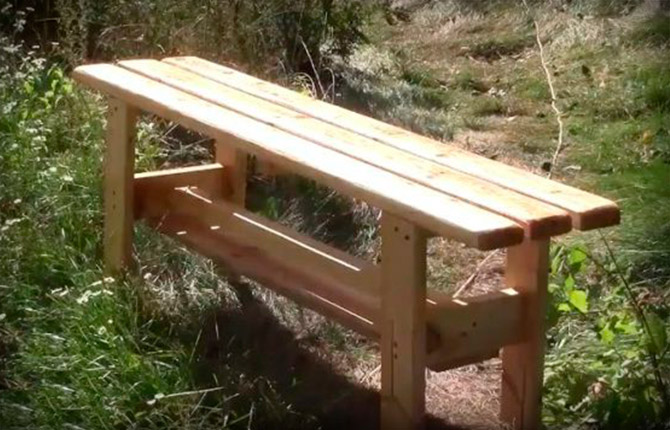
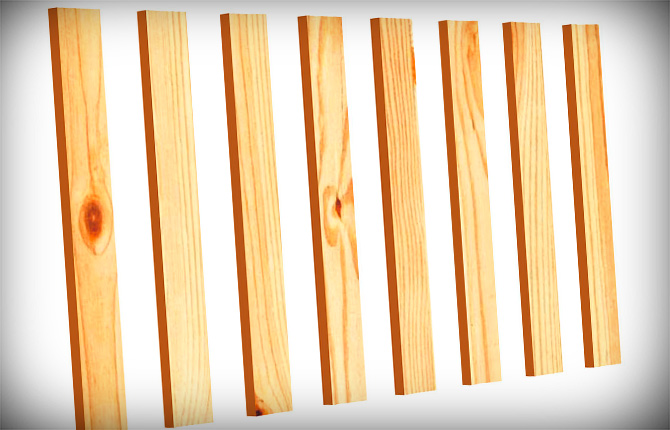
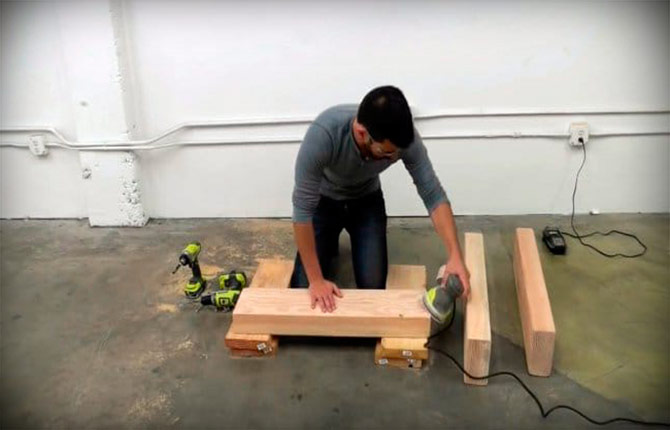
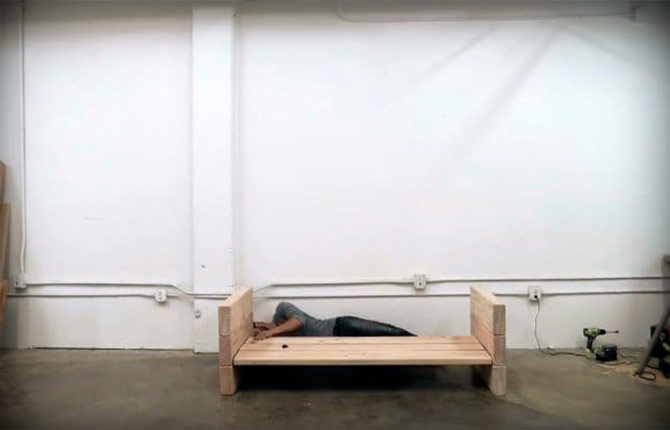
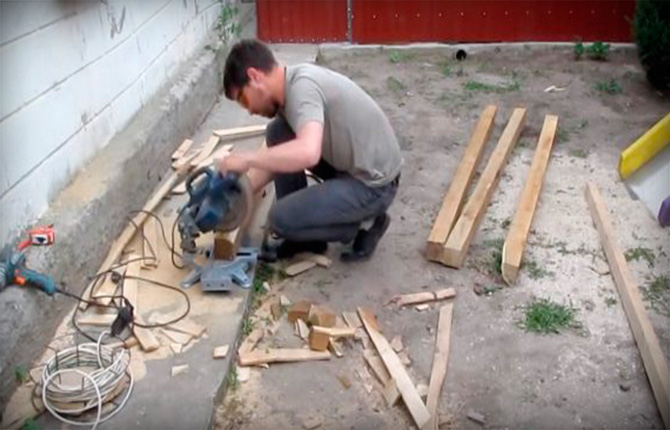
From planks and timber
For a street bench, the basic dimensions are maintained, taking into account the convenience of this type of furniture. It can be made from timber 5 x 10 cm, as well as wooden boards 6–8 cm wide (for lintels) and 12–15 cm wide (for the seat). Their thickness is 5–6 cm.
Algorithm:
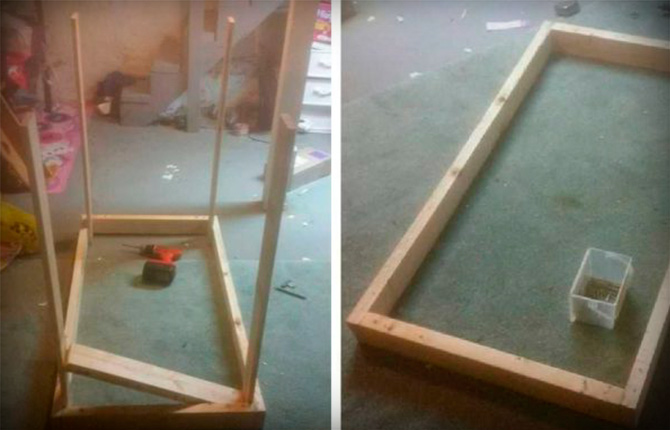
- 3 blanks of the required length for the seat are made from wide boards.
- The timber for the legs is cut into 4 parts. The height is made so that it is comfortable to sit.
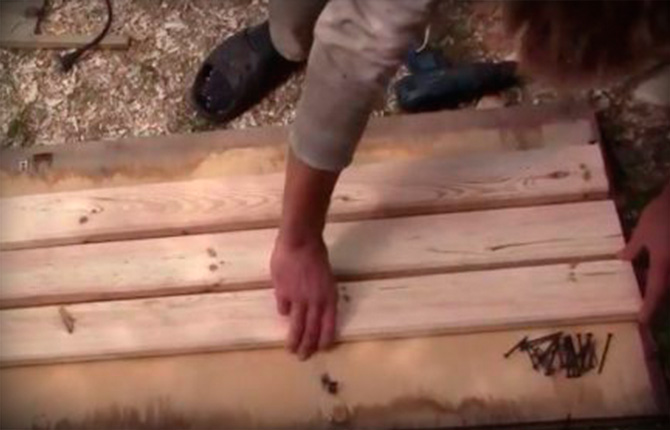
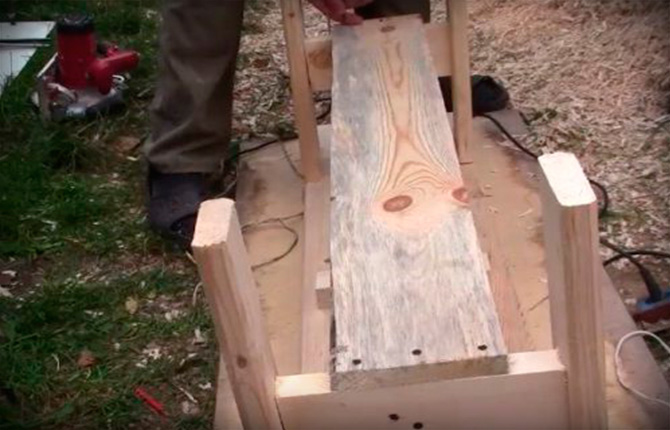
- Then the boards prepared for furniture seats are laid out on a sheet of plywood, leaving small gaps, on a flat area.
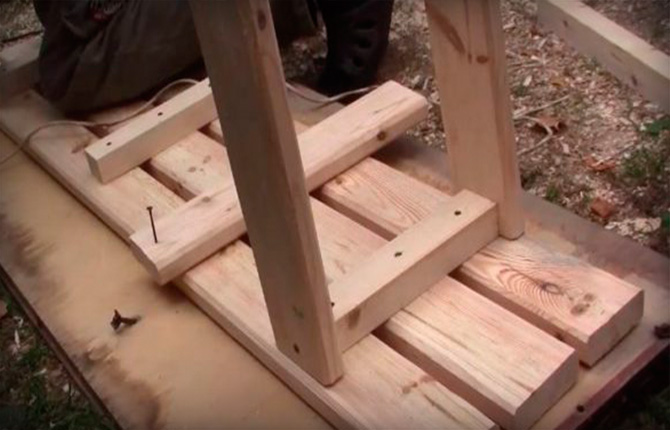
- Cut 3 crossbars from a narrow board. Their length should be such that the jumpers fasten the seat blanks, reaching the middle of the outer parts. Two side jumpers are attached to each plank with self-tapping screws. Their location corresponds to the place where the legs will be. A third cross member is fixed in the middle between them.
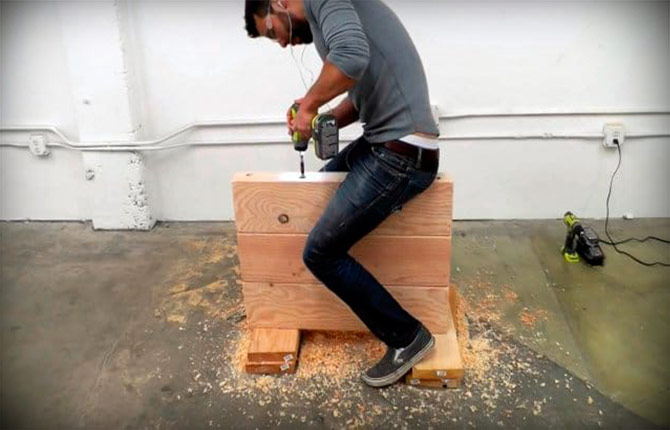
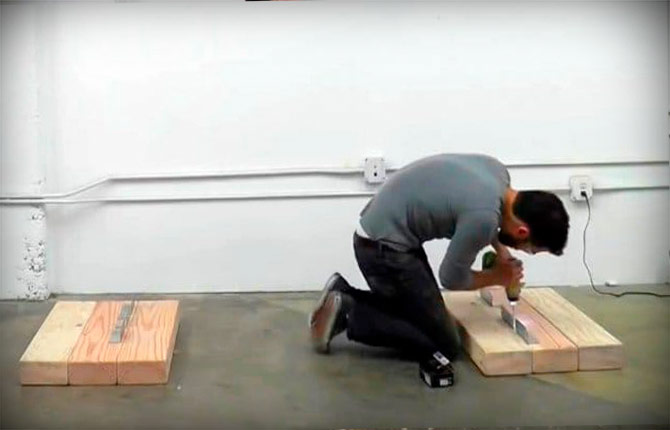
- The legs are installed, checking the exact vertical, to the ends of the two outer crossbars. Fastened with self-tapping screws.
- Two more crossbars are cut from a wider board. They are fixed between the legs to ensure stability.
- A longitudinal cross member is cut out of a wide board. Its length is the distance between the extreme sections of the jumper holding the legs. Screw it in with self-tapping screws.

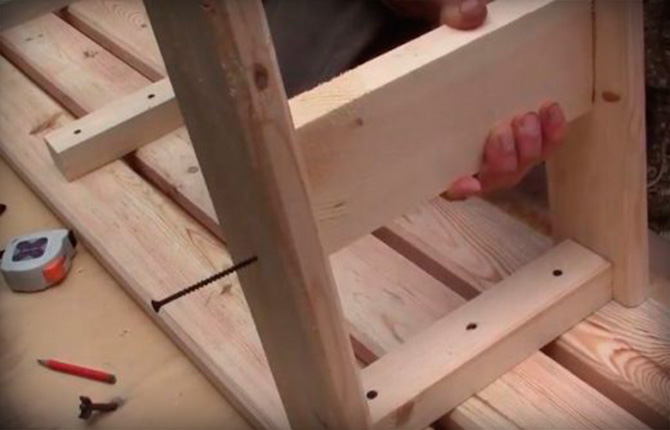
To ensure safety and comfort, all furniture parts must be sanded.It is more convenient to perform this procedure for each fragment separately during the process of assembling the street bench.
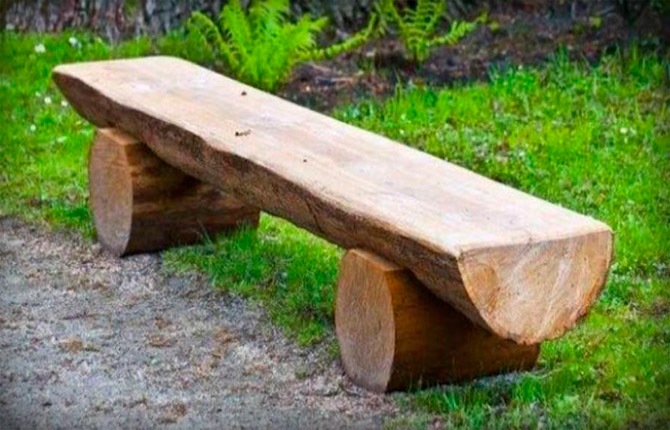
From a log
If there is a dry trunk 3.6 m long with a diameter of 60–70 cm, it takes a little time to make a street bench.
Sequence of operations:
- Remove the bark. Clean the surface from dirt.
- They saw a log for furniture into three parts. The length of one of them is 2.4 m, and the other two for the bases are made 60 cm each. The middle, longer part needs to be sawn in half along the central longitudinal line.
- The sides of short logs are cut off a little. On half of the log, retreating from the edges by 45 cm, notches are made on the bottom side. They must match in shape and size with the smoothed sides of the bases.
- All prepared parts for the street bench are polished. Place the bases on the ground with one smooth side down. Half of the trunk is placed on them, aligning the recesses with the blocks. Several nails are driven in to secure the furniture well.
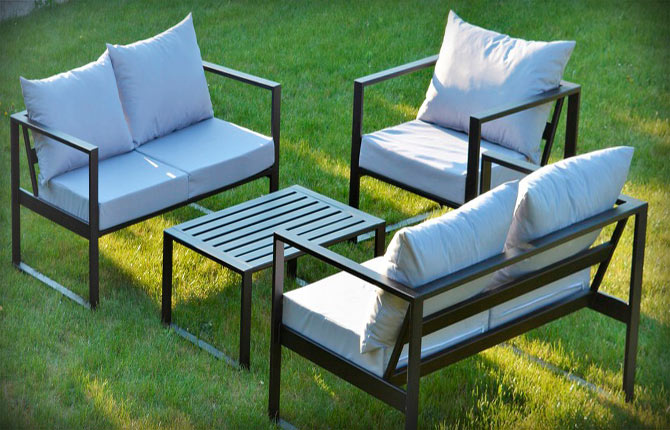
From a profile pipe
A reliable version of a street bench is obtained by using a profile pipe for the base.
Algorithm:
- The parts cut from the pipe are welded in the shape of a rectangle.
- Inside them, a transverse metal jumper is welded to the sidewalls, having previously prepared holes in it.
- Lay a sanded wooden board, which is attached through the holes with self-tapping screws.

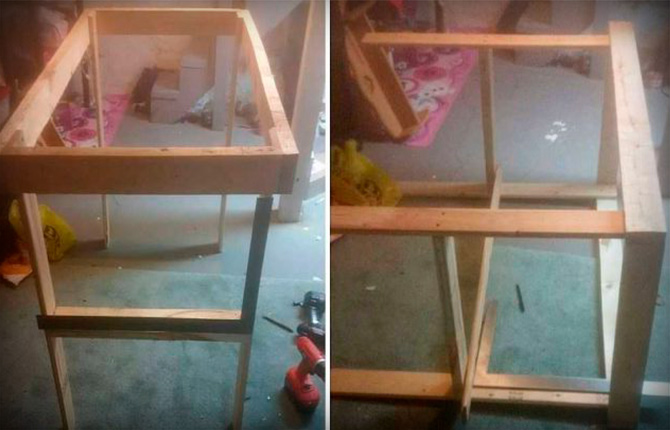
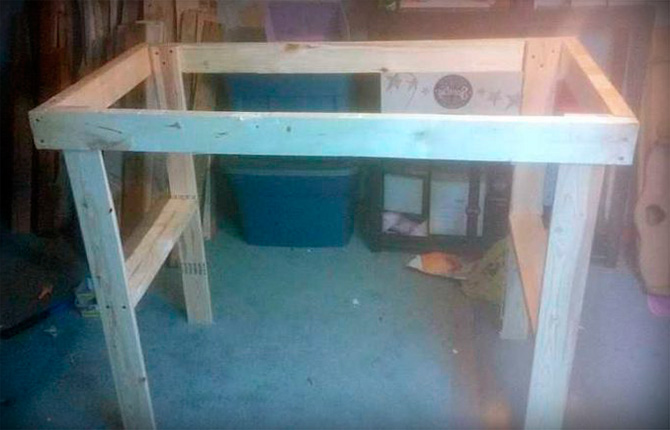
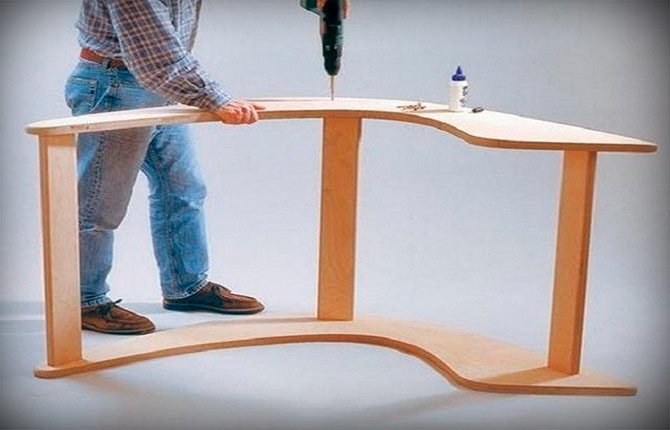
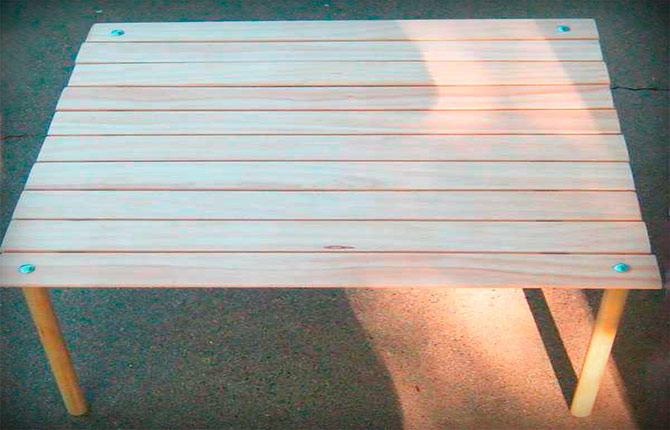
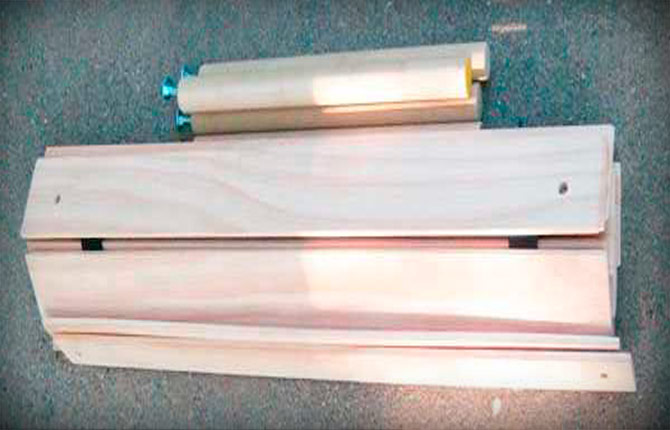
Table
One of the common furniture options for a home area is a table. It is easy to make from available materials with your own hands.
Algorithm:
- Prepare the material. Boards 50 cm wide and 25 cm thick are suitable. Dimensions of the future outdoor table: length - 150 cm, width - 60 cm, height - 85 cm.
- Assembling the furniture frame. You need two longitudinal (150 cm) boards.For the crossbars, to get a table width of 60 cm, cut off two pieces 55 cm long. Fasten all the blanks for the outdoor table with self-tapping screws, getting a rectangle. During the assembly process, angles are controlled. They must be straight. For the legs, 4 parts are sawn off. Their size is correlated with the planned table height of 85 cm. Each leg is fixed with 4 screws in the corners of the frame on both sides.
- Jumpers are cut out and attached between the legs just above their center, providing the required rigidity.
- By screwing the jumpers on opposite sides, they also prepare the base for the shelf.
- The furniture frame is sanded. Then the boards for the tabletop and shelf are cut and fixed with self-tapping screws.
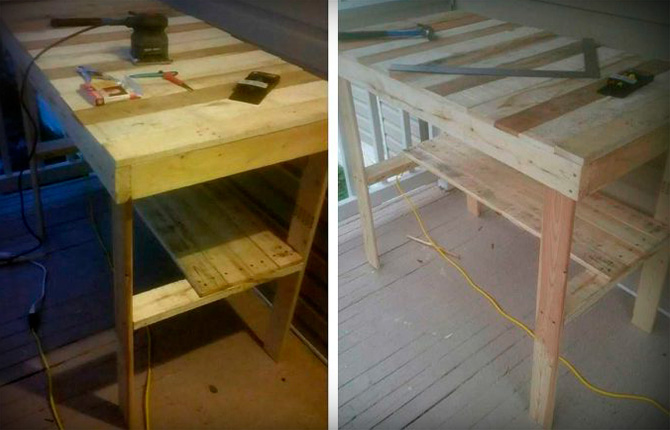
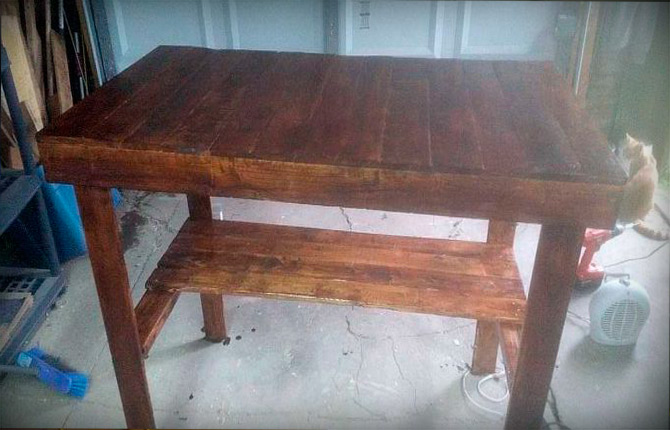
The finished outdoor table is sanded. Then it can be painted, stained or varnished.
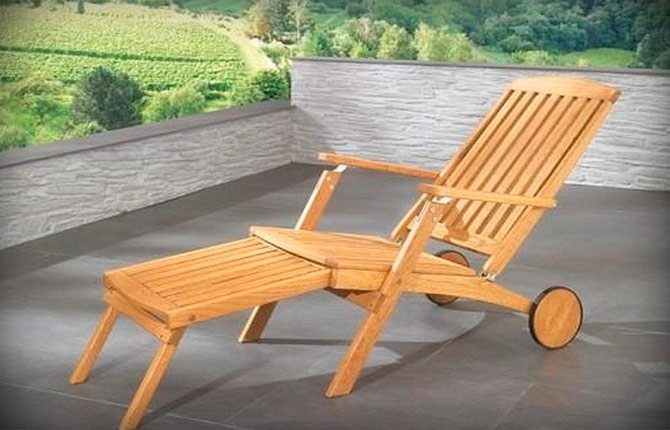
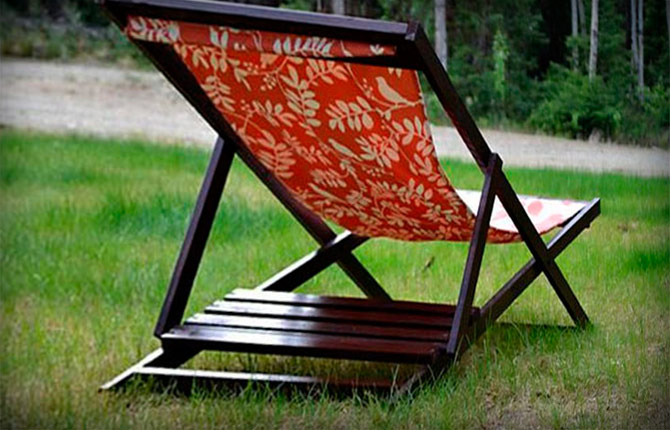
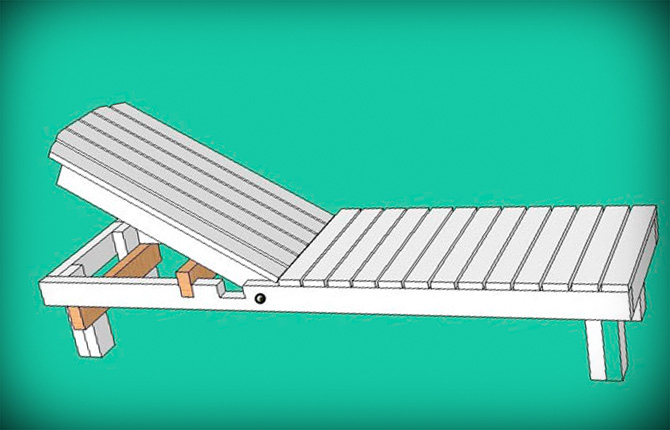
Chaise lounge
The word “chaise longue” is translated from French as “long chair.” This is a comfortable piece of furniture designed for a comfortable, relaxed stay. For manufacturing, simple street options are used.
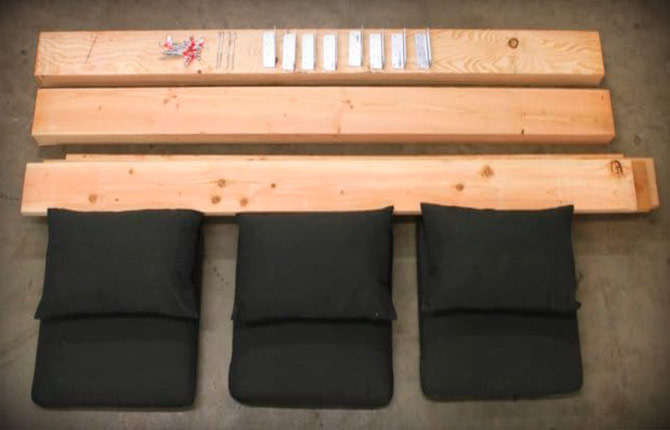
If you plan to make a mobile outdoor lounge chair on a light wooden base with a textile seat, prepare the necessary material:
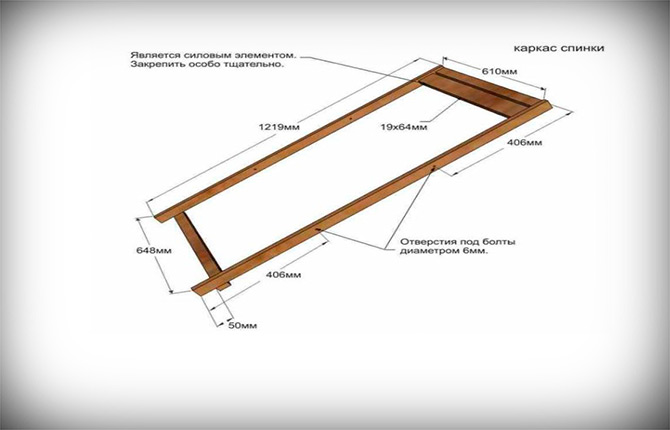
- For the back, boards are cut 19 mm thick, 38 mm wide to the required length: 1219 mm (2 pcs.), as well as 610, 648 mm (1 pc. each). They also cut out one board 19 mm thick, 64 mm wide, and 610 mm long.
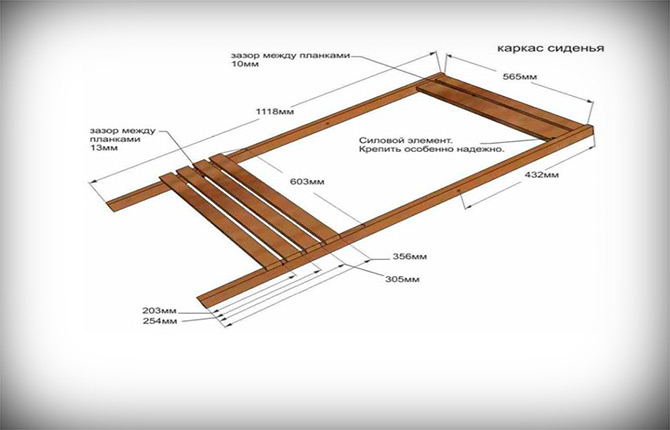
- For furniture seats, you will need boards 19 mm thick, 38 mm wide, of the following lengths: 1118 mm (2 pcs.), 603 mm (4 pcs.), 565 mm (1 pc.). You also need one board 19 mm thick, 64 mm wide, 565 mm long.
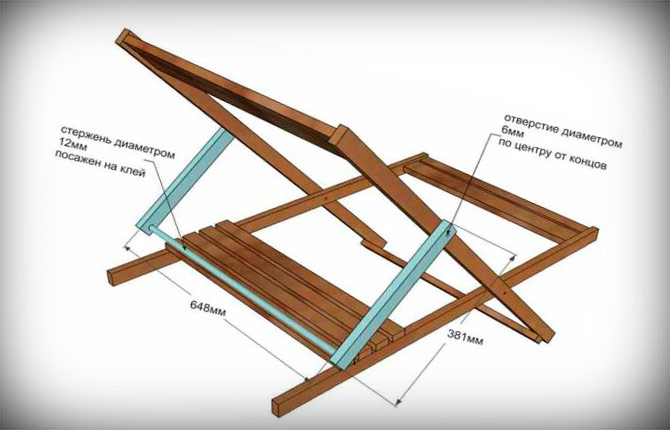
- For supporting fasteners, 2 boards with a thickness of 19 mm are cut out. Their width is 38 mm and length is 381 mm. A wooden rod with a diameter of 12 and a length of 648 mm is also prepared.
- For a textile seat, take durable awning fabric (two cuts 1372 x 578 mm), as well as two cylindrical dowels made of wood, 12 mm long and 559 mm long.
- Fastening parts: bolts with nuts (4 pcs.) 6 x 50 mm; washers (12 pcs.); wood screws 4 x 50 mm; carpenter's, PVA or other glue suitable for wood.
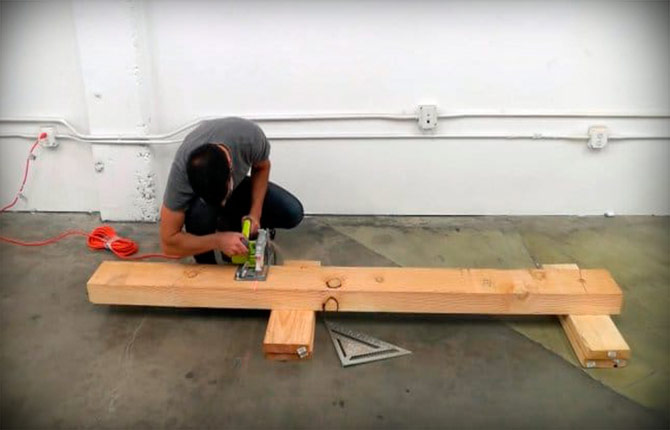
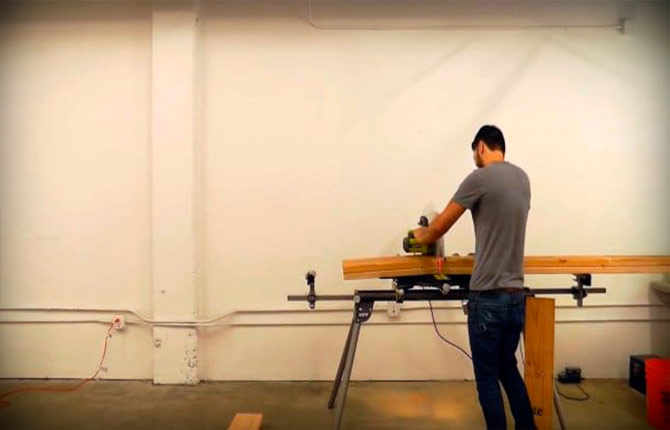
Sequence of operations:
- Based on the drawing, the frame for the back is assembled. Between the two top strips you need to leave a gap of 10 mm to fix the textile seat.
- Then you need to make the seat frame. When fixing the planks, maintain a gap of 13 mm between them. An interval of 10 mm is left between the top boards.
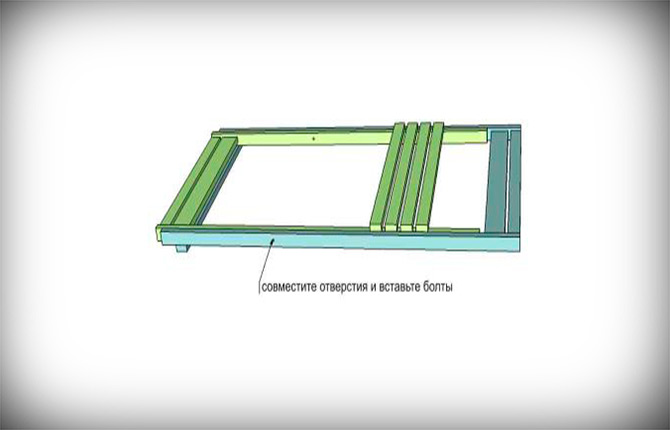
- The seat and backrest fold down. Through pre-prepared holes, they are connected, having previously placed washers, with bolts. The nuts can be secured with Moment glue or paint. This will keep them from unwinding quickly.
- Using a cylindrical rod and two boards 19 x 38 x 381 mm, assemble the backrest support. Drill holes with bolts to secure the strips to the back. For the rod, recesses with a diameter of 12 mm are also prepared and fixed in them with glue.
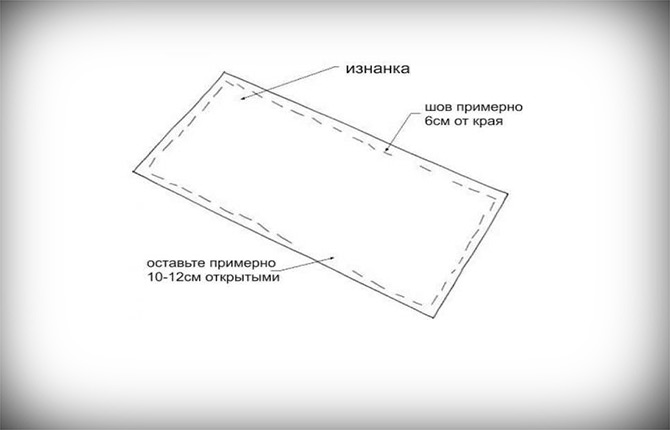
- The textile pieces are folded, matching the front sides. They are sewn on the wrong side, departing 6 cm from the edges. Leave a small unstitched area on the side (10–12 cm).
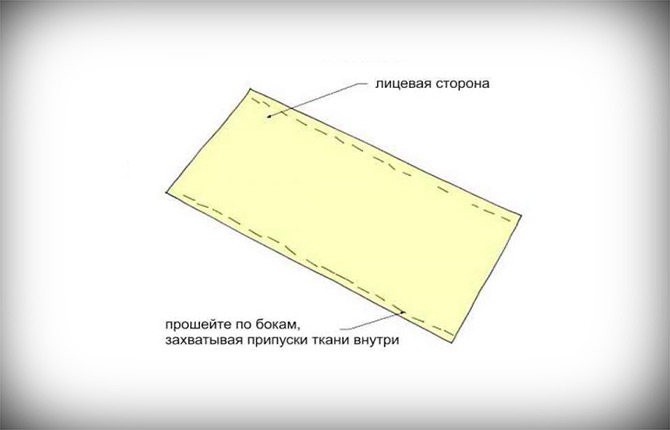
- The textile blank is turned inside out, straightening the corners. A stitch is placed along the long sides to secure the seam allowances.
- The short sides are folded and hemmed, forming wings under the rods. To determine the width of the hem, thread the fabric through the gaps left between the slats and check the required tension of the future seat.
- The prepared fabric is threaded into the grooves. Install dowels in the wings.
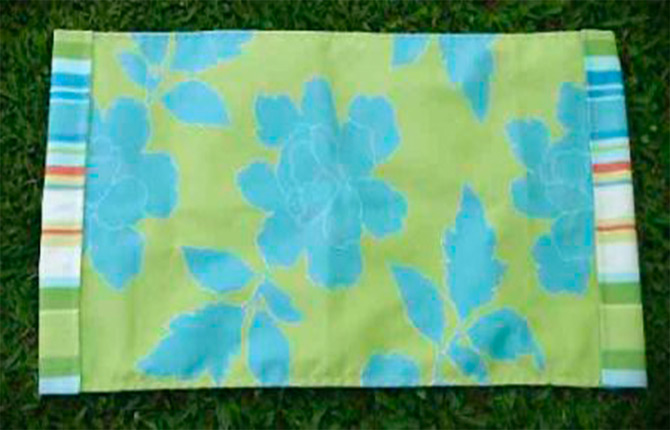
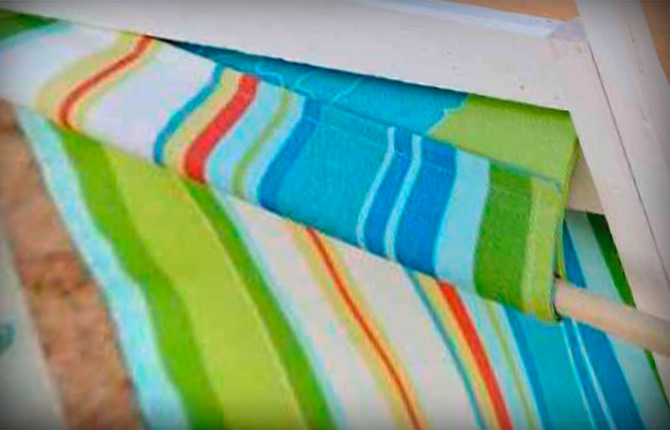
To ensure comfort, all wooden parts of an outdoor lounge chair must first be sanded and then treated with moisture-protecting agents. After drying, the furniture is varnished.
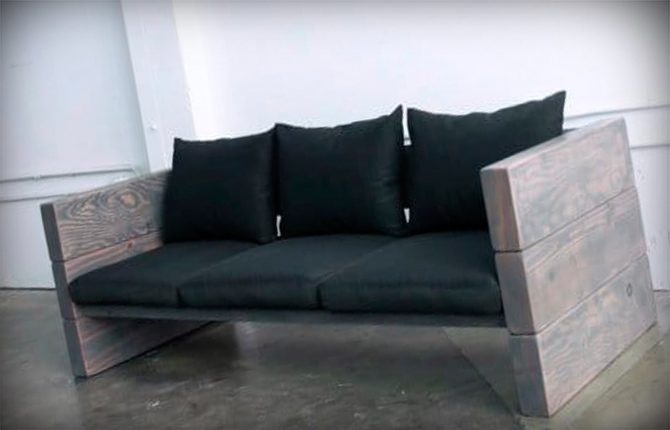
Garden sofa
When made with your own hands, a comfortable outdoor sofa is a seat equipped with a back and, if desired, armrests. For comfort, soft pillows or mattresses are placed. When sewing, choose waterproof removable covers. The seats for such furniture, unlike benches, are made wider.
Algorithm:
- It is necessary to select boards with a thickness of 50 and a width of 200 mm, as well as timber 100 x 200 mm for the work. Outdoor cushions for this furniture can be purchased ready-made.
- 6 pieces 82 cm long are cut from the timber.
- Boards for furniture need to be sawn into lengths of 150 cm.
- All parts are polished, simultaneously rounding the edges.
- Anchors are used by first drilling holes for them. These fasteners are used to connect three pieces of timber together. You get two sidewalls.
- Screw steel corners to furniture pieces assembled from beams, aligning their lower edge with the joint line.
- The sawn parts from the board are attached to the corners using galvanized self-tapping screws.
- To obtain the desired backrest angle, mark a line on the sides. Corners are screwed to them, to which the board is then fixed.
- To ensure the protection of furniture from the negative effects of moisture, all surfaces are impregnated with drying oil.
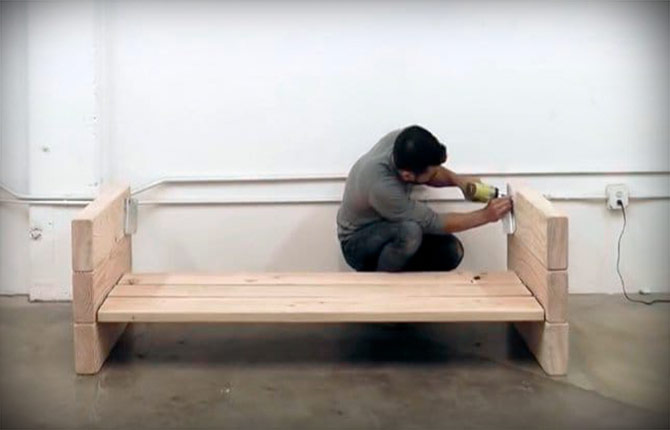
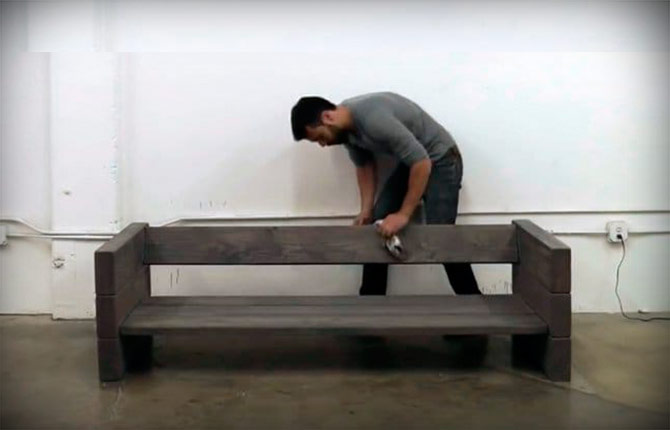
After drying, all that remains is to lay out the comfortable pillows. A comfortable outdoor sofa is ready.
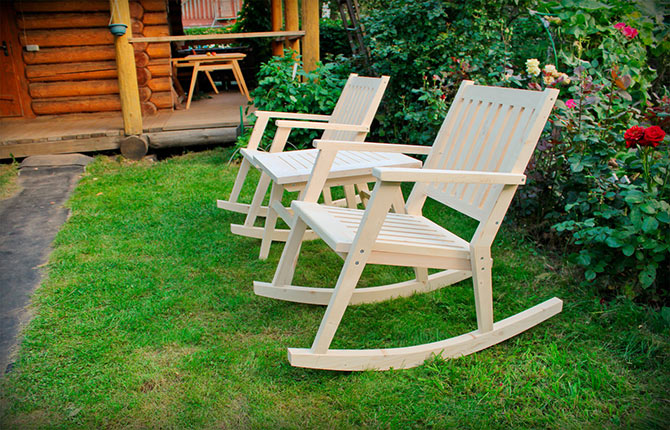
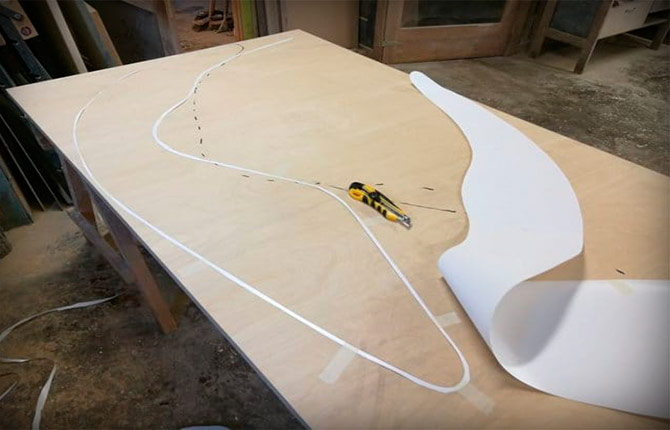
Rocking chair
Among the outdoor furniture options, the rocking chair attracts with its surprisingly comfortable appearance. If you plan to take this idea as a basis and make a similar item, you need to choose a simple option.
Sequence of operations:
- You need to prepare plywood 3 cm thick. The dimensions of the sheet are 140 x 120 cm. You will also need 3 boards for lintels 2 cm thick. Their width should be 15 cm and length - 80 cm. To cover an outdoor chair, you need planks (32 pcs.) thick 1.5 cm, 3 cm wide and 120 cm long.
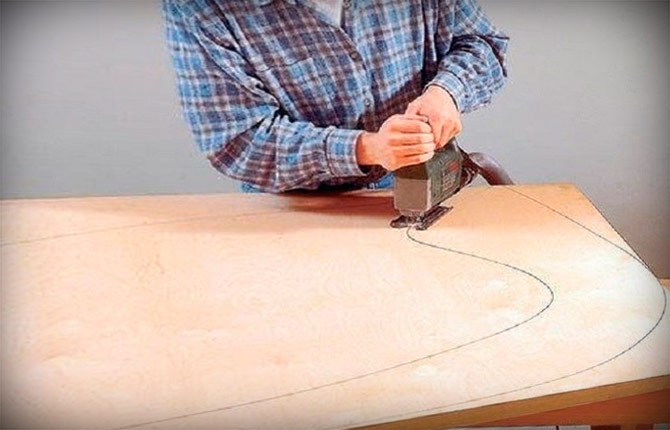
- The pattern for the sides of the furniture is drawn in full size. Cut it out of paper. Transfer to plywood.
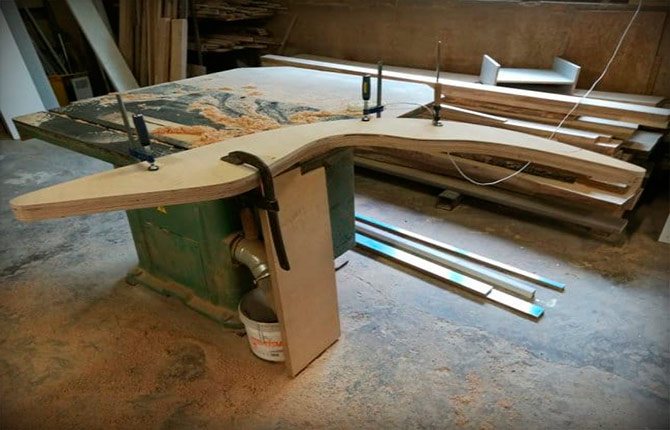
- Using a jigsaw, cut out two identical parts.
- Fold the parts, securing them with clamps. If necessary, adjust their shape with a milling cutter to achieve a complete match.
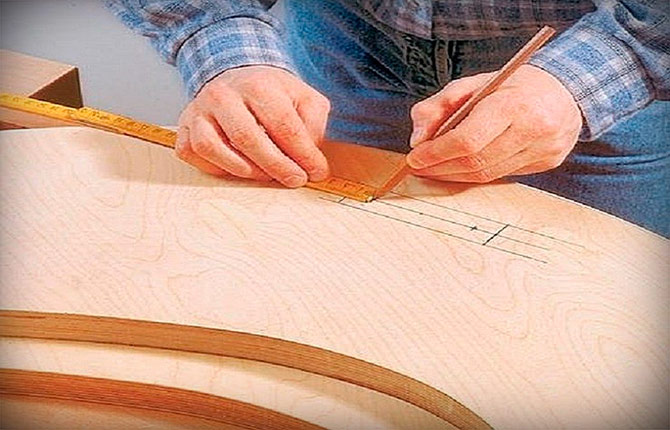
- In accordance with the drawing, mark on the inside of the sidewalls the places where the cross members will be attached. These are rectangles 2 x 15 cm.
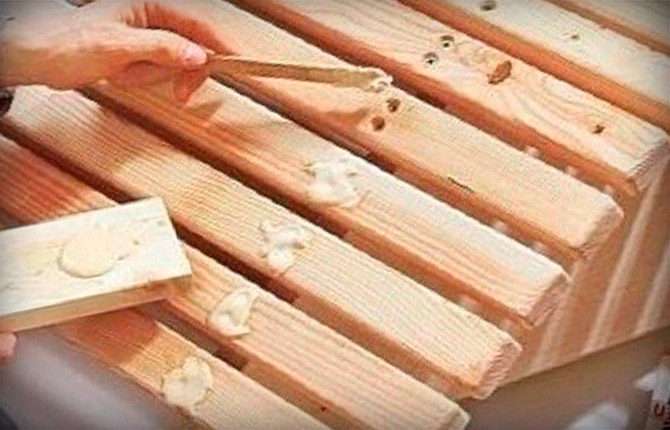
- In these rectangles, select a piece of plywood to a depth of 5 mm. Fill the grooves with wood glue (you can use PVA) and insert the jumpers. For reliability, they are fixed with self-tapping screws. There are two fasteners on one side for each axle.
- Now take planks 120 cm long, stepping back from the edge 20 cm, the fastening line. This will allow you to get smooth edges of the sheathing. The slats are fastened with self-tapping screws at intervals of 10 mm. To maintain accuracy, calibrators of appropriate thickness are used on both sides.
- Furniture is upholstered to the very top.
- The heads of the screws should be buried approximately 2 mm into the wood. Then the recesses are filled with putty, which is immediately leveled, and after drying it is also sanded.
- Cover the surfaces with moisture-resistant varnish.
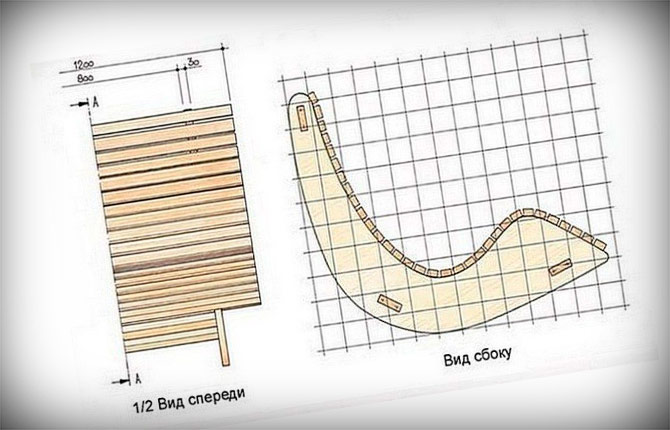
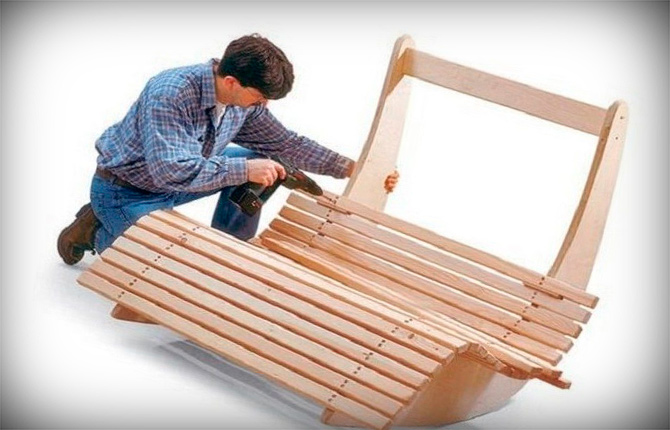
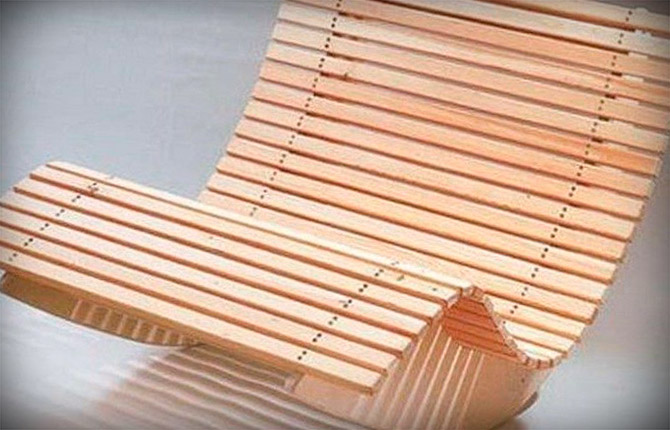
A ready-made outdoor rocking chair will serve as a wonderful place to relax and unwind.

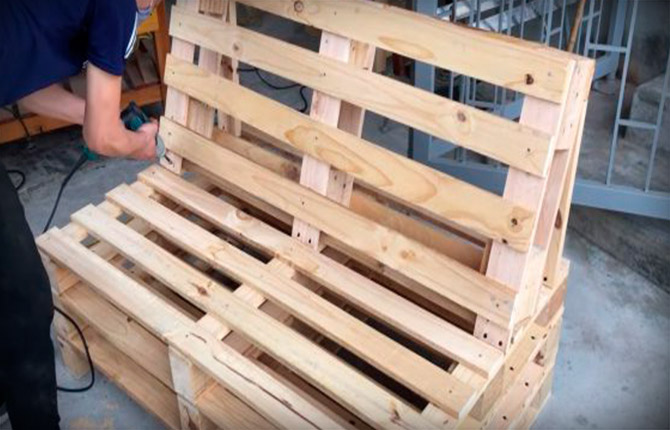
Bench
If you plan to make a bench for an outdoor version of wooden furniture, you need to mark the required dimensions on a previously developed diagram.
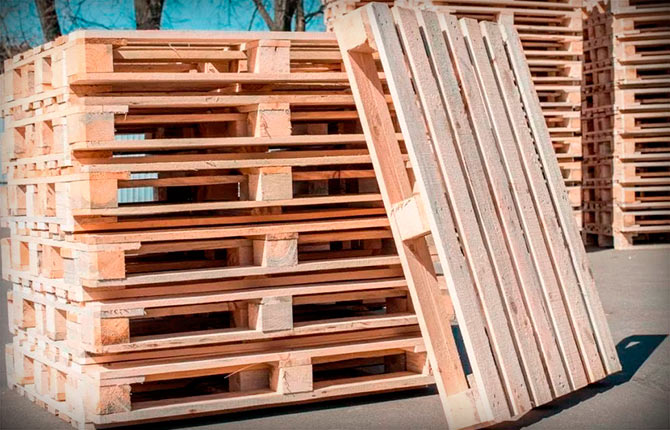
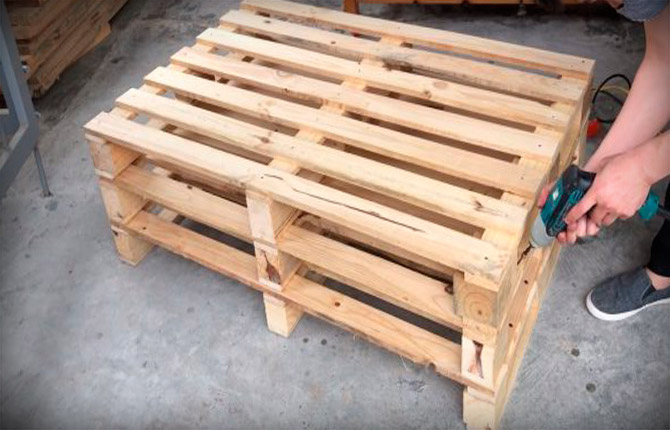
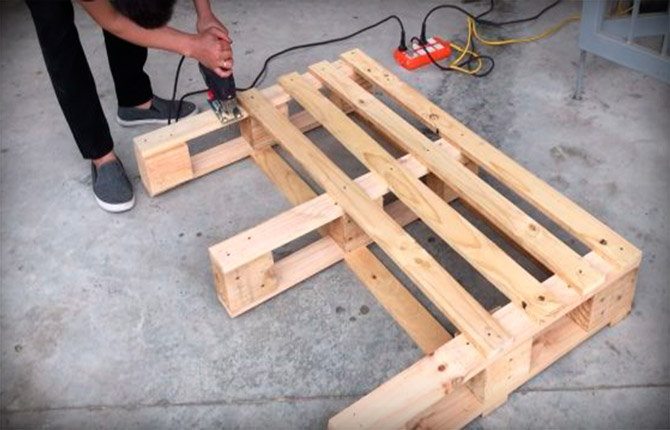
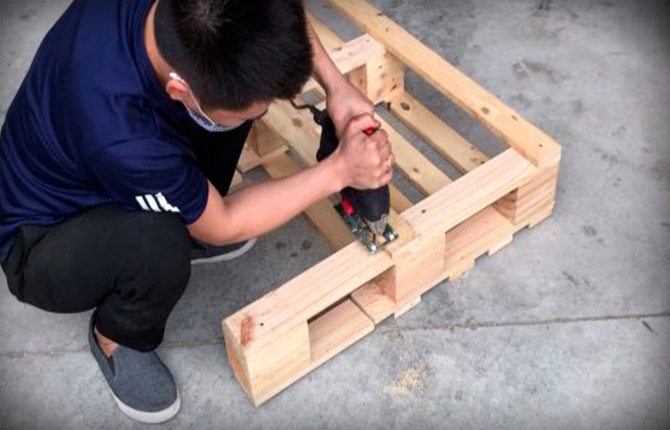
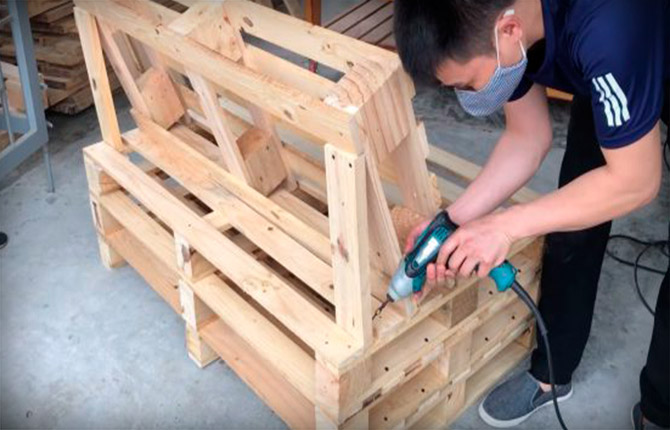
For work, choose available ideas, for example, use 6 pallets for a street bench. Tools you will need are a hacksaw and a screwdriver.
Sequence of operations:
- For the seat, 3 pallets are sequentially installed on top of each other, connecting them with self-tapping screws.
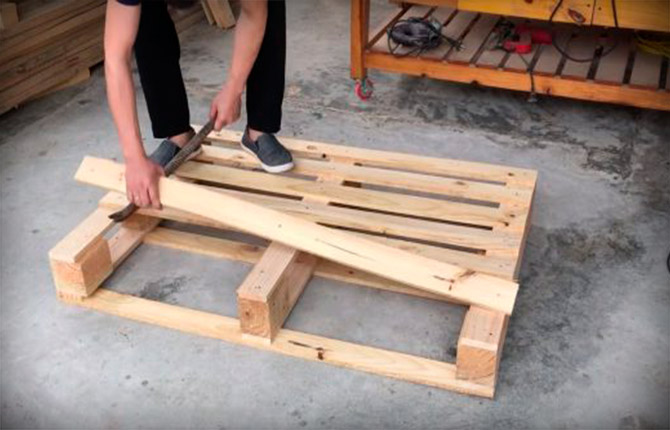
- Take another pallet, which will serve as the back of a street bench. The two outer boards are removed from the front side. One board is removed from the inside.
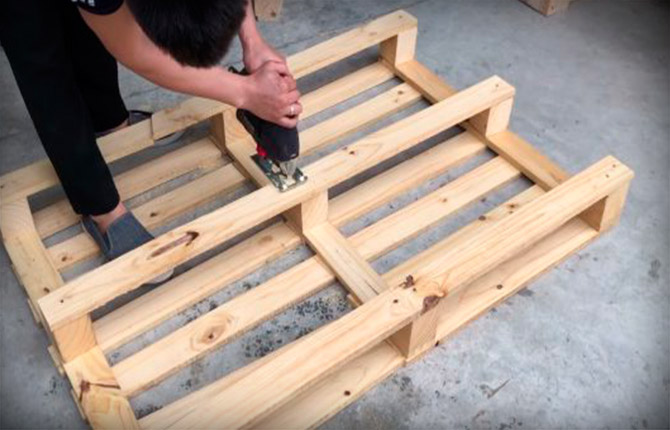
- Having retreated 10 cm from the front side from the remaining outermost bar, saw off the crossbar.
- From the inside out, the cut is made next to the board.
- Install the resulting part, which will serve as a backrest, onto the base.
- Cut two supports from the remaining boards. They are secured to the sides of the installed backrest. You need to tighten two screws on top and bottom.
- They also screw in two self-tapping screws at the front to secure the base and back.
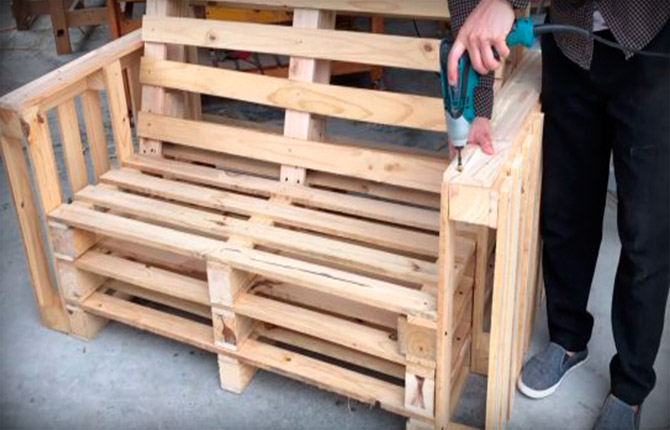
- Now you need to cut the two remaining pallets in half. On the wrong side, two planks are cut next to the bars, and the third outermost one is made longer (30–35 cm) for subsequent attachment to the back.
- Once in place, the sides are screwed to the back and base. A board is fixed on top, which will serve as an armrest.
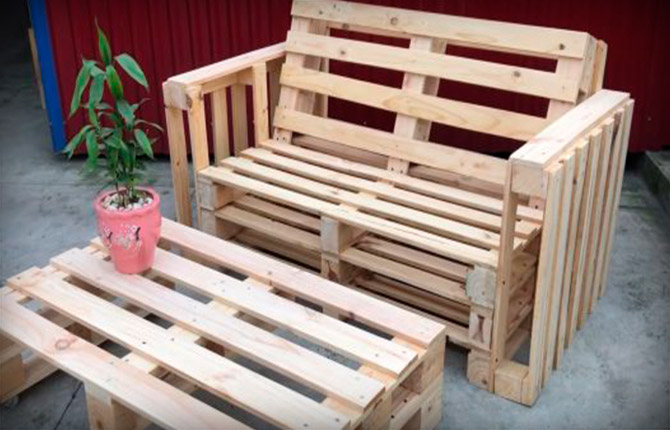
- All surfaces must be sanded and then varnished.
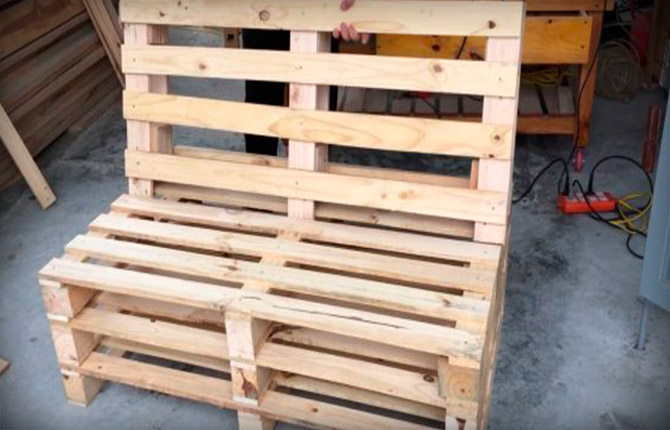

Near the street bench you can place a table assembled from pallets.
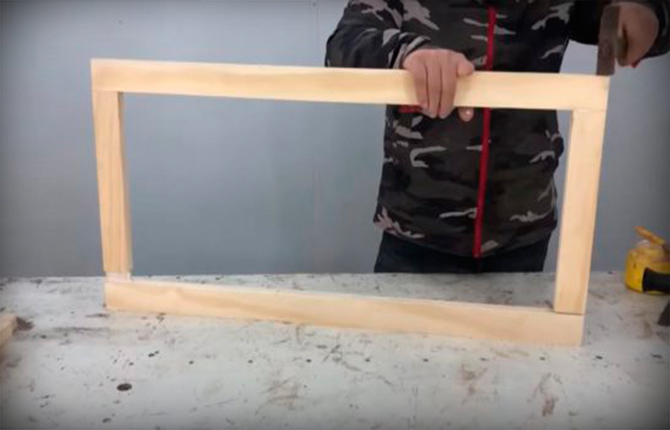
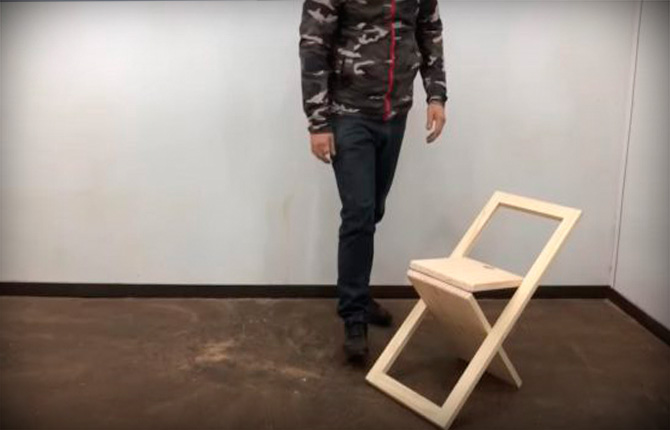
Folding chair
A compact, easily folding country chair is easy to use. It can be moved to another place, taken fishing or to the beach. If you plan to make such a piece of furniture with your own hands, study the most accessible types.
For the proposed outdoor model, you need to prepare a furniture panel or thick plywood, wooden blocks, and metal hinges.
Algorithm:
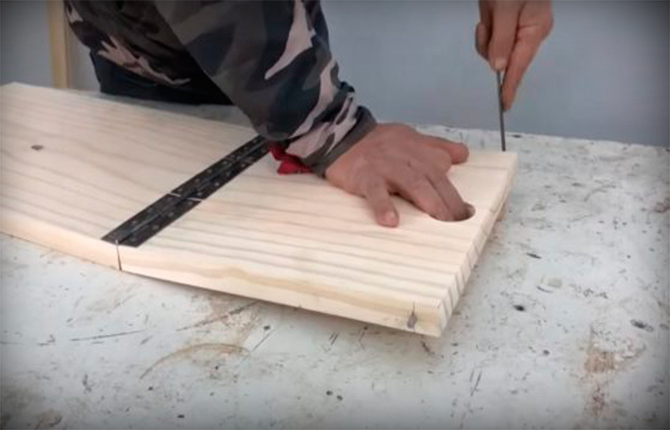
- The bars need to be sanded.Then tenons and grooves are prepared along the edges. Assemble the frame in the shape of a rectangle.
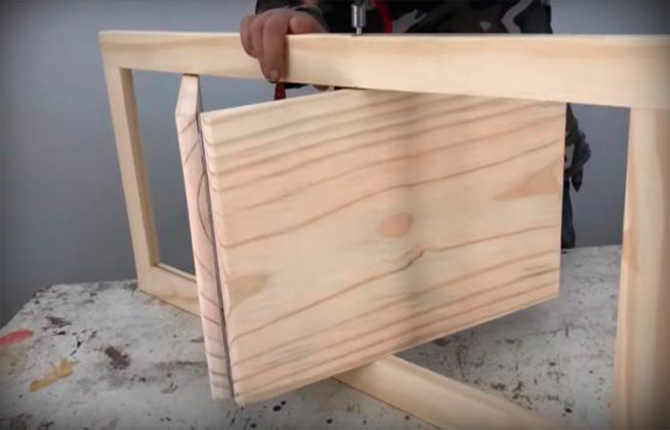
- Furniture panels of different sizes are purchased or glued together from wooden slats. They are fastened together with metal loops. A hole is prepared in a small shield into which the fingers should be placed when unfolding. Carpentry bolts are screwed into the sides, leaving the desired length. Hats are trimmed with a grinder.
- Insert the assembled structure into the frame. The ends of the screws must be inserted into longitudinal grooves previously prepared in the bars. The large shield should not lose its mobility after being fixed with screws.
- Check the manufactured piece of furniture in operation. The outdoor folding chair is then varnished or painted.
Picnic table
You can assemble a mobile folding table that is convenient to take with you outdoors for a picnic using available materials.
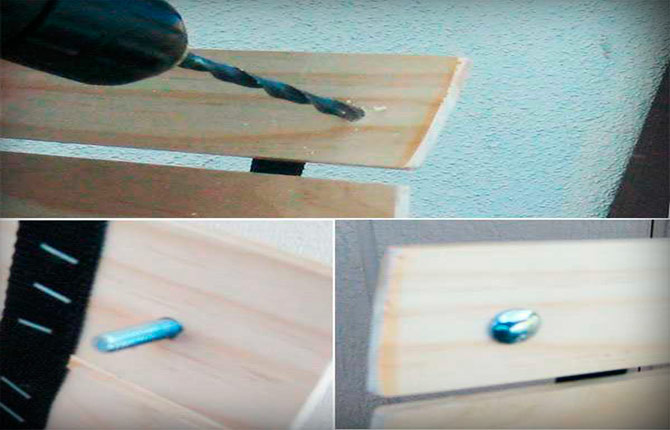
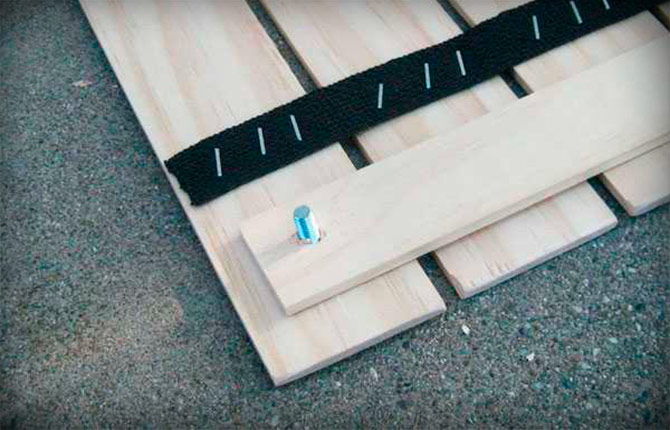
You need to prepare cylindrical wooden legs (4 pcs.) with a diameter of 2.5 cm and a length of 30 cm. For the table top, slats (10 pcs.) 2 cm thick are cut out. Their width is 5 and their length is 60 cm. You will also need 2 slats that play the role of tabletop clamps, the same size as the slats. You will need threaded nuts and bolts, durable nylon tape, and a furniture stapler.
Algorithm:
- Furniture legs on one side are treated with sandpaper.
- As a result, the ends are rounded. The slats prepared for the tabletop must be rounded and sanded on both ends.
- Begin assembling the table top. The slats are laid on a flat horizontal plane. To maintain the same gap, a 1 cm thick board is placed between them. The braid is cut. You need 2 pieces of 60 cm in length. The ends are carefully melted with the flame of a lighter. As the slats are laid out, tape is attached to them with a stapler.There are 3 staples for each plank.
- The entire tabletop is assembled sequentially.
- In the outer slats of the tabletop, holes are made for the bolts.
- Place fixing strips on the underside of the tabletop, on which the exact location is first marked and then holes are made. To check the match, insert a bolt.
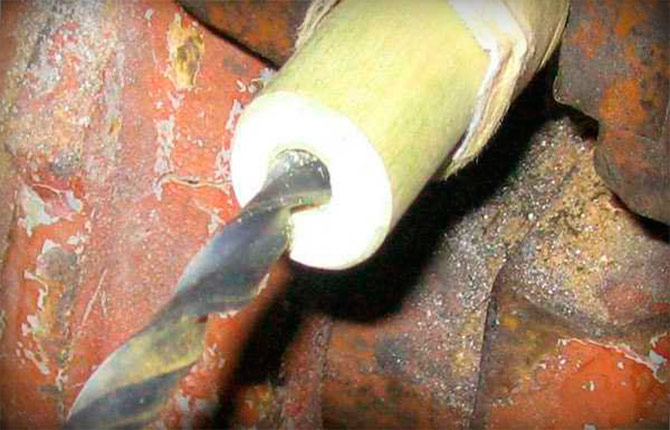
- The legs, wrapped in a piece of fabric to protect the wood from chipping and deformation, are clamped in a vice. Then holes are made in the upper end without rounding, where the screw nut will be installed.
- Using a polygon wrench, screw the screw nuts into the legs.
- Assemble a comfortable outdoor table suitable for a picnic. Check this piece of furniture for stability.
After unscrewing the legs, the table folds up easily. The compact roll fits into a backpack or sports bag.
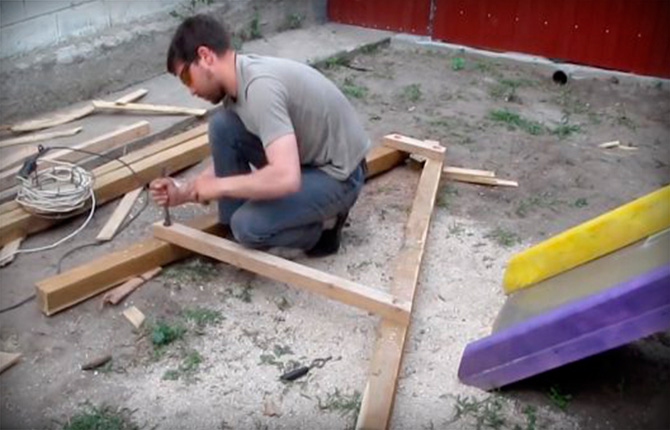
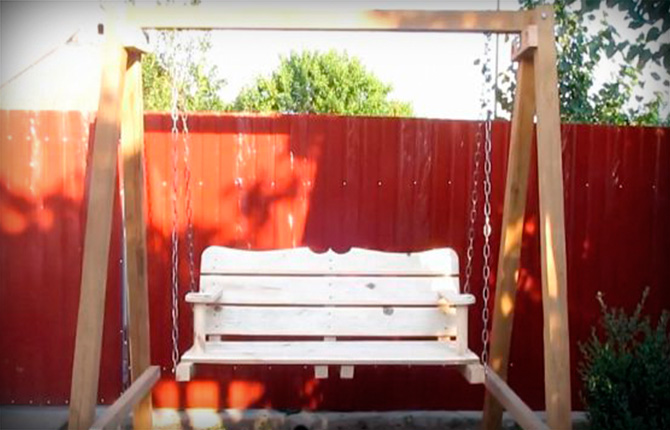
Baby swing
A vacation at the dacha is not complete without equipment for a play area if there are children in the family. One of their favorite pastimes is swings. You can make such a street attraction with your own hands.
To build an outdoor swing that is convenient for children, you will need two types of timber (10 x 10 cm and 5 x 5 cm), as well as boards 2.5 cm thick and 10 cm wide. You also need fastening plates, a galvanized chain, and screws. A metal pipe can serve as a replacement for timber.
Algorithm:
- 4 racks are cut out of timber with a diameter of 10 x 10 cm. Their height is 195 cm.
- The supports are connected in the shape of the letter “A”. For fastening, two jibs are used (bottom and top), cut from thinner timber 5 x 5 cm. To fix them, the parts are drilled through and tightened with bolts.
- Now take a beam 10 x 10 cm. Cut out the crossbar, maintaining a length of 180 cm. Place it on the upper stops. Fixed with bolts.
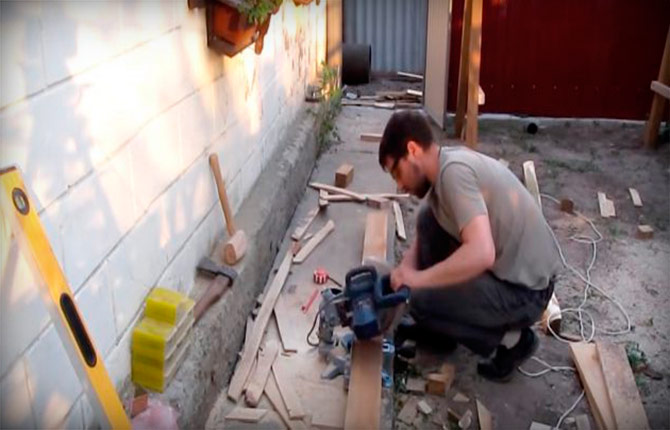
- Planks 120 cm long are cut from the boards.You need 3 pieces for the seat and back.
- A simple pattern is cut out on the top edge using a jigsaw. Sand the cuts with sandpaper.
- Fix 3 boards for the seat and then the backrest with self-tapping screws to the crossbars 5 x 5 cm. They are connected with bolts, maintaining the desired tilt of the backrest.
- Attach two boards on each side with screws, forming armrests.
- Holes are made in the upper beam. Bolts are placed in them, having first threaded them through a chain link. Place a metal washer on top and secure the bolts with a nut.
- At the bottom of the seat base bars, two holes are made on both sides. They install bolts that secure the ends of the chains.
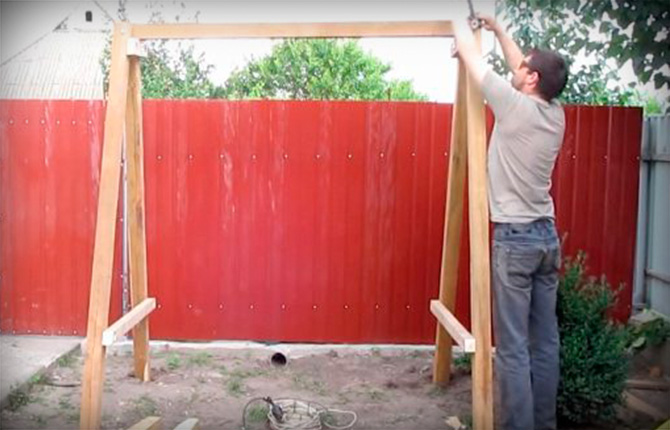
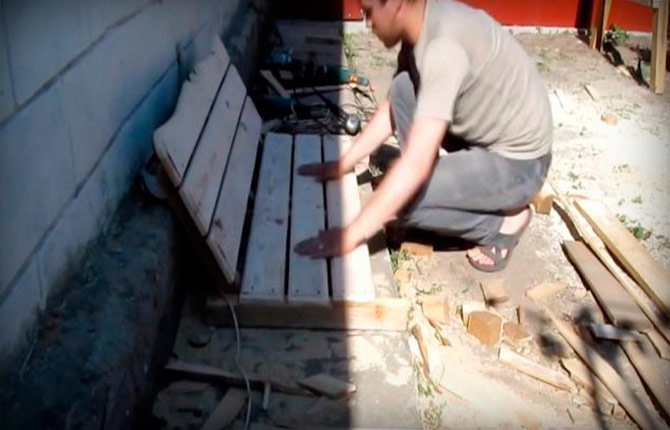
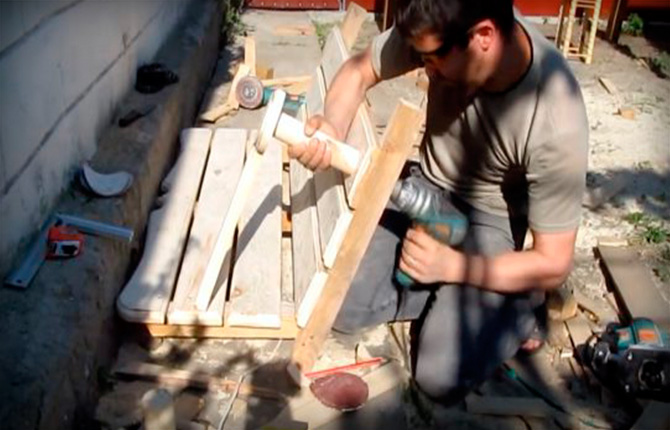

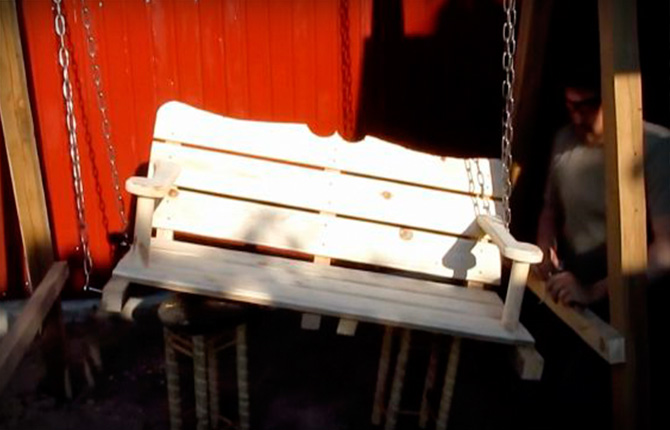
Adjust the suspension, setting the exact horizontal position of the seat.
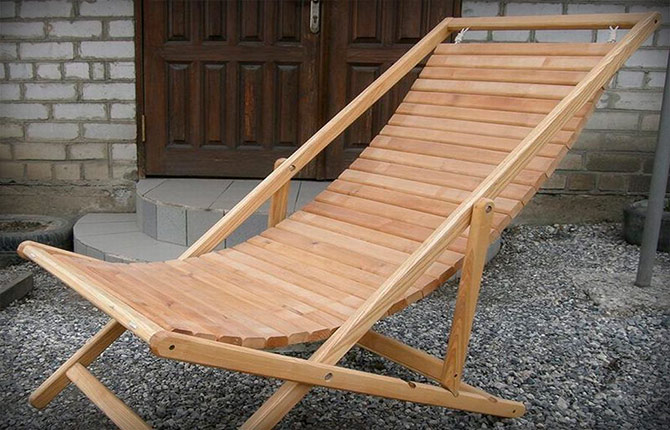
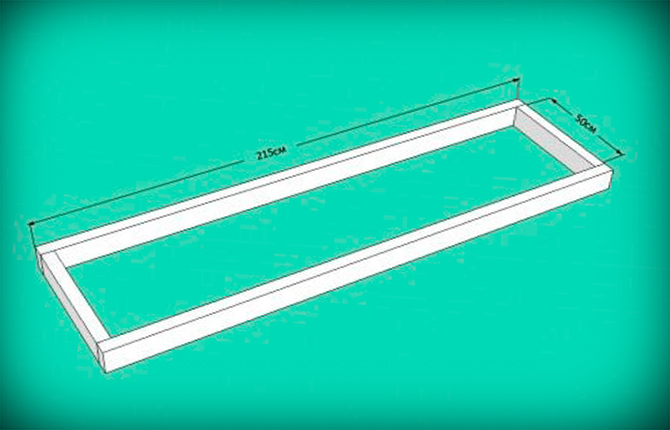
Sun lounger
Unlike a chaise lounge, a simple lounger is a type of mobile, hard, portable bed.
Algorithm:
- Prepare boards 5 cm thick and 10 cm wide for the outdoor lounger, as well as slats 2.5 cm thick and 8 cm wide. Saw off two parts (215 and 50 cm long) from boards 10 cm wide. Using self-tapping screws, make a rectangular frame from them.
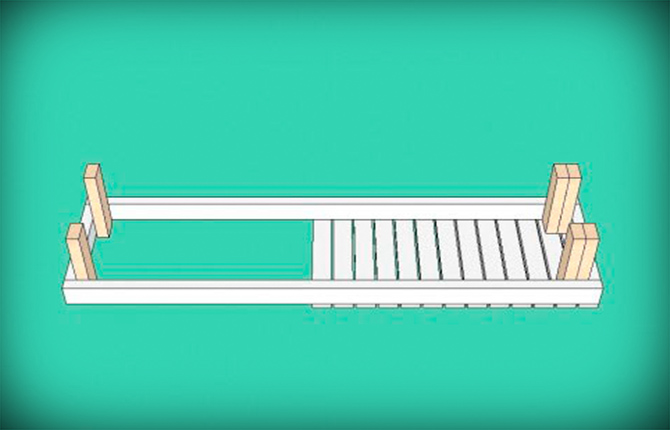
- For furniture seats, slats 8 cm wide are cut. 13 blanks are needed. They are made 60 cm long. Screwed on with self-tapping screws. To maintain the same 1-centimeter gap, a strip of similar thickness is applied when fixing each subsequent slat. Legs are attached in the corners. They are cut from slats. To ensure strength, two legs are installed at the bottom. The height of these parts is 35 cm. You can choose a different size.
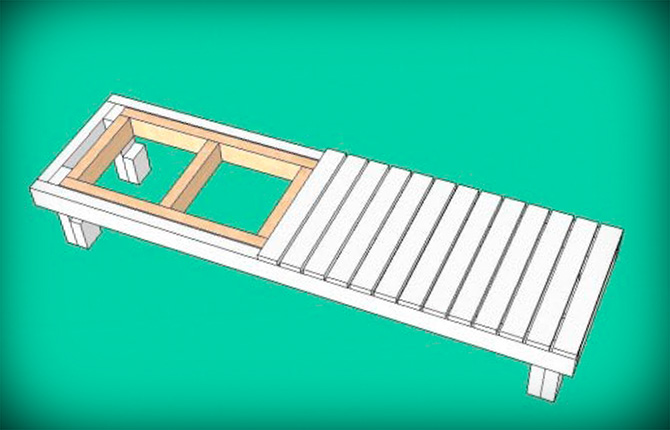
- For the back, two parts 88 cm long and 3 - 39 cm long are cut out of a board 10 cm wide. A frame is assembled from these blanks. Check that it fits freely with a small gap into the upper open part of the future outdoor lounger.
- From slats 8 cm wide, 6 parts 88 cm long are cut out. They are fixed to the upper frame in the longitudinal direction. The ends are slightly rounded at the top.
- To connect the base and backrest, 9 cm are removed from the edge of the seat. A hole is made into which a pin is inserted. In the base, at a distance of 9 cm, set aside from the stud, a groove is made 5 cm deep. Its width is 10 cm. Stepping back 20 cm from the first recess, make a second groove 5 x 5 cm. A part 10 cm wide, 5 cm thick and 60 cm long when the chaise lounge is folded is placed horizontally in the first recess. If you need to raise the headboard, the block is moved into the second groove, where it is placed vertically.
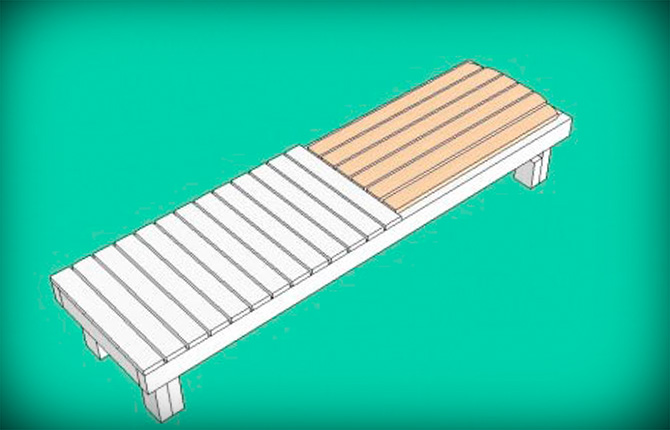
After sanding, the outdoor lounger can be varnished or painted.
Garden furniture made from available materials using simple technology and with your own hands fits well into the country landscape. By providing a protective coating, even wooden outdoor kits will not be damaged by moisture.
If you are interested in the options for comfortable outdoor furniture discussed in the article, please tell your friends about them on social networks, and save the material to your bookmarks. Which of the ideas did you like? Maybe you have already made some of the street furniture presented yourself?


I decided to make a simple wicker stool. The most attractive material is willow vine. How to prepare it correctly?
Smooth, long willow twigs are suitable for weaving. Branches cut in winter have good flexibility. To cleanse them from the bark, they are first boiled in water for 2 hours. When cutting in spring, the bark is easily removed immediately. To obtain material of the required diameter, large rods are split into 2–4 parts.
I have several wooden barrels at my dacha. I want to make a dining area out of them. What techniques can be used?
For a table, it is enough to equip one barrel with a wooden tabletop of any shape. Fixed with self-tapping screws. For chairs, you need to cut out a piece of wood from one side. From below, the barrel remains solid up to the height of the seat, which is mounted horizontally inside on the corners.