Decorating a site in a kindergarten with your own hands: materials, design options
When registering a site in a kindergarten, take into account the requirements set out in SanPiN 2.4.1.3049-13. This document regulates the procedure for establishing preschool educational organizations.
The content of the article:
What materials can be used for decoration?
You can create an interesting design for an area with play and educational elements on the territory of a kindergarten using available materials.
Please take into account that separate areas are provided for each group of children. They have a veranda, flower beds, and play complexes. It is important to landscape the adjacent area in the kindergarten. According to the standards, green spaces that serve as the border between group sites occupy 50% of the territory free from buildings. Poisonous, thorny, fruit-bearing plants are prohibited.
When designing a site, take into account that the size of group areas depends on the age of preschoolers. Per child, the indicators are at least:
- 7,0 m² (up to 3 years);
- 9,0 m² (3–7 years old).
The covering is made of soil (the soil must be well compacted to prevent the appearance of dust) or grass.
You can use special materials approved for preschool institutions. The area of the shady canopy (gazebo) in each group zone is at least 1 m² per child. There should also be a physical training area on the site.
You can make a variety of objects with your own hands.For kindergarten they should be playful, thematic, and educational.
Requirements for site design:
- Safety. The design is chosen according to the age of preschoolers. The materials used on the site must be safe. Sharp, glass parts are excluded. It must be taken into account that in accordance with Art. 8.2 of the Code of Administrative Offenses of the Russian Federation dated December 30, 2001 No. 195-FZ, it is prohibited to install car tires.
- Strength. All details of crafts should not harm children. The materials chosen are durable.
- Aesthetics. Decorating a children's area should evoke pleasant, not negative, emotions.
- Age appropriate for children. Themed crafts should be understandable to preschoolers.
- Practicality. All crafts installed on the site should be included in play and developmental activities.
Can be used:
- PET bottles (the material is polyethylene terephthalate, a non-toxic type that is resistant to external influences) without cracks or sharp chips,
- rounded stones;
- containers of different volumes (pots, basins, tubs, buckets, pans);
- plastic boxes;
- plywood, chipboard;
- wooden cuts, chocks.
Interesting selection:
- We make a gazebo from scrap materials with our own hands
- DIY decorative bridge for the garden
- How to make a beautiful dry stream in your country house with your own hands
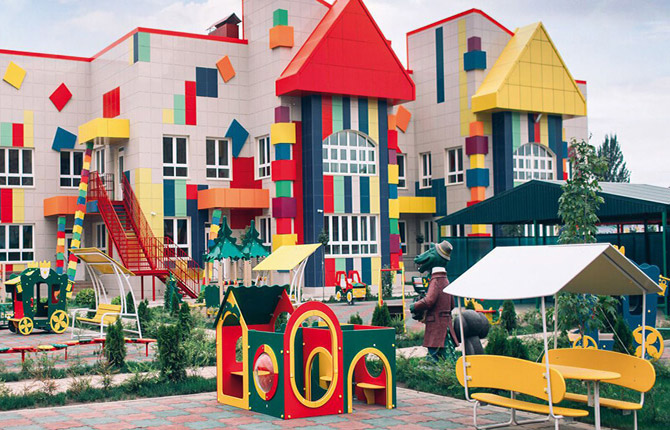
Design options for a children's area
Analyzing ideas for decorating a site for children's groups, you can choose suitable options. When creating crafts, you need to focus on the general plan for improving the kindergarten. Methods for decorating a summer area can be made from the following materials.
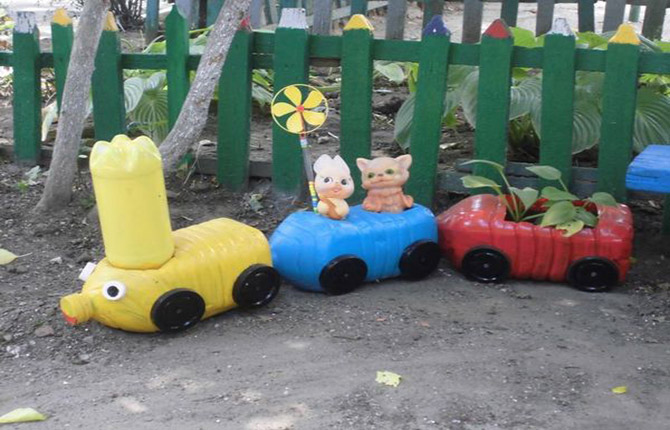
Using PET bottles
Choose plastic containers without damage.After cutting out parts, sharp edges are smoothed with coarse sandpaper or a file.
A few examples:
- Convenient flowerpots for decorative plants are made from bulky plastic containers. You can design such items in the form of animals.

- A bright train made from large plastic bottles looks good on the playground for the younger group. One of the carriages can easily accommodate a miniature flowerbed.
Wood crafts
When taking children outside for walks and games, the teacher provides an opportunity for them to relax and play comfortably. Many items to solve this problem are made from wood.
A few ideas:
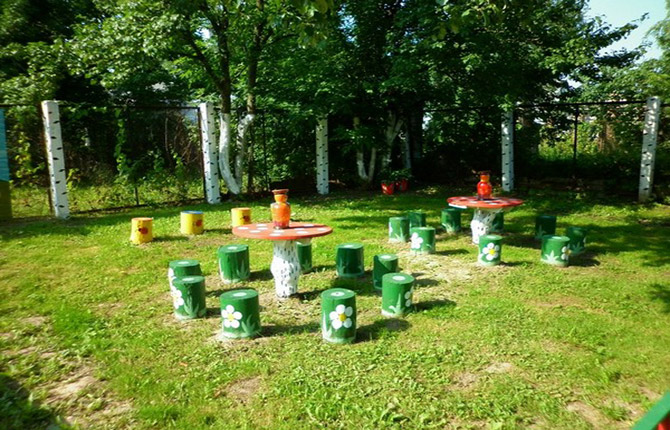
- They make bright chairs from wooden blocks dug into the soil. The bark is removed from them, and then the surfaces are polished. The stumps are impregnated with an anti-rotting agent and then painted. Nearby, tables are placed on a higher wooden leg.
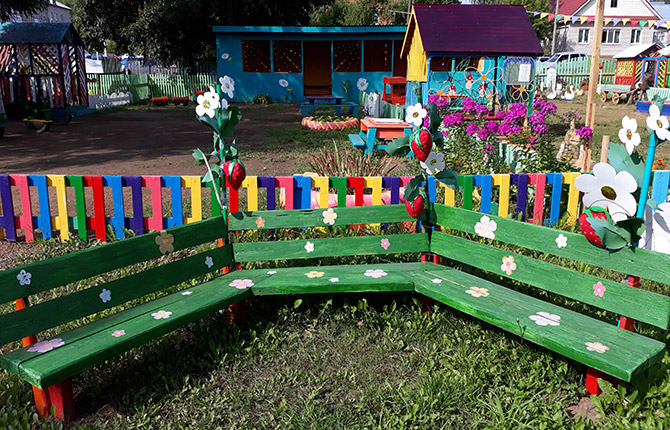
- In the recreation area you can install comfortable wooden benches equipped with backs. After sanding, they are painted and painted.
- Cheburashka is assembled from wooden sections of different sizes. A brown life-size toy with yellow inserts not only decorates the area near the kindergarten, but for kids it becomes a demonstration tool that allows them to conduct educational games based on their favorite fairy tale.
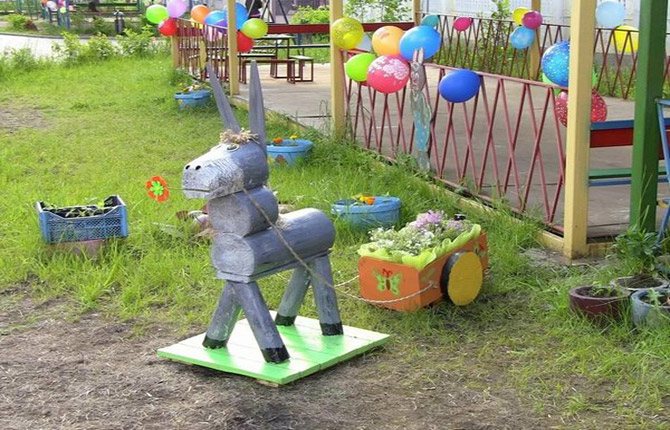
- A good design is voluminous street figures, which require wooden chocks. For example, a colorful donkey appears on the site with a cart in which flowering plants are planted.

Crafts made from plywood
To equip playgrounds on the territory of a kindergarten, it is easy to make themed compositions from plywood. The parts are primed and painted.
A few examples:
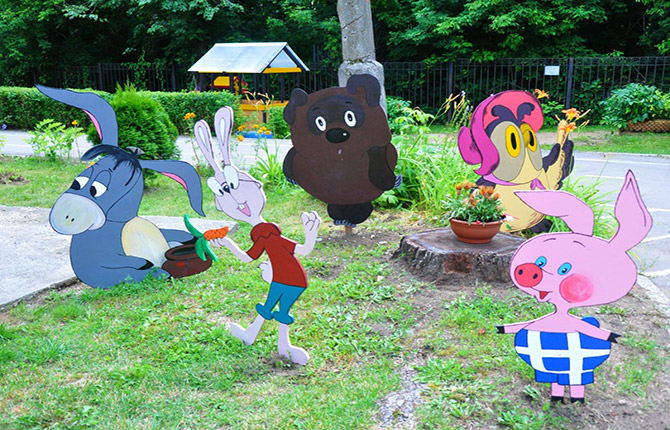
- If you install plywood cartoon characters about Winnie the Pooh on a small lawn, kids have the opportunity, while looking at the beautiful figures, to remember and voice the plot of their favorite fairy tale.
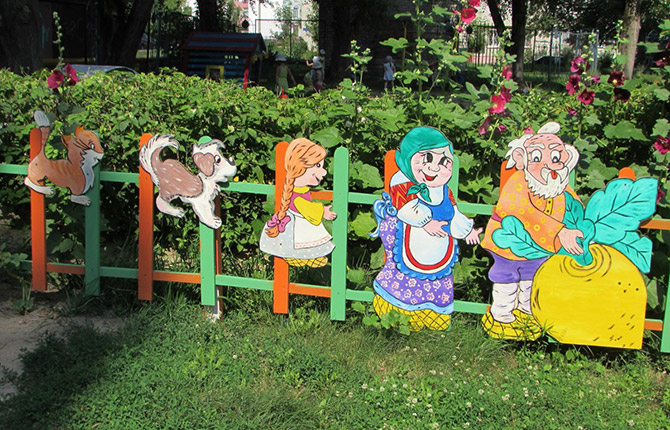
- The heroes of another fairy tale, “The Turnip,” which is well known to children, look expressive on the decorative fence.
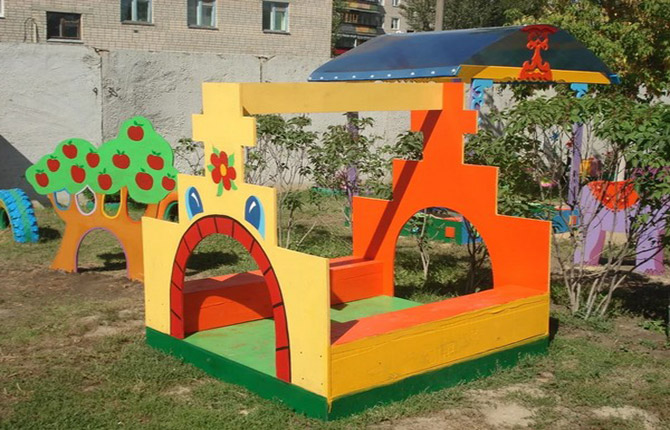
- Young children will be delighted by the colorful plywood house on the site in the form of a Russian stove, where you can organize fun games.
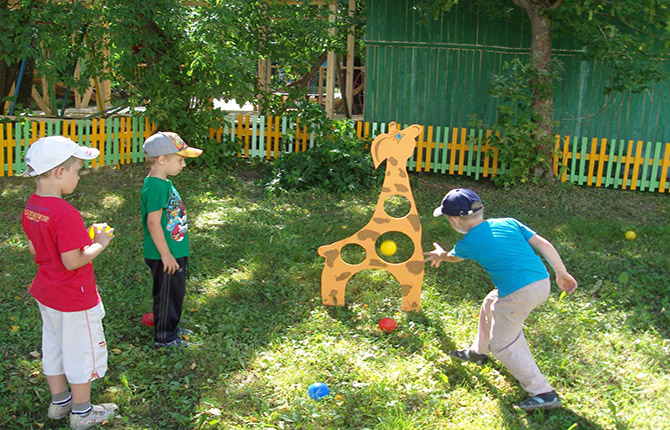
- It is convenient to combine developmental and sports activities when designing. For example, make holes in a vertical figure of a giraffe cut out of plywood installed on the site. Throwing balls at them allows you to develop accuracy and coordination of movements.
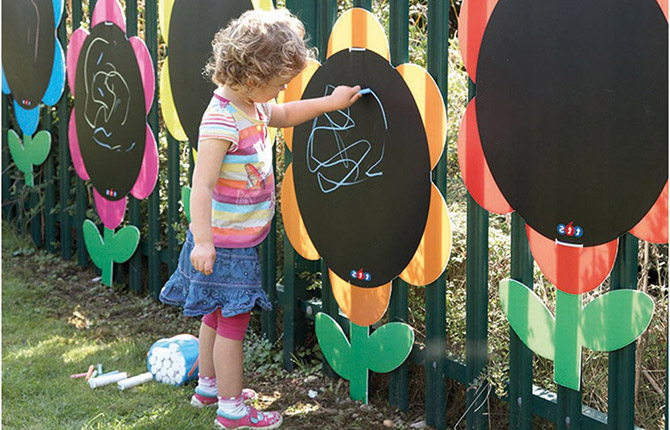
- Installing plywood flowers with a large, dark-colored core in the play area allows children to create patterns with colored chalk.
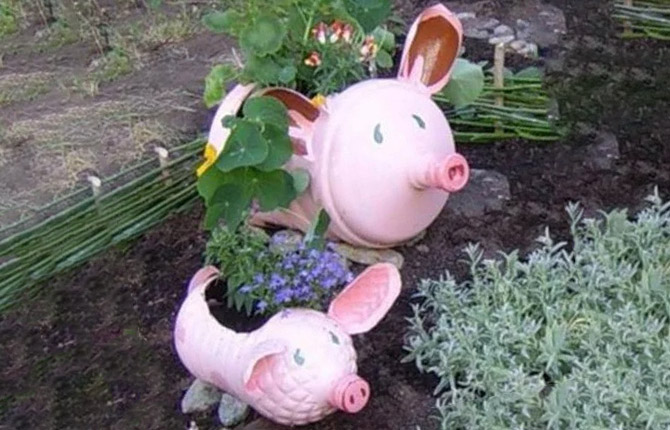
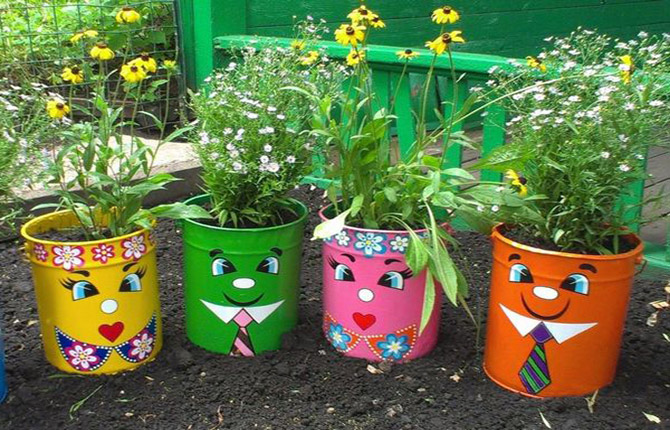
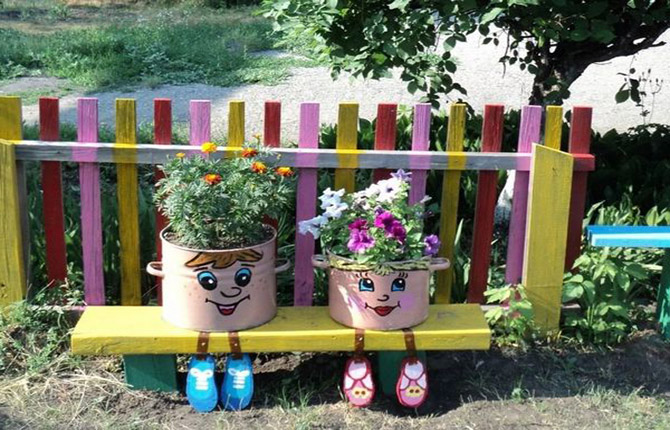
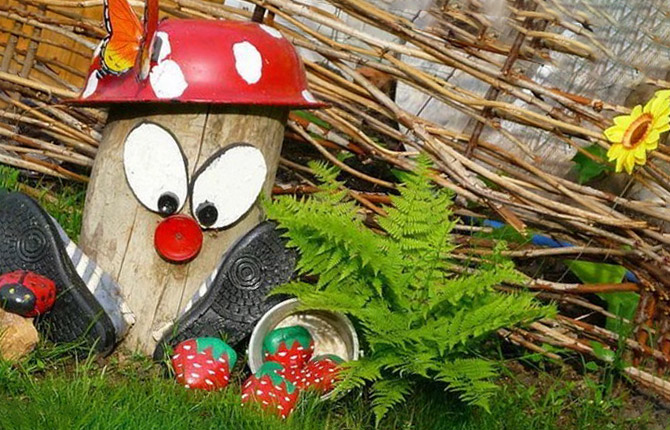
From different containers
On a properly organized territory belonging to a kindergarten, any new design is aimed at developing cognitive interest among pupils. Different containers will be useful for creativity.
Common options:
- The easiest way is to turn different containers into decorative components. Painted plastic cans become, for example, miniature flower beds.
- Pots quickly turn into cheerful little men sitting comfortably on a bench. This design attracts children, motivating them to care for the plants that are planted in such containers.
- When handled skillfully, the basin becomes a bright fly agaric cap. The leg for it is a log dug into the ground or a stump left in the garden.
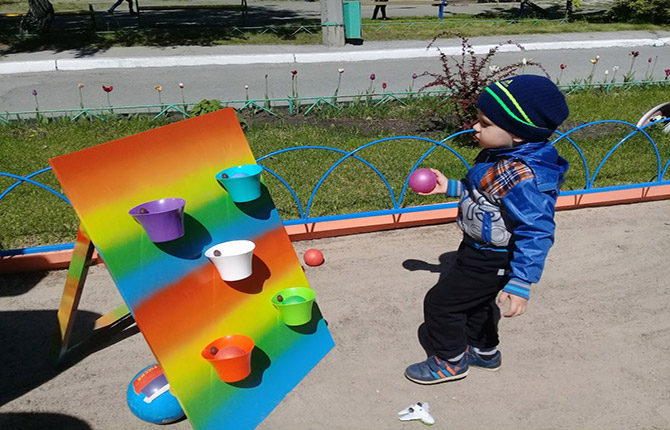
- Brightly colored plastic cups mounted on an iridescent slanted plywood base become sports equipment.
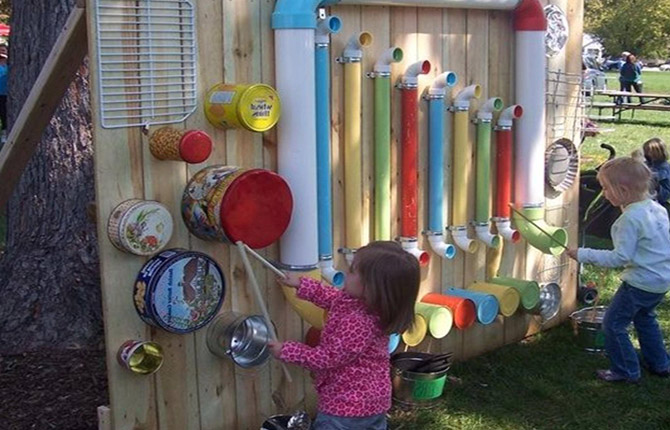
- Even scraps of plastic pipes and various cans of sweets, after being mounted on a wooden wall, become musical instruments. This design of one of the corners of the site attracts children with the opportunity to show their creative inclinations.
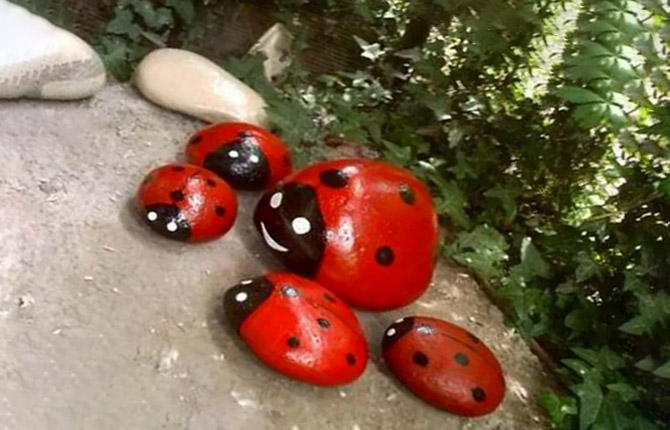
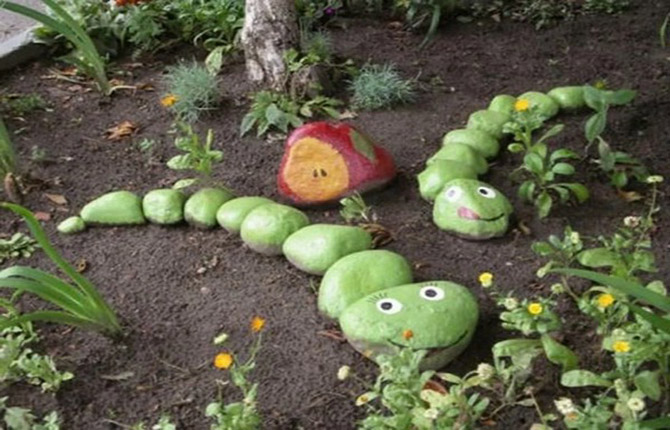
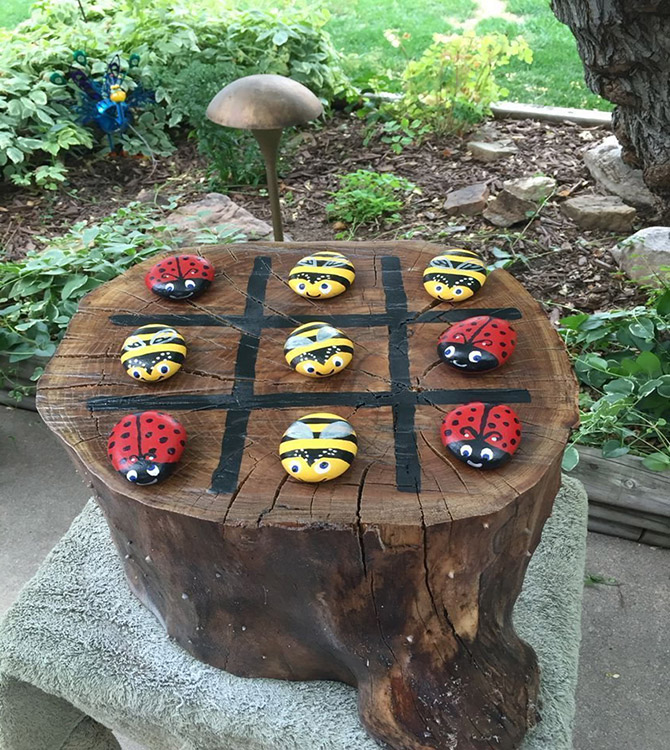
Crafts made from stones
Interesting demonstration material for kindergarten is obtained from ordinary cobblestones. Choose stones without sharp edges for decoration. They are painted and coated with moisture-resistant varnish.
A few ideas:
- As a result, bright ladybugs appear, for example, in a shady corner of the area.
- A caterpillar made up of green-painted cobblestones of various sizes is conveniently located under the tree.
- To develop the cognitive interest of preschoolers, you can make a collection of different insects from stones.

Crafts from boxes
When using boxes for crafts aimed at decorating a kindergarten area, check that there are no chips or sharp cuts on their surfaces. If you take a wooden container, then before painting all its surfaces are sanded.
Options for making crafts:
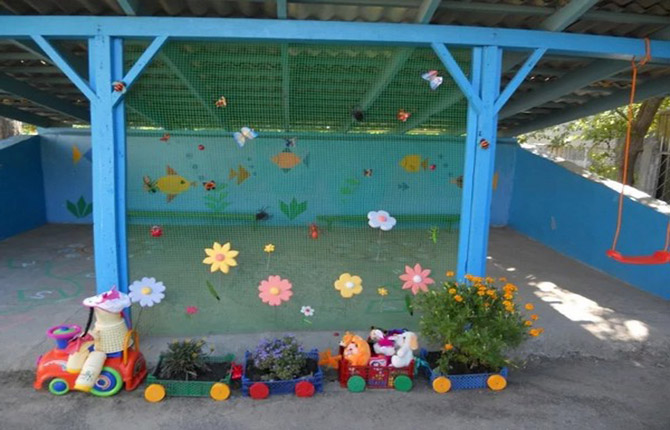
- You can quickly make a train out of small boxes. Open trailers serve as convenient vases where pots with flowering crops are placed.
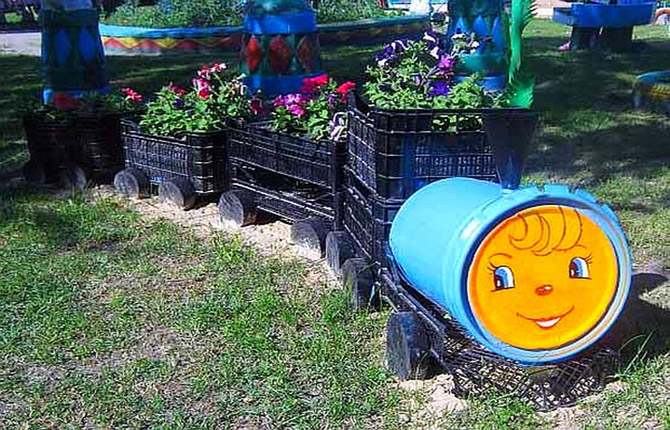
- A good type of design for part of the playground in a kindergarten is a train made of large plastic boxes that can be stacked on top of each other. Flower beds inside decorative carriages add color to the landscape of the site.
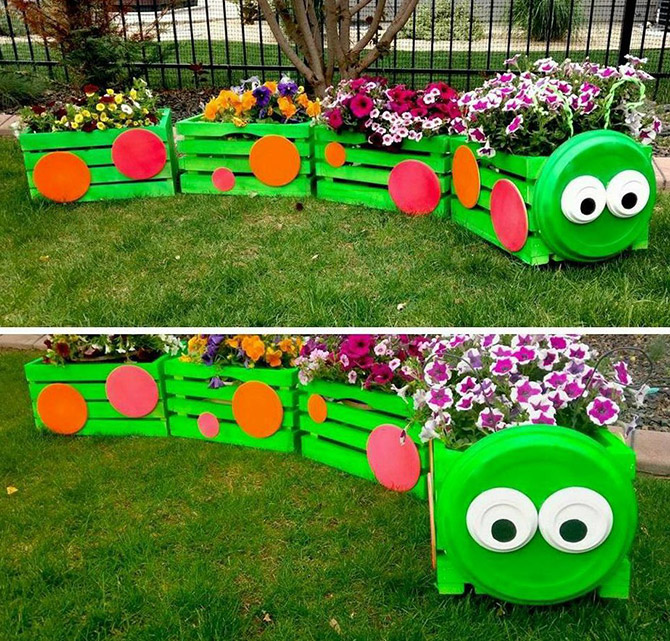
- After sanding, wooden boxes are coated with weather-resistant paint. You can enhance the decor with bright plywood circles on the side surfaces and flowering flower beds inside.

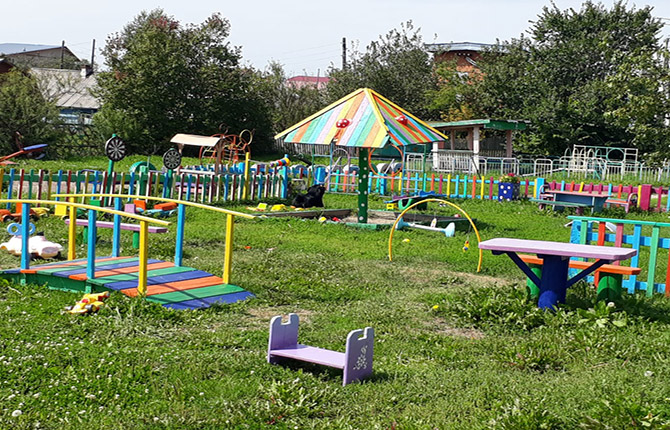
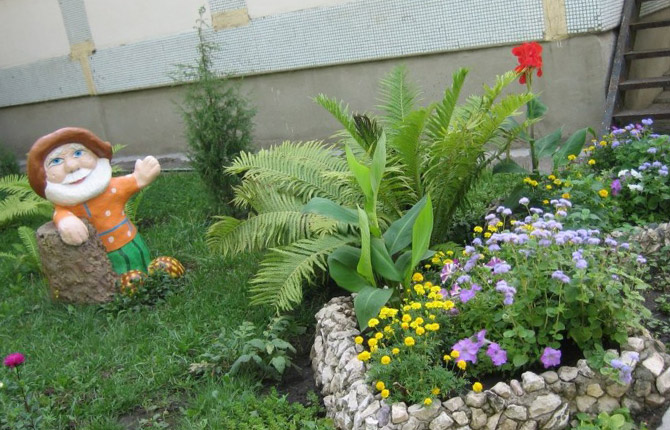
Flowerbeds on the territory of the kindergarten
For summer decoration, they think about the location of the flower beds on the site.More often, unusual bright options are used to frame them.
Ideas for flower beds:
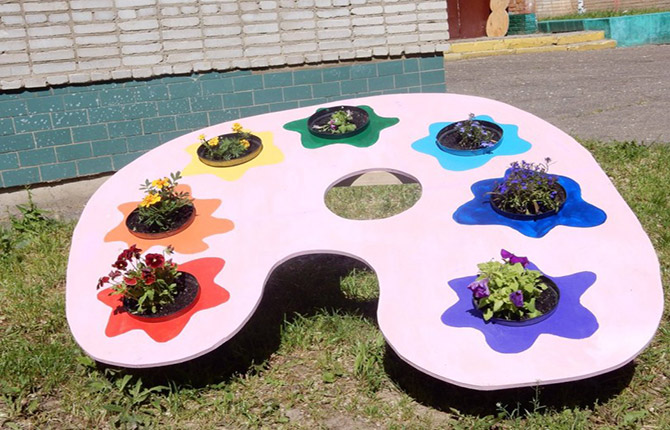
- An unusual flowerbed in the shape of a palette will allow children to explore colors. Cut out the base from moisture-resistant chipboard. Holes are made in it into which pots are placed. Lush greenery and bright buds harmoniously coexist with the shades of the rainbow used to edge the holes.
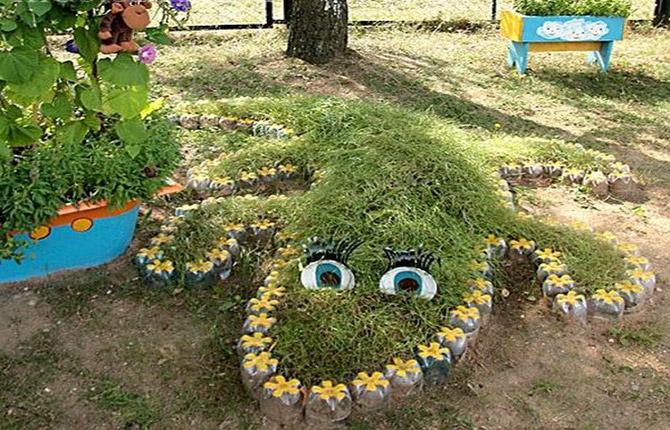
- Even lawn grass becomes a bright garden decor if the outline is laid out from plastic bottles turned upside down and buried in the soil in the shape of a crocodile.
- If desired, it is easy to create a small flowerbed in the shape of a butterfly on your site using multi-colored PET bottles.
- Cobblestones will serve as a good durable fence for miniature flower beds in the garden. They are laid out in several layers, bonded with concrete.
- You can create a simple fence if you install disposable plastic plates painted in different colors and attached to pegs around the flowerbed.
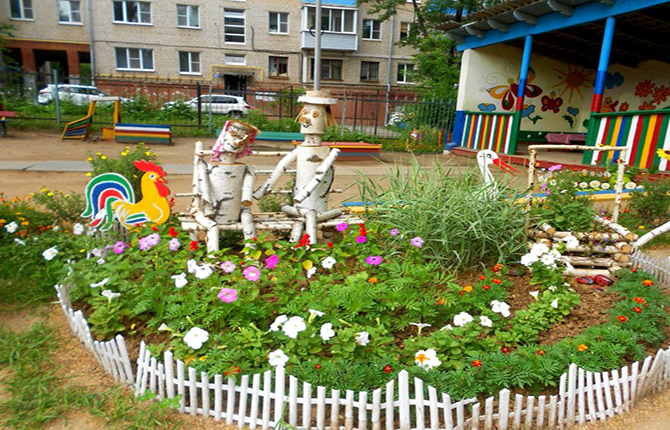
- Figures assembled from wooden chocks fit well into the landscape of a kindergarten when decorating a flower garden. The fence in such a situation is a low fence made of wooden slats.
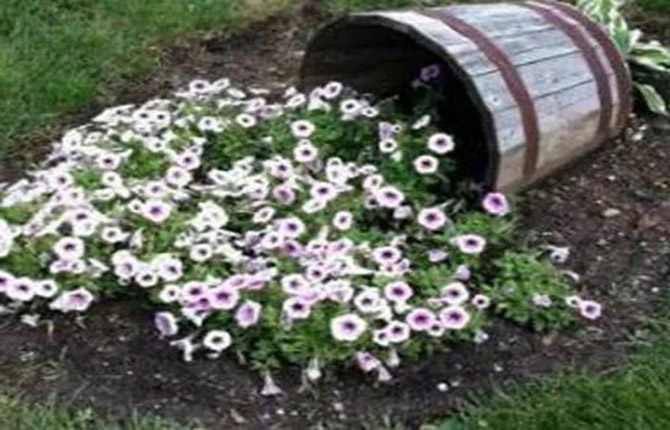
- An interesting option for a garden is a flower stream. The source is a wooden tub installed on its side.


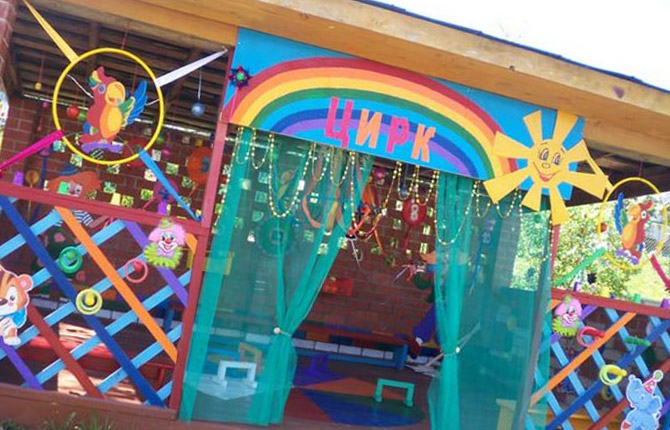
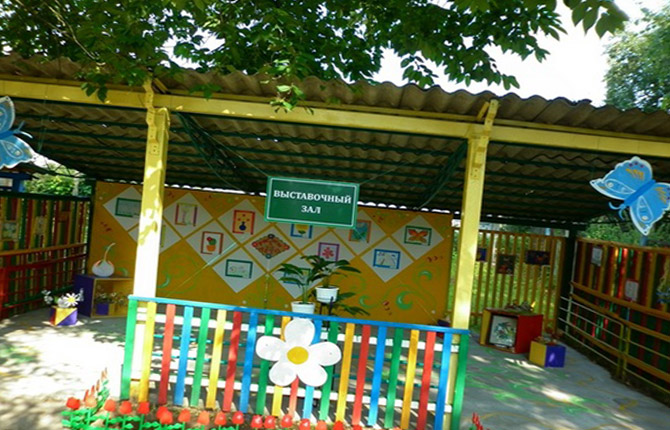
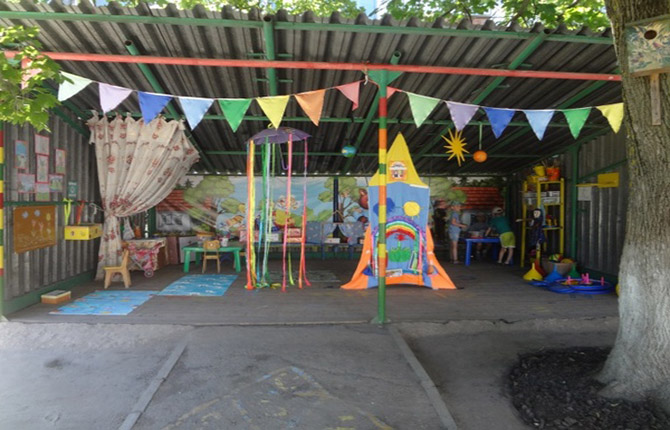
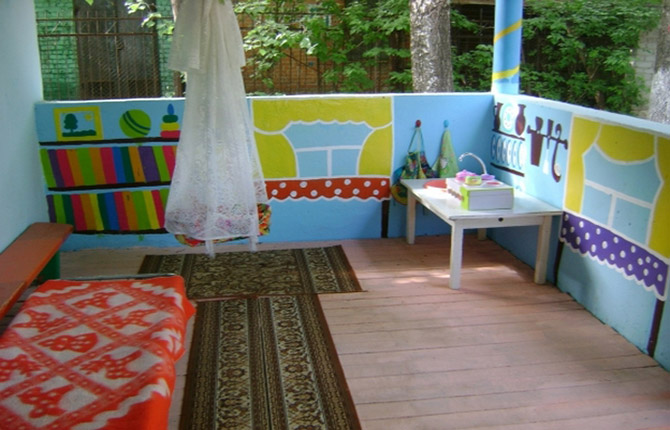
Veranda decoration
According to the standards governing the activities of the kindergarten, special canopies - verandas - must be installed in the adjacent area. These buildings often serve not only as shelter from wind and rain, but also become a development or play area.
A few examples:
- Thematic design based on circus performances attracts preschoolers. They can play different roles and navigate the world of birds and animals.
- The colorfully decorated veranda becomes a convenient place where a rotating exhibition of children's works will be held.
- Dividing the internal space of the veranda into several zones provides kindergarten students with a choice of attractive activities.
- The design of the interior space of the gazebo with a cozy sofa, table, and floor path is conducive to relaxation and conversation.
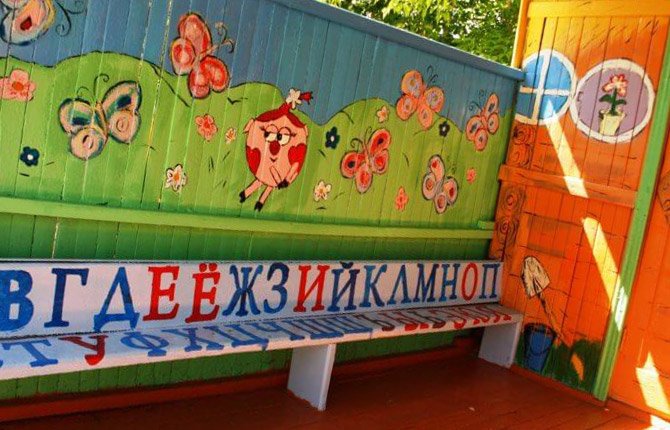
- The alphabet depicted on the bench will allow the teacher to repeat the letters with children in the middle and senior groups in a playful way.
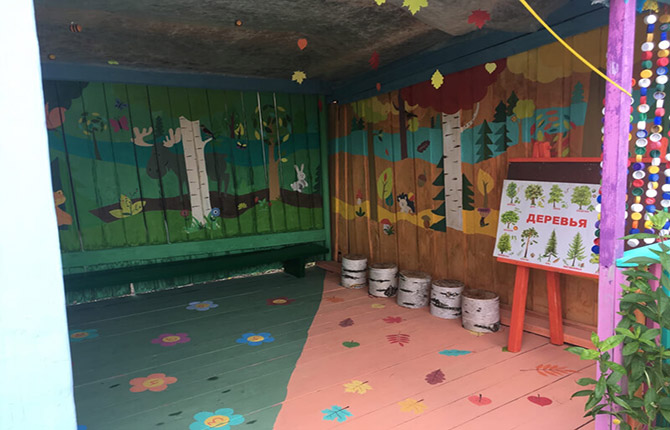
- The decoration of the walls of the kindergarten veranda with drawings depicting the seasons looks original. The role of chairs is played by birch logs. Here you can put up a stand on which posters are displayed, for example with types of trees. The whole environment is aimed at the development of children.
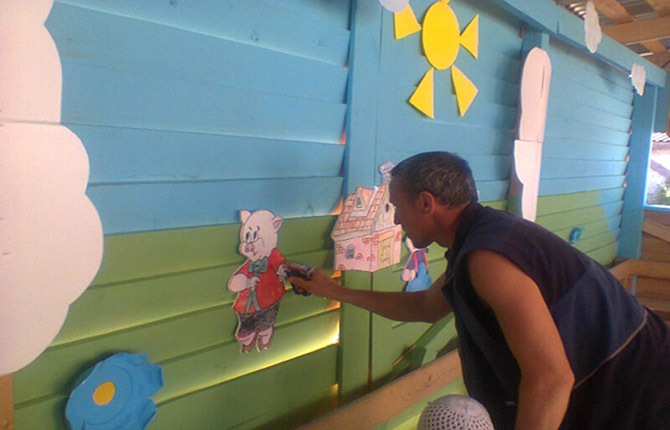
- The walls of the veranda, located in the area reserved for walks for children attending kindergarten, will be decorated with plywood and painted fairy tale and cartoon characters.
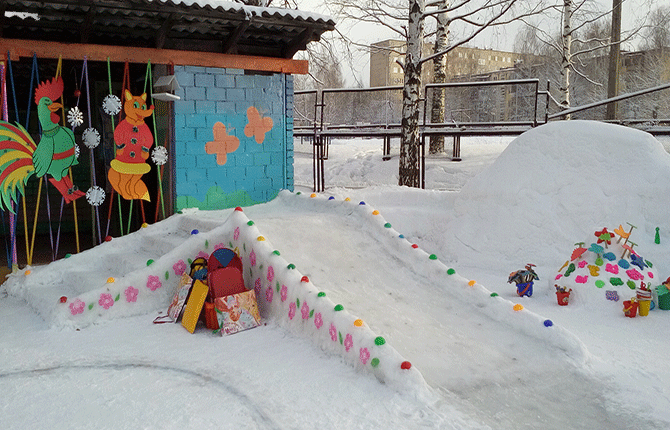
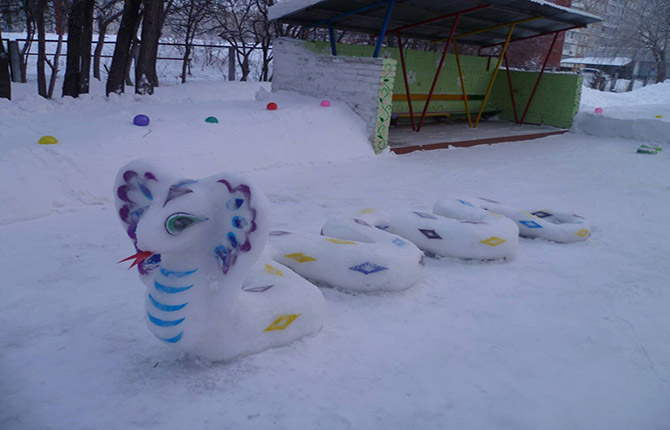
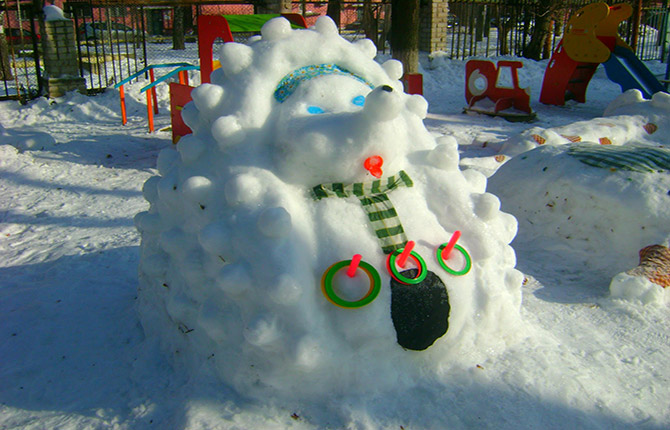
Winter decoration
Interesting design options suitable for the area where outings for preschoolers are organized can be offered for the winter season.
A few ideas:
- To add colorful nuances to the surroundings of the site in winter, children, together with kindergarten teachers, make snow figures. Choose simple forms that are accessible to different ages.
- You can make a small slide. It is important to ensure children’s safety when riding by equipping boards and comfortable steps.
- The winter area will be decorated with snow figures laid out on the surface. The patterns are applied with gouache.
- You can turn a large snowy figure in the garden into a sports simulator that develops accuracy.
When decorating a site in a kindergarten with your own hands, you need to use only safe materials.The developmental nature of the crafts being created is also taken into account. If you have interesting ideas on the topic under consideration, please share them in the comments. Also bookmark the article and share it on social networks. What ideas did you use to decorate the area in the kindergarten?


I was asked to make an animal figure for a kindergarten to install on the site, which can be used for sports games. Which option is right?
You can settle on the idea of making a plywood cow. The material is multi-layered and protected from moisture. The figure of a cow is first drawn on a large sheet of paper. It is important that the horns are long and the tail is raised. Then they cut out a figure from plywood and paint it. Cover with varnish. Children will be able to throw rings on the horns and tail. The exercise develops coordination and accuracy.
For the veranda in the kindergarten I need to make a round table. It should be bright. What design is suitable?
It is more convenient to make a table on one block leg. Cut out a round table top and a base of the same size. The leg is attached to the base with self-tapping screws.Then fix the tabletop with moisture-freeze-resistant polyurethane glue. All details are painted. The base is given a green tone, and the leg a silver tone. The tabletop is made bright red with white circles.