DIY door closer installation: step-by-step guide and common mistakes
There can be quite a few reasons for installing a door closer.But most often, the mechanism for braking and smoothly closing the door is used to avoid impacts on the door frame and, as a result, damage to the hinges or the leaf itself. Installing a door closer is not difficult, but it will require patience and the ability to adjust the mechanism.
The content of the article:
Selecting door closer installation options
First of all, you need the right choose a door closer model. All soft landing mechanisms for doors are divided into seven categories (classes) EN1-EN7 depending on the weight and width of the door leaf. The higher the class, the heavier the sash can be braked and held by the mechanism.
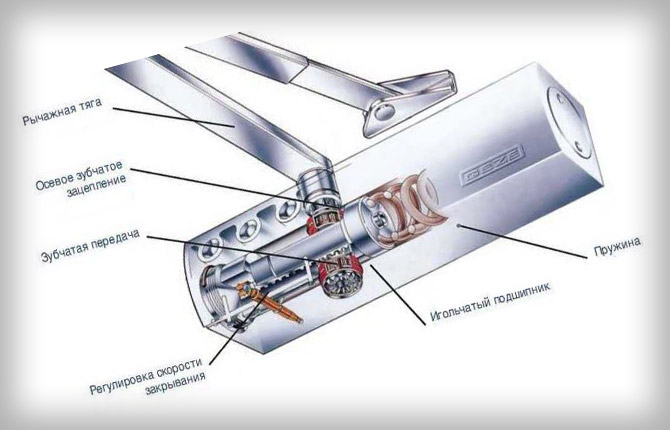
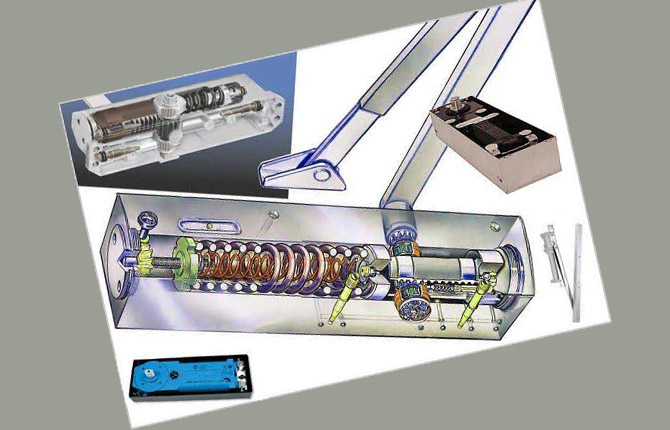
This is important, since installing an EN3 class door closer on a regular metal-plastic door weighing 40-45 kg with the expectation of a longer service life usually leads to destruction of the door leaf lining due to excessive loads on the attachment point. There are quite a few designs of closers; most models use a spring and a gear drive, also known as a brake, to create resistance to the opening force.
The installation itself is simple, you just need to secure the body and rod bracket to the door hatch and the leaf itself. In any case, before starting work, it would be correct to read the recommendations of the manufacturer about how to properly install door closers of the selected model.
You need to pay attention to the following nuances:
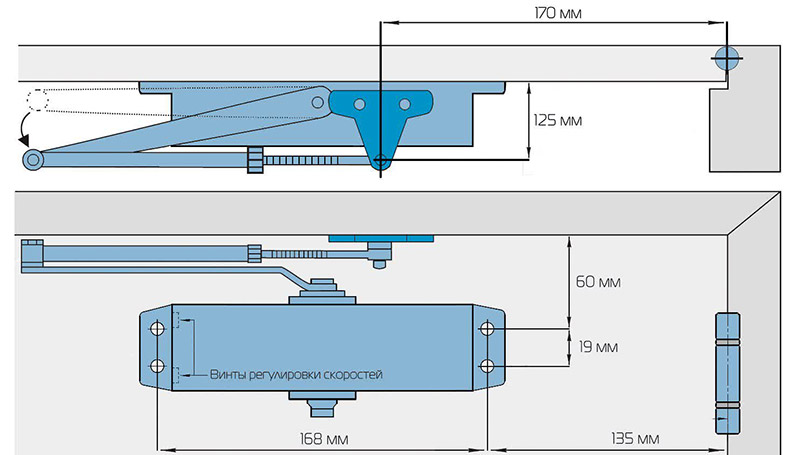
- The supplied template must be used to attach the mechanism housing.Marking and drilling holes only after leveling the position of the template using a building level or plumb line.
- The axis of rotation of the rod on the body must coincide with a conventional line passing through both door hinges.
- When installing, the bracket will also need to be aligned so that the pair of movable levers moves in planes (each in its own) perpendicular to the axis of rotation of the rod on the body.
The installation requirements of the manufacturer must be met. Otherwise, the resistance will be very large; in order to open the door, you will need to apply twice as much force, and most importantly, the door will not close completely.
In addition, wear of the braking mechanism will occur much faster than the warranty for the closer will expire. In this case, it will not be possible to return the device, since the cause of premature wear will be a violation of the requirements for installing the closer.
Standard installation
Most models of closers are designed in such a way that the lever arm, which is fixed on the rotary rod of the housing, can be rearranged and used for doors with right-hand and left-hand hinges.
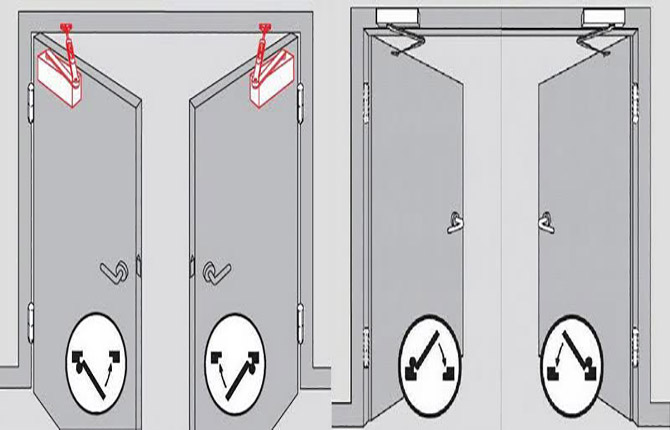
In the standard version, for example for interior doors or on the door leaf at the entrance to the kitchen, the closer is installed on the leaf (moving part). In this case, the door with the door closer attached to it opens “toward itself” upon entering the room.
In the same way, the door closer is installed on iron doors, door leaves with a glass insert and plastic leaves. The reason is quite simple: any door leaf has an internal frame, wooden or plastic, with a rail width of at least 90 mm.
This is more than enough to install the finishing mechanism housing. But the door frame (door frame) is always thin, the thickness of the crossbar is a maximum of 40-50 mm. This may not be enough to install the case. And for the support bracket, the width of which is usually no more than 20 mm, it is much easier to find a place for installation on the box.
An exception may be cases of installation on metal doors with an armored insert, entrance doors, insulated doors or with special finishing of the door leaf. In this case, it is better to study the step-by-step instructions from the model manufacturer again.

Top installation
The scheme with the housing located on the door is less common and is used mainly for entrance doors that open outward (when leaving the apartment). These are fire safety requirements. The top installation of the closer on the door simplifies the fastening of the mechanism and bracket. It is believed that this scheme is safer, since the force of opening and closing the door often reaches 70-80 kg.
In addition, if the front door is made of good quality metal, then drilling a couple of holes for installing a bracket is easier than drilling at 5-6 points.

There is also an opinion that the upper installation of the closer saves the mechanism from street dust. This is not entirely true.
The largest gap on any front door is the one above the top edge. Through it, dust can get onto the body when the closer is installed at the bottom. But dust has little effect on its operation, since most models are dust-proof.
But cold or frosty air blowing through the gap can seriously freeze the lubricant or oil inside the mechanism. To open the door, you will have to exert twice as much effort.When installed at the top, the closer remains protected from cold air. But for the front door it is better to look for a special model.
Step-by-step installation guide
It is clear that before starting work you need to put the door and hatch in order. After installing the closer, the load on the hinges and door frame will increase several times. Therefore, it is necessary to tighten the ties, and the lock may have to be adjusted again.
Selecting an installation scheme
There is not much difference, but there are personal preferences. For example, for a right-handed person it is more convenient to open the door with the right hand, which means that the hinges and closer should be on the right.
As for interior doors. According to the laws of ergonomics, it is much easier to open the door towards you when you enter a room, and towards yourself when you leave it. The exceptions are:
- Entrance to a house or apartment.
- In the bathroom or bathroom.
- When using double entrance doors. In this case, the door closer is installed only on one of them, usually on the inner one.
In addition, you need to inspect the hatch and door leaf. Sometimes there is only enough space to attach the mechanism body for one installation option.

You also need to take into account the location of the regulator on the mechanism body. In order to correctly adjust the operation of the braking system, you need to see the position of the regulator. Therefore, there should be a free space of at least 25-30 cm from the wall or from the ceiling surface to the housing.
Advice! Many experts recommend that when choosing an installation scheme, pay attention to the direction in which the draft blows in the spring and summer.
The very idea of installing a door closer involves smooth closing of the door with braking precisely as a means of preventing it from being slammed by a gust of wind.Therefore, before making a final decision, you need to once again check the direction of air flow inside the house or apartment.
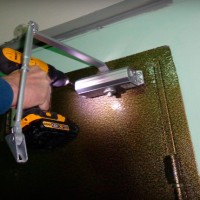
Installation
All that is required is to correctly install the housing and support bracket on the trap door. Since the operation of the levers depends on how wide the door swings open, you cannot choose a place arbitrarily. Otherwise, the opening angle can be greatly reduced, and entering and exiting through the doorway will be inconvenient.
Therefore, you need to take a paper sheet with a template diagram for the location of the body on the door and secure it so that the top edge and side of the door leaf coincide with the control markings of the template. The template must be secured with tape.
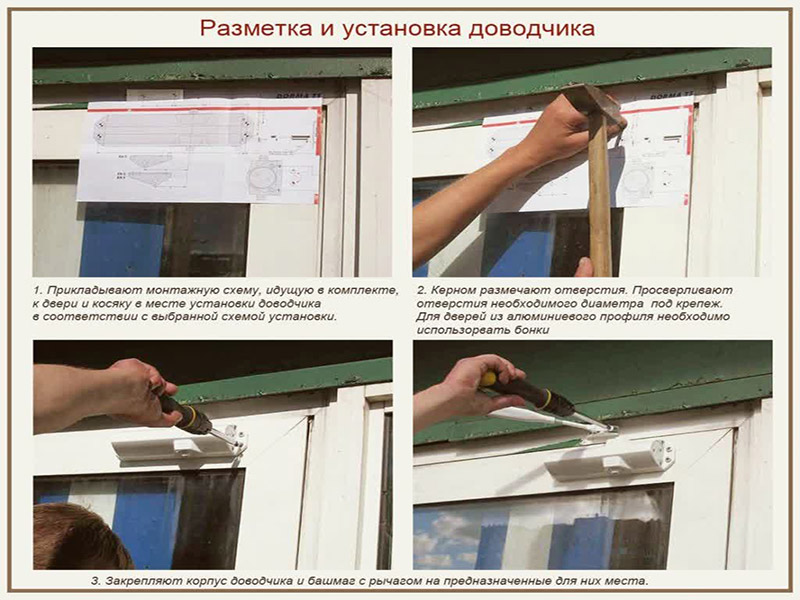
The next stage is to transfer the drilling points to the door leaf and the door. If the closer is attached to a metal-plastic door, then the points can simply be pierced through the paper with a sharp awl. The marks will be clearly visible on soft plastic or aluminum. If in doubt, you can lightly punch the points with a regular nail and hammer. For a steel door you will need a locksmith's core and a 400-500 g hammer.
Next, without removing the diagram, holes are drilled, the diameter is selected for the specific size of the screw. Usually the fasteners are included with the door closer, so you can select the drill in advance. In theory, the drill should be smaller than the outer diameter of the screw notch on the screw.
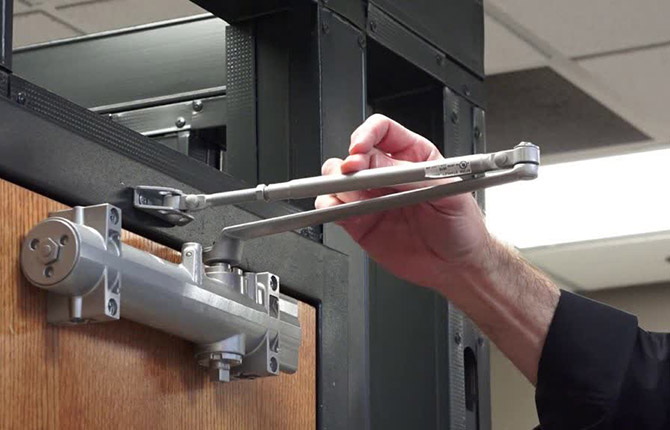
All that remains is to remove the template and tighten the self-tapping screws first with a screwdriver, and after the final adjustments you can crimp them with a screwdriver. A pair of levers is put on and fixed onto the drive shaft, the supporting end is threaded through the axle and secured with a nut on the bracket.
You can try how the device works. Usually the mechanism brings and almost closes the door, you just need to adjust it correctly.This takes about three times as long as the installation itself.
Adjustment and Settings
Often the planes in which the bracket and the housing are fixed do not coincide. In theory, the difference can be adjusted by unscrewing part of the threaded rod and securing it with a nut. This scheme works in about half of the cases, so craftsmen often cut out spacers from fiberboard or plastic to place under the bracket (casing).
Next, you need to correctly adjust the length of the levers. When the door is completely closed, the first (adjustable) lever from the body should be located perpendicular to the door leaf. Therefore, we turn out the threaded part so that the first elbow is perpendicular to the plane of the door frame, and the second is effortlessly attached to the body shaft.
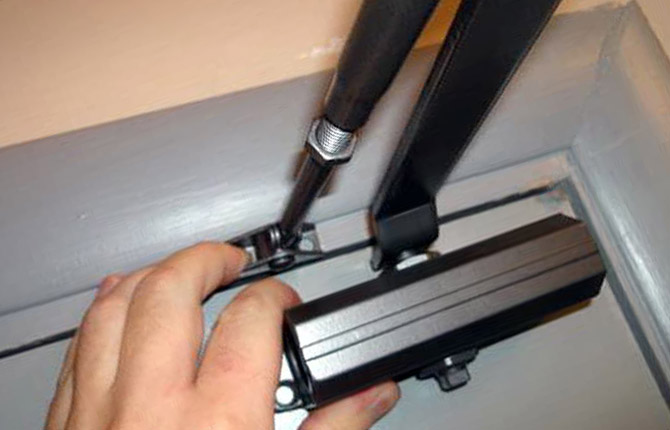
The next step is to adjust the speed of closing the door leaf. At the end or on the upper plane of the closer body there is a control knob or a pair of screws. By turning it by hand or with a screwdriver, you need to select the required closing speed - latching the door.
It is clear that when door closer regulation the canvas cannot be accompanied by hand. Although most people, when closing doors, do it automatically, without thinking.
Common installation errors
Most often, the closer is simply not adjusted during installation. The lever with a threaded rod can still be tightened if the door design allows, but usually no one adjusts the speed of closing and pressing the door leaf. As a result, the door does not close completely, and the closer often causes the door latch (ball) to break.
Problems often arise with the use of shims. Many apartment owners install door closers as is.If the installation planes do not coincide with a large difference, then instead of the lining, the rod is simply turned out to the limit. As a result, it is not possible to adjust the door pressing force normally.
Problems often arise if the wrong type of screws are used to install the door closer.
Included with the mechanism, as a rule, is the usual galvanized fasteners of a universal type. It can be used on wooden or panel doors.
If you attach it to a metal-plastic box, it is advisable to use special fasteners with fine threads. It is necessary that there be at least 4 turns of thread in adhesion to the metal.
After final adjustment of the mechanism, the fasteners need to be crimped using a screwdriver. You won’t be able to “tighten” the screws with a screwdriver.
Results
It is not difficult to understand how to install a door closer if you follow the instructions and do not try to make changes to the door device. The mechanism lasts on average up to 10 years for a residential building and 5-6 years for offices, shops, cafes.
Tell us about your experience installing a door closer. What mistakes do you think should be avoided first? Bookmark the article and share it on social networks.


My advice is to make a removable plate or plywood or metal on the door. You will attach the closer to it. My store has metal-plastic doors at the entrance, and I change the door closer every year. I don’t know where you found ones that last 10 years. People break them within a year. Therefore, take the cheapest ones and increase the closing speed to the maximum.
I have the same thing - at home I have an old Soviet door compensator with a weight suspension. He doesn't look very good BUT he is already 40 years old. Works like a clock. Once every two years I buy a mechanical door closer and install it in the office. The oil ones start to leak even earlier.