How to make a transforming bench with your own hands: diagrams, drawings, step-by-step instructions
Outdoor living will require furniture.You can dig in a table, knock down a couple of benches, or buy plastic furniture, thereby turning the rest area into something like a street cafe. One of the possible options is to make a transforming bench with your own hands. The thing is practical and extremely convenient for country gatherings over a cup of tea.
The content of the article:
Options for transforming benches
There are quite a lot of projects, and it is not surprising, because the idea of a relatively simple design of a transforming bench made of bent aluminum pipes appeared about 40 years ago. Of all the projects, the most popular (practical) were:
- a classic transforming bench with a frame made of a profile pipe, a reversible tabletop and a bench;
- a country version of a bench with a table made of wood with a rising bench and a table;
- a bench with a reclining backrest in the form of a table.
Transformer benches with sliding benches made of wood are not very popular. Firstly, much more materials are spent on the construction of a transforming shop. Secondly, the hinged design is much more convenient to unfold and fold than the retractable one.
Before you make a transforming bench, you need to choose the right dimensions, material and design design.
Transformable bench from profile
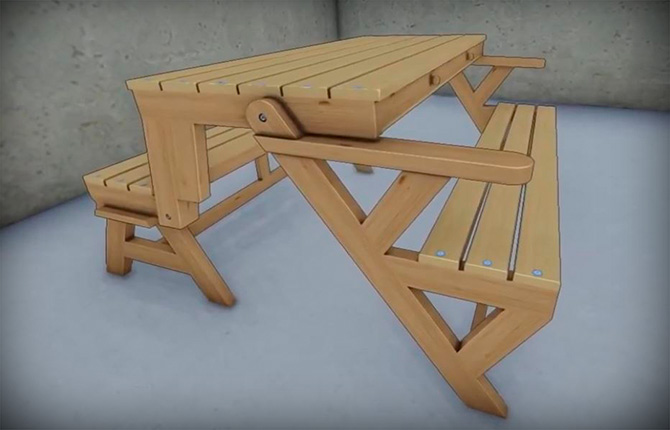
One of the options for a folding table with two benches can be made from a 20x20 mm profiled pipe. When unfolded, the width of the metal table will be equal to the height of the back of the bench. The width of each of the benches is approximately half the cross-sectional dimension of the video seating area.
When folded, as in the photo, the transformer is a fairly wide bench with a high back; when unfolded, there are two narrow benches with a relatively narrow and long tabletop.

A rather serious advantage of metal transformer models is the increased size of the lower arch, which serves as the legs. Plus, the bench has quite comfortable side armrests made from a profile.
Wooden option
You can make a transformer from plywood, edged boards, and even from pallets broken into planks. It is best assembled from aspen or ash, although there are no restrictions on the use of wood. It is important that the material is dry, without cracks or fiber delamination.
Selecting material for making a wooden transforming bench
The advantage of a wooden folding transforming bench is the light weight of the structure; it can be disassembled and transported to a dacha or country house. Disadvantages: smaller size, more parts and connections.
If made from plywood, you will need material with a thickness of at least 18-20 mm. A 20-pound plywood sheet costs about three times more than pine. In addition, some parts will need to be made double thickness, so there will be a lot of scraps. It is best to use beech or oak, ash, or acacia for a transforming bench. Wood is difficult to process, but the transforming bench will be quite strong and reliable.
Preparation for construction of the structure: drawings and dimensions
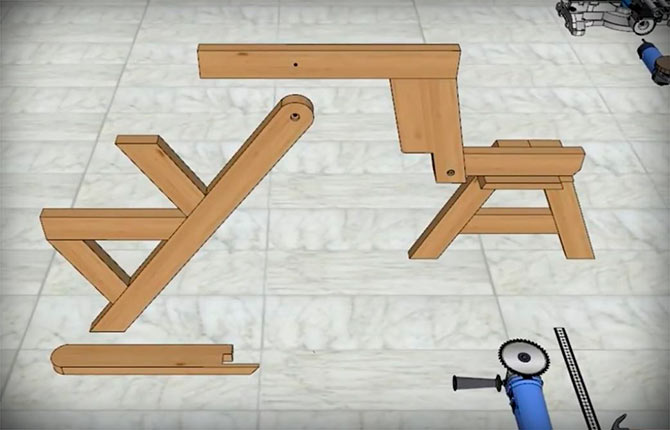
The transformer design consists of three main parts:
- Benches with a support strut that serves as a support for the tabletop.
- A simple bench with additional consoles.
- A table, which in turn consists of a tabletop and two short supports.
- All three basic parts are connected to each other by three pairs of hinges. If the wood is hard, then threaded rods or bolts can be used without removing the threads in the supporting part. For pine, aspen, and ash parts, it is better to use special axles with a smooth surface and threaded ends.
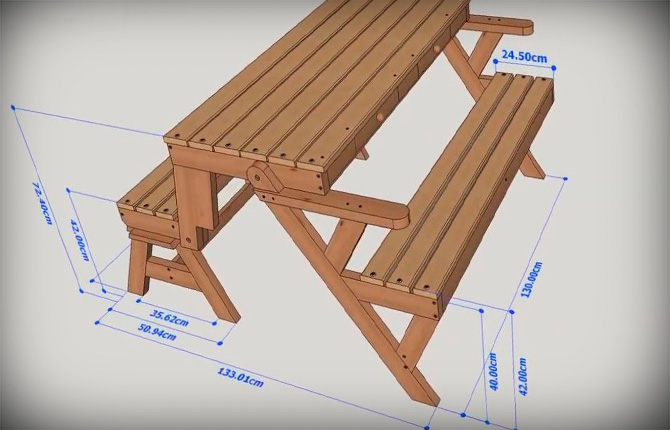
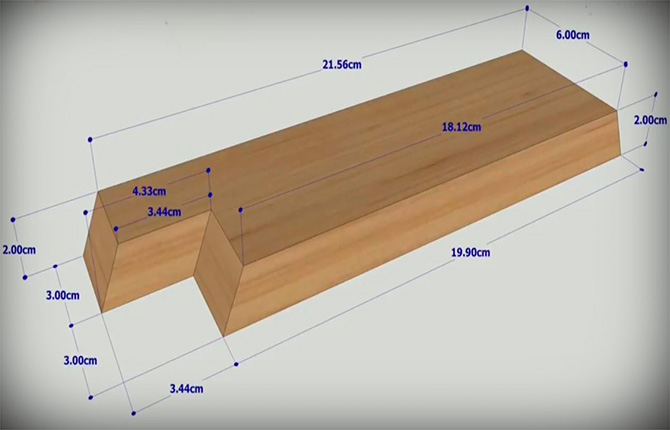
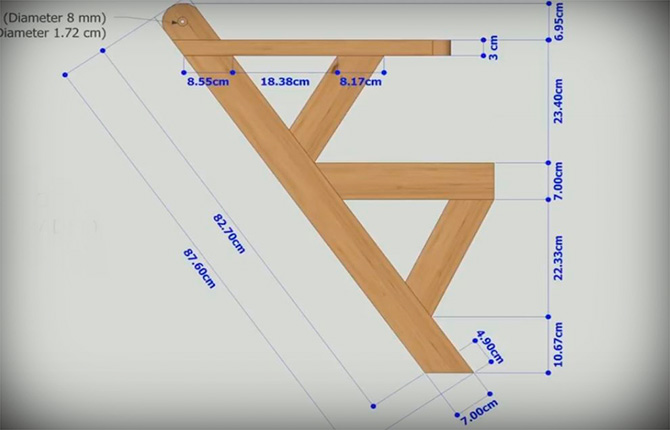
The drawing shows the main dimensions required to assemble the transforming bench.
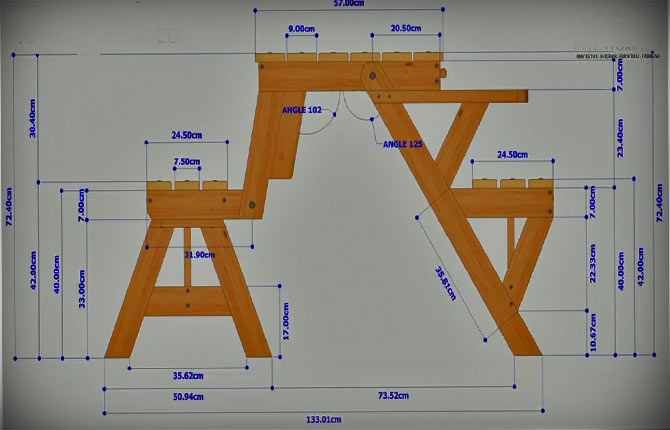
The height of the structure when unfolded is 73 cm, width is 133 cm. When folded, the height of the backrest is 57 cm, the width of the seat is 50 cm.
Material calculation and tools
All components of the transforming bench are made from boards 70x30 mm, 70x20 mm, it will require at least 25 m. In addition, for a combined stand (combined with a bench), it is advisable to use a 70x40 mm beam, it will be required in the amount of 2.5-3 m. Seat The benches are formed from slats 75x12.5 mm, it will need to be at least 10 m, the tabletop is made of a wider plank 90x20 mm or 70x12.5, it will also need to be stocked in quantities of 10-12 m.
For fastening, wooden tenons are used (oak plugs - 30 pieces), carpentry screws 45-50 mm. For hinges, you can choose M12 studs 50 mm long.
In the process of building a transforming bench, you will need the following tools:
- electric drill with a set of drills, including centering and cylindrical;
- hand brace with a set of feather drills;
- screwdriver;
- grinder with cutting wheel for wood with a diameter of 120 mm;
- marking tool.
Tenon joints will require precise drilling of holes. Therefore, you will have to use either a tabletop drilling machine, or drill with a hand-held brace with a feather drill, holding the workpiece in a vice.
Stages of making a bench-table
First of all, the material must be dried to a level of at least 18% humidity, and then treated with varnish or an alcohol-based varnish composition. This will stabilize the wood and avoid cracking or warping.
A tabletop cutting machine is used for cutting workpieces. It is inconvenient to cut wood with a hand saw, and in addition, uneven ends of the slats and beams will spoil the appearance of the transforming bench.
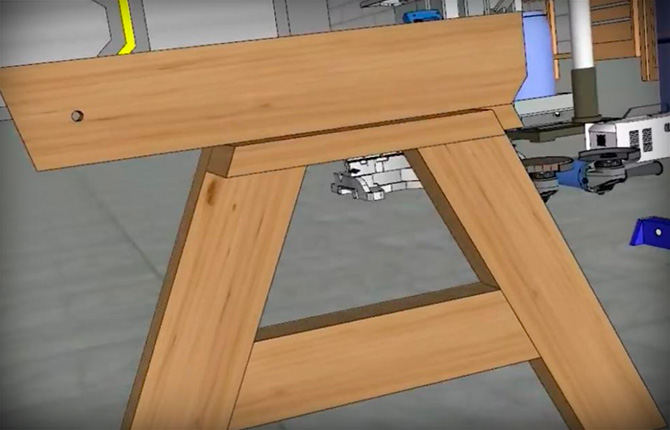
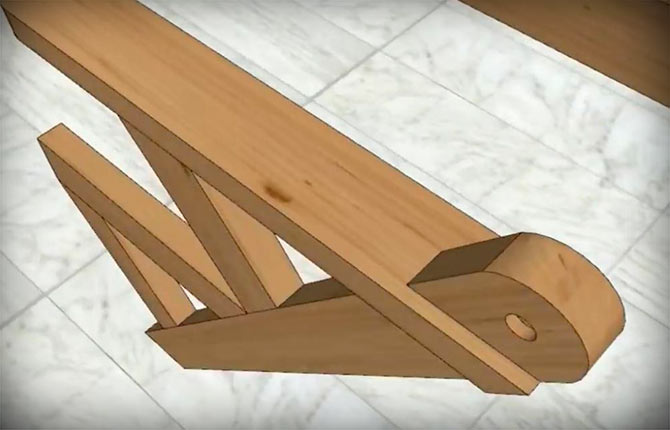
Making side supports for a small bench
The fixed base of the transforming bench will be assembled first. The small bench remains in place during the transformation process, the remaining parts move relative to it.
This part of the shop is quite simple. Two double supports on each side, seat slats and a pair of horizontal support blocks with a hinge.
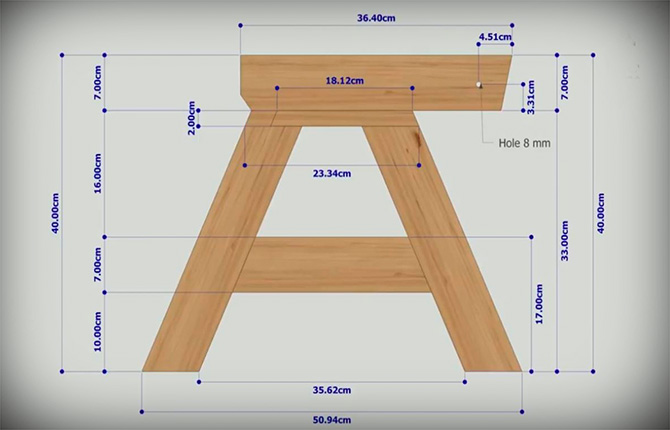
Initially, you will need to cut four legs from a 70x30 mm board, the ends are filed at an angle of 15O. The distance at the bottom between the inner edges should be 35.6 cm.
To ensure horizontal stability of the transformer, a spacer is inserted between the two supports at a height of 170 mm. The connection is made using tenons, wood glue and self-tapping screws.
Next, a 25 cm long crossbar is sewn in the upper part; during assembly, 75x20 mm strips will be stuffed onto it to form a seat. On the outside of each double support, a wooden block of 70x40 mm timber is sewn. Block length 34 cm.
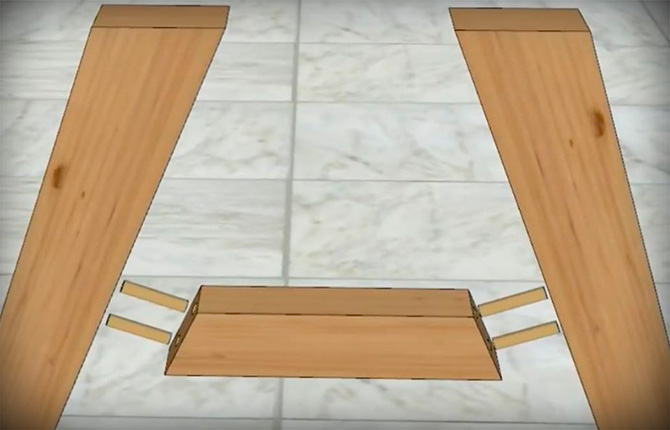
But before attaching the horizontal block to the supports, you will need to sew a support platform for the handrails to its lower part. It can be made from a piece of board 150 mm wide and at least 25 mm thick. Fastening is carried out using five 45 mm self-tapping screws into the body of the beam. It must be secured securely; if the platform collapses, the back of the bench (the transformer when folded) will fall back.
The next step is to cut out two movable arms. The shape is quite complex; you will have to cut it out of a 200 mm wide board with a grinder. The ends of the lever are made with an oblique cut of the edge at an angle of 12O.
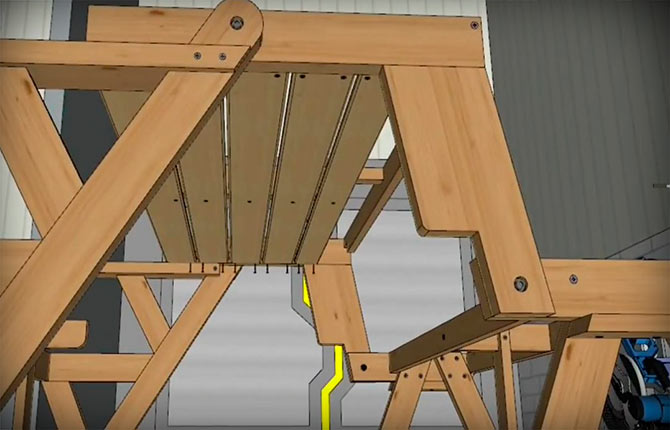
The upper part of the movable lever will be connected to the table box on dowels, the lower part to the horizontal block - on a hinge.
A crossbar, the horizontal part of the tabletop, is attached to the movable lever on spikes.
Assembling the double support for the second bench and table
Next, you will need to cut out two sets of parts according to the bench drawings, from which a pair of double supports will be assembled.
The kit includes:
- supporting beam 70x40 mm, length 100 cm;
- two horizontal blocks, one 40 cm long, section 70x30 mm, with a cutout - groove, the second - 70x40 mm, 30 cm long, sawn to 35O leading edge;
- two struts 26 cm each.
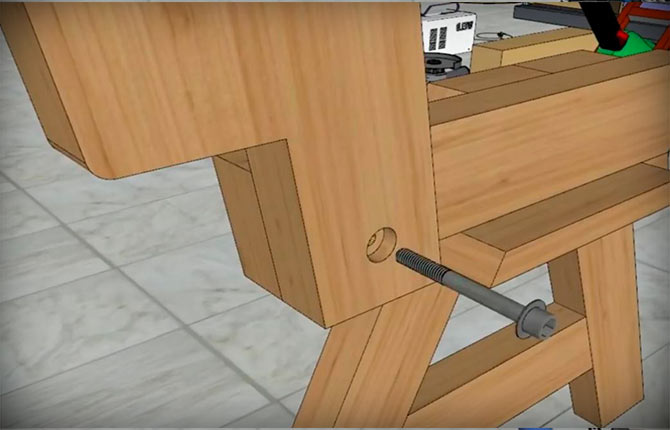
The first pair to be attached to the support beam is a lower strut and a 30 cm horizontal block. The edges of both parts will need to be sawed on a bias. The size for drilling dowels is selected so that after installation on the support block, the distance between the outer edges does not exceed 36 cm.
In a similar way, the upper pair: a strut and a horizontal block with a groove. But first you need to drill a 12 mm hole in the head of the support beam for the hinge axis. Drilling is performed along the midline, 35 mm from the edge.
Upon completion of assembly, all parts at the connection points are additionally reinforced with 25 mm carpentry screws.

Now you need to connect the small bench with the swing arm and the newly assembled double support in pairs. To do this, you need to step back 21 cm from the front end of the side of the table and drill a hole with a diameter of 11 mm.
The result should be two finished side parts of the transforming bench.
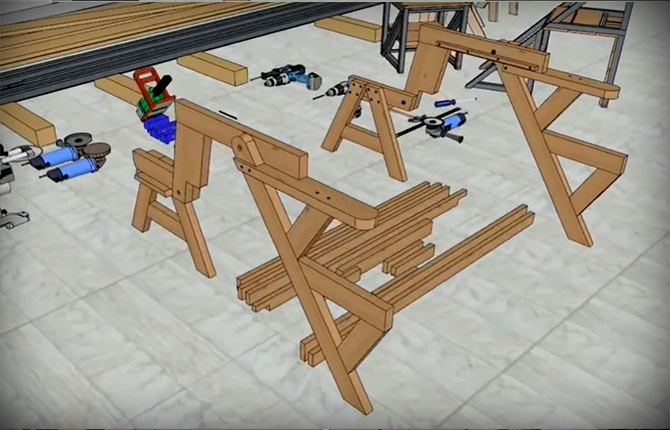
Frame assembly
The most labor-intensive part of the work on making the transforming bench has been completed. Now you need to install the two sides of the transforming bench in a vertical position and fix them. Before assembling the frame, both parts must be placed on a solid, level base, parallel to each other.
First of all, you need to connect both sidewalls using horizontal slats; two pieces are stuffed under the seat of the benches on each side.
The padded strips will be used to further strengthen the seats. Approximately in the middle, it is necessary to embed an additional L-shaped support of two slats, measuring 220x120 mm.
Another reinforcement, now between the paired supports of the small transforming bench. At the bottom, the spacers are connected by an additional crossbar cut from a 70x30 mm strip. The part is fastened with ordinary carpentry screws. This reinforcement will make it possible to embed an additional T-shaped support and sew on the horizontal sides of a large bench.
Before assembling the table top of the transforming bench, you will need to sew on one of the horizontal slats of the table.
Now you can move on to the final stage of assembling the transforming bench.
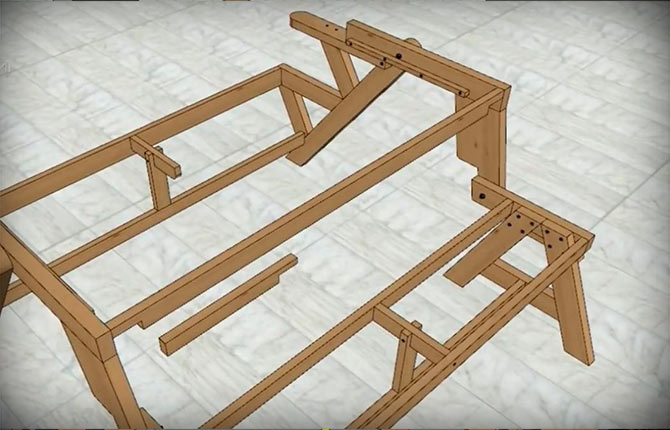
Assembling a transforming table and benches
The tabletop for the transformable bench is formed by padding in a row of slats 12.5 mm thick and 70-75 mm wide.The surface can be sanded or used as a rough base. In this case, the decorative upper part is sewn up with plastic, for example, textolite or furniture board.
The table structure consists of a box, upper and lower frame made of planks. Assembling the tabletop of the transforming bench begins with filling the bottom row of slats.
To prevent the slats from bending, an additional cross member with a cross-section of 70x30 mm is installed in the central part of the table box, connecting the long sides of the box.
Then you can sew on the top row of strips. The length of the facing material is selected according to the longitudinal size of the transformer. The planks are laid directly on top of the box.
But if further finishing of the table of the transforming bench requires, then it is better to cut the slats of the top row into the box at the same level as the sides.
After completing the facing work on the table, you need to sew up the seats of the transforming benches. The same planks are used as for the countertop. But in this case, the material is stuffed with a gap of 3-4 mm. This is done to increase the rigidity of the bench structure. In addition, it is believed that sitting on such a bench in the summer heat is more comfortable than if the surface of the transformer seats was completely sewn up.
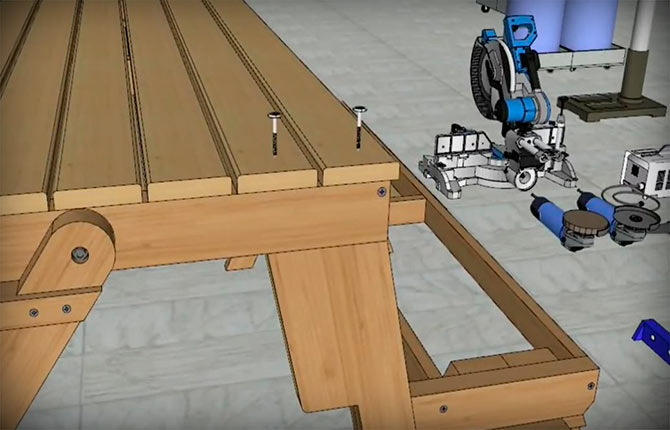
Important! The lining of the benches and the transformable table are fastened with furniture screws. Ordinary carpentry screws (black or yellow) are not suitable for these purposes.
The furniture screw has a wide “head”, which ensures stable pressing of the slats to the base. The main thing is that the thread is cut only on the first 25 mm of the rod, the rest is smooth metal. Therefore, the rail screwed with a furniture screw has a slight backlash.
If a person sits on the transforming bench, the slats bend slightly, without the risk of cracking.If you tighten the self-tapping screw, then after a couple of weeks of using the transforming bench, deep cracks will appear on the edges of the slats.
Fastening with a furniture screw requires care:
- Initially, a rough hole is drilled on the rail; it is 0.5 mm larger than the diameter of the screw thread;
- An undercut is made with a feather drill so that the head of the screw, after tightening, is completely recessed into the material of the rack;
- then the plank is laid on horizontal beams and secured with a clamp;
- using a new drill, with a diameter 0.7 mm smaller than the screw thread, drill a hole in the support beam;
- the screw is dipped with a thread in a lubricant, for example, in liquid soap or glycerin, and screwed in with a screwdriver until it stops.
How firmly the screw is held depends on the density of the wood. Therefore, it is better to use hard rocks for racks, support beams and transformer bench blocks. Oak or acacia is best. You can use beech or larch, but they are too prone to cracking under impact load. For example, if you try to fold and unfold a transforming bench with the legs hitting the ground.
Upon completion of the assembly of the transforming bench, the wood is treated with sandpaper of different grain sizes. You need to achieve a smooth surface. It’s not even about the spectacular appearance, but about the safety of using the transforming bench.
In order to unfold the transformer and turn it from a bench into a pair of benches with a table, you need to grab it with your hands several times. Unsanded wood can become a constant source of splinters. Some types of wood are highly caustic, for example, larch or overdried pine. Therefore, for cladding a table or benches, it is better to choose soft woods, for example, linden, birch or ash.
In addition, sitting on a bench made from unpolished slats in the summer is not very comfortable.
Decorating Tips
The transforming bench is already ready and can be used. You just need to put a small amount of lubricant in the hinges and improve the appearance of your country furniture. The steel axles must be lubricated, otherwise the transforming bench will creak during the unfolding process. Lubricant is placed in the hinges in a small amount, for each axis there will be enough LITOL with a match head. But this must be done.
Painting
The easiest way is to paint the transforming bench with acrylic paint, but for some reason it is believed that this is too expensive a coating for garden furniture. Acrylic is expensive, but provides a good appearance. True, before painting you need to carefully sand and blow off all the parts of the transforming bench. So that no tiny dust remains, otherwise, after mixing with the paint and drying, it will turn into something like sandpaper.
Only old transforming benches with a lot of surface defects are painted with oil paint. Before painting, it is recommended to putty the damaged areas of the surface, for example, with a composition of chalk (alabaster) and drying oil. After sanding, the old transforming bench will look like new.
It is better not to use nitro paints or pentaphthalic enamels for painting wooden benches.
Pasting with vinyl film
Quite a new way of decorative finishing. Traditionally, vinyl film is used to cover the table top and bench seats. Fully wrapping a wood structure will provide good protection for the wood much better than simply painting it.
At the same time, it is possible to choose a texture, a pattern to match valuable types of wood, you can make a “stone” decor or simply imitate a furniture board.
Varnishing
This is a complex type of decorative finishing; the main thing is to follow the varnish application technology step by step. The surface of the benches and table, all parts of the frame must be thoroughly sanded with sandpaper, dust removed with shoes, then with a damp cloth.
If the pattern of fibers on the slats of the tabletop is not very expressive (beautiful), then the surface is bleached white, washed and coated with a thin layer of colorless varnish. In this way, it is advisable to process all the details of the transforming bench so that the design turns out to be monochromatic.
On benches and details of tabletop supports, you can apply (burn) drawings or inscriptions in the Loft style. Logos in the style of the beginning of the last century, inscriptions in calligraphic handwritten style go very well with the light texture of bleached wood. Today this is one of the popular ways of decorating furniture in the Loft style. After painting, the bench is opened with one or two layers of colorless polyurethane varnish.
A simple transformable garden bench can simply be opened with a pentaphthalic varnish composition, tinted in the color of chestnut or walnut.
Impregnation treatment
Wood is an excellent material, but for dry and well-ventilated areas. If the transforming bench will be located in an open area, then instead of varnish or paint it is better to use impregnating waxes or oils, used to protect wood in saunas and steam rooms.
The impregnation is applied to the prepared surface, the wood practically does not change color, but if the transforming bench is exposed to solar ultraviolet radiation for a long time, the coating may darken, and a reddish-gray tint of artificially aged wood will appear.
Results
If you follow the proposed step-by-step instructions, assembling a transforming bench with your own hands will not be difficult even for novice carpenters and furniture makers. You can add your own details, for example, make the handrails more elegant or change the slatted tabletop to a solid plywood one.
Tell us about your experience building transformers. How can wooden furniture be better than a bench made of corrugated pipe or a steel corner? Save the article to bookmarks and share it on social networks.


The diagram is cool, but you can’t just make the axles into wood. You need to hammer in a brass or steel bushing, otherwise the axle can split the wood if you drop the bench.
The sizes are too small, my advice is to recalculate with a factor of 1.2. It will turn out wider and higher, and in general it will be comfortable. I made it from professional pipe, I didn’t like it - it was scrap metal. Wooden just right.