How to properly make a cellar with your own hands in the ground and on the surface at the dacha: guide, diagrams, photos and videos
A cellar is a non-residential premises intended for storing supplies.It is constantly maintained at a low temperature. Structurally, it is a pit with a covered top and reinforced walls. You can build a cellar with your own hands, but you need to take into account several nuances.
The content of the article:
- What to consider before building a cellar
- How to make an inexpensive cellar
- Types of cellars
- Choosing the material for the future cellar
- Choosing a floor in the basement
- Technology for building a grounded cellar
- How to build a horse cellar with boning
- Do-it-yourself above-ground cellar made of reinforced concrete rings
- How to make a cellar under the house with your own hands
- Ready-made structures for cellars
- Further care of the cellar
What to consider before building a cellar
Before starting construction, you need to pay attention to:
- The place where it is planned to build a cellar.
- Groundwater level (GWL), high water.
- Type and quality of building materials.
With the first position everything is simple. This should be the highest place on the site.If this is already occupied by other buildings, then it is not far from it.
The second position is the most important. The cellar at the dacha should not be flooded with rain and melt water. Their quantity is determined by the groundwater level and perched water. The lower they are, the deeper the cellar can be laid.
The third position concerns the arrangement of the cellar. Humidity coming from the soil increases its percentage in the underground room. This will irreversibly lead to the formation of mold, fungal infection and other troubles. This must be combated effectively not only by creating a well-functioning ventilation system, but also with the right choice of building materials. Particular attention is paid to waterproofing.
The construction of a cellar with your own hands must be approached taking into account these three positions. But there are others. For example, when setting up a cellar in the basement under a terrace or veranda. In this case, it is necessary to change the location of the ventilation pipes, leading them through the foundation.
How to find the groundwater level in your area
There are many options for determining groundwater level. The easiest way is to use the interactive map on the Hydrospetsgeology website, where all the information about the state of the subsoil in Russia is located. Including the results of groundwater monitoring.
The second option is to pick up a garden drill and make several wells with your own hands. If water appears at a depth of 3 m and below, then the water level is ideal for building cellars. Although this method is inaccurate. The groundwater level constantly changes from season to season.
The third option is if there is an existing well on the site, then the maximum water level in it can be taken as the groundwater level. The maximum is reached in spring or autumn.
The fourth option is to use the services of geologists who will determine the groundwater level using equipment. Their services are not cheap. But this option cannot be called accurate. In the calculations of geologists, there are assumptions based on fluctuations in the level of horizons.
Placement on the site, indent parameters
The highest point on the site is an ideal option for building a cellar. But other parameters must also be taken into account. Namely, the distance from neighboring objects, which are recorded in SNiP 30-02-97*.
| Object on site | Distance from the object to the cellar, m |
| Bathhouse, summer shower | 8 |
| Outdoor toilet | 12 |
| compost pit | 12 |
| Pen or barn with animals | 12 |
These indicators must also be taken into account when placing the cellar in relation to the objects of the neighboring site. For example, if the neighbor’s toilet is located behind fence, and the construction of the cellar is planned on the other side of the fence, then it will be necessary to retreat from it 12 m deep into the site.
Therefore, before building a cellar, you need to clearly calculate the distance to residential and non-residential objects. If this is not done, then there is a high probability that water mixed with sewage will penetrate inside the structure. Even if the water does not do this, an unpleasant odor will be guaranteed.
Purpose of the cellar
Cellars are places for storing vegetables. There must be a certain humidity inside it. This parameter is not the same for different vegetables. Therefore, the standard range from 75% to 95% is selected. If the humidity is lower, the vegetables will begin to dry out. If it’s higher, it will grow moldy.
In order to maintain humidity in a given range, it is necessary to properly formulate ventilation.
Some people confuse cellars with pits for storing vegetables. The second is a simplified version of the first.In essence, it is just a shallow hole that is insulated and access is provided from above. The entrance to the cellar can be either from above or from the side.
How to make an inexpensive cellar
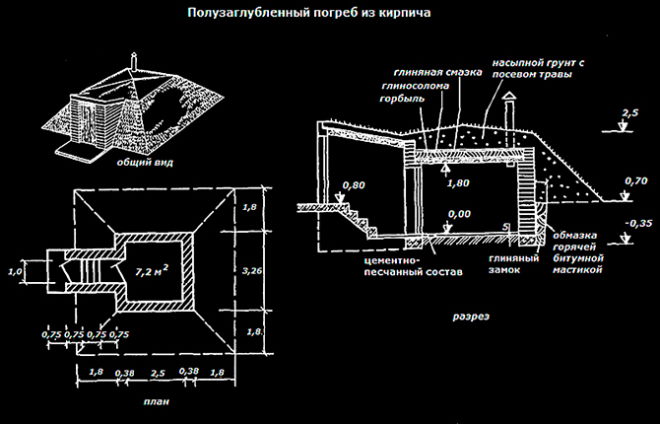
The construction of a cellar (inexpensive and temporary) is based on the use of a small amount of building materials. That's why if the soil on the site is clayey, then you can not use building materials when constructing walls. Clay is a dense and durable material with low water permeability properties. It will withstand operating loads well.
Construction after choosing a location begins with markings. Minimum standard recommended room parameters:
- area 4-6 m²;
- height 1.2-1.9 m;
- manhole (entrance) length – 0.8 m;
- manhole width – 0.6 m.
After marking, a pit is dug. Its walls should have a slight slope outward - 1-2º, so that the soil does not crumble.
It is important to form the floors correctly, because it is through them that moisture will penetrate into the cellar, increasing humidity.
Sequencing:
- Crushed stone backfill is made with a tamper. Crushed stone of medium fraction – 20-40 mm. Layer thickness – 50 mm.
- The crushed stone layer is filled with hot bitumen.
- An adobe floor is being constructed. This is fatty clay mixed with fine crushed stone 2:1. The floor is compacted. Its thickness is at least 100 mm.
The next stage of construction is the ceiling. For this, you can use different building materials: logs, beams, boards, concrete slabs, sheet iron with a pre-laid frame. Instead of metal sheets, you can use corrugated sheets.
This is an ordinary standard ceiling with supports on the walls of the cellar. In this case, on the ground. All structural elements are insulated. For this purpose, bitumen mastic is used.You can additionally lay roofing material or a waterproofing membrane on top.
The last stage is backfilling on top of the floor with soil selected from the pit. The thicker the layer, the higher the thermal insulation characteristics of the cellar. But don't be overzealous. It is necessary to take into account the possible loads that the ceiling can withstand.
The advantages of such a cellar:
- minimum construction costs;
- speed of construction due to the minimum number of construction operations.
Flaws:
- flooding during rains and snow melting, especially from the high water due to the lack of waterproofing of walls and floors;
- collapse of walls under the influence of moisture from the soil.
The disadvantages outweigh the advantages in their effect. Therefore, this cellar option can be recommended as a temporary structure for storing vegetables. In the future, it can be redone by raising the walls from durable materials and making good waterproofing. Fortunately, the foundation pit is already ready.
You can build a vegetable pit with your own hands using the same principle. There is just no need to build a ceiling. You can get by with an insulated lid or a soft covering in the form of a plastic film, on top of which earth is poured.
On soft soils the same cellar can be built. But you will have to strengthen the walls. For this, block material is used - concrete blocks, brick (preferably red), stone.
There is an option when regular asbestos slate is installed. To do this, first a frame in the form of a cube is constructed from pipes - four pipes located vertically at the corners of the structure. They are tied with pipes from the bottom and top.
Heels are welded to the lower ends of the racks. These are rectangular pieces of metal sheets 3-5 mm thick. The finished structure is lowered into the dug pit. The posts are not buried in the ground.They stand firmly on rectangular bases.
Slate sheets must be installed vertically between the walls of the pit and the metal pipe structure. They are laid overlapping in one or two waves, just like on a roof. Slate will keep the cellar walls from collapsing.
The ceiling is sheet iron, on top of which polystyrene foam boards are laid. Several transverse pipes are mounted under the sheets using electric welding. The distance between them is 1 m. Soil is poured on top of the insulation.
It is easy to form an inlet hole in such a ceiling. For this, free space is left, not covered by iron sheets. It is important that the entrance is located between two transversely laid pipes. The manhole is made from boards, which also provide insulation.
Attention! All metal materials are treated with protective compounds.
Instead of pipes, you can use lumber: logs, beams or boards. The wooden structure will need to be treated with antiseptics and coated with paint. But we must add that these materials cannot guarantee one hundred percent protection throughout the entire service life. Therefore, they must be applied with a certain frequency, that is, they must be updated.
Another simple option (here we mean the simplicity of the construction technology, and not the financial side of the matter) - reinforced concrete rings are used for construction. Manufacturers offer a wide range of standard sizes in terms of diameter - from 0.7 m to 2.5 m. The standard height is 0.9 m. Construction will require two reinforced concrete products. The best option for a cellar is a diameter of 2 m.
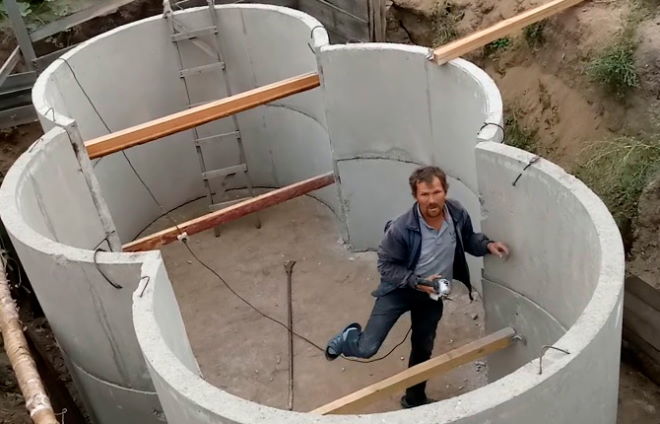
To do this, dig a round pit 2.0-2.2 m deep with your own hands. Then in the following sequence:
- The bottom of the structure is formed by pouring a concrete base with laying a reinforcing frame made of reinforcement or wire into the concrete layer. The second option is to purchase a finished bottom along with the rings, which is first lowered into the pit using a crane or winch. Here it is important to level the earthen floor with a sand cushion 10 mm thick.
- Concrete rings are successively lowered onto each other.
- The joints are putty, for which cement mortars with hydrophobic additives are used.
- The gap between the rings and the walls of the pit is filled with soil.
- The cover is installed. She may be ready. Or you can pour it from concrete into pre-installed formwork. The latter is a round box with a bottom, lined with waterproofing film. The first option is simpler and faster to install.
- The lid is insulated and covered with soil.
- A staircase is installed inside.
Attention! Reinforced concrete rings on the outside are treated with bitumen mastic before installation. This is an additional external waterproofing that increases the service life of reinforced concrete products.
Types of cellars
The dimensions of the cellar were announced above. These are parameters that are largely unlimited.
Depending on the ground water level, three types of cellars are used in dachas:
- Underground, also buried or earthen.
- Semi-recessed.
- Ground.
The latter is built if the groundwater level is high - not lower than 0.5 m.
Modern cellars (which include plastic products) are not only underground. They are also used as semi-buried ones.
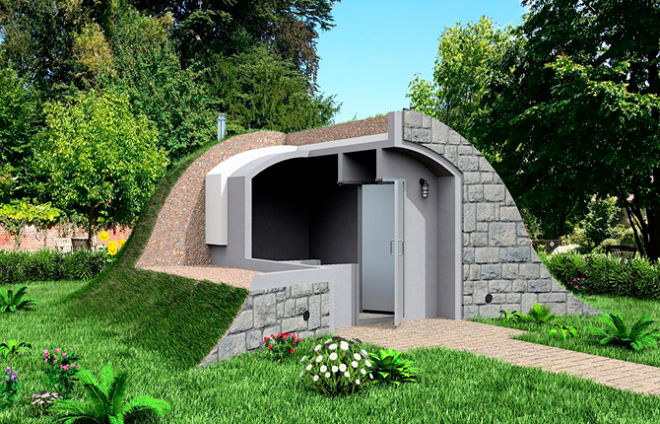
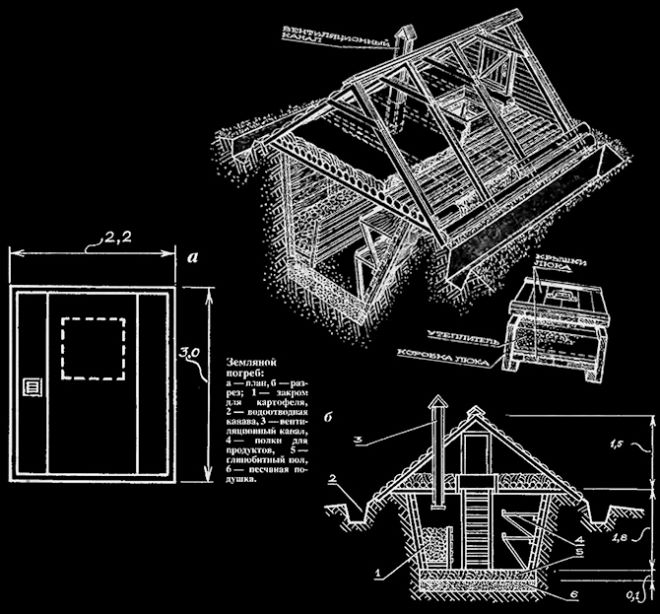
Zemlyanoy
A recessed one can be used as a cellar on the street or under the house (in the basement). This option is considered the best because underground temperature conditions practically do not change.It is important to properly insulate the entrance and ceiling.
Most often, the room is formed by wall building materials. But it is necessary to choose those with low moisture permeability. This indicator depends on the density of the product. The higher it is, the lower the moisture permeability.
| Material | Density, kg/m³ |
| Brick | 1600-1800 |
| Concrete | 2400-2500 |
| Expanded clay concrete | 500-1000 |
| Sand-lime brick | 1400-1600 |
| Foam concrete | 300-500 |
Pay attention to the sand-lime brick. It has a high density, but lime is used as a binder. It loses its astringent properties when exposed to moisture. So it is not recommended to use sand-lime brick in the cellar.
Brick and concrete blocks are the best option. Natural stone can also be included in this category.
Usually, to form walls, they use standard brick masonry or one and a half bricks with a standard masonry mortar: cement-sand - 1:3.
The finished walls are plastered on the inside with a composition to which hydrophobic components are added. The best option is when plaster and waterproofing are applied from the outside of the walls. But this is not always possible, so after plastering the surfaces inside, they are covered with a waterproofing material - bitumen mastic plus roll insulation on top.
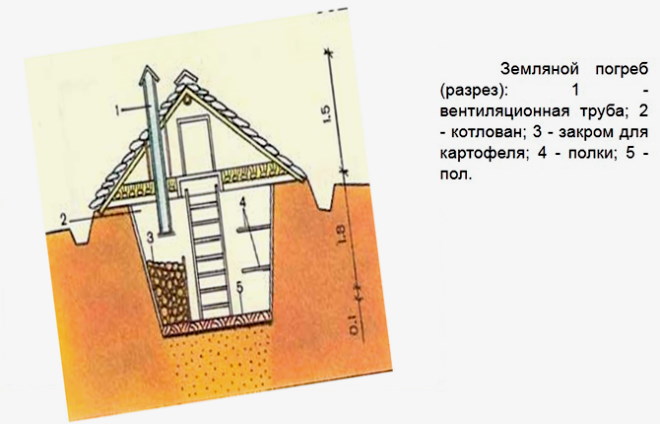
The underground cellar has the same ceiling as in the case of a clay cellar. It is recommended to insulate it well, because the humidity coming from below, reaching the ceiling of the room, can immediately turn into condensation if insulation is improper. This cannot be allowed.
Semi-recessed
It is constructed if the groundwater level is at least 1.5 m. Clay walls of the pit are not used here. The entire cellar is built from building materials. In this case, part of the wall rises above the ground. Therefore, special attention is paid to thermal insulation.
The size of the cellar does not matter here. This is just a small building where vegetables and fruits are stored. Therefore, there are structures built from a metal frame, insulated with mineral wool or polystyrene foam boards and waterproofed with a membrane.
Ground
It is difficult to call this variety a cellar. More precisely, its name is a vegetable storage facility, but this does not change the purpose of the building. There are two types of ground structures:
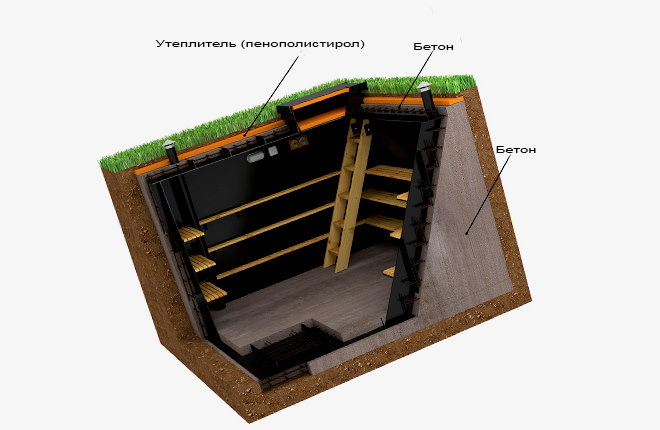
- Construction with a system of wall insulation and ceilings with thermal insulation materials.
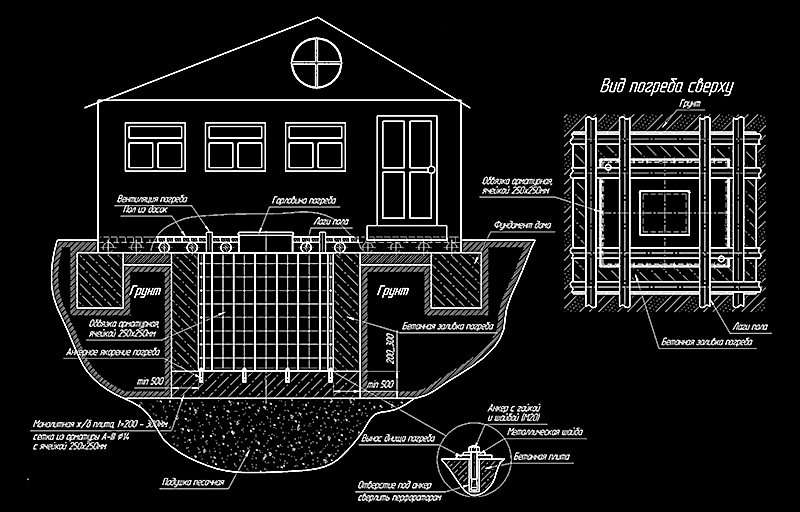
- Cellar with boning. The structure is filled with soil, as shown in the photo below.
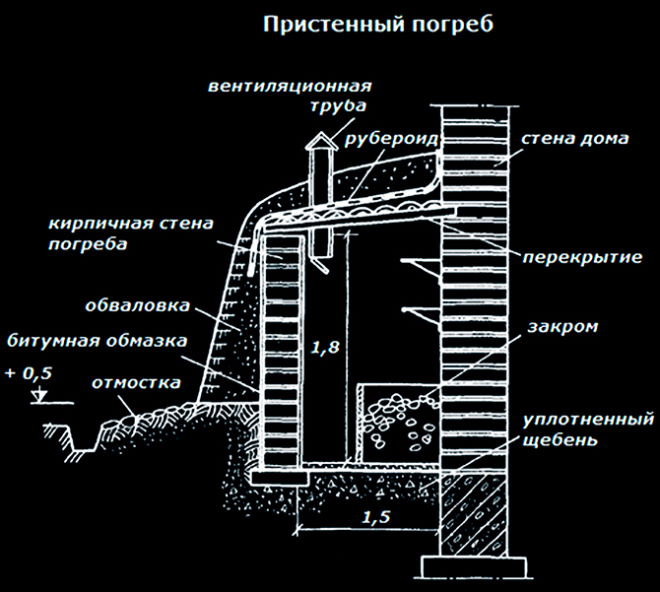
Wall-mounted
A ground-type cellar, which is attached to the wall of the house. This is a standard construction technology that uses wall materials.
As in the case of the ground version, there are structures with insulation or boning.
Caisson
This is the technical name, implying a sealed capsule that is buried in the ground completely or partially. Previously, they were made with their own hands from sheet iron or used ready-made steel containers. Today, a large number of manufacturers offer plastic caissons.
The advantages of this building:
- high tightness;
- versatility of the design, which can be installed anywhere;
- optimal temperature inside.
There is one minus - in the spring, the caissons, if they are not secured correctly, float up under the influence of ground and surface water.
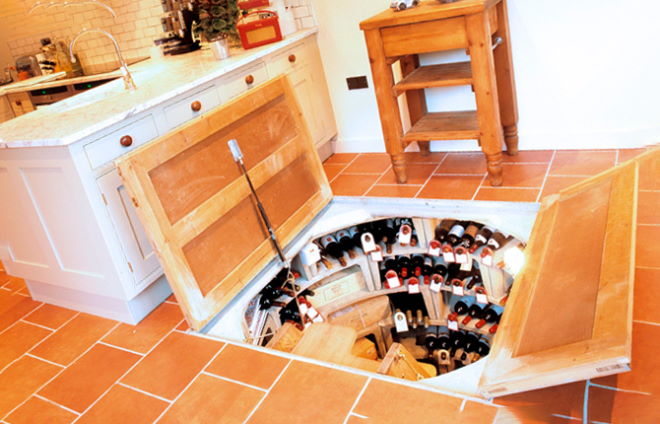
Cellar in the house
Advantages of this option:
- Saving building materials due to location. There is no need to make enhanced thermal insulation. Especially the floors.
- If the entrance to the cellar is made from the floor, then you can enter it without going outside.This is true in severe frosts.
- It is easier to maintain the required temperature inside.
It’s easier when the cellar is built during the construction of the house. If the need for a vegetable storage arose after the construction of the building, then a large amount of excavation work will have to be carried out and concrete walls will have to be poured, which will support the foundation of the house from the sides.
Building a basement, taking into account the fact that a cellar will also be built here, is the best option. Because the cellar is included immediately in the house design, where all construction and operating costs of this room are taken into account. Plus - in terms of construction technology, it is easier and more convenient.
Choosing the material for the future cellar
To make a good cellar in a private house, you need to choose the right materials from which it will be built.
Recommended use:
- red solid brick;
- concrete or expanded clay concrete blocks;
- reinforced concrete poured as a monolithic structure into pre-installed formwork;
- stone;
- plastic or metal caisson.
Brick
It is brick that is most often used. The reasons are in the material itself:
- high strength;
- low water permeability;
- high frost resistance;
- low thermal conductivity;
- rodents cannot chew through brick walls;
- ease of installation.
Cellar made of foam blocks
Cellular concrete blocks are not often used in the construction of cellars. Causes:
- porous structure that absorbs moisture well;
- not the highest strength.
But if the external waterproofing of walls made of foam blocks is carried out correctly, then this material can also be used in the construction of cellars.
Made of plastic
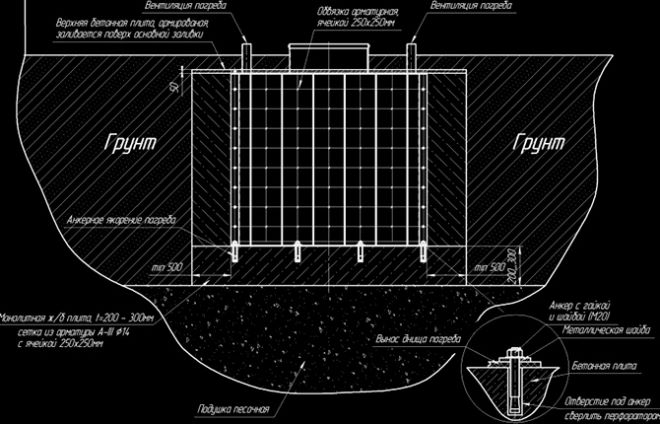
A good option with 100% tightness. Can be used as an in-ground cellar even at high groundwater levels.But in this case it will be necessary to anchor the caisson. To do this, 2-4 concrete bedside tables are poured, to which the plastic cellar is tied with chains, cables or tarpaulin tapes.
The bedside tables function as anchors - they do not allow the caisson to float up during the increase in groundwater level, which occurs during the period of rains and snow melting. They are placed next to the plastic cellar in a kotovan.
Concrete cellar
In all respects, this is the best option if hydrophobic components are added to the concrete solution. But this is an expensive project, plus labor-intensive.
Choosing a floor in the basement
In cellars, different building materials are used to form the floor base. It all depends on the financial capabilities of the owner and operating conditions. More often used:
- concrete;
- brick;
- stone;
- clay;
- land without additional cultivation;
- boards.
Zemlyanoy
The cheapest option. It has many disadvantages:
- there is no waterproofing that protects against moisture coming from the ground;
- in case of flooding, the earth will not become a protective barrier;
- it’s almost always slippery underfoot;
- the appearance leaves much to be desired.
An earthen floor is formed by leveling and compacting the bottom of the pit.
Concrete
It can be considered the best option, but also the most expensive. It's all about the large number of materials used.
- A cushion of sand and small crushed stone 20 cm thick is poured onto the leveled bottom of the pit.
- A waterproofing membrane is laid on top so that it covers the walls of the pit to a height of 10 cm.
- A grid of reinforcement with a diameter of 10 mm in cells of 20x20 cm is laid on top. Laying is carried out on stands 5 cm high. The reinforcing frame should be located inside the concrete layer and not lie on the waterproofing.
- Pouring concrete 10 cm thick.
Brick or stone
Both materials are highly durable, which means they will last a long time. Do not be afraid of moisture and water. Laying is carried out on a sand cushion with or without the use of masonry mortar. Much cheaper than the concrete option.
Wood
It is better to use lumber in cellars that are built in areas with low groundwater level. All wooden products used here are treated with antiseptic solutions, followed by periodic renewal.
Laying sequence:
- The bottom of the pit is covered with a 5-10 cm layer of crushed stone, which is thoroughly compacted.
- Logs are installed.
- Boards are attached to the latter.
Clay
Unfortunately, good fatty clay is not easy to come by. It's not cheap. The technology for forming a clay floor was described above.
Technology for building a grounded cellar
Before you make a grounded cellar with your own hands, you need to choose a location and develop a construction plan. The latter refers to the choice of project. But if the structure is small, then you can think out the work plan yourself.
Selecting a location
If the site is already built up, then any free space is selected. The main thing is to strictly maintain sanitary distances from neighboring objects.
Pit preparation
If you build a cellar with your own hands, then all excavation work is carried out with shovels. With the grounded version, this is a fairly large volume, for which it will be necessary to allocate several days, because the depth of installation is at least 2.5 m.
The bottom of the pit is leveled, the walls are brought out with a slight slope outward - 1-2º. If the soil in the area is soft, then the angle of inclination increases to 5-10º. This is done so that the walls of the pit do not crumble.
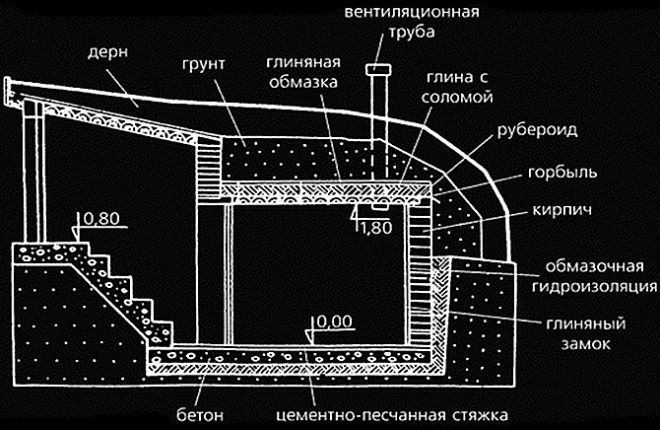
Clay castle
The castle is made from oily clay, which contains no more than 15% sand. Its waterproofing qualities can be increased by adding 20% slaked lime.
The finished solution is applied to the walls of the pit with a thickness of 15-30 cm and transferred to the floor. All surfaces of the pit must be covered with clay. Formwork is often used for this, especially in loose soils.
Another variant:
- Raise the brick walls of the cellar with a distance of 15-30 cm from the walls of the pit.
- The gap between the two walls is filled with clay.
This process can be done in stages. They raised the brick wall half a meter and filled the gap with clay. And so on.
Drainage
To arrange drainage, a storm drain is collected, which collects and drains rain and melt water.
A storm drainage system is a set of pipes laid according to a special pattern at an angle of 2-3 mm per 1 m of length towards the storage well. Typically a ring circuit is used. Pipes are laid around the perimeter of the underground structure. For drainage, it is better to purchase ready-made perforated pipes covered with geotextiles.
System formation process:
- At a distance of half a meter from the pit, trenches are dug along its perimeter. Depth – 0.5-1.0 m.
- Additional trench to the storage well.
- The bottom of the trenches is filled with coarse sand. The thickness of the layer is 10-15 cm. Using sand, the slope of the drainage system is maintained, which is controlled by an inclinometer or rule.
- Installation of drainage pipes, which are also checked for correct slope.
- Sand is poured on top to cover the pipe structure.
- The last layer is soil from the trenches.
Construction and decoration of walls
If a material is selected for the construction of cellar walls, then it should be either M75 or M100 grade brick.The masonry is carried out according to general construction standards - with a sling. The only thing you need to pay attention to is the masonry mortar, where hydrophobic additives must be added.
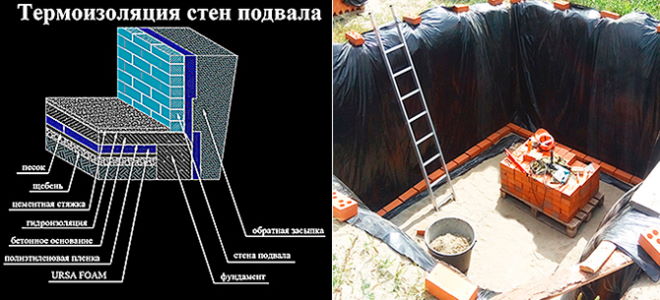
Table with mortar proportions for bricklaying
For the cellar, solutions of grade M50, 75 or 100 are used. These are standard mixtures of cement and sand, which are mixed in different proportions indicated in the table. Today you can buy ready-made dry mixtures in paper bags with the required brand.
| Brand of masonry mortar | Cement brand | Cement-sand proportions |
| 50 | 300 | 1:5, 1:6 |
| 50 | 400 | 1:7,5 |
| 75 | 300 | 1:4 |
| 75 | 400 | 1,5 |
| 75 | 500 | 1:7 |
| 100 | 300 | 1:3 |
| 100 | 400 | 1:4 |
| 100 | 500 | 1:5 |
Ventilation system
The ventilation system in the cellar consists of two vertically installed pipes located in opposite corners of the room. The lower end of one is located near the floor, the other near the ceiling.
The speed of movement of air masses depends on how high the upper ends of the pipes were raised relative to the ground or roof of the cellar. The higher, the higher the speed, the lower the humidity. To check this air parameter, you need to hang a hygrometer in the cellar.
Floor installation
A simple but reliable flooring option is laid timber, on top of which boards are stuffed. The latter must be trimmed. They are laid tightly next to each other and secured to the beams with self-tapping screws.
A waterproofing film is laid on top. There is another layer of waterproofing on top of the insulation slab. After which the ceiling is covered with soil selected from the pit.
Attention! All lumber is treated with an antiseptic compound before installation. It is better to additionally treat the ends of the floor beams with which they rest on the walls with bitumen mastic.
Waterproofing
In the cellar, it is better to use an integrated approach to carrying out waterproofing processes - simultaneously using penetrating, coating and roll insulation.
Waterproofing process:
- The walls of the cellar are cleaned of dust and dirt.
- Wet the surfaces with water.
- Penetrating insulation (liquid cement mortar) is applied. It contains hydrophobic and chemical fillers. The latter close small pores, cracks and recesses (no more than 2 mm wide), penetrate inside the wall and plug defects.
- After the cement mixture has dried, bitumen mastic is applied to the surface of the walls using a spatula or brush. It can be applied in two layers, the first of which must dry before applying the second.
- A waterproofing film is laid on the undried second layer of mastic. You can use roofing felt.
Penetrating insulation is best used when treating monolithic concrete cellar walls. It is not recommended to treat brickwork with such a solution; the defects on its surface are too large. The effect of such waterproofing material on bricks is small.
Electricity supply
Typically, one socket and a pair of light bulbs are installed in the cellar. The wiring is laid along the walls and ceiling, where hidden or open installation of electrical equipment and cables is carried out.
Hidden is when the grooves are made. Open or external - wiring is laid on the surfaces of supporting structures. It is recommended to lay the cables in a plastic corrugation or box.
Only waterproof lamps and sockets are used in the cellar.
Ceiling insulation
It is optimal to insulate the ceiling from the outside. But if this has not been done, then you can insulate the ceiling surface from the inside.In the case of a monolithic or slab floor, this will reduce the ceiling height in the cellar, which is not always acceptable.
With a wooden structure everything is simpler:
- a waterproofing film is laid on top of the beams and boards, which exactly goes around all the protrusions;
- heat-insulating material with a thickness equal to the height of the beams is laid between the beams;
- another layer of film on top;
- ceiling material is installed: boards, plywood, chipboard, fiberboard, OSB, etc., which is attached with self-tapping screws to the beams.
Doors, stairs, hatch
Usually, at the entrance to the cellar, a vestibule is made, which cuts off the internal space from the cold or hot air outside. An opening is formed with a minimum length of 80 cm and a width of 80 cm so that a person can fit into it:
- If the entrance to the cellar is from above, then an insulated wooden box is installed over the entrance hole. Essentially, this is an external hatch.
- If the entrance is from the side, then during the construction of the cellar an inclined tunnel is formed. An insulated door is mounted on the outside.
In a small cellar, the entrance to which is from the ceiling, a garden staircase made of lumber or a metal profile is used. If the entrance is from the side, then the staircase is built more impressive - often on stringers. Often, during the construction of a cellar, a monolithic staircase structure made of concrete is erected.
Interior decoration, racks and shelves
Arranging a cellar is an important matter. There are no restrictions in terms of finishing the interior space of the room. The simplest option is whitewashing. You can use basement paint, ceramic tiles, and other finishing materials.
Racks and shelves can be made from lumber or metal profiles. A prerequisite is the painting of structures.
In stores you can buy ready-made plastic shelves that will work well in small cellars.
How to build a horse cellar with boning
If this option is chosen, then there is no need to determine the groundwater level; the type of soil does not matter. The size of the vegetable storage is determined by the amount of products that will need to be stored.
Building an above-ground cellar with your own hands is easier than all other varieties. But the sequence of operations performed is exactly the same.
How to choose a place
Usually, a free-standing cellar begins to be built almost after the site is completely built out. Therefore, the location for it is selected based on the availability of free territory.
The best option is the highest place. But a ground cellar can also be built in low-lying areas. The main thing is to properly build the drainage system.
Mini pit
The depth of the pit is 50 cm. This size is necessary even with a high groundwater level, because the main requirement of an above-ground cellar is the absence of water inside the warehouse. Therefore, a cushion of bulk materials (drainage layer) is placed in the pit.
Coarse sand, gravel, crushed stone, expanded clay, brick or concrete scrap are used as floor drainage. The material is covered with a layer of 20 cm - this is the minimum size. If the groundwater level is very high, then a drainage layer is laid with a thickness of 40 cm.
Floor
There are many options here:
- clay;
- brick;
- stone;
- concrete;
- wood.
It is recommended to do waterproofing first:
- A layer of oily clay 10 cm thick is laid on top of the drainage layer.
- Fine-grained crushed stone 5-10 cm thick is backfilled.
- Hot bitumen is poured on top.
- A layer of sand or crushed stone 3-5 cm thick.
Floors can be formed on this basis.
Above ground part of the cellar
The simplest design is a frame one assembled from lumber:
- Four beams with a cross section of 200x200 mm are dug into the corners of the pit. Their lower ends are pre-treated in two layers of bitumen mastic.
- If the length of the cellar walls is more than 2 m, intermediate beams are also installed. Their cross section can be 100x100 mm.
- Two beams are dug in from the end side to form the entrance and install the door.
- The upper, middle and lower trim are formed from 200x200 mm timber.
- The roof of the cellar is being built. It should be gable with a slope of 45º. For this, boards 40-50 mm thick are used as rafters.
- The roof of the cellar can also be formed by boning. In this case, the roof is made flat from beams or boards.
- From the outside, the structure is sheathed with edged boards 50 mm thick.
- Roofing felt is laid on the outer side of the sheathing, which will serve as waterproofing. Laying strips of material is carried out overlapping with an offset of 3-5 cm.
- The inside of the cellar is insulated using slab material: polystyrene foam or mineral wool.
- A waterproofing film is laid on top of the insulation, which is attached to the frame of the building.
- Internal lining with plywood, OSB or other sheet material.
- The front door is being hung.
Attention! All wooden products must be treated with an antiseptic.
The cellar is ready, deboning can begin. Essentially, this is covering the structure with soil. You need to start from the bottom, gradually covering all the walls. Boning is carried out with a slope. The roof is covered with earth last. The main thing is to use soil to create a slope of the cellar slope of at least 45º.
You can build an above-ground cellar from other building materials: brick, stone, concrete blocks, log frame.But it’s easier to build a frame structure with your own hands.
Wall decoration
Since the walls were finished with sheet material, it can simply be treated with drying oil. As an option - brick cladding.
Ventilation pipes
The ventilation system is formed at the stage of roof construction. A hole is made in it, where a pipe is inserted, which is brought out as high as possible. In an above-ground cellar, one pipe is enough. It will remove moist air from inside the vegetable storage.
In order for air exchange to occur inside the room, you need to add a hole located near the floor. Through it, fresh air will enter the warehouse. It can be formed in the wall near the front door. The exhaust pipe is installed against the opposite wall.
Insulation of ceilings and walls
When constructing a frame structure, thermal insulation work is carried out during the construction of the warehouse.
Wiring and lighting
In a frame structure, the wiring can be laid under the internal lining. You will have to drill holes in the load-bearing elements (beams). There is no need to insert metal bushings or tubes into the holes, as is done in wooden houses. The main thing here is to use wires and cables in a protective sheath that does not support combustion. This is indicated in SP 31-105-2002 in section 13.5.
The best option is to install external cable routing so that they are always visible.
Shelves and racks
Any structure will do: wood, metal or plastic. Often the size is chosen taking into account the volume of the room, but not always. In some cases, the owner of the cellar tries to use the space efficiently and installs it along the perimeter of three walls, except for the one where the front door is located.
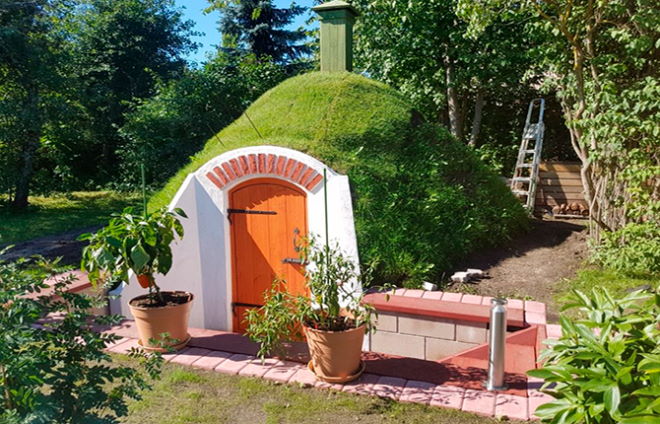
Facade decoration
Since the cellar is made with boning, the only option external design of the building - turf, which is laid over the entire area of the laid soil. After a year, the grass takes root completely, forming a green carpet on the surface.
The only element that requires DIY decoration is the front door. A strict rule is that it must be insulated with sealing contours. Making a door structure from lumber is easy. For this you will need boards 25-30 mm thick and beams with a section of 50x50 mm. From the latter, a simple frame is made according to the size of the door. After which it is covered with boards.
The plank side is external. From the inside, insulation with a thickness of 50 mm is laid in the space between the boards and the frame, and a plywood sheet is mounted on top. The door structure is hung using hinges.
Do-it-yourself above-ground cellar made of reinforced concrete rings
It has already been described above how you can make a deep cellar in your country house with your own hands. These were reinforced concrete rings installed vertically on top of each other. The ground version differs in that the rings are mounted horizontally.
The spatial arrangement of elements does not change anything in construction technology:
- a mini pit is dug;
- a drainage layer is formed;
- a reinforced concrete base 10 cm thick is poured;
- concrete rings are installed nearby, connected by a groove lock;
- the rear blank wall of the structure is formed - brickwork of one and a half bricks;
- the door is installed;
- the gap between the door and the rings is filled with bricks;
- soil deboning is carried out.
Points to pay attention to:
- There is no optimal size for this structure. Everything is limited by the free area allocated for the construction of the cellar.This is not a vegetable pit where there are certain recommended sizes.
- The joints between the rings are sealed with cement mortar with hydrophobic additives.
- A hole is left in the rear blank brick wall for the ventilation pipe. It is located at the highest point.
- Before installing the latter, the outer plane of the concrete rings is treated with bitumen mastic.
- On the outside, the rings are additionally connected to each other with steel brackets so that they “do not move apart.” 3-4 pieces around the perimeter.
- The brick end with the entrance door is insulated, preferably from the outside.
How to make a cellar under the house with your own hands
It is ideal if the cellar is built during the construction of the house. If this does not happen, then you will have to build it, taking into account the following recommendations:
- foundation walls cannot be used as cellar walls;
- You cannot set up a vegetable storage area under the entire house. The optimal size of an underground cellar is part of the area of one of the rooms.
First of all, determine the room under which the warehouse will be built. Usually this is a non-residential premises. In it, the floor base is removed, revealing the space under the floor.
Having retreated at least 1 m from the foundation, dig a pit with a depth of 15.-2.0 m. If the soil is clayey, then, as in previous cases, it can be used as the basis for the walls of the pit. If it’s soft, you’ll have to strengthen it. Alternatively, sheets of iron or corrugated sheets inserted into the frame, brick or block masonry, monolithic concrete structure. The latter is the best, but expensive.
Many people choose a monolithic structure because they are building a cellar under the house for many years of use. Regardless of the type of soil, formwork is installed around the entire perimeter of the pit.The thickness of the walls being poured is 20 cm minimum. Pouring is carried out with the installation of a reinforcing frame in the form of two vertical interconnected gratings made of steel reinforcement with a diameter of 12 mm.
The type of concrete used is M300 or M350. For example, the composition of M300 is shown in the table below.
| Cement brand | Mass composition: cement-sand-crushed stone |
| M400 | 1:1,9:3,7 |
| M500 | 1:2,4:4,3 |
Attention! Reception of concrete is carried out in one working day. You should not leave the formwork partially unfilled. This will lead to delamination of the structure, and subsequently through cracks will appear.
After removing the formwork, this is done after 7-10 days, and the concrete floor is poured. Crushed stone 20 cm thick is first poured, which is poured with hot bitumen on top. You can use a waterproofing film instead of the latter.
Supports are installed on which a reinforcing grid of reinforcement is laid. The pouring of concrete mortar begins, which will form durable floors. Concrete thickness – 10 cm.
Attention! Liquid hydrophobic additives must be added to all concrete mixtures.
The last stage is the construction of the ceiling. Here it is better to use wooden load-bearing beams, on top of which edged boards 40-50 mm thick are laid. They are covered on top with a waterproofing film and primer. You can add additional insulation. The temperature of the subfloor in a house with a strip foundation is always positive.
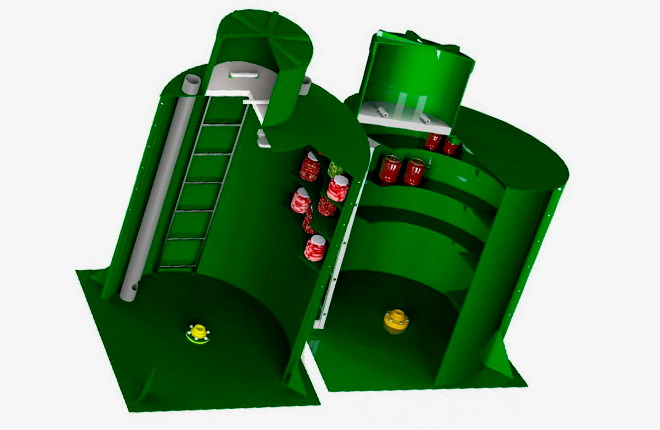
Ready-made structures for cellars
Plastic cellars have firmly occupied their niche in cellar construction. Manufacturers today offer two types of products made using different technologies:
- The extrusion method, during which a cellar with seams is obtained.
- Rotary. The caisson turns out to be monolithic.
The wall thickness of plastic warehouses is 16 mm.A metal frame is installed inside and power supply is provided. Some manufacturers equip them with additional batteries. During the installation process, thermal insulation measures are carried out, where 50 mm polystyrene foam is used, laid outside.
Other characteristics:
- Average dimensions – 2x2 m.
- Manufacturing material – food grade polyethylene.
- The temperature in winter is within +3-8 ℃.
- Service life – 50 years.
Further care of the cellar
Every year you need to set aside time to disinfect the vegetable storage. But before that, you need to clear the cellar of debris, old vegetables and fruits, and wash it. Effective disinfection methods:
- Whitewash. Add 10% copper sulfate to lime.
- If the walls were lined with modern finishing materials, then they need to be washed with a strong solution of potassium permanganate.
- Fumigation with sulfur. To do this, it is placed in a frying pan, the latter is placed on fire or coals. The warehouse is sealed. And he should remain in this state for two days. After which the cellar is ventilated.
- Take racks and shelves out into the air. Here they are washed with hot water with the addition of household chemicals. Then they dry it.
- If fungal infections of wood are detected, they are burned out with a blowtorch or burner. If the lesion is large and deep, then these elements are replaced with new ones.
Attention! Disinfection should be carried out one month before planting vegetables.
Building a cellar at your dacha with your own hands is not difficult if you choose the right size of the vegetable storage facility, materials for its construction and decide on the type of warehouse. This will also affect the cost of construction. Don't forget to choose the right building location.
The main requirement for a cellar is the absence of condensation.Even high humidity with well-functioning ventilation guarantees that there are no drops on the walls and ceiling. But if the ceiling and walls were not properly insulated, then there is a high probability that condensation will appear inside the room. Therefore, do not spare money and time for thermal insulation work.
What do you think, is it worth building a cellar on the site or is it better under the house? Maybe someone you know has already started construction? Which option did they choose? Write in the comments. To avoid losing the article, save it in your bookmarks.


He built a concrete cellar under the house. GWL - at a level of 1.5 m. I solved the problem this way - I buried a 200-liter metal barrel in the floor. The neck is open. The floor was made with a slight slope towards the barrel. The water that appeared on the floor flowed into the barrel. From there it was then removed in buckets. True, we had to install a more powerful exhaust fan in the ventilation duct in order to increase air exchange.
You need to install a fecal pump in the barrel with a float level. It will work automatically. Forget about buckets.
The pit cannot have an outward slope. Location on