How to make a blind area around the house with your own hands: rules and methods for arranging an ebb system
Even the strongest foundation of a house without reliable protection will lose its strength under the influence of environmental factors.Therefore, the waterproof strip around it is an important element of the structure, and the exterior without a blind area looks like it is unfinished.
Its design has its own technical subtleties and nuances. You will learn about them from our article. We will also talk about the best options for arranging the system. And having theoretical knowledge of how to make a blind area around the house, and following step-by-step instructions, you can do this work with your own hands.
The content of the article:
Why do you need a blind area?
The blind area performs many functions. The main one is to protect the foundation of the house and the soil around it from moisture. Consequently, the soil does not freeze, does not swell, and the geometry of the foundation is not disturbed.
It is inappropriate to install a blind area only if there is a pile-screw foundation.
In all other cases, it is necessary, since water entering this area creates serious problems:
- Vertical push heave. The presence of water at the base of the foundation and underneath it causes the soil to become wet. If the foundation is laid shallow, the soil will freeze, and heaving forces will squeeze out the structure. If they are unevenly distributed, cracks will appear.
- Tangential heaving. When heaving occurs in the soil, which is in contact with the side walls of the laid foundation. The load is quite large - it can reach 6 tons per 1 m² of wall structure.Having a well-executed blind area minimizes the likelihood of problems arising.
- Water penetration into basement rooms. This occurs not only with poor waterproofing. In conditions where humidity is off the charts, even with high-quality protection, leaks may appear.
The blind area can become far from the last element of landscape design. If it goes well with the decoration of the base and walls, the house fits organically into the landscape.

A foundation without a protective structure can be destroyed not only by moisture, but also by tree roots. A better way to protect the foundation from all sorts of unfavorable factors than installing a blind area has not yet been invented.
Existing varieties of the system
To choose the best option for a blind area, you need to know what types of it exist. The design of any blind area includes 2 base layers - an underlying layer and a covering layer.
The first is a dense base of sand, fine gravel, and crushed stone under the upper layer. The second is a barrier to the penetration of moisture into the soil under the blind area and foundation.
A blind area of any type will perform its functions. The difference lies only in the duration of full functioning.
Option #1 - clay drip system
This is the simplest and cheapest way to protect the bottom of the house from moisture. But also quite capricious - specialized forums are full of reviews that “the neighbor made a blind area from clay and covered it with tiles, but after a year it was all distorted.”
Clay itself, with a certain degree of purity, is a good natural waterproofing agent. When installed correctly, it will completely protect the house from groundwater and atmospheric precipitation. But you need to take into account that at sub-zero temperatures it expands.
When other coatings freeze, not having similar properties, they crack. To make such a blind area, you don’t have to be a specialist. Here it is important to make the right “pie”, and not just fill the entire trench with clay, ordering 10 cars of this material.
The arrangement technology is as follows:
- They dig a trench up to 0.3 m deep. The optimal width is 0.8 m.
- Make a “cushion” that rises 10 cm above the bottom using sand and gravel. They compact it.
- Waterproofing is placed between the foundation and the clay blind area.
- Clay is applied in a layer of about 15 cm with a slope from the foundation of more than 5⁰ for water drainage.
To prevent the leaching of particles from the clay layer, its top is decorated with pebbles, coarse crushed stone or stone. It is better to use quarry clay, since it has sufficient purity. Such a simple design looks especially harmonious in combination with the wooden walls of the house.
If clay tape is exposed to direct water over an extended period, the material will still be washed out a little. This is where its main drawback lies.
Option #2 - installation of a concrete blind area
To protect the foundation, a concrete blind area is most often chosen.
This solution has a number of undeniable advantages:
- high mechanical strength;
- resistance to the harmful effects of water;
- long service life;
- simple installation technology;
- wide possibilities for finishing.
The disadvantages of this material are no less significant than the advantages. These include fragility. Heaving forces that are not uniform in magnitude are very dangerous for a structure. Because of this, cracks appear. Reinforcement solves the problem, but this design is much more expensive.

Periodically, the concrete blind area needs to be repaired. If dismantling is required, the work will be very labor-intensive.
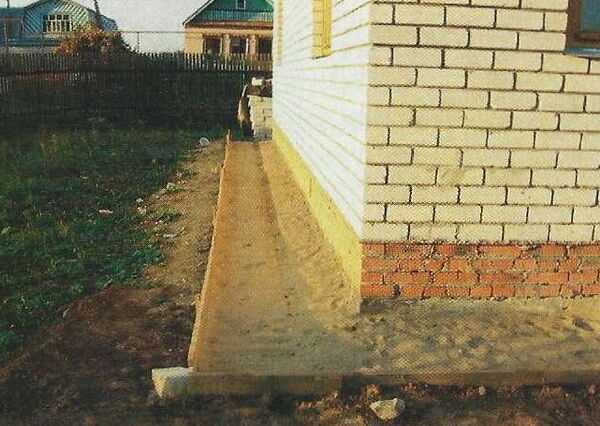
For a non-professional builder to build a blind area with his own hands, it is better to use the step-by-step instructions given below:
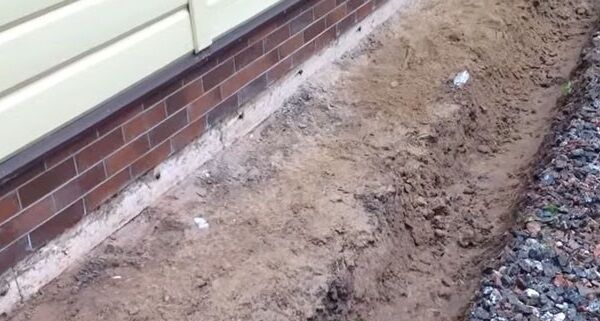
- Perimeter trench. The initial stage of constructing a concrete blind area is to surround the building with a trench around the perimeter. Its bottom should be 35 cm below the surface of the final covering. In turn, the final flooring must be raised above the adjacent soil by an average of 7 cm.
- Groove. To effectively drain water, the edge of the structure is formed with a groove (“tooth”) measuring approximately 0.2 x 0.2 m. The slope is made in the direction of the natural drainage.
- Clay castle. At the bottom of the ditch they make a clay castle about 110 mm high, using greasy clay.
- Rubble layer. A crushed stone layer is laid - 55 mm, followed by a sand layer - about 10 cm. The difference between the height of the finished underlying layer and the future level of the coating is within 4.5 - 6 cm.
- Geotextiles. To prevent mixing of the underlying layer materials, they are separated with geotextiles. A geocomposite drainage mat is placed between the compacted soil and the substrate.
- Reinforcement. To prevent the finished blind area from cracking, reinforcement is performed using a metal rod or steel mesh. The diameter of the rods is from 0.8 cm, the cell is up to and including 20 cm.
- Formwork + concrete. Formwork is installed under the side of the ditch, adjusting its height according to the final level of the structure. Afterwards the concrete mixture is laid.
In the presence of highly heaving soils, it is better to insulate the blind area.

Slabs are used as insulation extruded polystyrene foam. Lay the insulation on top of a centimeter layer of sand, then add more sand to a height of about 5.5 cm.
To install the formwork, two 2 x 10 cm boards are knocked down. Connecting jumpers are installed after 0.5 - 0.6 m. At intervals of 1.5 m, stakes are driven along the perimeter of the trench. The formwork is screwed to them. Its upper edge should be at the level of the finishing coating. On the outside, the boards are supported with soil to strengthen them.
They must be removed as soon as the solution has set a little. Subsequently, these grooves will have to be filled with damping material. More details about this process below. If you don’t plan to remove it, then you need to treat the boards antiseptic composition and wrap it in roofing felt.
An important nuance is that the blind area cannot be rigidly connected to the base of the house. Therefore, upon completion of the arrangement, expansion joints are made to minimize the deformation of the canvas.They are made with a distance of 1.5 to 2 m. Extruded polystyrene foam, bitumen mastic or damper tape are used for their construction.
The connection with the foundation can also be created using the rods that reinforced the blind area. This will prevent the gap from getting larger. Any clutch material must be masked. For this purpose, curbs, finishing elements, and slopes are used.

Thus, with the help of an expansion joint, the consequences of uneven shrinkage of such structures as the basement of a house and a monolithic blind area are smoothed out. If this nuance is not taken into account, the structures may collapse prematurely.
The next nuance is that fresh concrete should be protected from atmospheric influences, so the blind area is covered using sheets of chipboard or plywood.
To give it a special strength, the top layer of concrete is covered with primers or enamels, liquid glass, cement laitance, and sometimes natural stone or tiles. A particularly popular method is ironing. Its essence lies in the use of dry cement or milk based on it.
Option #3 - blind area made of paving slabs
While the concrete blind area is a rigid structure, the paving slab strip is a semi-rigid system.
Structurally, the blind area is similar to a multi-layer cake and consists of the following elements:
- priming;
- clay - 30 cm;
- crushed stone - 18 cm;
- geotextiles;
- cement-sand mixture - 6 cm;
- sidewalk tile.
Such a semi-rigid system has a lot of advantages: maintainability, relatively small financial investments, and if the technology is followed, the service life is quite long.
For heaving soils, this option is unacceptable, since they often violate the integrity of the coating.

Tiles are produced smooth and grooved in a wide range of colors - from orange to black. At any time of the year, one of the defective elements can be replaced.
Option #4 - soft design features
Rigid and semi-rigid blind areas often merge with the paths and are a continuation of the finishing of the base. The soft design is different. It continues, adjacent to the building, a front garden or flower bed.
To perform work on the device, you need to purchase the following materials:
- waterproofing in the form of roofing felt, PVC membrane, polyethylene;
- geotextile type filter layer;
- crushed stone of medium fraction;
- drainage pipe.
Geotextiles not only separate fractions, but also distribute loading forces. The lowest layer is well-compacted soil. A preparatory layer of coarse gravel stabilizes the surface.
This happens due to the fact that the stones wedge when in contact with each other and the load is distributed evenly. No subsidence of the coating is observed. The drainage slope is also formed by a crushed stone layer.
If the house stands on a strip foundation, a soft blind area, like any other, is installed around the entire perimeter.

When a house is built on stilts, a 0.4 m hydraulic barrier is placed under it.
There are no particular difficulties when creating a structure of this type, provided that you have carefully figured out how to properly make a strong blind area around the house and there are no unclear points left for you.
The labor costs here are not as large as when constructing a concrete structure and the cost is lower. The main thing is to maintain consistency.
To ensure a stable level for the bottom of the ditch, mark a rectangular area using a water level or level.

Next, the soil is removed, forming a depression located 43 centimeters below the lowest point. A groove 4 cm wide is made along the perimeter of the trench. Its depth is 2.5 cm. Elements are placed in it storm system. The edges of the trench do not need to be reinforced.
Compact the soil at the bottom of the trench and fill it with small crushed stone. Oily clay is moistened, poured onto the bottom and kneaded, distributed in a layer of 0.2 m, setting a slope of 5:100. A channel tray for storm water is formed from clay.
Be sure to let the preparatory layer dry. To prevent cracks from appearing, the surface is periodically sprayed. A layer of crushed stone with a fraction of about 18 mm and a height of 11 cm is placed on the clay, forming a slope.
To finally level the surface slope, the optimal value of which is 3:100, add a layer of fine-grained material - 8 cm. Sand, screenings or expanded clay chips are used as it. The latter also serves as insulation.

Next, layer by layer they begin to create a “pie”. As they are laid, each layer is compacted and watered.
After compaction, the sand surface is leveled and the geomembrane is laid out. At the same time, the bottom of the tray is covered with this material. Storm sewer pipes are also wrapped in geotextiles and laid. Then the collectors are installed.
A layer of geocomposite is applied to the membrane. Due to this, water will not accumulate in the embankment, but will flow into the canal. This solves the question of how to make effective low tides around the house with your own hands without much expense.
The geocomposite is followed by a four-centimeter leveling layer consisting of sand and gravel.

Geotextiles are placed on it, followed by a finishing coating. Granite crushed stone is used to completely level the structure. If you lower the entire pie below the zero mark by 150 mm, you can pour a layer of fertile soil and sow a lawn close to the house.

Healthy: Do-it-yourself insulated blind area around the house.
Drainage of storm water from the blind area
The minimum slope is 2% of the width of the fully finished structure. So, with a coating width of 60 cm, a slope of 1.2 cm is needed.

When deciding what to use to make your own blind area for the house and ebb tides, you need to take into account the characteristics of the soil on the site.
To drain liquid from the surface of the blind area, drains in the form of gutters are needed. They are produced specifically for sidewalks, and they are intended for directional drainage of water. In this case, neither the soil nor the foundation gets wet.
Since the slope previously formed along the entire perimeter is directed away from the building, gutters are placed along the edge of the blind area so that they fit tightly with the blind area. The gutters themselves can be plastic, metal, concrete, or you can simply cut an asbestos-cement pipe.
If the house is on a slope, and even stands on clay, it is necessary drainage pipe. It is placed about 1.3 m away from the wall of the house, at the level of the edge of the geotextile or slightly lower.
The pipe should be covered from below and from the outside with a membrane and geotextiles. Through the perforation, water will enter the pipe and then go to a predetermined place.
For drains, you also need to provide a slope towards the sewer, septic tank or drainage pit. This entire system must be sealed. For this joints are sealed, and an end cap is placed at the end.

Liquid drainage routes are provided in advance. If this septic tank, one of the gutters is directed in his direction. The same is done when draining water into the central sewer system.
We read: How to properly make a blind area around a house with paving slabs.
Conclusions and useful video on the topic
Video tutorial on the correct installation of the blind area:
Installing an independent blind area may not be the most difficult task, but it is far from simple. There are many options, but you need to choose the best method.
Our step-by-step instructions will help you make the blind area correctly. By adhering to it, you will avoid many mistakes and improve the performance properties of your building.
Are you choosing the best way to create a blind area around your home, but are you unsure about the correctness of the option you like? Ask for advice from other visitors to our site and from our experts - together we will help you choose the best type of blind area.
Or maybe you used one of the instructions above to construct a blind area and now want to share the results of your efforts? Add unique photos in the comments block - your work will become an inspiration to other home craftsmen.


I completely agree with what is written above, in terms of the fact that the blind area is a necessary part of the house, especially if there is a basement! On my own behalf, I would recommend choosing to use concrete as the main material for building a blind area. This is the part of the house, in my opinion, that you shouldn’t skimp on.It is better to build a reliable blind area that will have sufficient mechanical strength and high resistance to adverse climatic conditions than to have possible problems arising from another, more economical option.
Still, soft formwork seems unreliable, although the idea with a lawn is nice. And where thujas grow beautifully in balls, this is not for winter countries; a couple of times snow will fall from the roof onto this beauty and nothing will remain of it.
Solid formwork, in addition to protecting the house, also performs one convenient function - it is a path. When wet snow begins, and then there is mud around the house, and you need to clean something, dig out the streams. It is very convenient to deal with these problems by walking on dry ground.