Cable for heating a gas pipe: device, selection according to parameters, installation methods
During the cold season, unpleasant interruptions in the operation of gas pipelines occur. They arise not only due to low temperatures.You can most likely get a problem if the installation of communications was of poor quality. Then freezing with stopping movement in the pipeline becomes a common occurrence.
To resolve the issue, you will have to install a cable for heating the gas pipe, and preferably before the onset of frost. Next, we will tell you how to choose the right heating cable and share the intricacies of its installation.
The content of the article:
Heating cable structure
The design of heating wires includes up to 5 elements - the presence of one or another part depends on the type of product, and there are only two of them, not counting the rarely used ones:
- self-regulating;
- resistive.
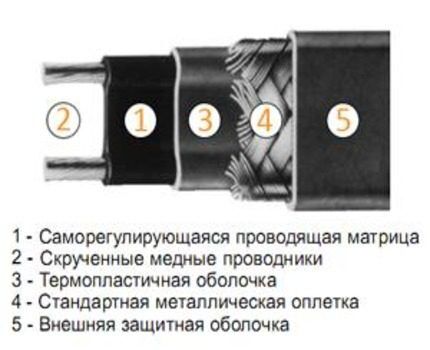
Self-regulating cable has two wires with different phases. Electricity flows through these copper conductors. They are located inside a conductive matrix, which heats the cable and acts as the brain of the system.
Each part of this interior consists of an electrical circuit with a location exactly in the middle between the conductors. It is the matrix that heats and regulates the power conductors.
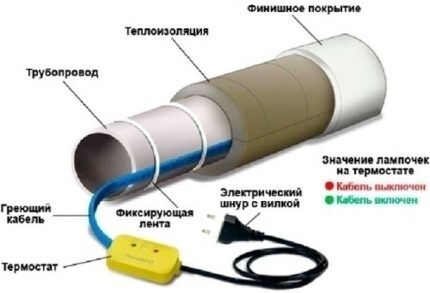
The main part of the cable is always threaded into a thermal insulation layer, which is also called thermal protection or insulating coating. The thermal insulation is enveloped in a shielding mesh made of flat copper plates. This braid is used for protection against electromagnetic waves from the outside, and also for grounding. The outer shell located on the mesh is a kind of shield against mechanical damage.
Resistive cables come in single and double cores. Accordingly, they are distinguished by the number of conductors. The device resembles a self-regulating version, but without a matrix system. Instead they make another one heat-protective layer.
Self-regulating heating wire
This cable works like a regular electrical conductor. Heating leads to an increase in resistance and, according to a simple physical law, to a decrease in current strength. In cold places of the pipe, the temperature of the wire is lower and the resistance is lower, and due to the greater current strength at these points, the heater works more and more intensely.
When the cable is turned on, it gradually increases power and at some point begins to work at full capacity. It turns out that heating the gas pipe speeds up this process.
The self-regulating cable does not stop working. There is no need to worry, because heating continues only until the desired temperature is reached, and then the cable operates with less power. The heater operates around a given temperature.
IN gas pipes It is not the gas itself that freezes, but the moisture, as a result of which it stops flowing. It is necessary to select such a pipe temperature to make the probability freezing insignificant.The peculiarity of self-regulating models is that the heating will not turn off or turn on as soon as the gas pipeline becomes warmer or colder than the optimal value. It’s just that the intensity of work will change greatly, either decreasing or increasing.
In turn, power costs should not hit your wallet, because the cables consume approximately 10 W per 1 meter of length. There are weak models with energy costs within 5 W and powerful ones with up to 150. Given the large selection, you can always find an acceptable option to allow yourself to keep the equipment turned on all the time.
Resistive heating cable model
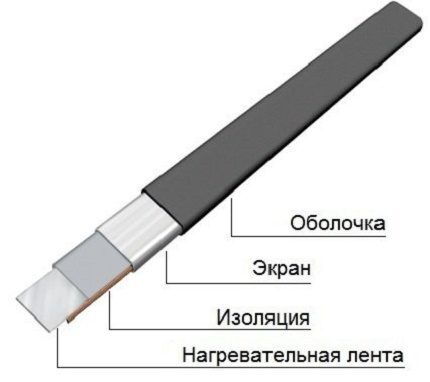
With the single-core variety, everything is more complicated, because you need power from both ends with subsequent design restrictions. The second end is returned to the connection point or additional power is laid to the same, far end. This is the essence of the inconvenience. Single-core wire with a sheath of thermoplastic occupies the niche of the most budget heaters on the market.
Based on the principle of a single-core cable, they created the HT modification with 50 watts per 1 meter. The scope of its application extends not only to pipelines. Along with high energy consumption, HT wire solves the issue of saving the material itself.
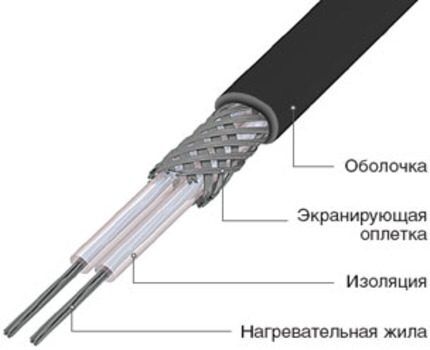
Based on the name, a two-core heater consists of 2 cores. They do not perform similar functions as is the case with matrix cables. The heating core works in tandem with conductive, which is assigned a supporting role.On one side, power is supplied to the cable, and on the opposite side, a sealed coupling is mounted.
Designing and installing the wire is not difficult, but the coupling often becomes a problem. Practice has shown that breakdowns are related to this part in more than half of the cases. To gradually replace problematic products, manufacturing companies began to produce clutchless options.
Resistive heating cables have the following advantages:
- stability of characteristics throughout the service life;
- high heat generation;
- low prices.
But in terms of reliability, they are somewhat inferior to self-regulating models, because in the event of a breakdown, you have to replace the entire section with the problem area, and local overheating is also quite common with them. The inconvenience is that you will have to spend time selecting sections of the optimal length.
Selecting the ideal option based on parameters
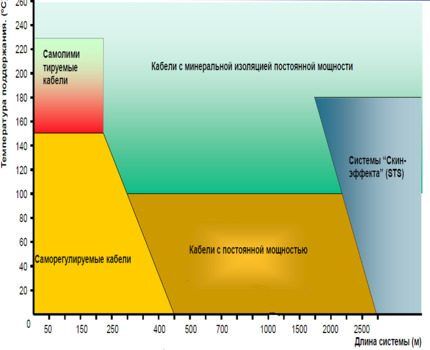
For all outdoor models, the benefit is determined by the power and uniformity of heat distribution. In theory, both types of cables are suitable approximately equally, because the weaknesses of the resistive one can be compensated for by the type of installation.
Depending on the minimum temperatures in the region, a cable is selected that is sufficiently resistant to extreme ambient temperatures. It may be that the indicator at which it occurs freezing, turns out to be too low for the heater itself.
There are also more clear-cut situations. Only underground pipelines are covered with self-regulating wire, because it is more profitable and convenient.Thin gas pipes should not be protected with a resistive wire - sometimes it happens that the communication melts and a hole forms at the contact point.
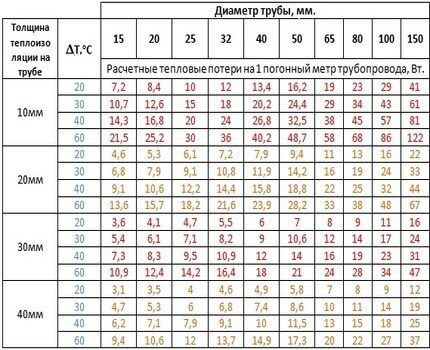
It will be nice if you have a table at hand heat loss. In it, heat loss is determined by the difference in temperature between the pipe and the environment in combination with the ratio of the diameter of the pipe and the thickness of the insulating layer.
The information is available in a convenient format - watts per 1 linear meter.
Installation rules and recommendations
Operational problems will not appear if the general standards are followed. In accordance with the rules for installing electrical appliances (PUE), the frost protection system must be equipped with a residual current device (RCD). Mounting on non-conductive surfaces and units are made only with protective braiding. Cables coated with this coating are also installed on synthetic pipes.
During installation, air temperature matters: work is carried out if it is not colder than -15 °C. After installation, mandatory thermal insulation is installed. To reduce heat loss, the thickness of this layer is adjusted exactly to the diameter of the pipe. Moreover, exceeding this indicator will not lead to anything bad, but will only get better.
The heating wire is considered functional if the bending radius reaches at least 3 product diameters. That isif the radius of an imaginary circle, the center of which is located directly at the edge of the cable bending zone, is at least three times the diameter and 6 times the radius of the wire itself.
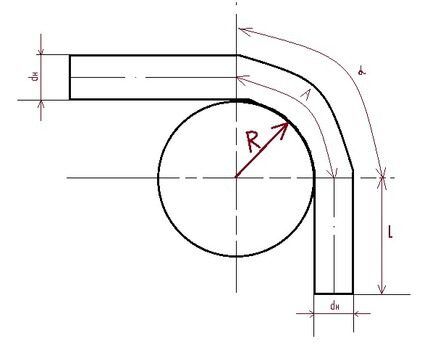
After work, the thermal insulation and the cable itself are checked for resistance. Then marks are made on the trench and pipeline warning of the presence of a heating element. Additionally, a sign is installed.
Cable installation allows designers to place the pipe in a convenient location. In this case, there is no need for laying taking into account the level of soil freezing.
Methods for installing heating cables
There are four main options for placing a heating cable, but the first two are most often used:
- longitudinal laying of one cable;
- securing the cable with a spiral around the gas pipeline;
- placement of several heating wires along the pipe;
- installation with a wavy outline.
The cable is usually routed along the bottom of the pipe at the 4th or 8th o'clock position, if you imagine that its cross section is the round dial of a mechanical watch. At the joints, they are raised by 60°. This is somewhat of a precaution: place the heating cable away from the mounting bracket.
There are separate ways of laying in different nodes of the system. Next to the valve, the core is bent, laid below the moving part and secured fiberglass tape. With a wavy or spiral fastening, the pitch of the coil is made larger where there is a turn in any direction. For example, at the knee joints.
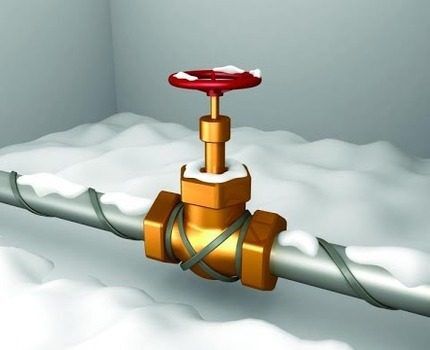
The essence of installation is extremely simple. All you need to do is select a trajectory for the cable and secure it on top with aluminum tape. First of all, the wire is fixed in fragments. Afterwards, press it against the pipe until it makes tight contact. There is no need to put in a lot of effort; minimal tension is enough, especially since the cable has the ability to stretch excessively.
In the future, you will need to secure it with tape along the entire length of the cable:
- to improve heat dissipation;
- for strength;
- to avoid contact with thermal insulation.
Aluminum tape or foil is used to process plastic pipes. This way, excessive heating of the plastic is avoided and a more uniform distribution of heat is achieved over the entire area and length of the gas pipeline. Whatever material the pipe is made of, a coupling is installed on it and the supply cold end and heating wire are fastened.
There, on the gas pipeline, the thermostat sensor is also placed - ideally exactly in the middle between the laid lines. In the future, the area will need to be insulated, after which the work can be considered complete.
Longitudinal installation of heating cable
Technically, this is a simpler method. At the same time, you should not expect the same effect as with spiral installation, when the gas pipeline is covered with a “mesh” of twisted cable. Fixation is performed parallel to the pipe closer to the bottom. Safety regulations do not prohibit higher installations, but the likelihood of damage from above will, by definition, be higher.
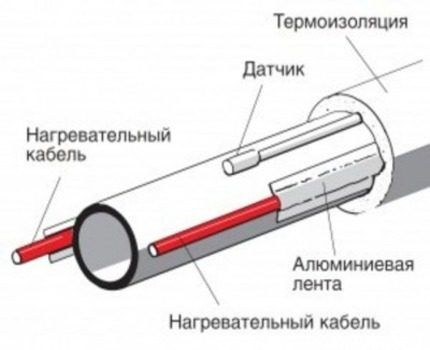
The distribution pattern of heating cables on a gas pipe directly depends on their number. One line is laid at the bottom corresponding to 4 o’clock, if again we imagine a dial instead of a slice. Adding a second one will mean placing it on the same level, but on the other side.
In the version with three branches, they are placed in an imaginary triangle on the lower half of the pipe, and it should look slightly to the right or left. The four cables are already made into a regular square pattern, and then two wires will be on top.
Fixation with a spiral around the pipe
The method is preferred in the northern regions. The likelihood of moisture freezing in gas pipes is much higher there, so the contact area is increased. The contact zone with the spiral method covers the pipe at different angles, according to a principle similar to a wavy gasket, but even more effective.
Long cables are available for spiral installation. So manufacturers provide an option for selecting the pitch between turns. In practice, the interval is sometimes adjusted to 5 cm or less. The cable will then exceed the length of the pipeline itself by approximately 2 times.
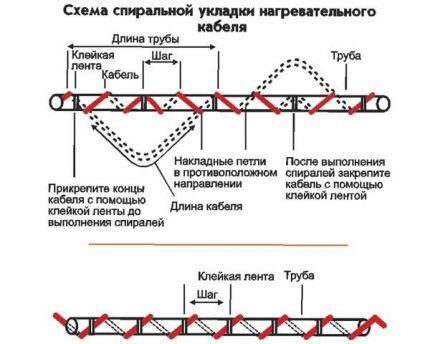
In some places, cable installation is difficult. The way out of the situation would be a screw-shaped installation, but using a different technology. The core is first wound with a reserve, and then tightened by changing the direction of the loops.
Important installation details
A successful installation involves several components.The first violin is played by the algorithm of actions. The pipeline must first be tested and painted, and a suitable day should be selected for installation when there is no rain. Moreover, some cables can only be laid on one side. It is enough to miss this one nuance - and all the work will have to start all over again.
Practical points regarding the use of heating cables:
- the lower the wire is, the better the heat exchange processes;
- the adhesive layer accelerates heating;
- thin metal pipes must be additionally insulated with foil or tape, just like plastic ones.
Do not rush the process of attaching to valves and threaded parts. The wire should be laid in such a way that later it is easy to service, repair and replace pipe elements without dismantling the heating system.
The cable must be shaped into a loop near the connection, and then rolled up to a state of slight tension and secured with tape.
Conclusions and useful video on the topic
Overview of self-regulating heating cable including operating principle, applications and tests:
A clear example of longitudinal installation on a thin pipe, also with a gasket near the valve:
Cables for installation on gas pipelines come in two types: self-regulating and resistive. You will hardly have to rack your brains over the choice, because the first option is clearly better in terms of the sum of its characteristics. The heating system is installed longitudinally, in a spiral or in a wavy line.
Before this, the length and power of the heater are selected, and calculations are made using a large number of physical indicators. After all, you need to understand what happens when heating a gas pipe with specific types of heating cable, and what you should avoid.After installation, discomfort and problems with gas supply will be a thing of the past.
Do you have any questions or can you add valuable information to our material? Please leave your comments - the contact block is located below.


Tell me, is the wire laid along the entire length of the pipe or only at the bottom? And how can you solve the condensation problem radically? Maybe a pipe has burst somewhere, maybe the condensate collector needs to be cleaned?