How to connect a switch: types, diagram and connection procedure with your own hands
It is important to be confident in the reliability of wiring, sockets and switches, as well as electrical equipment in your home, office, or any other room. After all, their serviceability is the key to safety.Agree, even one faulty switch can cause a fire with all the ensuing consequences. Therefore, you need not only to use electrical appliances correctly, but also to understand, at least in general terms, the nuances of choosing and connecting sockets and switches.
In this material we will talk about what types of switches can be found on the market and in what cases they are used. This is how you can choose the right option. We will also figure out how to connect the switch and what tools will be needed for this.
To make it easier for even a beginner to understand the installation instructions, we have provided them with visual photos and videos on connection.
The content of the article:
Types of light switches
To ensure optimal functionality, manufacturers have developed and supplied products that differ in the way they are switched on.
Moreover, in many cases this characteristic is the main one when choosing.Since it is precisely this that affects the functionality of any lighting equipment.

So, switches are divided into:
- keyboards;
- rotary;
- checkpoints;
- cross;
- dimmers;
- sensory;
- acoustic;
- remote controlled;
- push-button, which includes their rope subspecies.
To avoid errors, you should familiarize yourself with each of the listed types of products in more detail.
Traditional rocker switches
This group includes the most popular electromechanical equipment designed to control lighting devices.
It’s worth stopping at key switches if you don’t have any special wishes and you need a simple solution to the problem, and without significant costs.
At the same time, it should be remembered that these devices are:
- single-key;
- multi-key, namely two- and three-key.
Switches belonging to the first category are designed to control a single lamp or one group of lamps. Therefore, for example, they are optimally used to turn on/off lights in the bathroom or pantry.
Multi-key products are used to control various lighting fixtures and groups of lighting fixtures. For example, a two-button device would be a good choice for turning on lights in the bathroom and toilet.
And its three-key analogue conveniently and effectively controls several groups of lamps in a room, its individual zones, etc.

If there are more lighting fixtures than keys, then additional switches can be installed. For example, if you need to control five groups of lamps, then you can use two- and three-key devices simultaneously.
Convenience of pass-through switches
This type of equipment is a more technologically advanced alternative to traditional keyboard analogues. Walk-through switches are equipped with keys, but they do not have fixed on/off positions.
As a result, 2 switches can be used to control one lamp or group of lamps. Which, for example, can be installed at the beginning and end of a corridor, a passage room and other similar places. This will allow you to turn on the light at the entrance to the premises and turn it off at the exit. This is convenient and also allows you to save on utility bills.
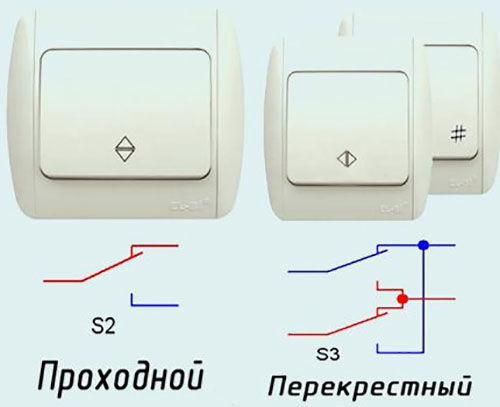
Light control with cross switches
This type of device is used exclusively in conjunction with pass-through analogues. Namely, when you need to control lamps or their groups from more than two places.
Features of rotary models
This type includes products that are structurally similar to their keyboard counterparts. Only instead of switches, rotary knobs are used.They close or open contacts in extreme positions.
Most often, rotary switches are used to control a single lamp or group of lighting fixtures.
Typically, devices belonging to this group have high decorative qualities in a retro style. Therefore, they will become a practical solution when laying electrical wiring in an open way, which is quite often practiced in wooden houses.
High-tech sensor equipment
This type of equipment is based on a microprocessor, which, together with the display, allows you not only to turn the light on/off, but also to adjust its brightness.

Additionally, touch switches have high aesthetic qualities. But the design of their mechanical part is traditional, that is, the same as that of conventional keyboard analogues.
Comfortable dimmers to use
Such dimmers, in addition to turning on/off, allow you to smoothly reduce or increase the brightness of the lighting. For example, like in a movie theater before and after the show.
Original acoustic products
This category of equipment is easy to operate; to turn it on, you only need to say something loudly. But at the same time there are a number of disadvantages. For example, when listening to music, such a switch will turn into a light and music system. It will also respond to any loud conversation, TV programs and other loud sounds.
As a result, such products should only be used in conjunction with traditional switches.Which increases the cost of installing acoustic analogues.
Remote controlled switches
Remote switches can become one of the elements of the system "smart home". The reason is that these switches can be controlled using a remote control.
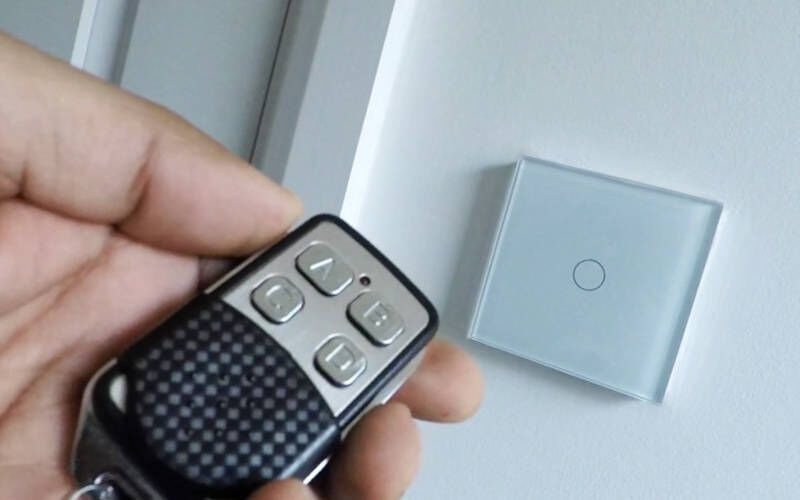
And not only turn it on, but also adjust the brightness of the lighting and a number of other parameters. For example, when integrating remote equipment into a smart home system, the lights can turn on when the user enters the home, automatically turn off when no one is in the room, and other scenarios.
At the same time, a significant disadvantage is the rather high cost of such equipment.
Push-button and rope switches
For push-button and rope switches, lighting devices are controlled by acting on ordinary contacts. The same as in the case of traditional key switches. The only difference is that the controls are different.
So, in one case it is a button, and in the other it is a rope. By the way, the rope acts on the button through the lever.

The main advantage of such products is their non-standard appearance.
Preparatory work before connection
When installing the selected switch, you should pay attention to:
- number of switches;
- the location of each;
- method of laying wires;
- length of wires and presence of other materials.
To take into account all these points and avoid any errors, you should draw up a circuit diagram for connecting the switches. It needs to be drawn as clearly as possible.
Optimal number of switches
When it is necessary to replace the rocker switch used to control the lamps in the corridor, it is worth considering replacing it with a practical walk-through model.
And also, replacing a single-key switch with several such products or one multi-key switch can often lead to a positive effect. Since this will allow you to divide one group of lamps into several.

In any case, the question of the number of devices that control the lamps is important and needs to be given time.
Switch location
Switches, according to the requirements of the PUE, should be placed in accordance with the following requirements and recommendations:
- At least 0.8-1.7 m above floor level. The optimal height is 0.9 m, since the switch will be convenient for people of different heights, including children, to use.
- No closer than 0.6 m from the door to the bathroom, shower room or no less than 0.1 m from the entrance to a regular room.
- No closer than 0.5 m from the nearest gas pipe or any other dangerous line.
In addition, the switch should be placed in a convenient location. For example, rope switches can be installed even under the ceiling.
Method of laying electrical wires
This point is relevant for cases when switches are installed for the first time, replacement or extension of wires is planned.
In this case, you need to know that the wiring can hidden or open. The first option is the safest and most reliable, and, therefore, in demand. When choosing this method, the wires are laid in grooves - they are not visible after the decorative finishing of the walls.
At the same time, this method is more labor-intensive and expensive. In addition, in this case, no mistakes should be made, since their elimination will lead to significant financial losses. Therefore, before carrying out work, you should make sure that the installation location is chosen correctly and that the wires themselves are in good condition.

The open method is considered relevant only in a few cases:
- if this is a temporary solution;
- It is not possible to use a hidden laying method.
Sometimes the open method is used deliberately to support the overall concept of a retro-style interior.
Required Supplies
Fasteners, socket boxes, distribution boxes, wires - all this should be purchased in the required volume and at one time.

Connection instructions
In the simplest case, to connect the switch you will need different types of screwdrivers, namely flat and Phillips. Additionally, you will always have to use a wire stripper. In some cases, you will even need a hammer drill (for gating).
Before installing the switch, you must complete a number of preliminary operations:
- Connect the wire(s). The cross-section of which should not be less than 2.5 mm².
- Install the distribution box.
- Install the socket box (installation box).
When laying wires, it should be taken into account that their ends must be free. Why is the insulating coating removed? To avoid damage to solve this problem, you should use stripper.
Next, remove 2-3 cm of the insulating coating from each core. Only the phase wire should be connected to the switch itself.

The procedure for connecting switches with a fixed on/off position and without a fixed position is slightly different. Let's consider the nuances of each option.
Connecting fixed position switches
This group includes all switches with the exception of pass-through switches and cross switches that work with them.

To connect you need:
- The incoming phase wire (from the main power cable) must be connected to the bottom terminal of the switch.
- A phase wire should be taken from each upper contact of the switch, which is then connected to a similar wire of the desired group of lamps. The number of upper contacts (outputs) is equal to the number of controls.For example, if a single-key switch is connected, then there is only one, but their two-key switches have 2, and their three-key switches have 3.
- Connect the neutral wire from the main power wire to a similar wire from the lighting fixtures of the desired group.
- Install the switch mechanism with connected wires into the socket box (installation box). Secure it.
- Install decorative elements (overlays, keys).
After which the work is considered completed and all that remains is to test the performance of the lighting.

Connecting products without a fixed position
As mentioned above, this group includes exclusively pass-through and cross switches. Their design feature is a large number of contacts for connecting wires. For example, a regular single-key switch has only 2 contacts - a phase input (supply wire) and a phase wire output to the lighting device.
But a single-key pass-through switch has 3 of them: a phase wire from the main supply cable (input) and 2 outgoing phase wires.
In addition, multi-key pass-through switches are ordinary single-key products combined in one housing.
It means that:
- The two-key pass-through switch structurally consists of 2 conventional single-key products. In this case, there will be 6 contacts for connection. Of these, 2 are input, 4 are output;
- The three-key pass-through switch structurally consists of 3 conventional single-key products. In this case, there will be 9 contacts for connection. Of these, 3 are input, 6 are output.
And to control each lamp or group of lamps, 2 pass-through switches are used. As a result, the outgoing phase wires must be led not to the lamps, but to the distribution box, where they are connected to the same wires taken from another switch. And only then is the connection to the lighting fixtures made.
detailed instructions connecting a pass-through switch discussed in the next article.

If it is necessary to install cross switches along with pass-through switches, then it is important to do this at the stage of laying the wires. They are installed between two passageways, and this can be done in any convenient place. And then the phase wire from one of the pass-through switches is connected to the two input contacts of the crossover switch.
And only then the phase wire from the two output contacts is supplied to the second pass-through switch.
We recommend that you read the step-by-step instructions cross switch connections.
Connection security measures
All work must be carried out only after the room has been de-energized.

If the house is new and uses the TN-S grounding system, then you should use its capabilities. Why is a separate grounding wire installed in the room?
The phase wire into the room must come from the circuit breaker.
Conclusions and useful video on the topic
After watching the first video, you can understand what to pay attention to when installing switches and where they should be placed:
The following video demonstrates how to install a device to control a lighting system:
The efficiency and safety of controlling the lighting system in any room depends on the correct installation and connection of the switch. Therefore, this task should be approached responsibly. And you need to start by choosing a suitable switch, wires, location. If you have doubts about your own abilities, then it is better to seek help from an electrician.
Do you have personal experience with connecting a switch? Or are you a professional electrical installer and want to give useful recommendations to amateur DIYers? Leave your comments - the feedback form is located below this article.
Also here you can ask our experts and other site visitors any questions you have about connecting switches.


