How to build an indoor pool with your own hands: drawings, dimensions, step-by-step instructions
If you create an open pond for swimming and relaxation at your dacha, then it must be an indoor pool. No films or heat-protective blankets will protect the water surface from evaporation, debris and heat loss. In addition, this is another good way to protect a place to relax from living creatures in the dacha, including birds and pets.
The content of the article:
Features of canopies over pools
For most pool owners, installing a roof over the pond is most often associated with the need for protection from pets. Therefore, the first desire is to make an inexpensive arched cover that is easy to install at night and remove while swimming in the pool.
Only with time does one realize how much higher the level of comfort is when swimming in an indoor pool. Making an indoor pool with your own hands is not difficult, you just need to plan the construction correctly.
Advantages
Protecting the water surface is not considered the main advantage of an indoor pool, although this is also important. A pool canopy or a full-fledged roof over a pond is made in order to:
- Reduce heat loss, especially in the cold season. If desired, you can swim in a heated pool even in late autumn or winter.
- Prevent those who got out of the water and wanted to relax on the side or at a table from catching a cold in cold weather.
- Protect swimmers from ultraviolet rays of the sun. It is much more convenient to swim in the heat, being under a protective canopy in a shaded space.
- Reduce water loss due to rain.
A heavy rain quickly brings a huge amount of organic matter into the pool, due to which the water requires cleaning and disinfection. Swimming in an indoor pool at your dacha is much safer than swimming in an open body of water that has turned green from multiplying algae.
Flaws
The disadvantages of indoor pool structures are no less than the positive aspects. A canopy or arched roof is quite expensive, so they are often made by hand. Each reservoir, despite the fact that it is built according to a standard design, is a unique structure with its own size, shape and bowl design. Therefore, the roof has to be designed “from scratch”, taking into account all the nuances of the design.
Periodically, the canopy-roof structure needs to be updated, repaired, and disinfected, like all other parts of the pool. A warm, humid environment promotes intensive development of microalgae and fungus. In addition, wooden and metal roof parts can be damaged when exposed to water vapor, which means additional maintenance is required.
Interesting: How to make a swimming pool at your dacha with your own hands.
Choosing construction and design
The first thing you need to pay attention to is the installation diagram of a protective dome or roof over the pool mirror. The canopy-roof frame must be installed and secured on a separate concrete foundation. Moreover, the covered part should not be connected to the edge of the plastic bowl or try to secure the frame to the side of the pool.This will inevitably lead to the destruction of the bowl.
Even with a slight breeze, the roof frame experiences significant lateral loads (up to 100 kg). Therefore, a separate foundation is made for the covered part.
For independent construction of an indoor pool, the best option is the classic version with a superstructure in the form of a stationary boathouse.
This arrangement of the covered superstructure has a number of advantages:
- simple diagram, all parts are easy to manufacture;
- low costs;
- no moving parts.
It is important that the covered superstructure has a minimum of hinges and moving elements. As practice shows, homemade folding canopies that tip over on “shell” hinges and slide to the side of the section require regular maintenance. As parts wear out, the covered superstructure increasingly fails. Therefore, the fewer moving parts, the longer the indoor pool superstructure will last.
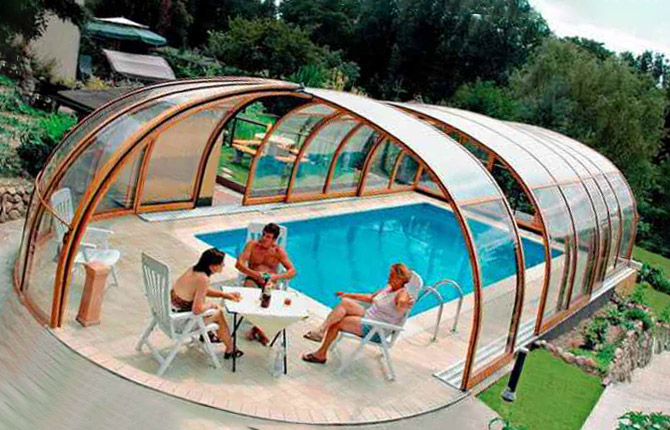
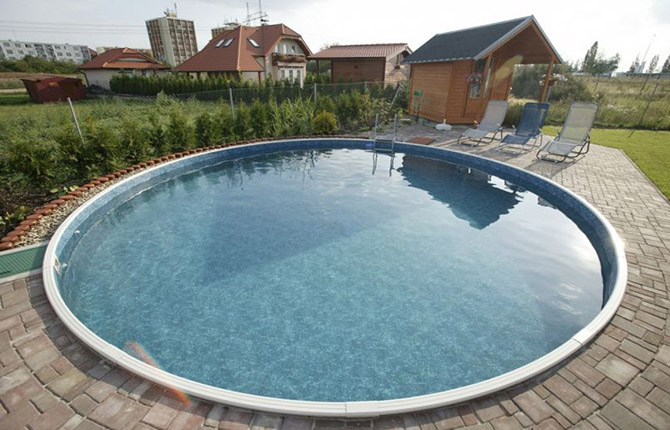
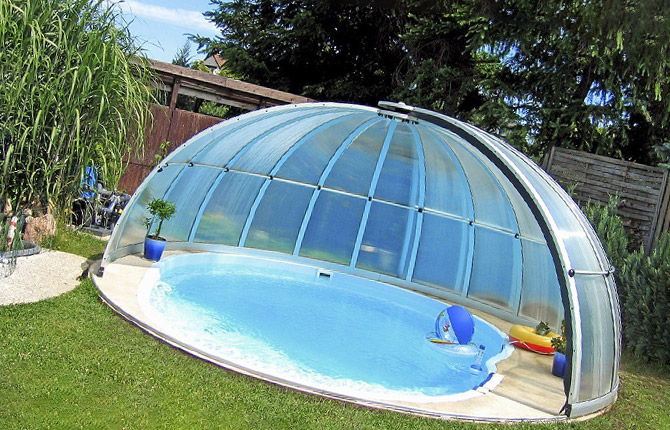
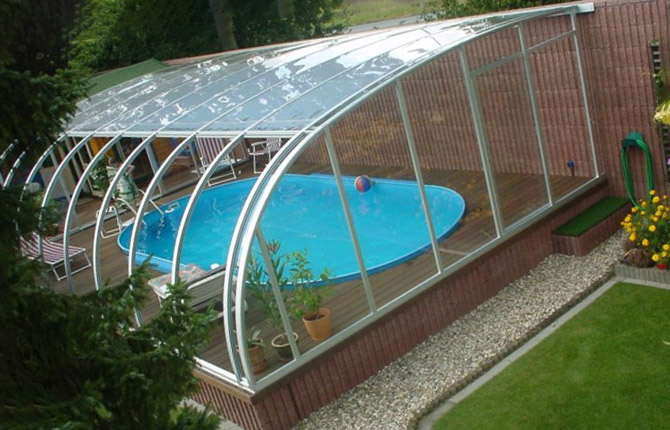
For a round bowl, you can choose a standard dome with polycarbonate glazing. But in practice, round-shaped reservoirs are most often built without a covered superstructure.
Indoor pool materials and tools
The roof frame must have high strength and rigidity. This is important, since the covered superstructure experiences significant load in the summer from gusts of wind, rain, and in the winter from a half-meter cap of snow.
Therefore, you can use steel square pipe or aluminum window profile to build an indoor pool. It is better not to consider any options for constructing a covered part from polypropylene water pipes. Construction will be cheaper than with a metal profile, but a lightweight roof will last several times less than a steel or aluminum one.
Square steel pipe is available in all sizes and sections. For the manufacture of an indoor pool, mainly squares of 30x30 mm and 40x40 mm are used.
For large bodies of water, roofs are made of metal-plastic window profiles. Ready-made sections can be ordered from a company that produces windows and accessories for them.
The result is a dome or arched superstructure that is strong enough to withstand rain or strong gusts of wind.
In addition to pipes or finished sections, you will need:
- cellular two-chamber polycarbonate 8 mm thick with a set of gaskets, washers and screws;
- sealant;
- orthophosphoric acid;
- polyester resin;
- corner gussets for strengthening welded joints.
Equipment for building a covered superstructure will require a welding machine, a grinder, a jigsaw, a knife, a measuring tool, and a screwdriver with a set of drills.
In addition, for the construction of the pool itself you will need a ready-made polypropylene bowl, concrete (up to 3 m3), red brick, boards, sand, crushed stone, polyethylene film, geotextiles, penoplex. Additionally, you will need to purchase a filter, pump, plastic pipes for water supply and drainage corrugations.
Interesting: Which pool is better, Bestway or Intex.
Types of pools
You can buy a bowl for your home pond ready-made or try to make it yourself. The frames (bowls) of small pools are cast from fiberglass or pressed from impact-resistant reinforced polypropylene. The dimensions of such a pool usually do not exceed 5x3m, but you can order a children’s version - shallow in depth, but with a larger surface area.

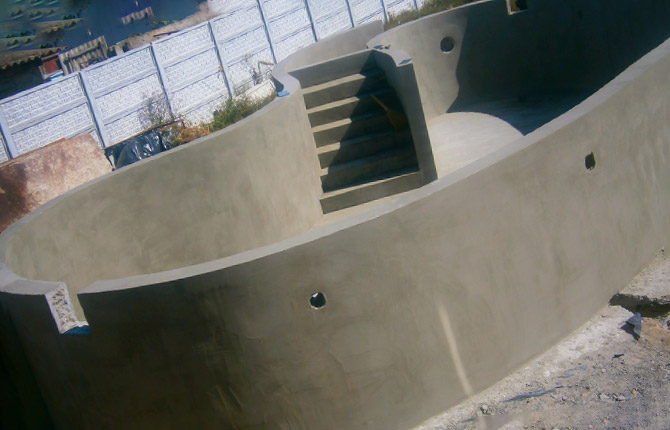
The second option is that the bowl is laid out from cinder block or cast from reinforced concrete.The cost of a DIY indoor pool bowl will be more expensive than a purchased polypropylene liner. Therefore, this concreting scheme is used mainly for large indoor reservoirs or non-standard shapes.
Healthy: How to make a pool from a Eurocube with your own hands.
Types of roofing and roof shapes
The installation scheme, material and shape of the roof are chosen depending on the selected design of the indoor pool. If this is a simple arched canopy, then it is better to use cellular polycarbonate.
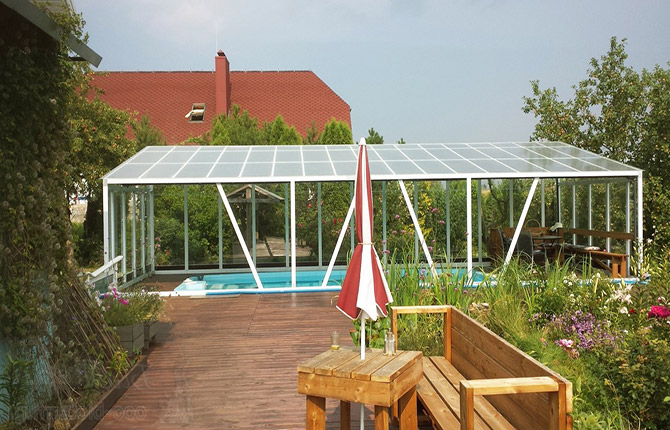
For flat roofs, the ideal material for an indoor pool would be monolithic polycarbonate. It is recommended to install it on flat bases. The material is capricious - if, when assembling a roofed superstructure, the sheets are incorrectly fastened, the roof is often covered with a network of small cracks.
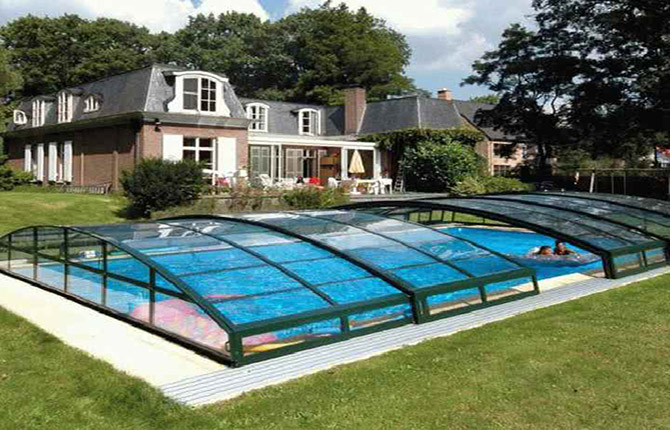
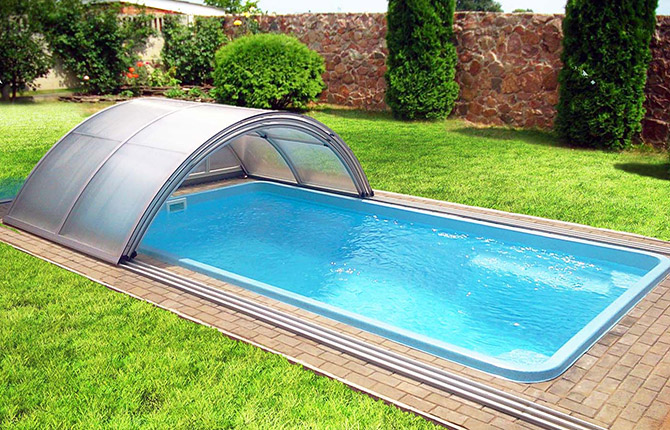
For small pools, a hinged roof structure is often used to free up the pond for swimming; simply swing open or move the doors to the side. The scheme is quite simple, but after the doors of the protective canopy are opened, there will be no swimmers over their heads.
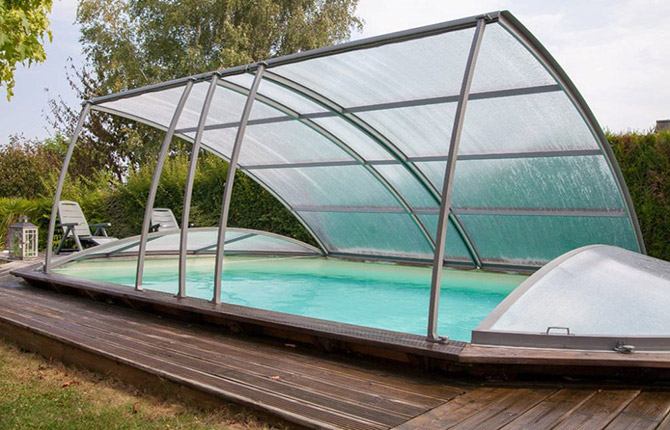
Another option for the covered part is a folding roof-canopy or shell. Unlike the previous one, the protection is not swung open, but raised and fixed on supports. Quite a good solution, since the internal space above the mirror is well ventilated, while there are protected areas where you can hide from the wind or solar ultraviolet radiation.
For long reservoirs, the covered superstructure is often made in the form of a sectional pavilion.

The height of the roof is only a couple of meters, but thanks to the ability to move the sections to the side, swimmers can swim both under the roof and under the covered superstructure.
There are also dome models of indoor pools, in which the dome can be assembled into a package, opening part of the mirror to sunlight.
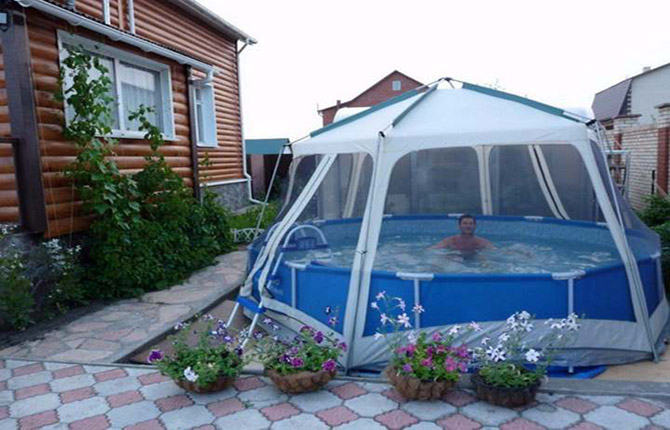
Many summer residents who own outdoor swimming pools use ready-made greenhouses for covered superstructures, assembled from aluminum pipes and polycarbonate or polyethylene film.
The dimensions of the greenhouse frame do not allow the permanent pool to be completely covered. Therefore, country greenhouse roofs are used as a covered superstructure mainly for soft frame reservoirs.
Step-by-step instructions for creating an indoor pool
First of all, you need to choose the right location for the indoor pool in your backyard. It is necessary to hide the pond as much as possible and reduce wind loads on the covered part. In addition, you will need to plan and lay out the hot water supply from the house, place a well with a pump and filter.
Foundation preparation
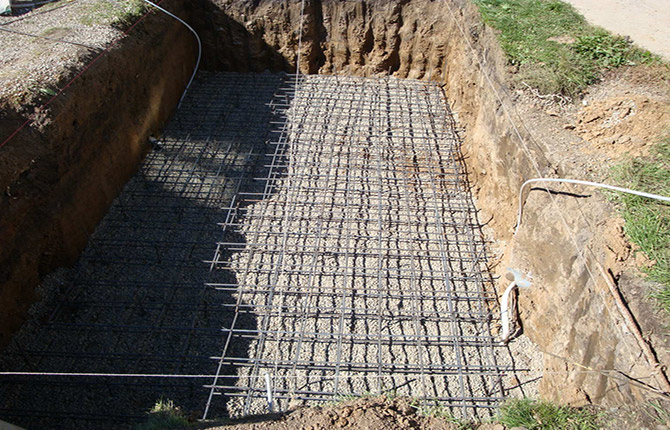
The pit is always made larger and deeper than the actual dimensions of the plastic bowl. Before installing the liner, you will need to make a base plate-foundation:
- The bottom of the pit is compacted using a manual or electric tamper.
- A layer of gravel up to 20 cm thick is laid.
- Geotextiles and a layer of sand up to 10 cm thick are laid on top.
Next, a thick polyethylene film and two layers of reinforcing mesh are laid. The reinforcement is filled with concrete. The result is a slab about 15 cm thick. A layer of penoplex needs to be laid on top of the slab foundation; this is insulation for the bottom of the pool.
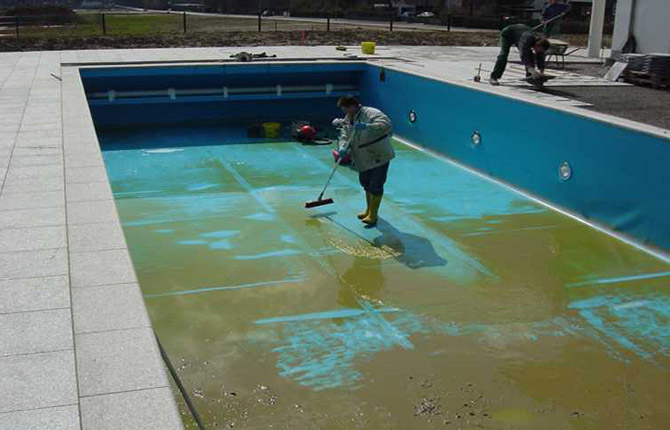
Installation of an indoor pool bowl
To install a plastic liner in a pit, you will need a dozen workers or a truck crane with two additional assistants.
When installing, the bowl must be leveled and secured with boards. There remains a gap between the wall of the pit and the bowl.The ground walls are covered with polyethylene, after which the space is covered with foam glass granules and grated clay. Part of the soil around the plastic liner is cut off with shovels to a depth of 50 cm.
The site is covered with gravel (10 cm) and sand (5 cm). That is, the upper edge of the liner bowl will protrude above the platform level. It will need to be lined with brickwork to the height of the side. Leave only an allowance for tiling.
Supports for a covered superstructure
The roof frame cannot be attached to brickwork. Therefore, to install the covered part of the pool, you need to make a columnar foundation. A two-row pattern with four posts in each row will be used. The supports for the frame of the covered part are made by pouring concrete into formwork made from boards.
You need to stretch construction cords between the outer pillars. In order for the covered canopy to stand level, the surface of the supports must be trimmed to a level (cord) after the concrete has hardened.
As soon as the concrete has set, you need to drill holes in the pillars and lay anchor pins or scraps of reinforcement with a diameter of up to 20 mm. After the concrete has hardened, the studs (reinforcement) of the supports are tied around the perimeter with a 40x40 mm square pipe. They are attached to the embedded elements either by welding or with nuts.
After laying the pipes and drainage, building a well for the filter and pump, the area around the pool is covered with crushed stone, then with sand for laying decorative tiles. When it rains, water will flow down the covered canopy onto the site, so before backfilling you need to waterproof it with film and lay drainage pipes.
The gaps between the supports will need to be filled with brickwork half a brick thick. The wall will give the frame of the covered superstructure additional stability.
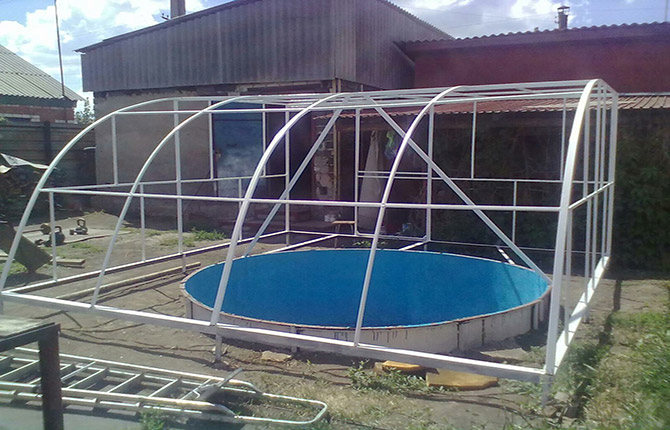
Making the frame of the covered part
The frame is best assembled from half-arches bent on a pipe bending machine from a square profile with a cross-section of 30x30 mm. If the height of the covered superstructure is more than 2.5 m and the width is more than 4 m, then a 40x40 mm square can be used.
The number of sections (half-arcs) depends on the length of the covered superstructure. They are optimally installed in increments of one meter. That is, to assemble a 6 m long roof, 10 arcs will be required.
In addition, on the front side you will need to weld a frame for the door frame. Two window frames are welded on the back side. The interior of an indoor pool must be ventilated regularly.
Assembling the frame of the covered part
The front and rear parts of the frame are installed first. To prevent the parts from falling, they are fixed with temporary struts made of slabs and boards. Next you need to lay and weld two ridge beams from a 30x50 mm pipe.
Before installation, each half-arc is adjusted in height by trimming the ends. The part is installed in the frame of the covered part and welded.
After assembly is completed, all welds are reinforced by welding gussets made of sheet steel. Only after this will it be necessary to treat the metal with an etching solution (orthophosphoric acid), prime it and coat it with polyester resin.
We read: How to make a wood-burning stove for a swimming pool with your own hands.
Laying lining on an indoor pool
Since a square steel pipe was used for the frame, laying the cladding on the half-arches will not be difficult. For glazing, it is best to use two-chamber cellular polycarbonate 8 mm thick with protection against condensation accumulation.
The only problem is cutting the polycarbonate sheets correctly.The cutting line must be sealed with tape, and saws with fine teeth for cutting metal are used for cutting.
Polycarbonate is laid on the covered part of the pool, always with a compensating gap between the edges, the ends are sealed with gaskets. Fastening is carried out using special self-tapping screws with a wide head and a compensating gasket. After laying the lining on the covered part of the reservoir, the joints are additionally treated with a sealant that is resistant to ultraviolet radiation.
To give the covered part a more elegant appearance, the joints are covered with decorative overlays.
Building an indoor pool with your own hands will require a lot of time and effort. On average, construction takes up to two weeks from the moment the pit is laid. In terms of costs, an indoor pond made from a profiled pipe is half the price of a purchased roof. If you do not violate the technology, the covered part will last for at least 20 years.
Tell us about your experience building an indoor pool. Which roof scheme is best for a home pond.


I made a roof on metal arches. Condensation constantly accumulates on the metal. In some places even the paint was blistered. They say they need to be replaced with plastic ones, otherwise the metal will rust.
It needed to be coated with polyester resin, not painted. It is better to disassemble it, bake it and cover it with varnish protection for sea water.