Installing a built-in hood: location options and installation instructions
The small dimensions of the kitchen force us to select compact options for its arrangement, which can be placed in one of the furnishings. Such options, which allow you to significantly save useful meters and centimeters, include a built-in hood. It takes up minimal space and does not affect the interior.
You can handle the installation of built-in exhaust hoods with your own hands if you know all the rules and subtleties of the work. We will tell you how to choose a unit for extracting exhaust air in the kitchen, and we will tell you how to install your purchase correctly.
The content of the article:
Exhaust equipment
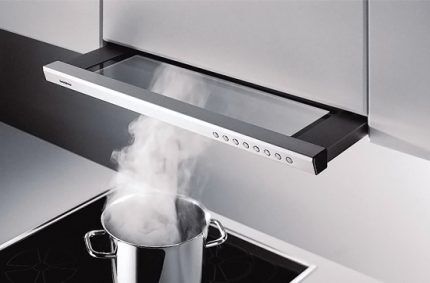
This type of hood is often chosen for kitchens with a small area, as it is compact in size. Of course, the purpose of the device is not limited to interior decoration problems. First of all, it is necessary to clean the air from unwanted impurities that arise during the cooking process.
The presence of a hood allows you to quickly remove foreign odors from cooking food, steam, dirt, etc. from the room. The built-in version fulfills all these requirements, and is also distinguished by its compact size and low noise emitted during operation.
The disadvantages of such devices include the high price, which is fully compensated by solid advantages. Despite its small size, the device has the necessary level of performance.
There are horizontal and vertical hoods. The first ones are considered the most common, since they are much easier to install.
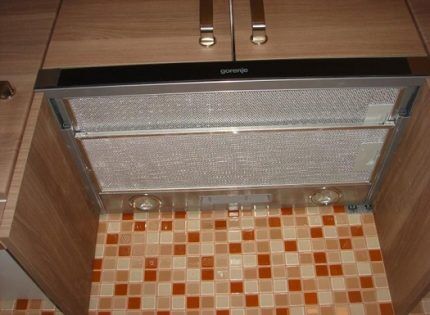
The device can be mounted in a wall cabinet or a special box. With the vertical option, everything is a little more complicated; it needs to be installed directly in the wall, in a niche made for this purpose. The manufacture of this niche significantly complicates installation. When choosing a hood, you need to focus not only on its type, but also on the dimensions of the hob surface of the stove.
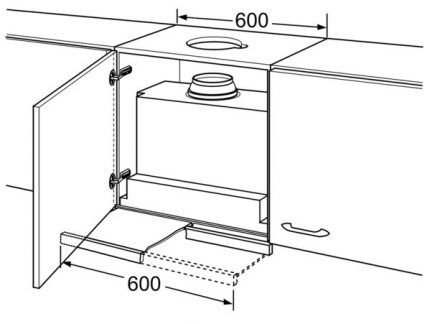
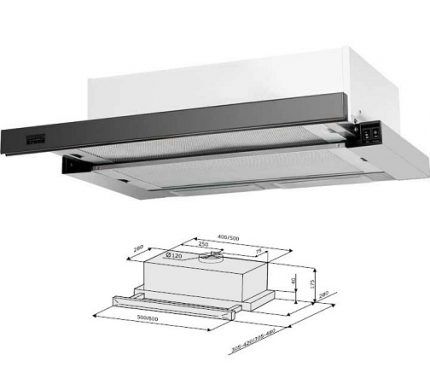
The width of the device can vary over a fairly wide range: from 45 to 90 cm. It should be remembered that the working width of the hood must correspond as closely as possible to the dimensions of the hob surface of the stove.
Only by following this rule can you achieve sufficient efficiency of the device. The most popular model is the size 60 cm.
An important element of the built-in hood model is a filter for catching grease. Before turning on, the horizontal hood must be pulled out so that it is located above the entire area of the hob. The grease filter is located in this moving part. Some models are equipped with an additional air recirculation function.
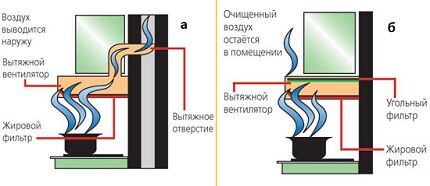
Such devices must be equipped carbon filter, they cost more. They can operate in two modes: diversion or recirculation.You should decide on the type of hood before making furniture for the kitchen, since the cabinet in which the device will be installed must have suitable dimensions.
Popular now hoods with recirculation They are good because they return not only purified air to the room, but also warm air. Thus, a significant part of the thermal energy spent on cooking and heating the air will remain within the house. However flow type hoods cleans the air better.
Another important parameter when installing such a hood is the vertical distance from the hob to the edge of the hood, i.e. to the bottom of the cabinet in which it is built. This parameter is strictly standardized; for electric stoves it should be 70 cm, and for gas stoves - 80 cm.
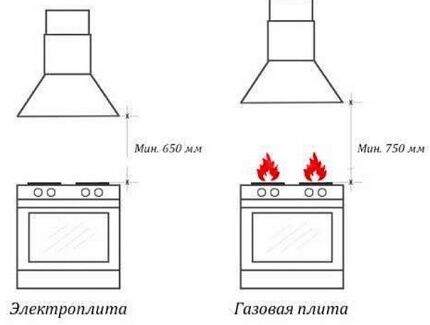
Failure to comply with this requirement will lead to a noticeable decrease in the efficiency of its operation, and it is possible that the device will break down. In some kitchens it is not possible to install a hood at a distance of at least 85 cm from the hob. In this case, it is necessary to purchase a design with a higher performance than the calculated one.
Exist plastic air ducts with square and round cross-section. Round structures are used less frequently than rectangular counterparts, since the latter take up significantly less space than a cylindrical channel.
It is preferable to use a plastic version with smooth walls, since they better resist the accumulation of dirt.
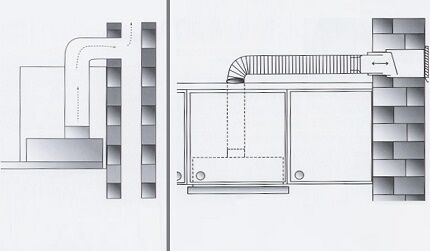
A corrugated air duct in this regard will create more problems; in addition, when hot air passes through such a duct, additional noise is generated. The maximum permissible level of sound interference that a hood can produce is 70 decibels. This is slightly louder than normal conversation.
Despite these shortcomings, corrugated air ducts are widely used with hoods, since they also have advantages. It is easier to install such a structure because it can be tilted and bent in a suitable manner. Therefore, for successful installation you will not need adapters or additional elements.
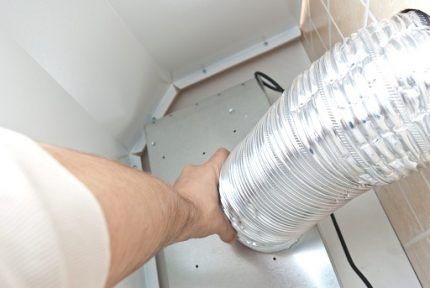
But to rotate the plastic air duct you need to create a special elbow. This design promotes the formation of hot air vortices inside the channel, which is not very useful. To reduce the amount of contamination on the walls of the corrugated air duct, when installing the built-in hood, you should stretch it a little.
If desired, the circular cross-section of this design can be made square so that the air duct takes up less space. This is another advantage of this type of construction. Good quality is demonstrated by such models of built-in hoods as Bosch DHL 545 S, Shindo MAYA 60 SS/BG, Elica KREA GFA WH/F/60, Miele DA 2270, Sub-Zero Wolf and others.
Performance, filters, management
According to sanitary standards for kitchen premises, tenfold air changes are recommended every hour.Therefore, when calculating the performance of the hood, you should focus on the volume of the kitchen, expressed in cubic meters. To do this, you need to multiply the length, width and height of the room, and increase the resulting result ten times.
For example, for a kitchen with an area of three by four meters and a ceiling height of three meters, you will need a hood with a capacity of (3 m X 4 m X 3 m X 10) 360 cubic meters per hour. And this is the minimum value.
Sellers recommend purchasing a kitchen hood with some power reserve. If the performance of the device is lower, it simply will not cope with cleaning the kitchen air from contaminants. How to calculate the power of a kitchen hood in detail written here.
Grease filters vary in composition as follows:
- organic (based on synthetic winterizer);
- paper (based on non-woven fabric);
- synthetic (acrylic based);
- metal (aluminum or steel).
Paper filters are a disposable option and need to be replaced with new ones every time they become dirty. Synthetic analogues can be washed, but this must be done very carefully, as they are easily damaged. They will also have to be replaced from time to time, although not as often as paper ones.
Metal filters are considered the most reliable; they are wear-resistant cassettes. Coal varieties, which are used only in recirculating installations, also cannot be purified. They must be replaced promptly, otherwise the performance of the hood may be significantly reduced.
When choosing a hood, you should pay attention to its type of control. Electronic control usually allows:
- automatically adjust performance levels;
- change operating modes;
- configure the device to turn on and off automatically;
- turning on the built-in lighting when there is movement near the stove;
- light indication of filter status, etc.
Among the useful functions of a hood built into a cabinet, one can note the residual mode: the fans run for some time after the hood is turned off to ensure the most complete removal of contaminants.
The additional ventilation mode allows you to automatically start the hood at low power at certain intervals to maintain optimal air exchange in the kitchen.
Installation rules
You need to start installation with the furniture into which the hood will be built. If the cabinet fits in size, then you can continue installation as usual, simply by making the necessary holes in the furniture, but this is not always possible. A small device with parameters of 50-60 cm usually fits in a standard kitchen cabinet.
If this is not the case, then the kitchen owner has two options: order new furniture or dismantle the cabinet to use a special hood box. The latter option has certain advantages, since the box is assembled separately at the bottom, then the hood is fixed in it, and only after that the entire structure is installed on the wall.
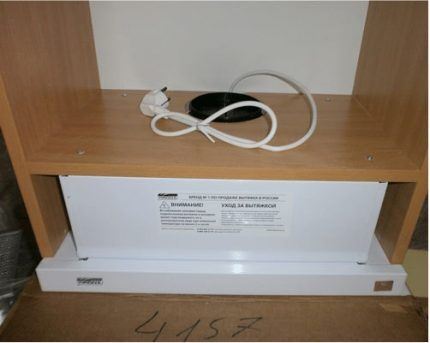
A façade is installed on top of the hood, so the hood looks neat and stylish from the outside. The problem of insufficient space can be solved by using a device of minimal dimensions - 45 cm.
This model can be placed even in a very small closet. But it should be remembered that compact dimensions in this case come at the expense of performance.
It is necessary to take this point into account so that it does not turn out that a suitable-sized hood cannot cope with the required amount of work. If the cabinet fits the dimensions, you need to make a hole in its bottom for the hood, taking into account its size. Sometimes it is more convenient to completely remove the bottom. You will also need to make an opening for the air duct at the top of the cabinet.
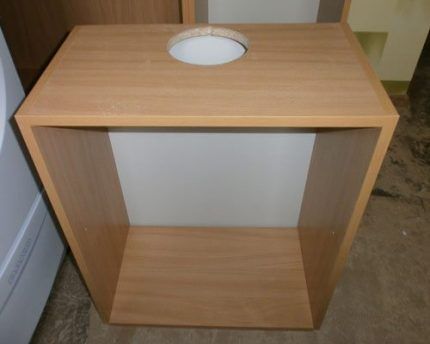
It can be round or rectangular, it all depends on the type of duct. Flexible corrugated structures with a round cross-section are often used, but there are also plastic ventilation ducts with a rectangular or square cross-section.
The air duct connects the hood to a hole in the wall leading to a common ventilation duct in an apartment building or directly to the street in the case of a private building. Another cutout will need to be made on the back of the cabinet to secure the device and install the socket.
Once all the necessary openings in the cabinet are ready, you can proceed directly to installing the device. First, the hood is secured in a cabinet or box. In this case, you should make sure that the moving part of the device freely extends to the required width.
After this, the air duct is attached to the connector at the top of the device using a clamp. Experts recommend making this mount detachable so that it remains possible for simple dismantling. Some craftsmen immediately use sealant, but professionals do not always approve of this decision.
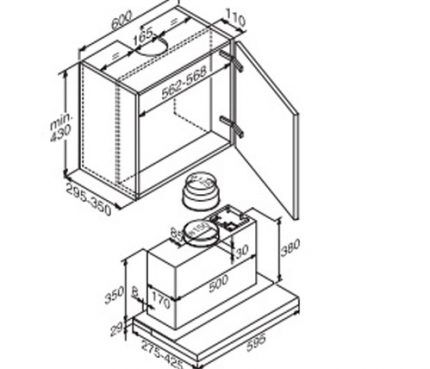
Periodically, the structure will have to be disassembled to clean it from accumulated fat and other contaminants. However, it should be remembered that the connection must be sufficiently tight to ensure effective removal of contaminated kitchen air.
Most often, the hood duct is removed vertically from the cabinet, but sometimes a side outlet through the rear wall is used for this purpose. In this case, the hole is made at the back. You should not make holes “not a peephole”, you should first apply markings.
Some models of hoods are equipped with a convenient template, which greatly facilitates the process of marking the mounting floor for the device. If such a template is missing, you will have to perform the markup in the usual way, i.e. using a tape measure and a building level. The hood must be installed strictly horizontally.
The installation of a built-in hood is usually carried out after the entire kitchen unit has been assembled, so that the entire structure is comfortable and looks neat. Self-tapping screws with dowels are usually used as fasteners for hoods.After installing the hood in the box, a special adapter is installed in the corresponding hole to connect the air duct.
After this, all that remains is to take it out into the ventilation duct. The exhaust duct should be as short as possible in length, since this indicator affects the overall performance of the device. The maximum allowed number of knees is three.
These points should be taken into account at the stage of general kitchen design; it is recommended to install the stove as close as possible to the general ventilation duct of the house. The diameter of the air duct must be the same as the dimensions of the pipe intended for it. Typically this figure is 120 mm or more.
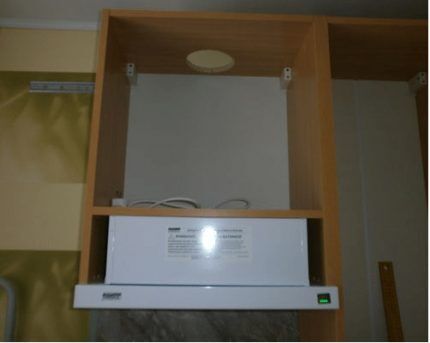
An important point is choosing the correct position for the power cord. It should not pass directly over the hob.
The cable must be secured inside the cabinet, and the socket for connecting it must be installed in the area of the rear wall in which the hood is installed. You can choose another location for the outlet, the main thing is that this part of the device does not overheat when the stove is on.
After all installation work is completed, you should connect the device to the power supply, pull out part of the hood and test its operation. Ventilation of the kitchen space can also be done using an exhaust fan, but if a hood is already installed in the room, the use of additional devices is considered unnecessary.
Conclusions and useful video on the topic
The installation process of such a hood is clearly demonstrated here:
This video provides information on how to choose a suitable hood:
Here is some useful information about replacing carbon filters:
A hood that can be hidden behind a furniture façade is an ideal choice for almost any kitchen. Such a device makes little noise, does not spoil the interior and can be installed by one person in just a couple of hours.
If the hood is correctly selected and its installation is carried out without errors, it will provide the kitchen with the necessary air exchange intensity.
Would you like to tell us how you installed a built-in hood in your own kitchen, or provide useful information on the topic of the article? Please write comments in the block below. Ask questions, share your opinion, post photos of the device selection or installation process.


In our apartment, the kitchenette is very small, only 5 square meters, so any time you cook at the stove, odors spread very quickly. Even an open window does not always help, for this reason we decided to install a good hood. I did all the installation work with my friend, in general there is nothing difficult about it. The main thing is to adhere to the rules, and of course, to do everything efficiently. There are now 2/3 less odors, the price is low!
Please tell me, is it possible to install a hood and leave the electric fan nearby in the exhaust well?
The kitchen in my apartment is very small, so it would be impossible to do without a hood, otherwise the smells of food would begin to spread not only throughout my apartment, but also outside it. I didn’t have to do the hood myself; it was already there when I moved in. It is located directly above the stove.It just makes a terrible noise, louder than a vacuum cleaner when you turn it on. Don't know if this can be fixed somehow?