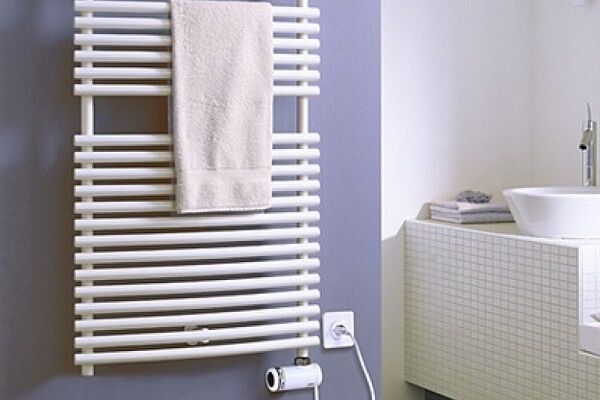
Installing a heated towel rail in the bathroom: DIY installation guide
For a home handyman skilled in plumbing work, installation heated towel rail is not a very difficult task.Before you begin installing the device, you need to decide on the optimal drying model and connection method.
You should develop a wiring diagram and become familiar with the installation steps. Compliance with requirements and installation technology will ensure uninterrupted operation heated towel rail.
The content of the article:
- Criteria for choosing a heated towel rail for the bathroom
- Connecting a heated towel rail: DHW or heating
- General installation requirements
- Recommended and unacceptable insertion schemes
- Step-by-step installation of a water heated towel rail
- Features of installation of electric models
- Conclusions and useful video on the topic
Criterias of choice heated towel rail For bathroom
The durability of plumbing equipment depends on its initial characteristics and compliance with installation technology. An important role will be played by the compliance of the selected model with operating conditions.
At choosing a heated towel rail special attention must be paid to the principle of operation, material of manufacture and configuration heated towel rail.
Operating principle and technical characteristics
All models of “towel dryers” for the bathroom are divided into three types:
- water;
- electrical;
- combined.
Water units operate due to the circulation of hot coolant. The connection is made through the heating or water supply system.The main advantage of such models is energy saving.
Lack of water heated towel rail – the complexity of installation if the device is not initially included in the communication system of the apartment or house.
At choosing a water heated towel rail it is necessary to take into account the pressure in the pipeline.
In modern apartment buildings system pressure DHW is about 8-10 atmospheres, and in buildings of the old foundation - 5-7 atmospheres. Most imported models heated towel rails They are distinguished by low operating pressure, and the thickness of the pipe walls does not exceed 1.25 mm. The service life of the device in a typical high-rise building is 1-2 years.
The choice of coil for a private home is quite extensive, since pressure in the autonomous system heating is low.
Electric heated towel rail operates autonomously, regardless of the operation of other systems. To operate, you will need an uninterrupted power supply.
The use of the device is advisable in the following cases:
- requires quick installation without interfering with the heating or water supply system;
- installation of a “backup” heated towel rail;
- the need to place the coil outside the bathroom - a portable electric drying model is optimal.
To avoid wasting energy, you should choose an electric heated towel rail by room volume. It is optimal if per 1 sq. m accounts for 140 W of energy - under such conditions the bath warms up to 22-24°. If unit is necessary for the spring-summer period, then low-power models are suitable at the rate of 100 W per 1 sq. m.

The power of “wet” models reaches 2 kW, “dry” devices – 100-200 W.
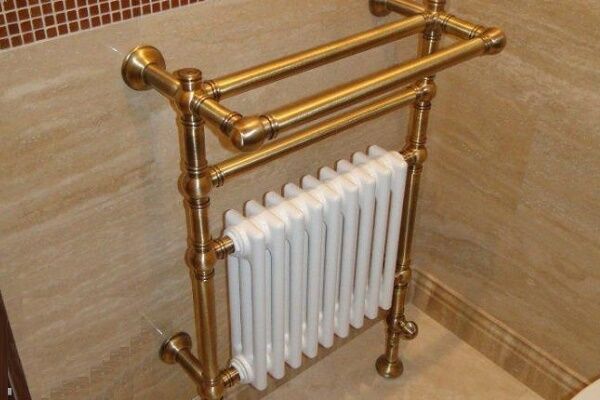
Combined heated towel rails capable of operating in two modes: from the network or from the system DHW. This is the most practical and effective heating option, but the high cost of a universal coil scares off many buyers.
Plumbing fixture material
In the manufacture of coils heated towel rails Three metals are commonly used:
- stainless steel;
- copper and brass;
- black steel.
Stainless steel appliances resistant to moisture, but susceptible to impurities contained in water. Over time, sediment forms on the inside of the coil walls, limiting the path of water flow.
Choosing heated towel rail made of stainless steel, preference should be given to chrome-plated models with a wall thickness of 2 mm.
Radiators made of brass and copper They are distinguished by high heat transfer, but have a limited service life. When purchasing, you need to check the product passport. It must indicate that the pipes are galvanized from the inside and heated towel rail suitable for connection to the system DHW.
Black steel capricious to the coolant. Models made from this material are recommended for installation in an autonomous heating system, where pressure drops are excluded. To the central system DHW It is permissible to connect a coil with anti-corrosion internal protection.

Dimensions and shape heated towel rail
The size and configuration are determined based on the location of the dryer, the dimensions of the bathtub and personal preferences. In addition, you need to take into account the insertion method: side, diagonal, top or bottom.
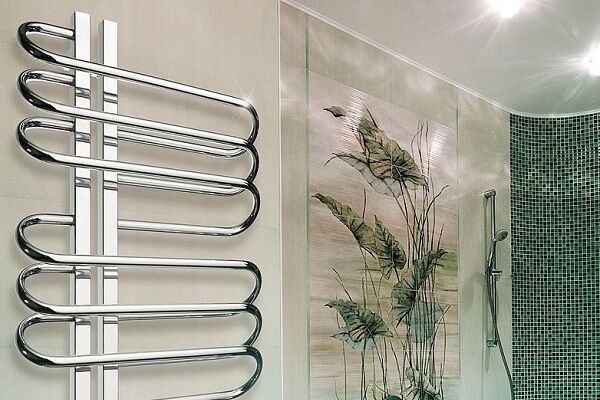
Classic M- and U-shaped forms are affordable and are optimally suited for replacing worn-out Soviet coils. Radiators “ladder”, “foxtrot” and “modern” are more spacious. The area allows you to place laundry, as in a stationary dryer.
Heated towel rail should be combined with the design of the bathroom and not clutter up the space.
Connection heated towel rail: DHW or heating
Before installing the water heated towel rail in the bathroom, you need to decide on the method of connecting it.
Two options are available:
- Plugging into the system DHW. The method guarantees year-round heating. The appliance heats up as hot water is consumed – overnight heated towel rail cools down even when turned on directly through the riser.
- Connection to the heating system. This option is relevant in the absence of a centralized hot water supply network. Thanks to the forced circulation of the coolant, the coil remains warm around the clock. The disadvantage is that the dryer functions only in the cold season.
At replacing a heated towel rail in an apartment building with a change in the method of its connection, a project will need to be developed and approved by Housing and communal services. It will take about a month to complete the package of documents.
General installation requirements
Installation heated towel rail with the “water” principle of operation is carried out subject to a number of conditions:
№1. The diameter of the pipes of the device must correspond to the diameter of the riser; narrowing from the installed ones is unacceptable fittings.
№2. A jumper must be provided between the drying outlets. The bypass performs a number of tasks:
- maintaining the speed of water circulation throughout the riser;
- separation of coolant flows allows you to save heat for subsequent water intake points;
A significant advantage of switching on closing sections, bypasses, is the possibility of switching off heated towel rail to carry out repairs without stopping the operation of the system as a whole.
№3. It is prohibited to install shut-off valves on the pipeline section up to the bypass and directly on the jumper.
Failure to comply with the requirement entails:
- slowdown of water circulation through the riser and drop in coolant temperature;
- deterioration of pressure in apartments located in the direction of water supply.
The closing sections can be equipped with the usual ball valves on the bypass and supply line or with more functional three-way valves that allow the coolant to be directed either to the bypass or to the radiator.
№4. The recommended height for placing towel dryers according to SNiP is 120 cm from the floor.
№5. Maximum distances between the heating device and wall cladding:
- 3.5-4 cm – if the coil diameter is 2.5 cm or less;
- 5-7 cm – for pipe cross-sections larger than 2.5 cm.
If a bypass is provided in the installation diagram, then it is permissible to install cut-off valves at the outlet and inlet of the device. ball valves.
Recommended and unacceptable insertion schemes
The operation of the coil is based on the principle of a “gravity pump”. Proper insertion ensures natural circulation and functionality of the radiator. Development of a water supply installation scheme heated towel rail done with your own hands in accordance with the design of a specific model and the location of the riser in the bathroom.
Lateral and diagonal connection
For most devices, the optimal option is a connection with coolant supply through the top outlet and outlet from the bottom. This is achieved with universal connections, the diagrams of which are given below.

Advantages of a universal insert:
- performance does not depend on the direction and speed of water supply in the riser;
- after turning off the circulation, bleeding of air is not required;
The universal insert option allows you to place heated towel rail at any distance convenient for installation from the riser.
Conditions for the operation of the scheme:
- The lower insertion point is located below the connection pipe to the radiator, and the upper insertion, accordingly, is above the upper outlet. The slope of the supply pipes is 2-3 cm per meter. A horizontal connection is permissible for pipes with a cross-section of 32 mm, and also if the distance to the riser is less than 2 m.
- Supply pipes - without bends or humps. Otherwise the system becomes airy and natural circulation stops.
- Optimal diameter of supply pipes: ¾ inch steel, 25 mm – reinforced polypropylene.
- It is advisable to insulate the pipes. This requirement is especially relevant for hidden installation of a plastic pipeline.
A completely workable side/diagonal insertion scheme with a narrowed bypass. Plumbers resort to this design on a previously installed heated towel rail, if there is no need to completely change constructive boner

Shifting the bypass is justified if you want to preserve the old connections to the riser. With this connection method, it is not recommended to use a narrowed jumper. The main requirement is the top supply of coolant.

Some dryer models are designed for bottom connection. The insertion is carried out according to three main schemes.

Requirements for implementing the bottom connection:
- The lower outlet must be located below heated towel rail.
- It is advisable to insulate the supply pipes.
- The upper outlet of the riser when using an offset or narrowed bypass is located below the point of connection to the device.
The optimal slope is about 2 cm per meter of pipe. Fulfillment of this condition ensures that the circuit is independent of the direction of water flow.
Possible forced insertion options
When connecting laterally, some deviations from typical recommended circuits are allowed.

The basic conditions of the tie-in remain unchanged. Difference in connection points heated towel rail with a riser, as well as the presence of vertical sections at the inlet and outlet of the device.
An alternative sidebar option is shown below. Top heated towel rail located above the top outlet. After turning off the water, you will need to bleed the air from the coil.

Some modified there may be a lower inset. The need to place pipes from the riser at a minimum distance to the floor forces us to increase both ascending connections. If all requirements for the lower connection are met, the system operates without failure.

Incorrect connection diagrams
Inexperienced craftsmen sometimes do not adhere to the recommended schemes. As a result, the dryer remains cold with an uninterrupted supply of hot water. Examples of possible omissions are displayed below.

In both options, the device is located below the lower outlet from the riser. The coolant that sinks down cools and becomes trapped.The water is not pushed back, since there is pressure from the coolant flow from above.
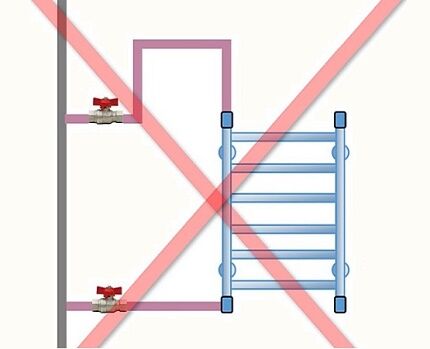
Air accumulates in the resulting “hump.” Over time, the air lock blocks circulation in the radiator and heated towel rail cools down.
The option presented below combines two errors at the same time. The scheme is obviously not working.

Step-by-step installation of water heated towel rail
Water installation technology heated towel rail with your own hands is the same for different connection schemes. The step-by-step progress of work includes dismantling the worn-out device, supplying pipes from the riser, installing taps and fastening the coil.
Preparation of tools and materials
Set of tools required for installation and replacement heated towel rail, depends on the type of water pipes in the room. For installation through polypropylene pipes you will need: ball valves; mounting brackets; polypropylene pipes; soldering iron and knife for cutting PP pipes.
Standard equipment heated towel rail includes:
- transition corners;
- silicone gaskets;
- locking units;
- telescopic brackets;
- tap "Mayevsky».
It is advisable to use components from the same metal in the system to avoid electrolytic corrosion.

Dismantling of old equipment
Before dismantling the outdated coil, it is necessary to coordinate the actions with house manager organization. Disconnecting the riser from the water requires special permission.
Following actions:
- If the towel dryer is not integral with the hot main, then the threaded connections must simply be unscrewed.
- If the device is welded to the riser, then it should be cut off with a grinder. The remaining portion of the pipe connection should be sufficient for threading.
- Remove the used device from the brackets.
The height of the cutout in the riser must exceed the distance between the pipes of the new device by the length of the couplings and bends required for inserting the bypass jumper

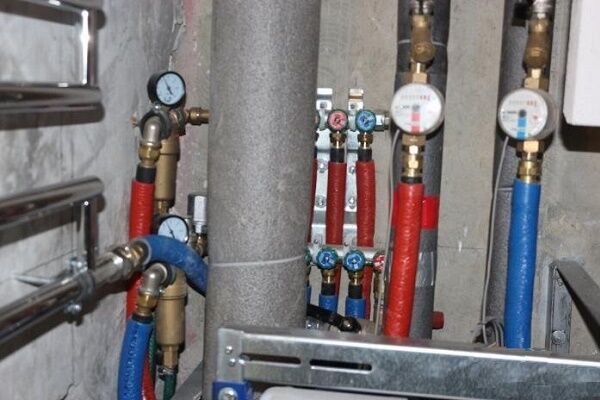
Installation of bypass and ball valves
The coil can be mounted without installing a bypass, but experts recommend providing a jumper in advance. At the ends heated towel rail ball valves are installed. If necessary, the coolant supply to the device can be shut off, while water will circulate freely through the riser.

To install valves on pipe sections, cut a new thread using a die of the required diameter. If after dismantling the old device the thread has survived, then it is enough to “drive” it with a die to improve the connection. Install shut-off valves on the prepared pipes.

Coil fastening heated towel rail
The procedure for “hanging” and connecting the device is as follows:
- Apply markings on the wall for the brackets - it is necessary to ensure that the placement of the coil is horizontal.
- Prepare the holes and insert dowels into them.
- Screw the brackets to heated towel rail, place the device against the wall and secure it with screws. It is important to maintain the recommended distance between the radiator and wall facing.
- Connect the unit to the valves on the jumper using fittings, seal the connections with linen winding.
Depending on the type of connection, straight or angular threaded connections are used fitting.

Features of installation of electric models
Unlike water models, electric dryers can be installed anywhere, since they do not depend on the location of heating pipes and hot water supply. In this case, special attention should be paid to the quality of the electrical wiring.
Requirements to installation of electrical heated towel rails:
- The installation location is selected taking into account the level of protection of the device from moisture. The distance to the bathroom or washbasin is at least 60 cm.
- The minimum distance to the floor is 20 cm, to the wall – 30 cm, to the surface of furniture – 75 cm.
- The heating device must not be placed directly under the outlet.
Connection to the electrical network is carried out in accordance with the international standard NFC-15-100.

Electrical wiring under heated towel rail carried out in compliance with electrical safety standards in rooms with high humidity:
- connection via a three-wire cable with grounding;
- Only hidden electrical wiring is allowed;
- the socket must have a rubber seal and a cover covering the contact holes;
- Copper wires of the following grades are used for the electrical network: VVGng and VVGng-LS.
A prerequisite for the installation and operation of electrical appliances is the use RCD, which turns off the device when the current operating characteristics are exceeded.

Conclusions and useful video on the topic
Recommendations for choosing a towel dryer are given in the video:
Water installation process heated towel rail shown in the video clip:
Installation technology heated towel rail depends on the selected model. The performance of a water device is determined by a well-designed and executed installation diagram.
When installing an electric model, special attention is paid to operational safety. It is better to entrust the installation of a combined “coil” to professionals.
Do you have personal experience installing a heated towel rail? Want to share useful tips or ask questions on a topic? Please leave comments - the feedback form is located below.


Please accept the correction. An RCD (residual current device) breaks the circuit not when the current operating characteristics are exceeded, but when there is a current leak (usually more than 30 mA). Those. if a small part of the current leaves the circuit (breakdown or wetness), the RCD will turn off the supply.A device that disconnects the circuit when the operating characteristics are exceeded is called an automatic circuit breaker.
In the event of leaks, the circuit breaker does not operate; it operates only when its operating characteristic is exceeded, which is quite large and expressed in amperes (triggered in the event of a short circuit, excess load current). A high-quality RCD operates instantly; when the load is exceeded, the machine is triggered depending on its class (from several seconds to several minutes; in case of a short circuit, instantly). A device that combines an RCD and an automatic device is called a difavtomat.
We ourselves chose the place for the heated towel rail in the bath. There is no wealth of options in a standard bathroom measuring 2m x 1.5m, so we could only determine the shape of the dryer in width and its installation in height. It seems that all the previously noted nuances have been taken into account, but still sometimes I touch him with my shoulder and get burned. The temperature of hot water in the pipes in our five-story building is always higher than permissible, 85-89 degrees, although this is prohibited.
Hello. Please tell me why a water radiator with an electric radiator does not heat up from the heating? The radiator was removed and put back several times due to repairs. Now there is water in it, but it is cold. While the autonomy boiler is running. What mistake did the amateurs make? Water radiator, GORDIVARI, white with electricity.
I bought a brand new heated towel rail: excellent quality at a low price. But I didn’t dare install it myself: there were too many subtleties when connecting to a metal-plastic pipe. I called the plumbers, they know how to do all this correctly, and I myself would not have been able to shut off the water supply to the riser in the entrance.
I have a question about installing a water heated towel rail. It so happened that the renovation is almost complete, but the heated towel rail has not yet been installed. True, plumbers worked before the start. We made bends in the cabinet with taps. Now the question itself. Is it possible to connect a heated towel rail to these terminals on a polypropylene pipe?
Some say it is possible, some say no way. I don't really want to flood my neighbors! And is it possible to install metal connections in a plumbing closet now? Attaching photo.
And one more question. Should the distances between the inlets and outlets on the pipe on the heated towel rail be the same?
Good afternoon I came up with the idea of installing a water heated towel rail in the kitchen. We have an apartment building (7 floors). Is it possible to install a water heated towel rail in the kitchen? If you need permission, tell me where to go. I couldn't find any information on this issue. Thank you!
Hello. In general, even replacing an old heated towel rail with a new one in the bathroom of an apartment building must be approved by the relevant organizations. Permission, of course, is necessary; not only that, you will also have to legitimize the reconstruction of engineering systems. You need to contact the management company, the HOA, in general, the organization that manages your home. Moreover, it is not worth doing such work yourself without involving specialists.
Now, regarding your question: do you want to move the heated towel rail from the bathroom to the kitchen or install a new one? In any case, you need to agree on the project with the management company that services your home. If a transfer is needed, then plugs will be needed in place of the old location of the PS. Insertion into a new place in the kitchen will be needed in any case.I advise you to do everything officially and with the involvement of specialists, so as not to disrupt the normal functioning of the heating system at home.
But it will be much easier to install an electric substation in the kitchen: you don’t need any permits, involve specialists in the installation, you can do everything yourself.
Good afternoon, I recently encountered a problem; I needed to replace my heated towel rail. My husband and I watched a lot of videos and just read how to do it ourselves. We thought it was very simple... But that was not the case... The horror began from the moment we decided to do it with our own hands... My husband and I suffered for a day. I won’t write all the horror. I can say one thing, if you need to replace a heated towel rail or install a new one, it is better to contact specialists. Friends recommended the Unified Service Center 007, if you are from St. Petersburg, I advise you too. They arrived and did everything quickly. This was our first and last attempt to do something with our own hands.