How to properly hang wallpaper in the corners: step-by-step instructions, features of the work
At first glance, there is nothing special about gluing trellises to walls.In theory, the process can be mastered by any careful person. In fact, pasting often causes difficulties even for those who have glued them more than once or twice.
Problems arise at the stage when you need to put wallpaper in the corners. In this case, patience and accuracy alone are not enough. You need to know exactly how to glue the panel in the corner area.
The content of the article:
Difficulties and features
There are no trifles in gluing - you need to take into account the quality of the canvas, its weight, width and the ability of the material to stretch on a not entirely flat wall surface. But it is the walls that cause the most problems.
Pasting wallpaper in corners is no more difficult than on walls, but you need to take into account:
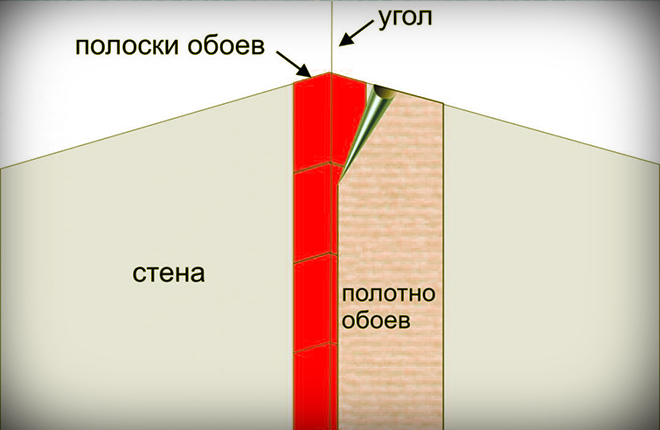
- Quality of walls. You may need to install a perforated plastic (or aluminum) profile on the outer corner to form an ideal line between the 2 walls.
- The number of strips of wallpaper and the actual width of the wall from corner to corner. It is necessary to calculate the number of rolls so that the edge of the last panel does not lie directly in (on) the corner. At a minimum, the canvas should either go to the second wall, or there should be at least 20 cm from the edge to the mating line. In such a situation, it will not be possible to glue the edges end-to-end, and a small overlap will look ugly.
- How to adjust a pattern on a corner.It's easier to hang wallpaper if there are no ornate patterns. Otherwise, you will need to select a pair of panels for each corner according to the pattern.
Generally put up wallpaper It’s not difficult if you select pairs for gluing on the corners in advance, choose the right starting point and direction for laying new strips.
Usually, the panels begin to be glued from the window towards the entrance doors. It is believed that in this case the edge overlap will be invisible due to the fact that the light flow will be directed in the direction of the sticker line. In fact, it is not only daylight that needs to be taken into account, but also interior lighting. At a minimum, the most powerful source is a chandelier or wall lighting.
In addition, you need to take into account the direction of lighting at the corners, and the edge of which of the 2 panels should be glued on the outer corner from above. This determines whether the end of the wallpaper will be visible or not.
If you plan to glue trellises to the ceiling, then markings in the form of parallel lines should be applied to the prepared surface with a pencil. Without guidelines, it will be difficult to hang wallpaper so that it is parallel to the window opening.
But the worst thing is that unevenly laid ceiling trellises will fit differently onto the corner line between the wall and the ceiling. Therefore, you will have to apply wallpaper from the ceiling to the wall, and cover the defect by further gluing with decorative edging or install ceiling plinths.
Features of working with drawings
If the walls are lined with plasterboard slabs or any other facing material with a perfectly flat surface, then strips of wallpaper can be glued directly with an overlap along the corner line or with a slight overlap onto the next wall. It will be enough to glue with an overlap of up to 20 mm.
But this situation does not happen often.Usually the walls are poorly leveled with plaster, so the corner line is uneven. You don’t have to select the pattern on the first corner from the window opening, but stick a whole panel on it. The width from the window slope to the first corner is usually no more than 30-35 cm. Therefore, you can glue the full canvas if the stock of wallpaper allows.
The part of the wall near the window is usually considered blind. Due to the fact that daylight through the window blinds the eyes, plus a cornice with curtains is always placed above the window opening. Therefore, the selection of the pattern in this corner is transferred to the final stage, when all the most important corner areas have been glued.
Often, when selecting a design, one of the panels has to be cut lengthwise, and from these scraps you can glue one blind corner (usually the right one, if you look at the window).
Combination Features
The wallpapering process is moving quickly. As soon as the corner zone approaches, you need to combine, otherwise it will be difficult to combine the pattern.
Stop work approximately 20-25 cm from the corner. The next piece of wallpaper to be hung (then another) will have to be selected so that it matches the pattern with those previously glued to the wall.
A new piece of wallpaper (transitional) can be measured and then cut in length so that it is smaller in width, and the edge of the panel “goes” through the corner line onto the adjacent wall by no more than 5 cm. Glue the next piece of wallpaper directly from the corner. This is the most common pattern for gluing wallpaper both in internal and external corners. It makes it possible to simply select a pattern on adjacent panels.

The second method of gluing assumes that the transitional piece of wallpaper is not cut in length, but is glued in full width. In this case, an edge up to 20 cm wide may extend onto the adjacent wall.The edge turns out to be uneven, so the next strip of wallpaper has to be selected according to the pattern, trimmed and glued end-to-end. This method is used mainly on internal corners with curved walls.
Specific way to wallpaper is selected according to the blind surface rule. The piece of cloth that is most darkened is cut. It is recommended to glue the front, well-lit part of the walls in whole stripes with careful selection of the pattern.
Preparing the surface
The better the quality of the wall surface, the easier it is to hang wallpaper. The same goes for the ceiling. It is best to glue the wallpaper to the ceiling part, wrap and glue the edges of the panels that are placed through the corner line on the wall. Only after this will it become clear at what height the walls can be started to be glued.
On the ceiling, the transition in the corner is made by a maximum of 3-4 cm, if it is in good condition. If the house is old, then perhaps it is better to avoid wallpapering in the corners, covering the line with a wide edging.
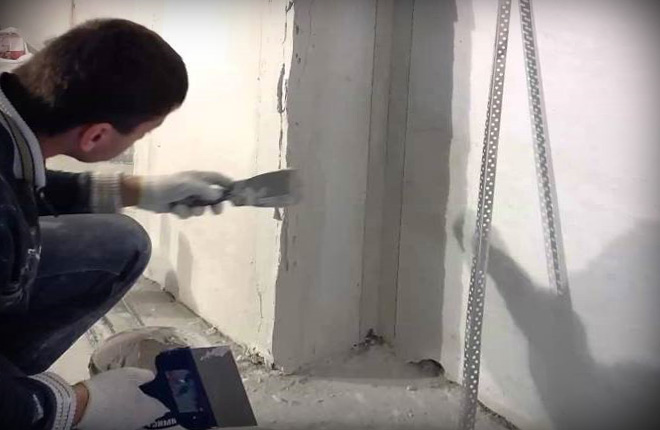
Refinement of external corner surfaces and slopes
Preparation begins with removing the old coating and puttying any chips or damage to the plaster on the wall. Cracks can be lightly tapped to make sure that the plaster is firmly in place. If there are no peelings of the plaster layer, then the defects are rubbed with liquid finishing putty.
Large chips are first covered with finishing putty. It is necessary to lay a small layer just to strengthen the wall material. Most of the chipping is filled with starting putty. In this case, you need to level the repaired surface with a spatula so that it is in the same plane with the wall. After the putty has dried, rub off the residue with a hand float and sandpaper.
Often the condition of the outer corner is poor, there are many chips, and some of the plaster may even be lost. Pasting wallpaper on it means that after a while holes will appear in the panel. Therefore, a repair profile-overlay is glued onto the putty over the corner. This is a soft profile made of perforated aluminum or polystyrene tape.
After 10-13 hours, the surfaces of the walls adjacent to the repaired line are puttied, leveled, and a day later rubbed with a hand float or a painting mesh-emery. The result is a relatively flat and smooth surface that absorbs glue well.
Preparing interior corners
First you need to clean the adjacent surfaces of the corner from glue residues and old wallpaper. In half the cases, especially in old apartments, the line of the inner corner is uneven.
The middle may be flat, but the sections adjacent to the ceiling and floor always have an arc. This is a specific defect in plastering work with a pure cement-sand mixture.
Level the surface of the walls in the corner
If everything is too crooked and uneven, then a small layer of plaster at the bottom of the walls can be removed using a grater board on which coarse-grain sandpaper is glued. You need to rub in several passes, gradually leveling the corner line. For control, you can use a plumb line and a plaster rule 1.2-1.5 m long.
You cannot level the walls with any other tool. A spatula or even a wooden scraper leaves deep marks and removes material unevenly. If you paste wallpaper, “humps” and “waves” on the surface of the walls will immediately become visible.
After leveling, the wall should be plastered with a finishing gypsum mixture.After a day, you can once again go through the vertical line of the corner using a rectangular wooden block onto which a plaster sanding mesh is glued. Any wallpaper can be glued to such a surface, even non-woven wallpaper. Due to the high porosity of the putty, the adhesive layer will hold better than on the rest of the wall plane.

If it is not possible to apply gypsum putty to the wall in the corner, then you can stick strips of newsprint using the old method.
Pasting the outer corner
In most cases, one of the walls adjacent to the corner is better lit and is in plain sight. The second one always remains in the shadows or is located so that less attention is paid to it. In this case, the process of gluing the panel begins with the “front” wall, goes around the corner and lays the edge of the wallpaper on the adjacent surface.
In rare cases, the walls on the outer corner can be almost equal, for example, when moving from the hallway to the corridor of the apartment. In this case, you need to hang wallpaper starting from a more “status” room.
How to wallpaper an outside corner with one uneven wall
This is the most common situation. The gluing process begins with measuring the areas on which the canvas will lie. It happens that the corner line was aligned, but the plane of one of the walls still differs from the vertical one. Therefore, the outer corner, despite the fact that visually it looks straight and strictly vertical, is actually inclined at 5-7O to the vertical.
If you simply paste wallpaper from one wall to another, then one edge of the canvas (starting) will be aligned with the line of the previously pasted piece of wallpaper and will look even. After pasting on the wall, the opposite edge of the wallpaper will be inclined.
How to properly wallpaper a protruding corner:
- Using a tape measure, measure the distance from the edge of the previously glued piece of wallpaper at 3 points - the top, middle and bottom parts to the next line for laying the trellis. Based on the results, we select the average value. This will be the width of the blank for gluing.
- Cut out a piece of wallpaper of the required width and height.
- To remove dust, wipe the walls with a slightly damp sponge.
- Apply glue with a roller to the wall and to the back of the piece. Before gluing, take a short pause so that the adhesive mass is absorbed.
- We take the panel to the wall, apply the edge to the edge of the previously glued piece and lightly press it to the surface along its entire height. We level the edge at the top and then you need to glue the canvas to the wall towards the corner and beyond.
Even if you wallpaper the protruding corner as carefully as possible, level it and smooth it, the opposite edge of the newly pasted piece will still be slightly tilted.
To correct the situation, you need to find the middle at the edge, approximately half its height. Next, using a long ruler and level, draw a vertical line through the point (preferably with a simple pencil).
Along this line you will need to glue the next strip of wallpaper. Some of it will overlap, some will have to go under the edge of the corner panel. After gluing, you need to use a meter-long plumber's ruler (steel) and a wallpaper knife to make a cut along the marking line from the ceiling to the floor. Then straighten and smooth the edges.
As a result, we were able to wallpaper the problematic outer corner and at the same time eliminate the resulting slope.
Pasting the inner corner
The angular internal line, even after careful preparation of the walls for wallpapering, turns out to be either sharp or wide.That is, in the first case, the corner looks as if it was cut with a knife, in the second, they additionally passed along the mating line with a thin brush.
How to wallpaper on an internal sharp corner
The gluing process is simpler than in the case of an external corner. A sharp line is usually obtained after covering the walls with plasterboard or major repairs with modern plaster materials using corner profiles. Therefore, the line turns out smooth.
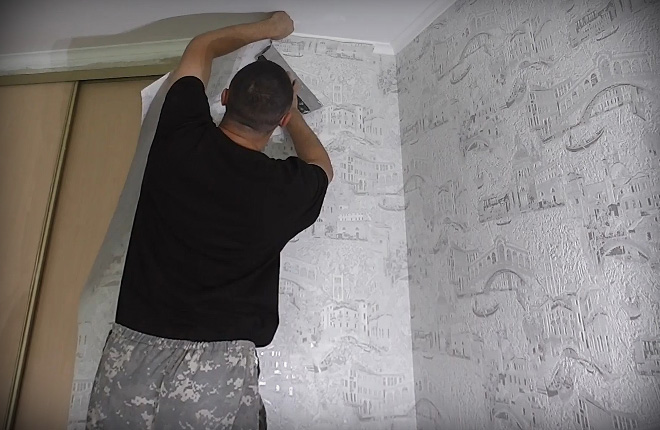
First you need to apply a layer of glue to the wall. For the corner zone this must be done; the rest of the area does not need to be primed. Modern wallpaper glue penetrates perfectly even into concrete.
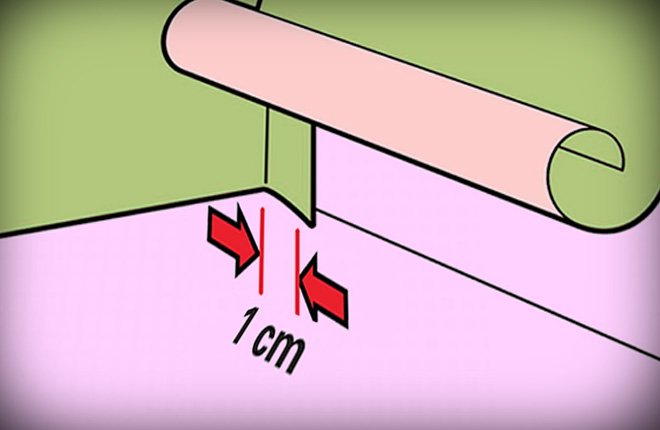
Next, we coat the panel and lay it on the wall so that the front edge passes through the corner line to the adjacent surface by at least 10-15 mm. You can do more, but everything that has moved onto the adjacent wall will still be cut off, so it’s better to do it earlier. You need to go over the glued material with the back of a plastic iron to settle it deeper.
If you need to glue relatively thin and soft paper wallpaper, then simply cut off a new panel, coat it with glue and lay it on the wall so that the right edge fits tightly and lies on the line. All that remains is to smooth the canvas and squeeze out the remaining glue. This gluing technique is established by the old instructions and SNiP.
But for modern multilayer wallpaper with non-woven or vinyl backing this method is not used. If you glue it with an overlap, then due to the large thickness of the material, the seams will be clearly visible and the overlap will stick out under the joint line.
Therefore, for non-woven dense trellises, the gluing order is different:
- We glue the canvas with a transition through the corner, the fold size is 10-15 mm.
- Using a plastic spatula and knife, cut off the turn, leaving no more than 2 mm.
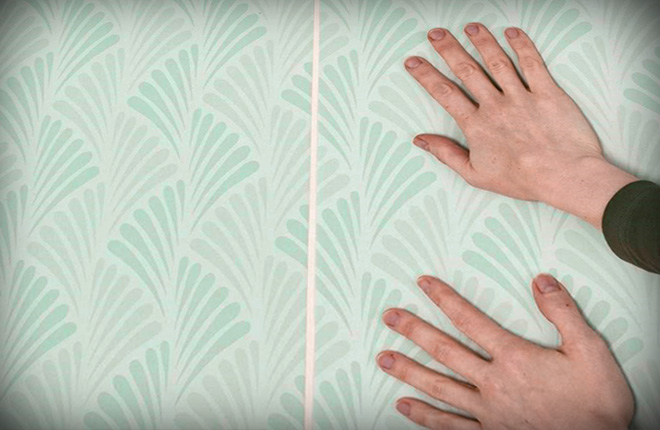
- On the adjacent wall we glue the canvas so that the left edge of the wallpaper fits tightly into the corner. It also needs to be trimmed, but with a metal spatula.
As a result, the joining line coincides with the corner. No seams or joints will be visible visually. Before gluing, it is advisable to blow off dust from the interface between the 2 walls and coat it well with glue using a thin brush. After 5-10 minutes. Remove excess glue with a sponge. After drying, the glue will attract the trellis material, and the corner line will remain sharp.
Wallpapering with a wide corner line
The presence of a fillet along the line where two surfaces meet indicates that the walls in the room were plastered using old methods, or that the building has problems with cracks and settlement.
The wall surface on which you plan to glue the trellises can be quite smooth and flat. That is, the presence of old plaster does not necessarily mean that the base is crooked. But the joint along the entire length of the inner corner could have been repaired several times. Therefore, the line in problem areas will always be wide.
The gluing technology is approximately the same as with a sharp joint line. The only difference is that after laying the second canvas on the adjacent wall, you need to slightly pull the canvas towards the corner line. After the glue has dried, the wallpaper material will adhere tightly to the surface of the fillet.
It’s not difficult to hang wallpaper in the corners with your own hands, you just need to choose the right pattern and prepare the base, putty the cracks and potholes, if necessary, prime the walls. You can even practice on a small piece of old wallpaper to make sure the method you choose is correct.
Tell us about your experience in wallpapering - what is the fastest and easiest way to hang wallpaper, in your opinion? Save the article to your bookmarks so that it is at hand if you need to re-read it again.


It turns out beautifully, but the selection of the design is just a disaster. How to choose it correctly so as not to cut the entire roll, wallpaper is expensive.
Glue with paper wallpaper as always with overlap at the corners. SNiP was not invented by fools. The requirement for overlap appeared due to the fact that during shrinkage the material stretched a little, exposing the joint. If there is overlap, this will not be guaranteed. Non-woven fabric and vinyl can be glued to walls in the kitchen, or maximum in the bathroom. The rest is paper, unless of course you care about health.