Insert or pour-in bath - which is better? Comparison of technological and technical characteristics
The issue of installing a new bathtub would not be difficult if it did not entail many problems.After all, this is not only spending on a new product and its delivery, but also dismantling the old plumbing product and installing a new one.
Therefore, for some users, restoring an old bathtub is the most affordable solution. All that remains is to decide whether a liner or a pour-in bath will be used for updating. Let's figure it out together.
The content of the article:
All about restoration using the “fill bath” method
A self-leveling acrylic bathtub is considered the most convenient way to quickly and without destruction to update an old bathtub.
But even this modern technology has its drawbacks. What are the pros and cons of the method, we will consider further.

Arguments in favor of acrylic
Acrylic is a relatively new material, which first began to be used in the 90s of the last century thanks to Finnish manufacturers. Its use makes it possible to create a perfectly flat surface, very smooth, without pores or streaks.
The positive properties that distinguish acrylic from other materials for restoration (for example, from epoxy enamel) are the following:
- it is durable, retains performance characteristics for up to 15 years;
- provided that the work is carried out correctly, the paint covers the surface well, filling all the cracks and roughness, creating an absolutely even layer;
- Even a non-professional can apply liquid acrylic, however, in order to avoid annoying mistakes, you need to know some nuances;
- compared with enamel, which dries up to 7 days, drying acrylic lasts about 3 days;
- The pouring bath method can be used for products made of cast iron, steel, plastic, of any size and configuration.
Self-leveling acrylic has good adhesion. This property is especially important if the house has a good-quality bathtub made of quality material, but which has lost its appearance.

Disadvantages of a self-fill bath
When covering a bathtub with acrylic, some inconveniences may arise. For example, when sanding a bathtub, the house is filled with smoke and dust, and the solvent that some craftsmen use when sanding has a strong odor. Therefore, during the work, it is better to send children and family members prone to allergic reactions to friends or relatives.
When carrying out restoration, you need to be very careful.Although acrylic is easier to work with than enamel, even experienced craftsmen sometimes have troubles: the tiles adjacent to the side can get dirty, and the surface of the bathtub can turn out uneven.
Another problem that can arise when treating a bathtub with acrylic is poor-quality surface treatment before applying it. As a result, a poor connection between two homogeneous or dissimilar materials occurs, and the coating begins to swell, turn yellow, and form cracks and pockets.
Water gets under the damaged layers, and this worsens the sanitary condition of the bathroom, because development occurs in such hard-to-reach places. bacteria and fungus.

Carrying out restoration with liquid acrylic
Even a non-professional can renew a bathtub using liquid acrylic. But, as with any other job, you can’t do without your secrets and nuances that will help you avoid annoying mistakes.
Stage No. 1 - preparatory work
To protect yourself as much as possible from the spread of dust and strong odors, ventilation should be provided.
To carry out the work you will need tools, so it is better to prepare in advance:
- components for preparing liquid acrylic;
- waterproof sandpaper No. 1;
- screwdriver, pliers, pliers;
- drill or grinder, hair dryer;
- gloves and respirator;
- spatula, putty.
Liquid acrylic itself has virtually no odor, but products used to clean and degrease the surface can release aggressive volatile substances. Therefore, it is better to protect yourself and use a respirator when working.
Preparation for applying acrylic also involves thorough cleaning of the room.All objects are removed from the bathroom, surfaces from which anything could spill into the bath are washed. To protect chrome taps and shower heads from exposure to harmful fumes, they are removed and taken out of the room. The washing machine is carefully wrapped in cellophane.
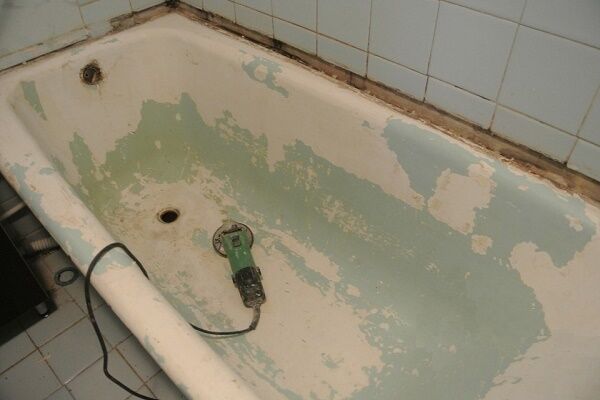
Stage No. 2 - cleaning the bathtub and removing the gloss
Before applying a new coating, it is necessary to prepare the surface. It is cleaned with "Pemoluxa" or other active cleaning agent. You can use oxalic acid if you have a respirator. Prepare a paste from the product, rub it on the walls and leave for 15 minutes, then rinse off and fill the bath with water. They release her after 20 minutes.
Notches are applied to the top layer of the cast iron bath using a grinder and special silicon carbide discs. You can also use an electric drill with a cord brush. The walls of an acrylic bathtub are cleaned to a smooth and uniform matte finish. If the bathtub is tin, then remove any hint of rust, being careful not to rub the material through.
For abrasive processing it is necessary to use sandpaper No. 1. Coarse material can create microcracks that are difficult for paint to penetrate and become areas for peeling.
Treatment with an abrasive material is carried out to improve adhesion and tight fit of acrylic to the surface. Areas with deep cracks and chips are puttied before painting.

You can check the quality of surface preparation using a flashlight - there should be no glare from the old glossy coating.
By highlighting it, they check everything centimeter by centimeter. You can run your fingernail along the surface - it should not slide, but stretch.

Stage No. 3 - degreasing the surface
It is necessary to collect dust from the bathtub with a vacuum cleaner and thoroughly degrease it with acid-based products, such as "Sanox" And "Adrilana". They are applied using a new brush or household sponge, being careful not to miss a single area. Ammonia is used around the drain and overflow.
The degreasing process is very important for successful work, because any remaining fat will cause poor adhesion to the surface. Over time, it is in these places that the acrylic layer will begin to peel off.

The bathtub, covered with an acidic substance, should stand for about an hour and a half, then it is filled with water. After this, the surface of the bath should become very hot. If this does not happen, add another half bottle of the substance to the water.
When the water in the bathroom has cooled, it is drained. In order not to wet your hands in an aggressive solution, the cork is pulled out using a chain or tied fishing line.
There are also special products for degreasing the surface, which are produced by manufacturers of liquid acrylic. Their use is simpler and does not require much time and effort.
You can check the quality of degreasing using a stream of water, which should flow in an even layer and not collect in drops.Cleanliness can be checked using a rag with a solvent - if after carefully wiping the surface, it remains clean, then the cleaning was successful.
Now you need to remove the drain and overflow and treat the areas that were hidden under them. If it is not possible to remove them, then wrap the overflow with masking tape - it will prevent paint from getting inside. A plastic cup is glued to the drain grate using plumbing sealant.

Stage No. 4 - preparing components for application
Choice self-leveling acrylic It is advisable to follow the principle: the more expensive, the better. The updated bathtub should be used for at least another 15 years, so you shouldn’t skimp – low-quality material can undo all the efforts spent. Among the most famous brands are "EcoBath", "YarLi", and the most popular Stacril and Plastall.
To protect the painted bath from drops of water that may collect as condensation, the faucet is wrapped in a plastic bag. The tiles on the floor are protected from paint by spreading cellophane or newspapers around the perimeter of the bathtub.
The wall near the sides is covered with masking tape. To make it comfortable to work with liquid acrylic, it is necessary that the temperature in the room be 24-26 °C. Before this, the materials are brought into the room and kept for at least 24 hours so that their temperature becomes equal to the ambient temperature.
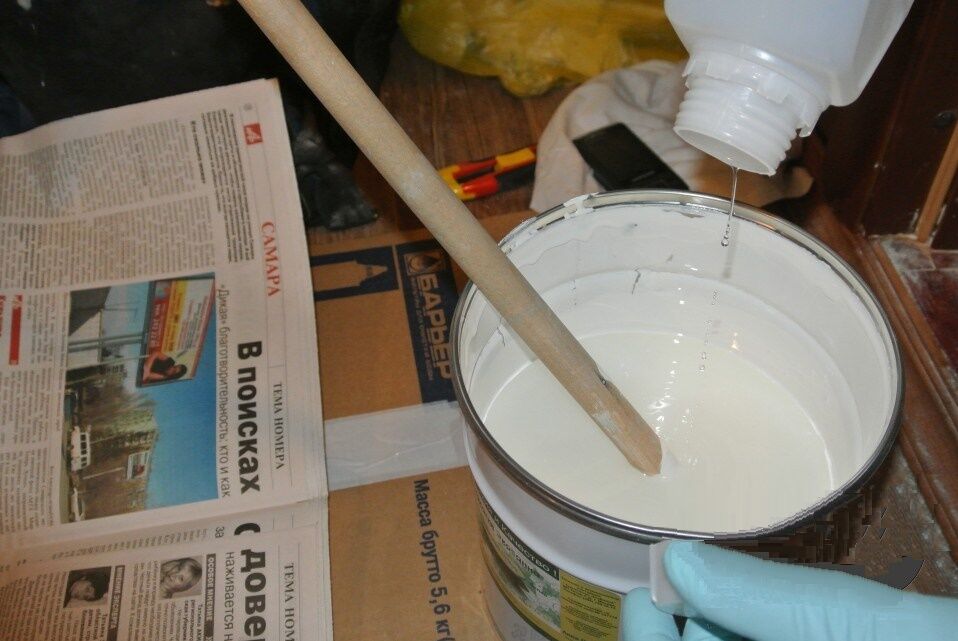
The working mixture is prepared as follows: the hardener is poured into the bucket with the base and mixed with a wooden spatula for about 10-12 minutes.In this case, using a drill with mixer-type attachments is ineffective. The walls and bottom of the container need to be given special attention.
Before mixing the base, remove it from the walls with a spatula and allow it to drain down. It is necessary to strictly adhere to the proportions established by the manufacturer.
To ensure that the paint mixes well, it can be brought to room temperature in a water bath, but not overheated, as excessively warm acrylic can become runny. This will result in too thin a layer of paint, resulting in yellowing and peeling areas of the coating. Cover the finished mixture with a lid and allow it to sit for about 15 minutes to activate the properties of the hardener.

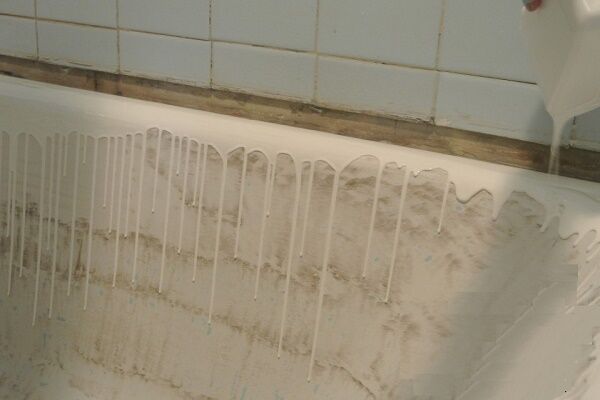
Stage No. 5 - applying acrylic to the bathtub
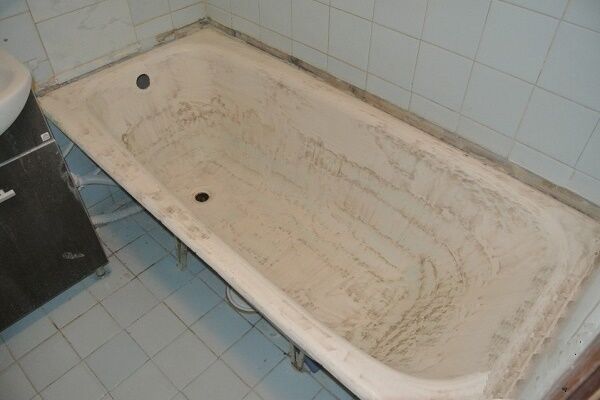
Before applying self-leveling acrylic, place a container with a volume of about half a liter under the bathtub drain - excess paint will drain into it. Stir the material again for five minutes. For application, use a clean half-liter plastic glass.
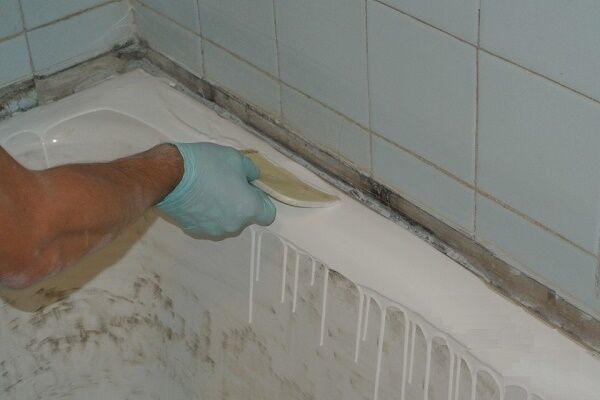
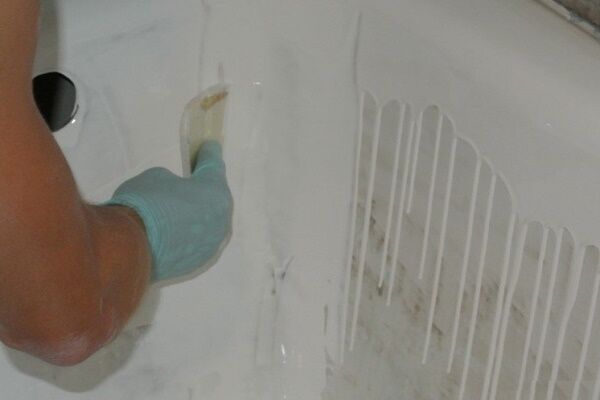
Apply the mixture to the sides of the bath, starting from the farthest corner. The paint, slowly flowing, covers the entire surface and collects at the bottom, where it forms a layer of up to 5 millimeters. To distribute the acrylic evenly, use a metal spatula. They are passed along the bottom in a zigzag motion.
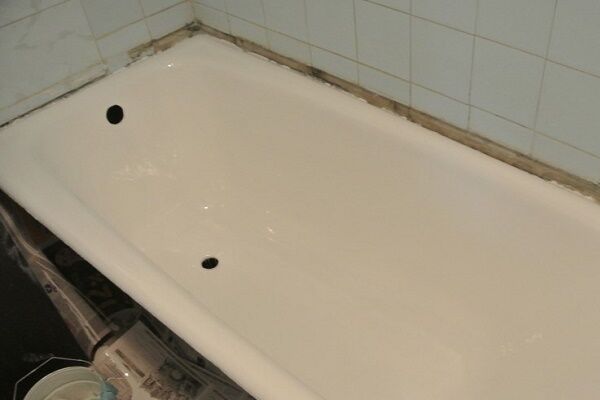
By the end of application, the composition levels itself. To evaluate the result, take a flashlight and check whether the entire surface is painted evenly. If voids are found, then use a spatula to pull up the paint from the bottom and lead it to the unfilled area. At the end of the work, remove any uncured drops of acrylic from the sides of the bath using a spatula.
After 48 hours, you can remove the film and install the siphon and overflow. Final drying will occur after another 48 hours. Then you can use the bath for its intended purpose.
You can read detailed instructions on using liquid acrylic for bathtub restoration Here.
Characteristics and installation of acrylic liner
The acrylic liner is a bathtub 4-6 mm thick, without legs or holes for drainage. It is placed on top of the old one and fixed using special mounting foam.
When installing the liner, the old bathtub serves as a support for it and therefore their configuration must be exactly the same. The slightest discrepancy will lead to problems during operation.

All the pros and cons of installation
The main advantages of this method are as follows:
- the service life of the updated product is about 15 years;
- there is no need to get rid of the old bathtub;
- the glossy surface of the liner does not retain dirt and bacteria;
- The acrylic layer is abrasion resistant.
But one of the main arguments in favor is the desire to preserve a solid cast-iron base, because such bathtubs are practically no longer produced or are produced, but they are not cheap.

If the old bathtub is installed with a side recessed into the wall, you will have to cut a groove in the wall or, if tiles are installed, remove the tiled border or adjacent row of tiles. Naturally, then you will have to restore the previous neat appearance of the room.
Performing this work makes restoring a bathtub using a liner less profitable than using the pour-in bathtub method, especially if you hire craftsmen rather than do everything yourself.
It often happens that craftsmen correct the discrepancy between the parameters of the liner and the bathtub using foam plastic, filling the voids with it. This leads to poor-quality sealing, resulting in peeling of the top layer and the formation of cracks.
The most significant disadvantages of an acrylic liner can be attributed to improper installation, but not to the material or product itself. The cause of problems can also be the use of low-quality sealant.
How to remove the old liner?
Through damage, water gets under the liner and begins to deteriorate.The smell from stagnant liquid intensifies more and more, and it becomes possible to combat this only through dismantling.
Work to remove the old liner takes place in the following sequence:
- Using an angle grinder (grinder), carefully, without touching the surface of the bathtub, cut the bottom of the liner.
- To simplify dismantling, cut the liner into small segments and remove the layers one by one.
- Clean the remaining foam from the walls and remove stagnant water.
After completely cleaning the bathtub from traces of installing the old liner, you can begin further work.

Preparation for product installation
Before purchasing a liner, it is necessary to take measurements of the old bathtub according to the following values: length (including sides and without), width (in two places), depth. The depth is measured five centimeters from the drain. To do this, place an even and flat object on the bathtub, and, lowering the end of the tape measure to the bottom, take measurements.

If the bathtub has a sloping bottom or narrowed sides, then it is better to ask the seller: it is possible that such configurations are not on sale. The most commonly produced models are 1.7 and 1.5 meters long.
Since the liner is installed on the free sides of the bathtub, you need to free them. To do this, use a hammer and chisel to chop off a row of tile edging. Next, remove the drain and overflow grates, as well as the old trim.
Preparing the old surface for installation of the liner is carried out in almost the same way as for the pouring bath method. It is degreased, the top glossy layer is removed, paying special attention to the transitions from the bottom to the walls.

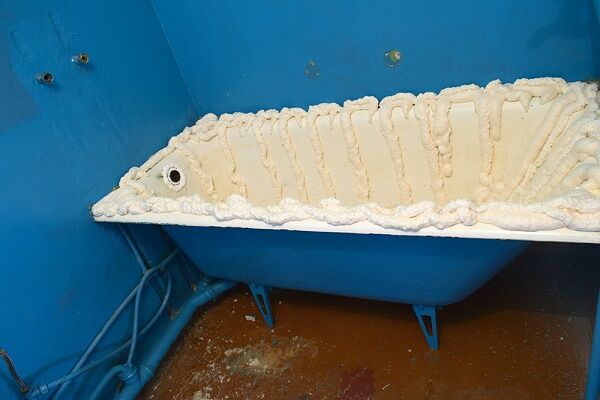
Restoration using the “bath-to-bath” method
A special two-component polyurethane foam is applied to the prepared surface of the old bathtub, which does not expand and does not deform the liner. It is very important to apply evenly over the entire surface.
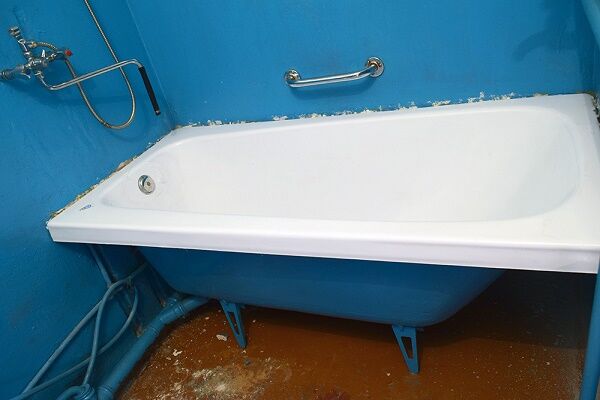
Silicone sealant is applied around the drain and overflow.It will prevent water from entering the space between the new and old bathtub. Next, install the liner, press it with your hands, and tap it with a rubber mallet. Particular attention is paid to the bottom and the transition to the sides.
Immediately after installing the liner, install the drain and overflow. This will help secure the liner and protect it from leaking, because the next step is to fill the bathtub with cold water. Water, due to its weight, helps create uniform pressure on the walls and bottom until the foam hardens.
The final stage can be considered the installation of borders made of plastic or tiles. Without this element, it is difficult to achieve tightness of the joints between the wall and the bathtub.
We also recommend that you read the step-by-step instructions for installation of acrylic liner, which is on our website.
7 criteria for comparing restoration methods
To evaluate different ways to update an old bathtub and make the right decision, you can use a set of criteria that will help you sort out the advantages and disadvantages of each method.
The table will help you visually compare the advantages and disadvantages of methods for restoring a bathtub by installing a liner and applying a filler.
| Filling bath | Acrylic liner | |
| Bath configuration | Any | Standard models only |
| Life time | 15 years | 15-20 years |
| Working hours | Up to 5 hours | Up to 3 hours |
| Drying time | 1 day | Up to 4 days |
| Removing tiles near the edges | No | Yes |
| Material cost | Relatively small | 50% more expensive than bulk |
Each restoration method has its pros and cons. You can make the right decision only based on a specific situation.
Conclusions and useful video on the topic
Detailed video about the restoration of a bathtub using the “fill-in bathtub” method:
Installation of the acrylic liner is described in detail in this video:
Whatever restoration method you choose - a pour-over bath or an acrylic liner - they have the same material, and therefore so does their care. Acrylic products are resistant to aggressive detergents and products containing abrasives. Even hard bristled sponges are not recommended.
No metal objects are placed in the bathtub, and animals are bathed only on a protective mat. You should also not use water that is too hot or cold. By following the recommendations, you can keep your acrylic bathtub in perfect condition for many years.
Have you already had to restore a bathtub yourself and can you give some practical advice to our readers? Please leave comments, share your experience, and ask questions about the topic of the article in the block below.


The first method of restoration with liquid acrylic, in my opinion, is the most time-consuming and labor-intensive at the stage of preparing the container. Plus the removal of old enamel, after which there is a lot of dust, debris, and degreasing. I think it's easier to install an acrylic liner, there are many more benefits. The main thing is that he is an experienced master, then the quality of the work will meet all expectations. This type of restoration may be more expensive, but I don’t regret at all that I chose this method. The bathtub is now like new!
It was useful to read; it’s good that the advantages and disadvantages of both methods are highlighted and the service life is indicated. Based on the results, I realized that I needed to choose an insert.
I have nowhere to take my family and, most importantly, my old father, out of the house during renovations. Smells and noise are the main disadvantages of this method for me. Another thing is the liner, I can install it myself, especially since the bathtub is standard. And it will last longer than acrylic.
I've encountered both methods. The preparation, smell and time are approximately the same - you can use it in about a day or a little more. 15 years, of course, is nonsense - any acrylic turns yellow and gets scratched after 4-6 years, depending on the care of the owners. The insert is a little more expensive - that's the whole difference.