Welding polyethylene pipes: comparison of methods + installation instructions
To assemble wiring from polyethylene (PE) pipes, certain skills are required in welding and connecting them using fittings.The equipment used for installing polypropylene pipelines is also suitable for this work.
Welding of polyethylene pipes is carried out with special machines and requires certain knowledge, which we will talk about in this article. We will consider in detail the features of preparing equipment for the welding process, and provide recommendations for making a high-quality weld. We will also consider various options welding polyethylene pipes.
The content of the article:
Preparing equipment for welding
Different equipment is used for each type of welding. There is no point in purchasing it for a one-time installation of communications using the butt and electric welding method, because the cost of the kit is several thousand dollars. It is better to use the services of third-party companies or rent equipment.
Welding equipment used
Equipment for socket soldering costs between 100-200 dollars, so the question of purchasing welding machine everyone decides for themselves.
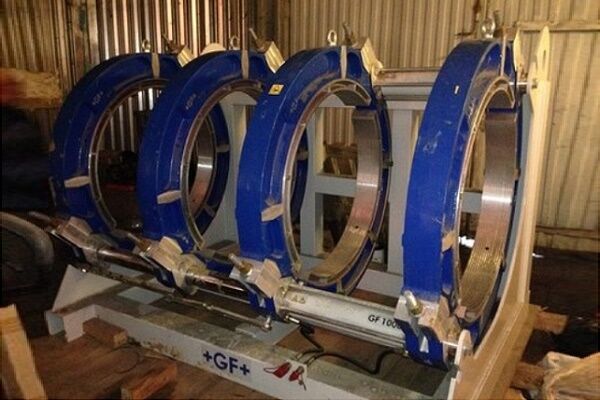
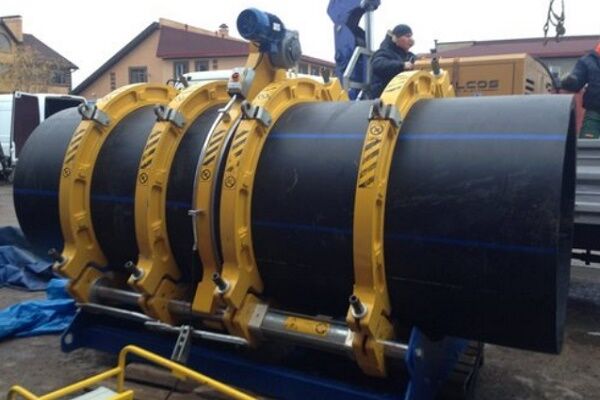
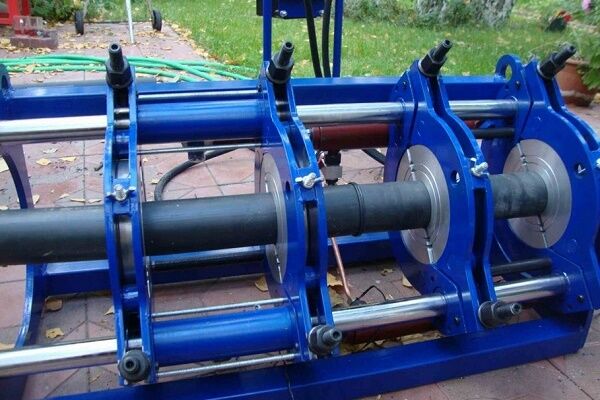
The standard set of devices for butt welding of polyethylene pipes includes:
- Centralizer. This is a frame with 4 metal pipe clamps, two of which are movable, and two are rigidly fixed to the base.
- Trimmer. It is a separate disk device for precise mechanical cutting of the ends of welded pipes. The device is attached to the guides of the welding machine.
- Heating mirror. It is a round plate coated with Teflon, onto which pipe joints are pressed to melt the PE. Has a built-in thermometer.
- Hydraulic or mechanical drive. A device for regulating the compression force of pipes during heating and subsequent connection.
- Reducing liners. This is a set of replaceable half rings for fixing pipes of various diameters.
- Control block. Included in equipment sets with automation of the welding process.
In fact, a set of equipment is an independent device that performs certain functions at various stages of the welding process. They can be either intended for purely manual welding or for connecting pipes in a fully automatic mode.
To install electrofusion joints, a suitable welding machine with a built-in barcode scanner is used. No additional devices are required for this process.

For socket welding it will be necessary to purchase the following kit:
- electric welding machine;
- pipe cutters;
- stand;
- calibrator and chamfer;
- nozzles for heating the elements being connected.
In addition to the specified equipment, for installing pipes you may also need general household tools: an adjustable wrench, a tape measure, a marker and others.
Preparation for the welding process
An important factor in high-quality welding of HDPE pipelines is their preliminary preparation. The necessary manipulations to form a good weld will be presented in the form of instructions.
Immediately before heating the parts to be soldered, you need to:
- Make sure that the material and markings of the parts being soldered are identical.
- Clean and degrease the joints of the products to be joined.
- Center the pipes and secure them tightly.
- Process the cuts with a trimmer until a continuous strip is formed, two pipe circumferences long.
After everything, you need to clean the edges of the parts to be joined from chips.

After carefully preparing polyethylene pipes and fittings for welding, you can be sure that a high-quality seam is half guaranteed.
Methods for welding PE pipes
Industrial low-density polyethylene (HDPE) is a thermoplastic material whose properties do not change during heating-cooling cycles. Therefore, it is ideal for installing domestic and industrial pipelines.
The connection of individual HDPE pipes and fittings to each other occurs using detachable threaded connections or the following welding methods:
- bell-shaped;
- electrofusion;
- butt.
Pipes with a wall thickness of up to 4.5 mm (diameter up to 50-110 mm) are soldered using the first two methods, and for thicker-walled pipes a fittingless butt welding method is used.

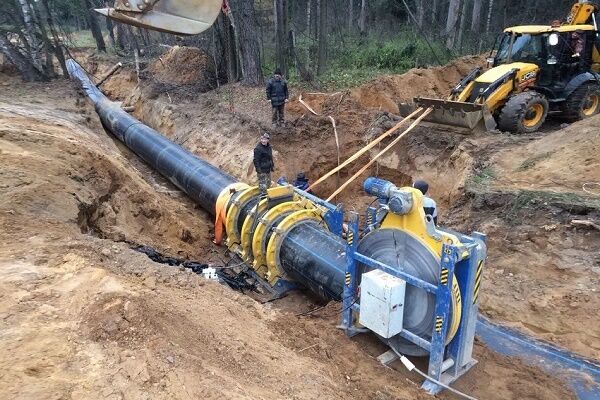
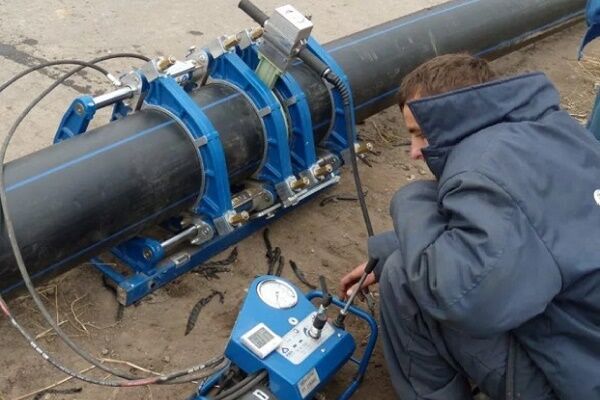
Option #1 - butt welding mode
During butt welding, it is important to control critical parameters: tool and plastic temperature, clamping force and operation duration. In the absence of sensors for these values, it is unlikely that it will be possible to consistently obtain a high-quality seam.
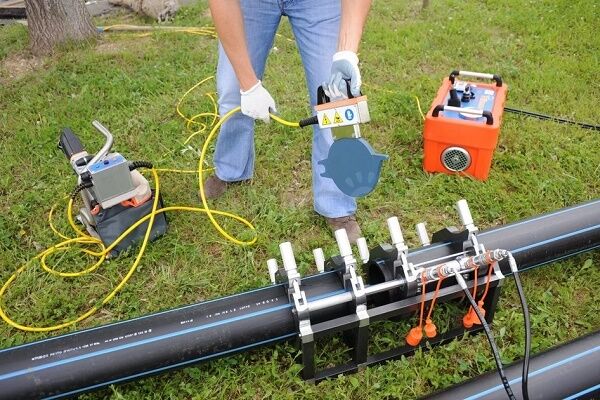
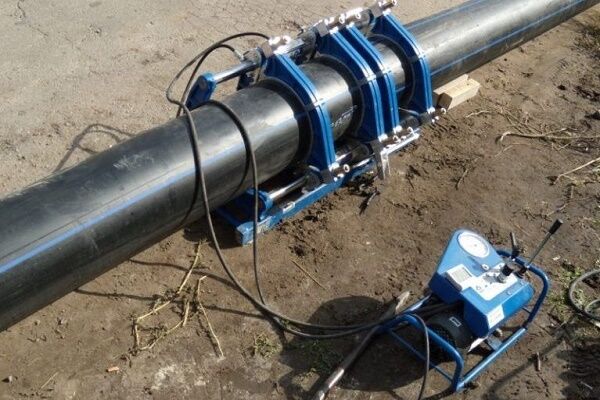
It is better to consider step-by-step instructions for butt welding of polyethylene pipes using the example of semi-automatic equipment with a hydraulic drive.
Butt welding is carried out if the wall thickness of the polyethylene pipe does not exceed 5 mm and its diameter does not exceed 50 cm. The technology includes a number of standard steps:
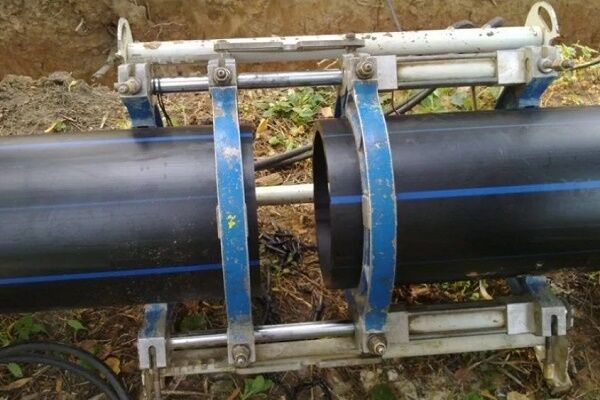
Step #1 - heating the joints
After processing the ends of the pipes, the welding mirror is heated to a temperature of 200-230 degrees and placed in the middle of the centralizer. Then, using a hydraulic drive, the edges of the HDPE pipes are tightly pressed against it with a force of 4-6 kg/cm2.
After the burr size approaches the minimum permissible values, the force is reduced to 0.2-0.5 kg/cm2 and the plastic continues to be heated for the entire standard time. Welding is permissible at temperatures from 15 below zero to 45 degrees above zero, but in cold conditions the heating time can be increased.

Step #2 - connecting pipes
After the necessary heating and melting of the HDPE at the joints, the pipes are spread apart using a hydraulic drive, the mirror is removed and the welded surfaces are again pressed together with a force of 1-3 kg/cm2 using the drive. The size of the burr is controlled visually, so the clamping pressure may vary.

Step #3 - Cooling and Inspection
The pipes continue to be pressed against each other until the joint has completely cooled. After removing the force from the hydraulic drive, the pipes are removed from the clamps of the centralizer, and the condition of the weld and bead is assessed. If their parameters are normal, then the pipe is ready for use.
Option #2 - socket welding of HDPE pipes
After preliminary cutting and preparation of HDPE pipes and parts, you can begin their socket welding.The process will be discussed in the form of step-by-step instructions.
Step #1: Prepare the Soldering Iron
The optimal temperature for welding polyethylene pipes ranges from 210 °C, so only soldering irons with adjustable heating are suitable. Before connecting to the network, you need to screw special double-sided attachments (sleeve and mandrel) onto the iron and place the soldering iron on a cross-shaped stand.

When the set temperature is reached, a warning light (usually green) will light up.
Step #2: Heating the Parts
It is safer to work with hot pipes while wearing gloves. To heat the parts, it is necessary to simultaneously pull one part to be connected onto the mandrel, and then insert the second into the metal sleeve.

To maintain the depth of the connection, you can apply a corresponding mark on the pipe with a marker in advance, and then navigate along it when joining heated products.

Above is a table with the approximate time frame for heating, joining and cooling of pipes, as well as the depth of insertion into the socket. At sub-zero temperatures, the heating time of the material can be increased by 1-2 seconds.
Step #4: connecting the parts
After warming up, the products must be simultaneously disconnected from the nozzles and with a strong direct movement, insert the pipe into the socket to the marked line. You cannot rotate the parts relative to each other. 5-10 seconds after joining, any movements can lead to a sharp decrease in the strength of the joint.

After cooling, it is advisable to inspect the resulting internal seam for the presence of nodules blocking the lumen of the pipe. If it is narrowed, it is better to resolder the connection to prevent a drop in pressure in the system.
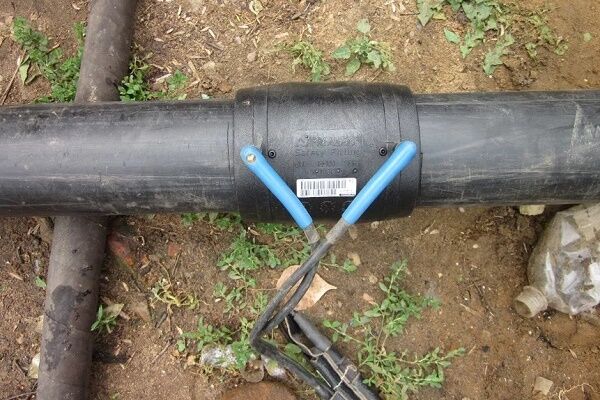
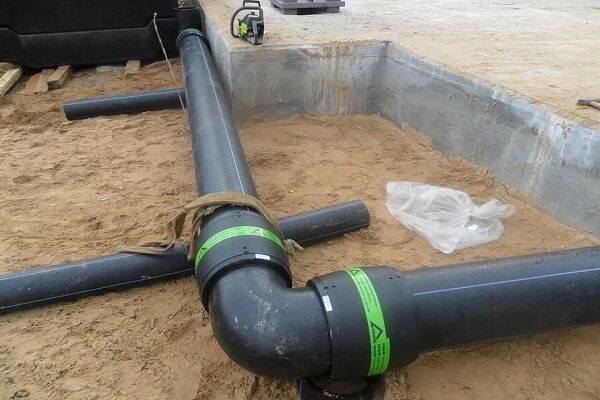
Option #3 - electrofusion welding of polyethylene
Welding polyethylene pipes using an electric coupling is the simplest and fastest way. Plastic fittings have a built-in metal spiral, which independently heats the surfaces being connected and melts the PE.
With this method, you have to spend additional money on electric couplings, the cost of which starts at 3-4 dollars apiece. Therefore, such welding is used only in places where the butt and socket methods are not available. The advantage of the electrofusion method is the ability to connect pipes with a thickness of 4.5 mm or less.
Main stages of welding:
- Cleaning and machining of fittings and pipe ends.
- Centering and inserting the pipe into the electrofusion coupling.
- Connecting the fitting to the electrical contacts of a special welding machine, heating the connection.
The last stage is turning off the power and cooling the pipe.

Electric couplings have a barcode with encoded parameters for heating time, current and voltage. It is read by the scanner of the welding machine, which then carries out the soldering process automatically. The products are tightly and reliably soldered over a large area.
Proper butt welds
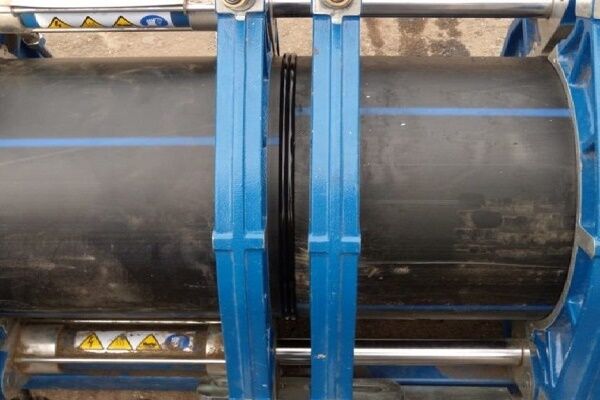
The correct execution of all welding instructions can be assessed by the final appearance of the polyethylene joint. If an incorrect seam is formed and there is a high risk of leakage during further operation, it is better to cut off the joint at the edges and weld a new one.
In a correctly executed seam, the dimensions of the burr bead must correspond to the standard values.

There are additional requirements for roller parameters:
- Symmetrical and uniform around the entire circumference of the joint.
- The displacement of the pipe walls in the radial plane should not be more than 10% of their thickness.
- The color of the rollers must be identical to the color of the pipe.
- The depression between the burrs should not go deeper than the level of the outer surface of the pipes.
And of course, the presence of cracks and pores is completely eliminated.


The reason for the asymmetry of the rollers along the circumference may be poor-quality preliminary trimming or the location of the trimmer at an angle to the pipe.
Installation instructions for polyethylene pipes
To connect polyethylene pipes to water supply elements, the following connections can be used:
- one-piece;
- detachable.
Permanent connections are obtained by soldering pipes to each other or to special welded fittings. This method is cheap, but the resulting structures are often bulky. The use of permanent connections is justified when installing underground stationary water pipelines.
To assemble temporary systems from polyethylene pipes, as well as in the absence of welding equipment, you can use threaded compression fittings, the installation of which will be discussed below.
Attaching a Pipe to a Compression Fitting
Compression fittings are more expensive than welded models, but are dismountable and easy to use. Recommendations for their installation are discussed in the step-by-step instructions below.
Step one - external inspection and trimming
Assembling a system from a polyethylene pipe and a plastic compression fitting begins with inspecting them for cracks and deep scratches. It is better to cut off the defective section of the pipe immediately.
You can cut a polyethylene pipe with a knife or a special pipe cutter. The result should be a perfectly perpendicular cut without snags or waves. To remove uneven edges, you can purchase a manual trimmer.

Step two - putting the fitting elements on the pipe
First, a clamping nut is put on the hose, then a collet, then a clamping ring, and finally a rubber gasket is tightened.

The end of the pipe is inserted into the fitting body until it stops, and the elements put on the hose are pushed into the threads. After this, the clamping nut is tightened tightly by hand. If you have a chain wrench, you can tighten the connection with it.
There is no need to rush to tighten the clamping nut - it may become warped. If the movement is tight, it is better to unscrew the connection once again and repeat the assembly process.
After installing the fitting, it is worth checking the tightness of the connection. In case of leakage, you can easily tighten the nut by adjusting the structural elements.
Inserting a saddle into a pipe
If you need to make a branch from a polyethylene pipe, it is not necessary to buy a tee. It will be enough to drill a hole in it and install a saddle. How to do this will be explained in step-by-step instructions.
Step one - preparation
Initially, you need to inspect the products being joined for scratches and cracks and wipe their surface with a damp cloth.
Step two - assembling the clamp
Place both parts of the clamp on the pipe and tighten the nuts with a wrench. The purpose of the procedure is to firmly fix the saddle.

Step three - drilling
Mark a point in the center of the saddle hole, and make stripes along the edges of the fitting to remember its position. Unscrew the saddle and remove its parts. Drill the polyethylene pipe in the intended location using a drill of the required diameter.

Step four - assembling the saddle
Clean the inside of the PE pipe from chips and remove possible snags from the edges of the drilled hole. Attach parts of the fitting to the pipe according to the previously drawn marks and firmly tighten the fixing nuts.

When screwing a pipe or fitting into the seat, you can wrap several layers of fum tape.
The part of the saddle with the outlet hole may have a groove on the pipe side for a rubber sealing ring. Therefore, if there is a sealant, it is necessary to place it between the pipe and the fitting.
If you need to bend a pipe on a certain section of the pipeline, we recommend doing this according to the instructions, given here.
Conclusions and useful video on the topic
The proposed videos will clearly demonstrate all types of welding of HDPE pipes, and will also introduce you to the process of assembling a compression fitting and saddle.
Socket welding of polyethylene pipes:
Electrofusion welding process:
Butt welding of HDPE pipes using a semi-automatic machine with a hydraulic drive:
Installation of a compression fitting on a pipe:
Installing a saddle on a HDPE pipe:
Self-installation of polyethylene water pipes requires some knowledge and skills, but is completely doable if you follow the above rules. In the absence of special equipment, you can assemble a water supply without any tools at all, using exclusively compression fittings.
There are many installation options, but you need to use the one that will provide results with a minimum of financial costs.
Are you determining the optimal method for welding polyethylene and want to clarify some points? Feel free to ask our experts your questions - we will try to help you.
Or maybe you want to share your personal experience of installing polyethylene at home? Write your comments, add unique photos - many newbies will find your information useful.


Of course, plastic pipes for plumbing and heating are very convenient and any man with his hands can install them. But why doesn’t anyone talk about safety precautions when welding these pipes, that the only thing more harmful than the fumes of smoldering plastic is mercury and lead.
It is imperative to use respirators and ventilate the room. Send your pets, and especially children and animals (we are talking about body weight here), to visit during the repairs.
Plastic makes our life easier in many areas - but it also kills us... Take care of yourself!
Hello, Elina, I understand your concern and therefore I would like to explain in a little more detail the main points that relate to safety precautions. First of all, you need to understand that the profession of a polyethylene pipe welder is a profession with increased danger.
But let's look at the points for ordinary citizens:
— it is necessary to ensure normal ventilation in the room where polyethylene pipes will be welded;
— you need to work in special clothing;
— use special protective gloves;
— use respirators;
- take breaks from work to get some fresh air.
If these points are observed, the process of welding polyethylene pipes will not be associated with harm to the body.