How to insulate an iron entrance door: materials, step-by-step instructions
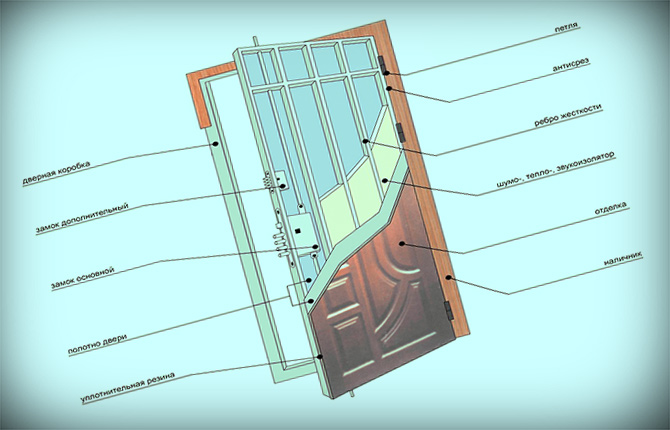
The fashion for reinforced steel doors for entering a house or apartment also has a downside.Any metal has high thermal conductivity, so in winter a large amount of heat escapes through the doorway.

The content of the article:
Reasons for heat loss through doors?
This is not to say that manufacturing companies are not aware of the existing problem. Typically, for a metal door, the outer (front) plane is made with an overlap (overlap) in the gap between the leaf and the frame. In addition, the door leaf itself must be made thick in order to lay an additional layer of thermal insulation inside it. But all this helps only partly.
The main causes of heat loss:
- Presence of a cold draft in the cracks between the frame and the door leaf. Cracks always appear during operation, regardless of the design of the hangers and hinges.
- Incorrect installation of the door frame into the wall opening. The box is always made of stamped steel without thermal insulation inside the supporting profile.
- Insufficient layer of insulation inside the door leaf.
Most inexpensive metal doors may not have any door leaf insulation at all.Internal ribs and a reinforcing profile, the presence of crossbars, or a specific locking pattern of the door leaf inside the frame with the locks closed may interfere.
We read: How to properly insulate a wooden entrance door with your own hands
How to find where the cold penetrates
Before attempting to install insulation on a metal door, you need to determine the location of the problem areas. The best place to start is the doorway. If a metal door has been standing for more than 5 years and is actively used, then most likely the first cold bridge is associated with the opening.
Checking the doorway
After 3-5 years of service, the geometry of the doorway changes. The problem with any metal door is that the weight of the heavy door leaf deforms the hinges, as well as partly the frame itself. As a result, gaps appear between the box and the canvas. Almost always the largest ones are located at the top of the doorway.
You can see places with a loose fit if you illuminate the metal door with a regular flashlight. In those areas where the insulation fits tightly to the box, it will be dark, and there will also be areas with light stripes. In these places, heat leaks due to drafts.
Checking the canvas
The main enemy of entry is not only severe frost.If the front door faces directly onto the street, then the cold bridges can be seen with your own eyes at the first severe frost. Ice frost is formed due to freezing water vapor, therefore, in addition to insulation, you need to do a vapor barrier.
The coldest frozen areas can be identified visually or by hand. If it is not frosty outside, it is better to use a remote infrared thermometer. Typically, the leakage area is the perimeter of the door leaf, as well as the floor and side posts of the frame.
Checking the box
For a metal entrance door that is not armored, the door frame is made of a hollow profile. Only in certain modifications with increased fire resistance and sound insulation, the profile is filled with foam or glass granules.
But since, according to the instructions, filling the frame of the metal entrance door should be done after installing the wall in the opening, then, most likely, they remained empty. Craftsmen usually do not want to backfill.
But, oddly enough, the presence or absence of insulation inside the profile does not affect heat loss in any way. The problem is that the outer parts of the steel profile easily lose heat due to the high thermal conductivity of the metal walls. That is, the profile will lose heat until insulation is installed on the inside or outside of the door.
Which insulation to choose?
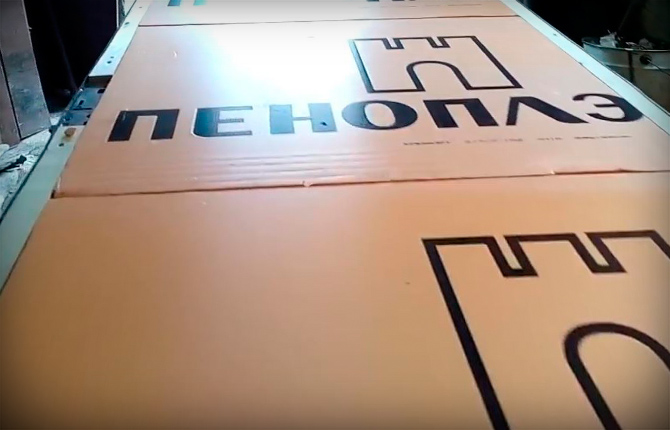
The type of material is selected depending on the insulation method.If we are talking about improving thermal insulation without dismantling the door leaf, then it is quite possible to use foil polyethylene foam, sheet polystyrene foam, penoplex and even isolon. Mineral fiber is often used in rolls.
Thermal insulation of the box
The metal frame is assembled by welding at the factory, the thin-walled profile is manually welded into a box using a carbon dioxide semi-automatic machine. Moreover, the assembly is carried out in special devices - conductors, thanks to which it is possible to avoid deformation of the box (torsion by a “propeller”). Therefore, the box arrives from the factory complete with a metal door. And it is also installed together with the door inside the wall opening.
This means that you cannot cut or disassemble the box just to put insulation inside. The metal box after installation should remain in place in any situation.
But up to 25-30% of all evaporated heat is lost through the box, so insulation is indispensable. In this case, a layer of insulation, usually penoplex or polystyrene foam, is laid on top of the metal profile of the box.
You can insulate in two ways:
- fasten the penoplex strips on top of only the metal box (along the perimeter;
- make complete insulation, that is, lay thermal insulation simultaneously on a steel profile with an overlap on the wall surface.
The second method is used mainly for concrete walls, as well as metal entrance doors of private houses. For apartments, this scheme is used less often, since it is necessary to cut off part of the wall under the platband.Therefore, owners usually limit themselves to insulation using penoplex laid on a metal profile under a decorative trim.
Repairing the opening
For high-rise apartments, it is quite rare to restore the opening. Even in severe frosts, positive temperatures and low air humidity remain inside the entrance. Therefore, the walls do not collapse. All that needs to be done is to remove the platbands from the side of the landing and blow out all the free space between the frame and the wall surface with polyurethane foam.
For private houses the situation is completely different. Installing a metal entrance door requires a fairly large opening in the wall. Usually the width, taking into account the thickness of the door frame, is at least one meter. Plus the height is approximately 200-210 cm.
The volume of work is enormous, the thickness of the walls in the entrance area is rarely less than 30-40 cm. In private houses, the opening is laid out of brick according to the pre-calibrated dimensions of the future entrance door.
It is clear that no additional insulation of the edges is done when installing a metal door frame. The problem is noticed after the entrance door is installed, when the facing brick or wall material begins to crumble due to freezing condensation.
Therefore, before insulating the front door, you need to repair the opening in the wall.
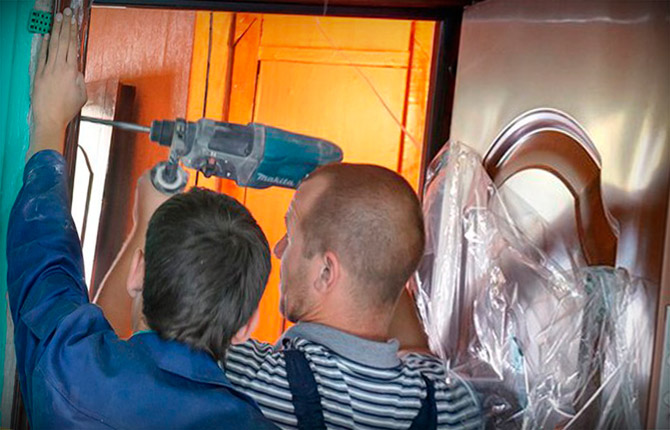
Using a grinder and a hammer drill, a small layer of material up to 20 mm thick is cut along the contour of the opening in the wall. The brick must be cut from the surface of the opening from the inside and outside;
The door panel will need to be removed. If, after trimming the opening, the walls along the contour of the anchor continue to hold the exit door frame normally, then no additional measures will be required.Otherwise, you will have to replace the anchor bolts (studs) with longer and more massive ones.
Next you need to disassemble and remove the overhead metal threshold. Typically, a metal entrance door is installed on an oak board 40 mm thick. It serves as both a shock absorber and insulation. If the tree is in good condition, then you will need to cut a groove 20-30 mm deep in the board, and additional insulation in the form of a strip of polystyrene foam will be laid in it.
But if the metal entrance door is simply placed on a concrete screed lined with glass roofing felt, then the concrete will need to be cut with a hammer drill to a depth of at least 80 mm. Under the threshold there should be a groove (groove) spanning the entire width of the opening in the wall. The height of the groove is at least 40 mm, the depth is 80 mm.
Now you will need to lay 20 mm thick penoplex on the grooved surfaces, and 40 mm under the threshold. On the side walls and under the ceiling, insulation is installed at the ends of the opening both from the inside and from the outside. The insulation can be fixed with glue and fungi. Polyurethane foam, as a rule, squeezes out the insulation, so you still have to secure the penoplex with mechanical fasteners.
The installed insulation will need to be plastered, otherwise solar ultraviolet radiation and moisture will destroy the polystyrene foam within a few years.
Insulating a metal door leaf - instructions
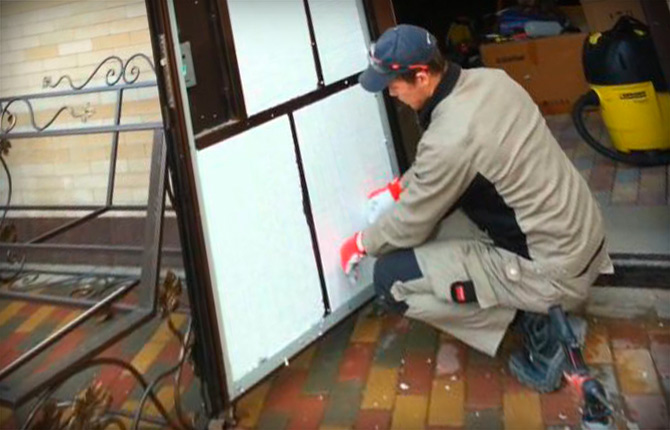
First of all, the front door must be removed from its hinges and placed on a workbench or carpenter's table. You can lay insulation, as they say, on the fly, without removing the canvas, as in the photo.
But this method can only be recommended for garage doors and utility room entrances. The reason is that polystyrene foam is not the best option for insulating metal sashes.
What will you need?
The set of materials depends on the size and design of the entrance door. For a standard Chinese door with a metal outer cladding and a plastic inner panel you will need:
- wooden slats and bars 30x40 mm, 5-8 linear meters;
- fiberboard or pieces of thick cardboard;
- polyurethane foam;
- penoplex 25-40 mm thick, depending on the thickness of the metal door.
If you plan to insulate an armor-type entrance metal door, then instead of expanded polystyrene or penoplex it is better to use rolled mineral wool and foil-clad polyethylene foam up to 5 mm thick.
Step by step instructions
Almost all budget-level metal entrance doors are designed the same way. They are made mainly in Southeast Asia and offered as entrances to apartments. For a warm climate, perhaps there would be no problems, but in the middle zone the front door does not retain heat at all.
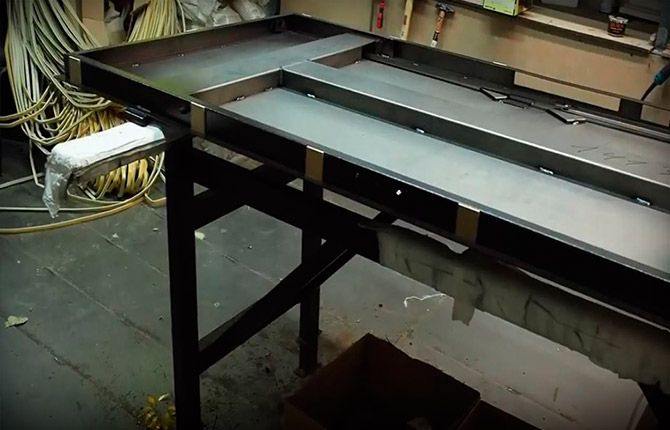
The first thing you need to do according to the instructions is to remove the door leaf from its hinges and place it on a workbench (table). The most difficult thing about insulating a door leaf is disassembling it. You have to unscrew the awnings, the lock and several screws around the perimeter.
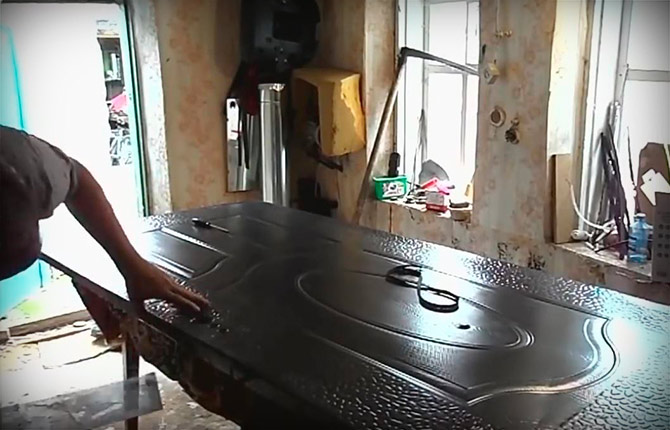
After the metal shell was separated and removed, the back panel with paper stiffeners remained on the table.
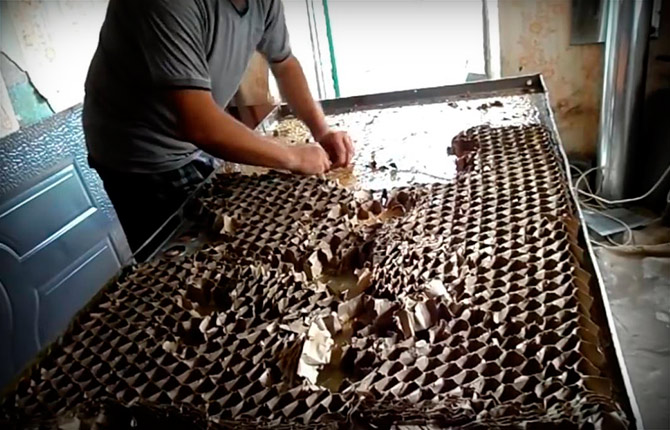
There is no insulation or sound insulation in simple metal entrance doors.The outer metal cladding provides the main contribution to the rigidity of the door leaf, so all these paper ribs are needed only to prevent the surface of the front door from slamming under load. Therefore, all paper must be removed.
Next, the internal frame is assembled from wooden slats; you can use any wood, but larch is best. It is not afraid of moisture and does not rot during prolonged contact with water condensate. You can even sew the entire fabric with larch. The front door will be very strong, but in terms of thermal insulation it will become noticeably worse.
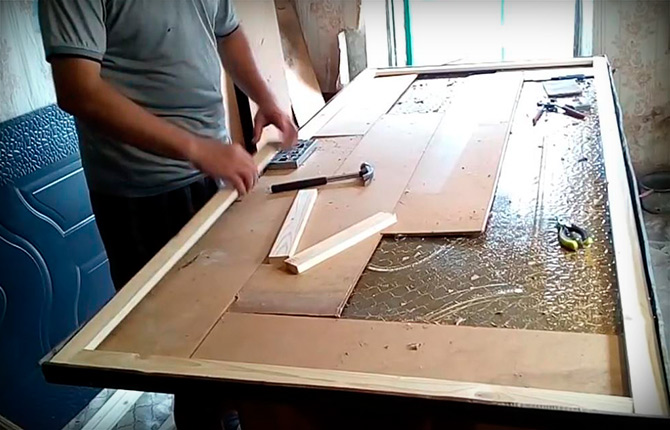
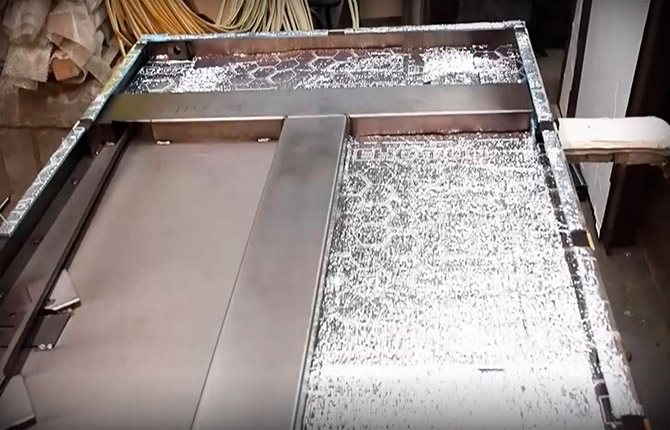
The next stage is to sew up the base with a sheet of fiberboard, not necessarily a solid one; it is enough to collect scraps and waste for insulation. But the gaps and joints must be adjusted as carefully as possible, otherwise there is a risk of condensation forming on the insulation layer.
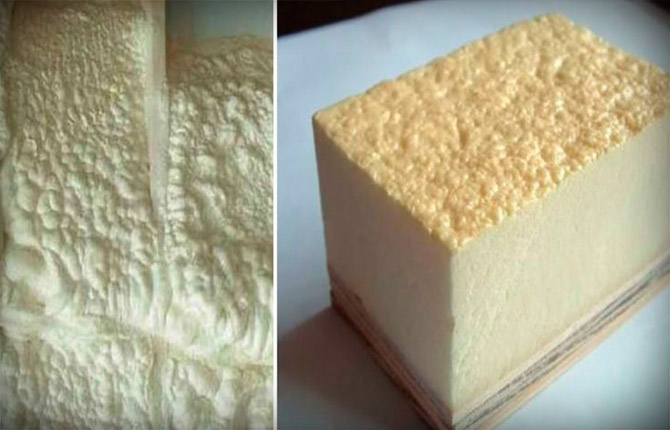
Next, the insulation itself is installed. It needs to be made from several whole sheets of polystyrene foam. The fewer seams between the insulation sheets, the warmer the door leaf will be.
Places where cracks have nevertheless formed must be filled with pieces of polystyrene foam with polyurethane foam. Now you will need to check and level the insulation plane. After installing the metal cladding, there should be no protruding areas, irregularities or “bumps”.
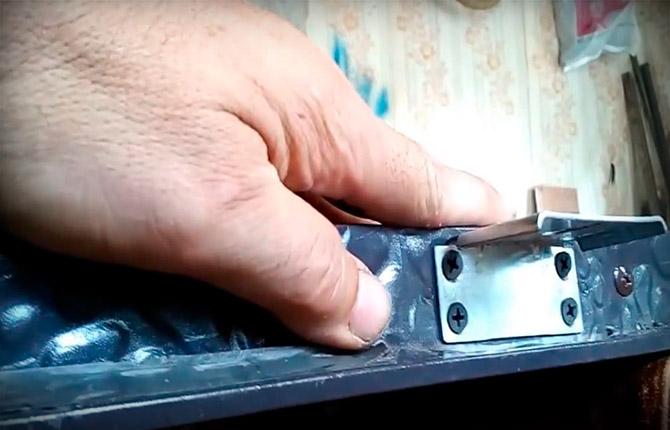
It is necessary to mount the front door lock and return the metal tabs to which the door awnings were screwed back into place.
The last stage is to put on the metal lining of the front door, carefully position it around the perimeter, attach the awnings and the lock trim plate.
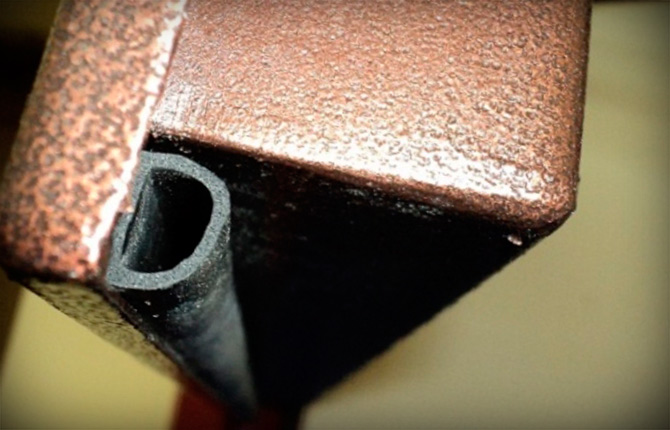
Due to the installed insulation and wooden frame, the weight of the front door increased by 20%. Therefore, it may be necessary to replace the awnings with more powerful ones.After installing the door leaf, you will need to stick a new seal on the frame; it is best to use a tubular silicone seal with an additional comb. On a metal door it practically does not wear out.
Insulation of a reinforced metal door
The process of installing insulation on entrance doors with a reinforced metal front panel looks a little more complicated. This is not an armored door; the metal sheet cannot be disassembled without using a special tool. Insulation of the “armor” is carried out at the assembly stage.
Typically, the internal cavities of the front door are filled with viscous filler. It works as insulation and sound insulation. In addition, the filler does not allow working with a cutting wheel, high-speed drill or gas torch.
A standard metal door is insulated with expanded polystyrene or blown with foam. Very often, several (up to a dozen) layers of corrugated cardboard treated with water-repellent impregnation are simply laid inside the entrance doors as insulation. Such doors are used primarily as entrance doors for apartments and offices.
To install insulation inside the metal sheet, the door must be removed from its hinges and placed on a workbench. The weight of a metal structure can reach 80-100 kg, so dismantling is best done with one or two assistants.
The next step is to cut off the blind rivets and remove the back panel; it can be metal or plastic.
Before installation, you need to dismantle the lock, crossbars and the remains of the old thermal insulation.
Next, a layer of foiled polyethylene foam is placed on the back side of the front panel. The insulation sheet should overlap the internal ribs and even the end surface.This will provide reliable protection from any drafts.
After this, you can assemble the lock and install the rods in place. To prevent metal moving parts from contacting the insulation, pipe insulation made of polypropylene foam is put on top.
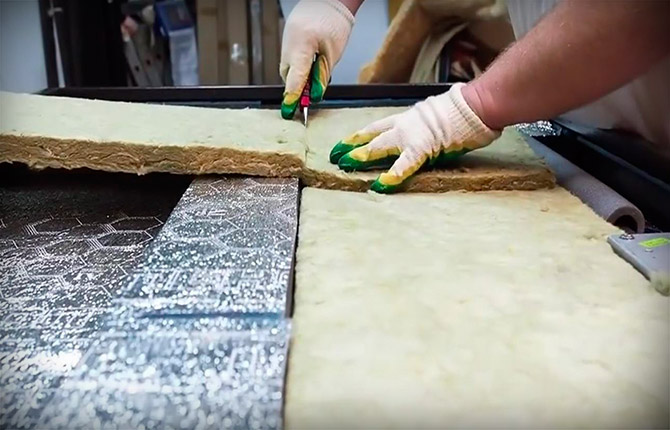
Now you need to lay the main insulation. For thermal insulation of metal sheets, Rockwoll stone wool 50 mm thick is best suited. If possible, insulation should be done in one piece. The fewer seams, the lower the likelihood of cold bridges forming inside a metal entrance door.
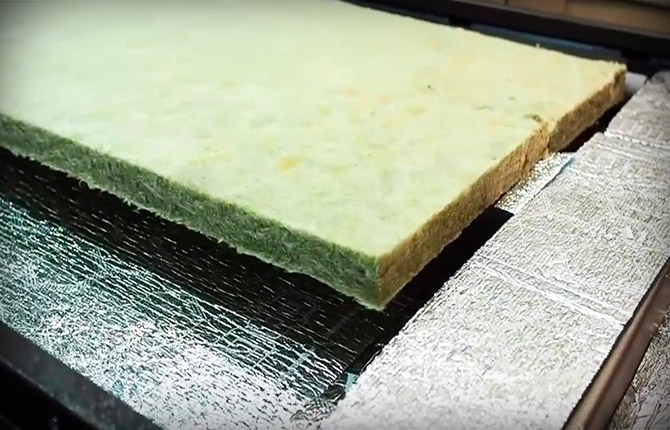
Before laying, a sheet of stone wool is cut to fit the size of the niches inside the door leaf. The insulation should be inserted into the niche with a slight compressive force. This method will hold the material inside the front door better than any glue.
Now all that remains is to lay the back panel of the front door and assemble the entire structure in the reverse order.
Advice! Some craftsmen recommend installing the back panel with sealant to avoid the accumulation of water vapor inside the front door.
It will also be useful to place one or two bags of silica gel inside the metal sheet. It will absorb water vapor and protect metal parts from rusting.
Results
Insulating a door with your own hands in a private house is not as difficult as it might seem at first glance. The work requires care when laying thermal insulation. The procedure itself is simple, but you should not allow cold bridges or cracks to remain inside the door leaf.
For apartment entrance doors, cold spots will form in these places. For the entrance doors of a private house, a cold bridge will lead to intense condensation and the appearance of rust.
Tell us about your experience of insulating entrance doors.What material was used for thermal insulation and why? Also bookmark the article and share it on social networks.


In my opinion, it’s easier to blow everything out from the inside with foam from a balloon. PPU holds heat almost like polystyrene foam. This is how roofs are insulated and garage doors. It will cost a little more, but you need to disassemble everything. You can figure it out from the Chinese, but then you can’t put it back together.
This is how they insulate with foam. It then turns into powder and is poured onto the floor of the house. Who needs this kind of insulation? It’s not for nothing that the men take everything apart and cover it with penoplex or cotton wool.