Do-it-yourself electric heated floor: device, installation technology and connection diagrams
The type of heating in which heat is generated by using electrical energy is distinguished by its simple design, and its installation takes a minimum of time. You don’t have to be a professional to install an electric heated floor with your own hands, you just need to follow all the instructions exactly.
The article we presented describes in detail all types of electric underfloor heating systems, their characteristics and pros and cons are given. For do-it-yourselfers, we have provided step-by-step installation guides. Taking into account our advice, you can build and connect an electric floor with your own hands.
The content of the article:
Electric floors and their varieties
Depending on the heater used, electrically heated floors are divided into 2 categories: with a heating element in the form of a cable and with infrared.
According to the production method, they are divided into 4 types:
- Heating cable. It can be single- or 2-core, including self-regulating.
- Heating mats. It is a cable on a mounting grid.
- Film. Polymer flexible sheets with a built-in infrared heating element.
- Rod. Consists of carbon rods connected in series.
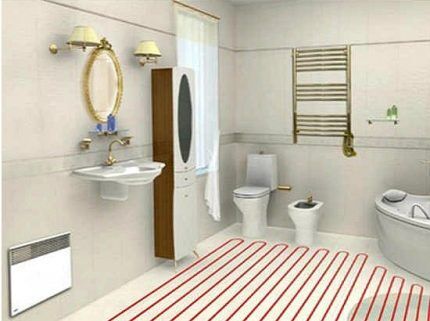
A warm electric floor is calculated based on the size of the part of the room free from furnishings. It is not recommended to install heating elements under furniture due to the excess load on the system in these areas. The floor power is chosen based on 0.1 kW/m² on average. This indicator differs for different rooms.
Before starting work, it is important to calculate the step with which the cable will then be laid out. To do this, find the quotient of the area planned for laying the heating system in m², multiplied by 100 and divided by the length of the section in m, taken from the passport.

He will introduce you to the arguments and criteria for choosing the best option for installing a heated floor for you personally. next article, which we recommend that you familiarize yourself with.
Cable heating system
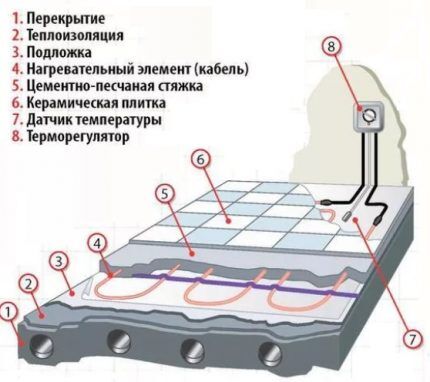
The heat output of a cable heated floor is very high; virtually all electrical energy is converted into heat. Its kit includes a heater cable, coupling, adjustment and control devices. The cable is laid both in the screed and under the floor covering.
Features of operation and device
The system does not have a heating boiler; the heat is supplied by the electric cable itself. Most often it is used as an auxiliary type of heating, but if the house is well insulated, then the floor, heated with cable, can also serve as the main source of heat. The cable is laid in 3 ways: under the screed, inside it and above it.
It is necessary to position it evenly, maintaining a distance from one heating line to another of at least 80 mm and avoiding intersections, kinks and stress on turns.During installation, the cable can easily be damaged, so experienced craftsmen recommend wearing soft shoes or covering the already installed areas with sheets of plywood.
Installation of an electric floor in a screed
The process of installing electric heated floors into a screed is labor-intensive. The advantage of this method is that the heating element, being in the center of the screed, heats the surface more quickly and evenly. The technological process consists of several stages.
First, pour the first layer - this will be the base. The slabs are first cleaned. Use a perforator to widen cracks more than a millimeter wide and fill them, as well as chips and holes, with mortar.
The slab is leveled horizontally; if necessary, the composition “self-leveling floors” is used. After the base has dried, liquid waterproofing is applied and left for 2 hours to dry.
A heat-insulating substrate with a foil-coated heat-reflecting layer is spread over the surface. If there is an unheated room below, then choose thermal insulation with a height of 5 to 10 cm. Otherwise, a layer of 2-3 cm is sufficient. Seams and joints are sealed with foil tape.
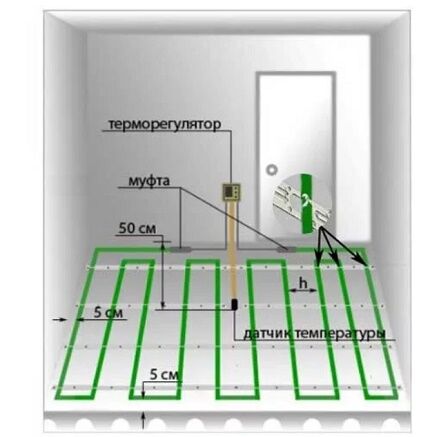
Assemble the heating circuit. In a direction perpendicular to the wall selected for installing the control unit, strips with latches are mounted to secure the cable. The edges of the polymer strips should end at a distance of 50-100 mm from the walls.
If mounting rails are used instead of strips, they are removed from the walls by 200 mm. Before laying a heated floor, check the cable resistance using a tester. The readings are checked against the passport, the permissible difference is 10% maximum.
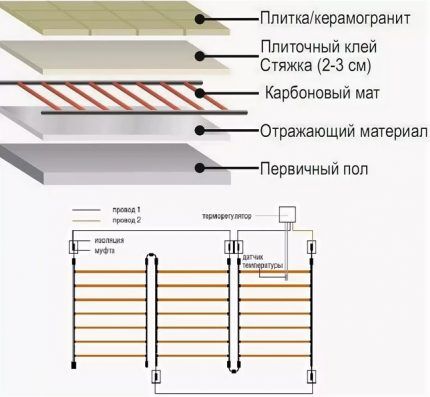
The starting point in the cable connection diagram for an electric heated floor according to the classic version is the control unit.Design the display in the shape of a “snake” and place it parallel to the wall.
All transitions to the next turn must be outside the boundary slats. At the finish line, there should be an insulated end near the opposite wall. The option when installation starts from the end is also possible.
After the line is completely laid, a temperature sensor is mounted between the turns in a metal corrugated pipe. The wires are routed towards the baseboard and then to the control unit. You should not bury the sensors in concrete - removing them if necessary becomes very difficult.
After checking the reliability of fixation of the laid elements, they are filled with a concrete screed, the power of which depends on the technical data of the object and the type of electric heating system. The solution must be well compacted. If voids remain, the thermal conductivity of the top layer will decrease.
Acts as a control unit for the heated floor thermostat. It is responsible for processing information received from the temperature sensor and turning off or turning on the system in accordance with the settings. The thermostat can be either programmable or without software. Connect it to a 220 V outlet. The installation location is chosen in an area with free access.
Experts do not recommend connecting the control unit to a regular outlet. This may place additional stress on the electrical wiring. It is necessary to create a separate branch to connect the system.
In some cases, the cable is laid in grooves made in a concrete screed.The cable in the grooves is filled with tile adhesive. The advantage of this method is that the level of the finish remains the same. After completing the cable installation, the floor is turned on only after 2 weeks.
Electric floor based on thermomat
For the production of thermomats, a cable no thicker than 45 mm is used. It is fixed on a fiberglass mesh 0.5 m wide. The cable has a shielded core and protected by an outer sheath. For residential premises, heating mats with double cores are used due to their significantly lower level of electromagnetic radiation.
Principle of operation and construction
The heating mat includes 2 elements: the thermomat itself with a cable and a corrugation. A sensor is inserted inside it, and it protects it from moisture and aggressive influences. If the adhesive layer is so thin that it cannot completely cover the corrugation, you need to use a moisture-resistant sensor.
The thermostat complete with an external temperature sensor, mounting boxes, and wires are purchased additionally. When choosing the first element, maximum energy consumption is taken into account. The cross-section of the wires is selected based on the power of the system and the material of manufacture.
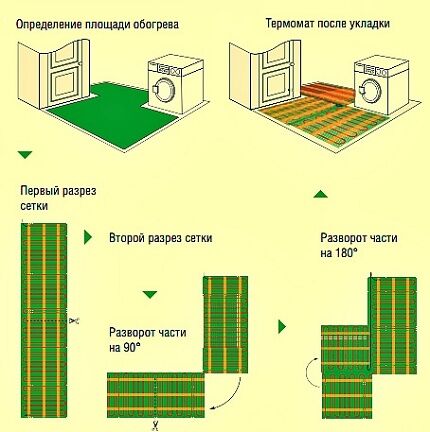
The installation process is extremely simple, because thermomat is a product completely ready for installation. There is no need to attach a heating cable, and uniform laying is ensured by the structure itself.Its cost is higher than that of a cable floor, but it has many advantages, including faster heating of the surface.
Installation of thermal mats
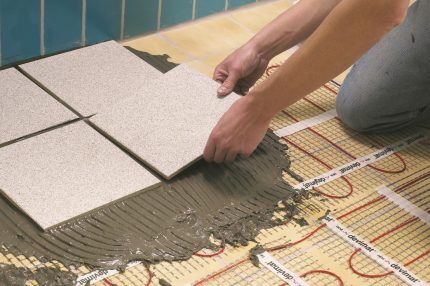
Before laying out the thermal mat, the floor is covered with a layer of primer. This will increase the adhesion of the glue to the concrete surface. Usually the glue is applied directly to the mat, but if it is a damp room, then after a thin layer of glue has been applied and dried, it is covered with waterproofing and then glued again.
In order not to damage the integrity of the cable and to apply the adhesive evenly, you need to distribute the adhesive composition using a plastic comb. The tiles are laid on the glue and leveled.
The total of tiles plus glue should be 20 mm, although some manufacturers recommend a minimum of 50 mm. This is explained by the fact that with such a thickness of the layer, the heat is distributed more evenly.
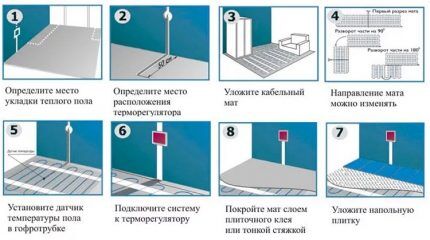
In accordance with the PUE, it is imperative to install a protective shutdown that guarantees safety and a circuit breaker. If the system is installed in a bathroom, the thermostat should be moved to an adjacent dry room.
Specifics of film flooring
In the design of the heating system film electric floor there are no particular difficulties. Many people install it themselves. It is suitable for any floor covering. The system, which operates based on infrared radiation, is safe even for laminate and other wood coverings.
There are 2 types of such floor film:
- Solid. Available in the form of a thin two-layer polyurethane film with continuous carbon coating inside.
- Striped. Including the same 2 layers of film made of lavsan, polyester or polyurethane with carbon or ultra-thin aluminum strips located between them.
The thermal elements in these systems have parallel and series connections. At their edges there are bimetallic current-carrying busbars made of silver and copper strips stacked on top of each other. IR film flooring is not made with either a screed or a layer of glue. Only “dry” styling is suitable.
Warm infrared floors have a number of advantages.
These include:
- simple and quick installation;
- small thickness of the film (0.3 cm) which does not significantly reduce the height of the room;
- the possibility of eliminating such working moments as pouring screed;
- no effect on indoor humidity;
- antiallergic effect;
- comparatively low electricity consumption - 20% less than other types of electric thermal systems;
- air ionization;
- easy dismantling if necessary;
- high reliability.
The standard set of materials includes thermal film rolled into a roll, contact clamps, insulation and electrical wiring. To this kit you must add a thermostat equipped with a temperature sensor, as well as plastic film, tape, and foil material. Before purchasing all this, you need to calculate the required footage of the film.
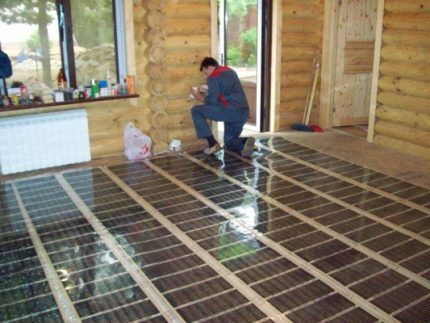
The easiest way is to make a sketch of the room on graph paper. Next, you should mark the places where the sensors and connection points will be placed. Select the part of the room where you plan to lay the heated infrared floor, then calculate how many heating elements will be needed.
Compare device specifics film and cable floors The information contained in our recommended article will help.
Infrared system installation process
If the previous coating is in good condition, then the technology for laying electric infrared heated floors allows it not to be dismantled. It is enough to simply clean and eliminate differences. The film floor roll is cut using ordinary scissors.
It should be taken into account that when forming the surface, the strips should not intersect or touch the current-carrying busbars. Manufacturers usually designate cutting locations.This does not mean that the film cannot be cut in other convenient places.
The main thing is that the cut should pass along the gap between the heating elements. If the cut falls on the designated line, only the collector bimetallic plates are isolated. In other cases, tape the ends of the strips.
First, a layer of waterproofing is laid to protect the floor from moisture from the concrete floor. Next comes thermal insulation, which prevents heat loss from radiation going into the base. Any material can be used, as long as the metallized side faces outward.
Mark the places where the electrical wiring will pass. Afterwards, a place is allocated for installing the temperature sensor. The channel for the temperature sensor is about 20 mm wide. The wiring for the sensor is placed in a corrugated tube, then laid in the prepared channel.
Next, the prepared strips are laid according to the sketch. In order to reduce the length of the wire, when laying the strips, they turn their end sides towards the wall, where the thermostat will subsequently be located, and stop 15 centimeters short of it.
If the room has a fireplace, set a distance of at least 1 m from it. The film is laid with the side up that is indicated by the system manufacturer in the product instructions. Connect the clamps to the edge of the bimetallic strip, then connect the wires - the left ones are attached to the left clamps, and the right ones are attached to the right ones.
The wiring for the temperature sensor should be hidden under thermal film. For this purpose, narrow grooves 1 cm wide are cut out in the thermal insulation, and adhesive tape is placed along the power cable laid in them and covered with thermal film. The wires should not be allowed to rise above the thermal insulation.
The insulation on the edge of the wire is removed, rolled up, the wire itself is pushed through the clamp, fixed with pliers, then the connection point is insulated with bitumen tape. Having connected the entire circuit, measure the resistance of the resulting structure.
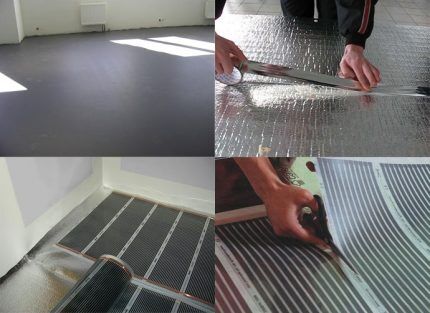
The final stage is installation of the finishing coating. The principle of connecting the thermostat is the same for all types of heated electric floors.
Some useful tips
Before completing the work by laying the topcoat, the system is tested. If the thermal film meets all the requirements, sparking and overheating of areas will not be observed anywhere. If any defects are found, the floor is covered with another layer of polyethylene film with a thickness of at least 80 microns. It is laid overlapping with an overlap of about 20 cm.
There are a number of additional recommendations from professionals regarding installation:
- The warm film system should be installed at moderate humidity (maximum 60%) and above-zero temperatures.
- Rolled film cannot be connected to the network.
- Before connecting the film floor, it is necessary to check the insulation of the contacts in the places where the sheet was cut.
- If the thermal film is damaged, double-sided insulation is applied in the place where the graphite coating is located.
- If the floor is flooded, it is immediately disconnected from the power supply and left to dry in natural conditions.
- You cannot walk on the finished floor in shoes.
The temperature sensor must not be bricked up. It is necessary to leave the opportunity for its control and replacement.Also, do not place carpets and other dense natural coverings on warm floors. To ensure ventilation and eliminate the possibility of deformation of the finishing coating due to temperature changes, it is recommended to leave a slight gap between the wall and the coating.
Rod-type warm floor
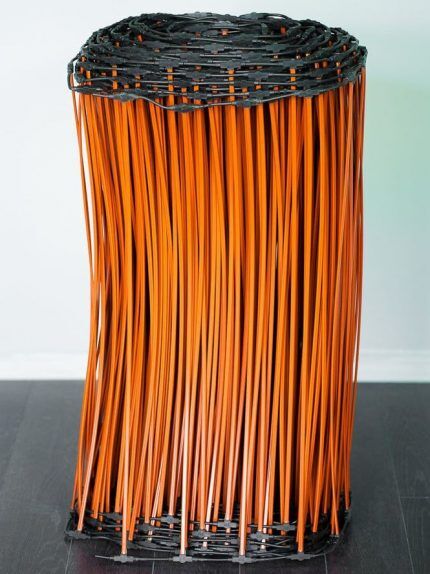
A rod carbon floor is a rod structure that heats the room with far-wave infrared rays. There is no electromagnetic radiation in this range. Its peculiarity is that it is not the atmosphere that is heated, but the objects present in the room.
Subtleties of work and organization
It consists of carbon rods connected in parallel into elastic mats 0.8 m wide and 25 m long using a power wire. Heating elements are placed inside the “carpet”. The inside of the rods consists of carbon, silver, copper, and the heat is generated by the first of them.
In addition to the rods, this floor contains a temperature sensor and a thermostat. This gender has the property of self-regulation. This means that the amount of heat is directly proportional to temperature. The disadvantage is that its installation is possible only with the use of a screed, therefore, its dismantling is out of the question.
If you place any object on the floor plane, the heat transfer in the place occupied by it decreases, and the rods begin to emit less heat, thus lowering the temperature.Consequently, the thermostat is needed here only to control the power; the function of preventing overheating is performed by the rod floor itself.
Nuances of installation and connection
Although a core floor is considered a smart system, you can install it yourself. The technology is simple, but it will work provided that all requirements are met.
The process consists of 8 sequential steps:
- preparing the base;
- heat reflector installation;
- installation of rods;
- connecting strips to each other;
- connecting the power cable;
- connecting the structure to the thermostat;
- connecting a temperature sensor;
- pouring screed or installing a tile-type finishing coating.
Before performing this work, they plan in which direction the heating mat will be laid and calculate the amount of material. Carbon floors are sold as a kit, but sometimes you have to buy some additional consumables.
The choice of power is influenced by 2 factors: area and type of heating. Based on power, rod heated floors are divided into 2 types: up to 160 W/m² and up to 220 W/m².
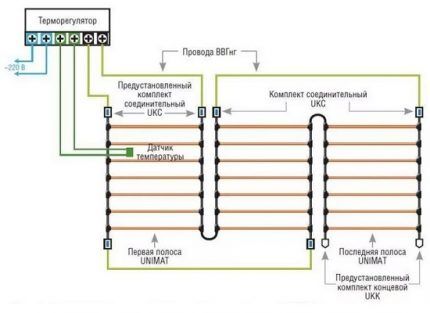
The most rational option for placing a heating mat is along a long wall, oriented towards the heat regulator, because in this case, when connecting to the temperature controller, you can use shorter wires and reduce the number of cuts.
Manufacturers mainly produce a complete installation kit. At a minimum, it includes a rod mat, a connection kit and an end kit, wires, and installation instructions.Everything else: thermal insulation, tape, corrugated pipe with a plug, thermostat, sensor, bitumen insulation - must be purchased additionally.
It is written in detail about which version of the heated floor: electric or water, it is better to arrange for subsequent laying of the laminate in the articlededicated to this issue.
Conclusions and useful video on the topic
Video #1. You will learn everything about laying a core floor from this video instruction:
Video #2. Choosing the type of electric floor will become easier if you watch this video:
Video #3. The author of this video will teach you how not to spend too much when buying a heated floor system:
Heating your home using electric heated floors will allow you to maintain a comfortable temperature. The temperature difference between the top of the room and the floor will be minimal. If you choose the right system, calculate everything accurately and do the installation work yourself, then you can win financially.
What type of underfloor heating did you prefer for arranging your own cottage/apartment? Perhaps you would like to share the intricacies of installation known only to you? Please write comments in the block below, ask questions, post photos on the topic of the article.


I bought heated floors based on the square footage of the kitchen, but taking into account the places where the furniture will be placed. I laid it directly under the tiles. The most difficult thing was connecting to the regulator (laying wires and a temperature sensor, the corrugation of which is not so small (I had to scrape the floor, making a niche for it). Otherwise, it is a completely simple system, quite accessible for installation by a contractor without special qualifications.
I live in Ukraine.Every month I pay through the nose for gas to heat my house. You can imagine how much I pay for gas if there is none in Ukraine at all! Now I’ve decided to give up the gas boiler and install heated floors in the house, but I just can’t choose the right heating element. For now I’ve settled on infrared film, but maybe there’s something better and more effective? For me, the main thing is that warm floors are reliable, durable, economical and durable. Help with advice, if it’s not difficult. The area of the house is 142 sq.m., a one-story brick building of new construction. Is it possible to heat the entire house using infrared film?
It is possible to heat a house using infrared film as the main heating source, but it will not be cheap. I don’t know what it’s like with your gas prices, but I’m not sure that it will be cheaper here. In my opinion, IR film should be installed only as additional heating.
If you nevertheless decide to abandon gas heating in favor of electric heating, then first of all I recommend switching to a two-zone meter. And also draw up a project for electric heating, which will reduce tariffs by up to 40% during the heating season!
Regarding the infrared film that you are going to use as the main heat source: from my own experience I will say that it will be quite expensive. And it would be more practical to make a warm floor from a heating cable, and install an electric convector in each room. Tie this entire system to a thermostat, which will maintain the required temperature in the house. In my opinion this is the most optimal solution.
Great article! Thank you :) I would also like to know what problems there are with heated floors. We had a situation after installing an (electric, two-wire cable) floor. They turned it on a month later (according to the instructions), worked for several hours, checked it, turned it off.
Summer is over, we turn on the floor, but it shows no signs of life at all. We filed a complaint with the store, and they went to the manufacturer. As a result, we were refused due to the fact that there was no seal from the installation organization. However, the specialist who installed it has a license to perform electrical work...
Hello. The problem may be:
1. Malfunction of the thermostat.
2. Damage to the temperature sensor.
3. Damage to the cable and thermomat.
As for the refusal of a claim, you need to look at the warranty obligations of the seller and the manufacturer. According to the installation organization - an excuse. If the defect is in the material itself, they were obliged to check it without the expiration of the warranty and then render a verdict: the reason was a manufacturing defect that ensured the short duration of the work or improper installation.
But, with one caveat - if you do not have a postscript in your documents - installation is possible only by specialists from the service organization of the store or the manufacturer. Although even in this case, it was necessary to draw up a work acceptance certificate and a contract. That is, to put that same stamp. Then the organization that works for the store/manufacturer would be responsible for installation.
If the installer is a representative of another company, you could file a claim with that organization. But again, as I understand, you have no evidence of who did it to you and when, etc.